Wondershare UniConverter
-
 Convert videos to MOV, AVI, MKV, MP4, and other 1000+ formats and optimized preset for almost all devices.
 - Edit videos before converting to MOV with trimming, merging, editing subtitles, etc.
- Versatile toolbox combines screen recorder, GIF maker, fix video metadata, etc.


Mac
- TRY FREE TRY FREE
- 1. Burn Video/Audio on Mac+
-
- 1.1 Convert AVI to MP4 on Mac
- 1.2 Convert AVCHD on Mac
- 1.3 Convert Audio on Mac
- 1.4 MP3 to WAV Converter Mac
- 1.5 WAV to MP3 Converter Mac
- 1.6 svg converter
- 1.7 music converter
- 1.8 dmg file
- 1.9 webp
- 1.10 online wpd converter
- 1.11 readme md
- 1.12 online svg converter
- 1.13 ai to svg
- 1.14 music converter
- 1.15 md file
- 1.16 wpd file
- 1.17 djvu file
- 1.18 sf2 file
- 1.19 oga file
- 1.20 arj file
- 1.21 free svg converter
- 1.22 md5 converter
- 1.23 convert dmg to iso
- 1.24 dpi converter
- 1.25 Toast Titanium Alternative for Mac
- 1.26 Copy a CD on Mac
- 1.27 Best GIF Maker for Mac
- 1.28 PPT to Video on Mac
- 1.29 iPad Video Converter Mac
- 1.30 Top 6 Media Converter Mac
- 1.31 Top 8 File Converters for Mac
- 1.32 10 Free Video Converter for Mac
- 2. Recording Tips on Mac+
- 3. Edit Photos and Videos on Mac+
-
- 3.1 Photo Viewer for Mac
- 3.2 Crop a Picture on Mac
- 3.3 Top 10 Image Editor for Mac
- 3.4 How to Screenshot on Mac
- 3.5 Use Snipping Tool on Mac
- 3.6 Convert HEIC to JPG on Mac
- 3.7 Best Drawing Software for Mac
- 3.8 Best Photo Organizer for Mac
- 3.9 How to Resize Photos on Mac
- 3.10 Best Photo Editors for Mac
- 3.11 Convert PNG to JPG
- 3.12 TIFF to JPEG Mac
- 3.13 Convert Picture to SVG
- 3.14 How to Edit MP4 on Mac
- 3.15 Video Editing Software for Mac
- 3.16 4 Best MP3 Trimmer for Mac
- 4. Other Tips & Trick+
-
- 4.1 An Intel Mac VS ARM
- 4.2 Fix Mac Running Slow Problem
- 4.3 How to Run Windows on Mac
- 4.4 Top 15 Mac Apps in 2020
- 4.5 Everything about macOS 11 Big Sur
- 4.6 How to Transfer Data between Macs
- 4.7 How to Use Mac Magic
- 4.8 Clear Space on Your Mac
- 4.9 15 Things for New Mac Owner
- 4.10 Best Games for Mac in 2020
- 4.11 Best 12 Alternatives to CleanMyMac
- 4.12 How to Make a Collage on Mac
- 4.13 Best Free Voice Changer for Mac
- 4.14 Posting on Instagram from Mac
- 4.15 10 Easy Way Do Split-Screen on Mac
- 4.16 How to Turn Off iMesages
- 4.17 How to Airplay Video to Mac
- 5. Tips for Playing Videos+
All Topic
- AI Tools Tips
- DVD Users
- Social Media Users
- Camera Users
- Photography
- Creative Design
- Movie Users
- Travelling Fans
- Educational Users
- More Solutions
- Holidays
- Game Lovers
- Other Tips
Easy Steps to Transfer Data between Macs with Migration Assistant
by Kayla Morrison • 2024-07-20 18:27:51 • Proven solutions
If you have upgraded your Mac system or have shifted to a new device, the first and the most important thing is the transfer of the data from an old Mac to the new device. To get the task done most efficiently, the Migration Assistant app that comes with the Mac system is the best method. Using Migration Assistant, applications, user accounts, documents, settings of the system, printer set-up, and other data can be transferred from the old device to the new or the updated Mac.
- Part 1. What's the best way to migrate data from an old Mac to a new Mac
- Part 2. Extended Knowledge about Migration Assistant
Part 1. What's the best way to migrate data from an old Mac to a new Mac
When it comes to the transfer of data between the Mac systems, the built-in Migration Assistant app is the best way. Using this method, you can transfer the data between the systems and from the Time Machine back-up as well. The devices between which the data has to be transferred can be connected through the same WIFI network, FireWire, Ethernet, or Thunderbolt as suitable.
Thus, using Migration Assistant all the files can be transferred to the new system without copying them manually.
There are certain things listed below that need to be considered before starting the actual transfer of the data.
- Make sure that your Mac systems are running on the latest OS version. Also, make sure that the updates for the third-party apps are also done.
- For the Migration Assistant to work, your old Mac must be using OS X Lion or the later OS versions.
- The old Mac system must have a name if it does not have so. You can give the name by opening System Preferences > Sharing and then adding a name in the Computer Name field.
- Both the system between which the data transfer must be done must be connected to the AC power source.
- If you are using the Wi-Fi network to connect the device, make sure that both the devices are connected to the same network. In case of direct connection, get the FireWire, Ethernet cable, or Thunderbolt ready. You can even connect the new Mac system to the Time Machine backup of the old system.
Steps to transfer data from old Mac to New Mac using Migration Assistant:
On the New Mac:
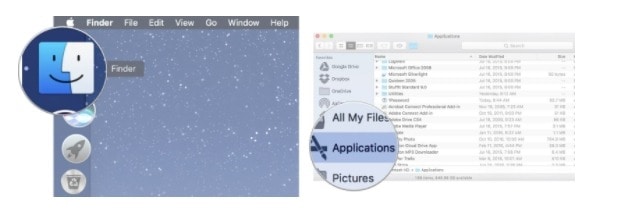
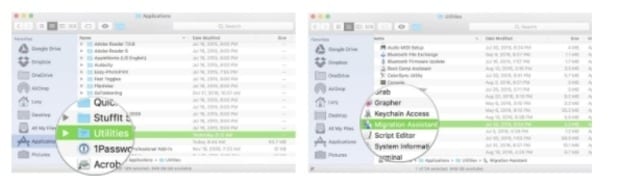
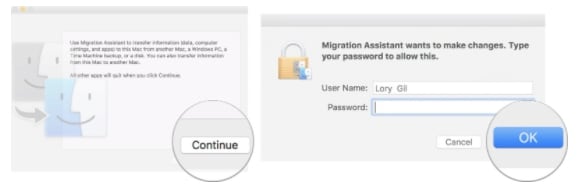
- Open the Finder window, hit on the Applications option from the sidebar, and then double-click on the Utilities folder. Next double-click on the Migration Assistant option and then hit on the Continue.
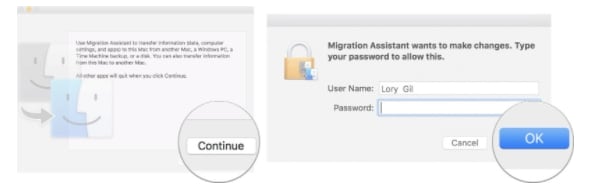
- If you are being prompted you need you to enter your administrator password and then click on the OK button.
- Next, select how you want the information to be transferred- from a Mac, start-up disk, or Time Machine. Click on the Continue.
On the Old Mac:
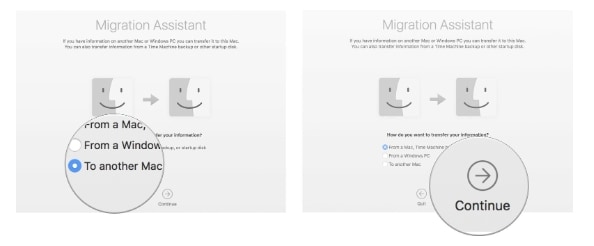
- Open the Migration Assistant option and click on the Continue button.
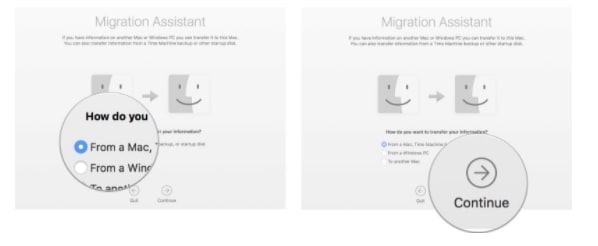
- Choose the option of transfer to another Mac when asked how you would like to transfer the information and then click on the Continue button.
The above steps can be skipped if you are transferring the data from the Time Machine backup or if you have started the old Mac in the target disk mode.
On the New Mac:
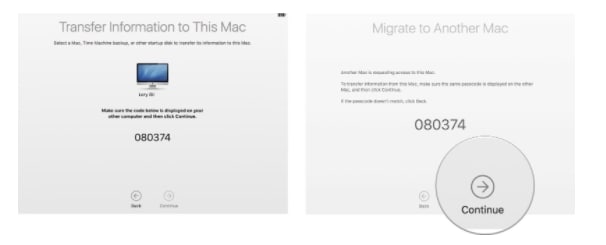
- Choose the appropriate option when asked to select from the Mac, startup disk, or Time Machine backup.
- Click on the Continue button and the security code may appear.
On the Old Mac:
- If there is a security code, just make sure that it is the same as the one that appears on the New Mac. Click on the Continue button.
- The above step is to be skipped if you are transferring the data from the Time Machine backup or if you have started the old Mac in the target disk mode.
On the New Mac:
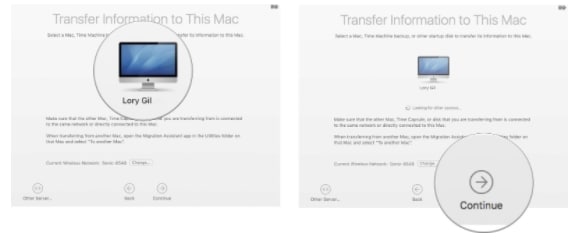
- Select the backup to transfer the information from and then click on the Continue button.
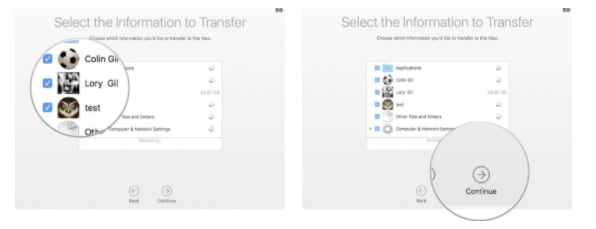
- Next choose the information that you need to transfer from the backup (files, apps, settings, and other information).
- To start the transfer process, click on the Continue button. Depending on the content to be transferred, the system will take the time to complete the process.
After the transfer process is complete, on your new Mac system, log in to the migrated account and check for the files. If all the data is transferred, your new Mac will look just like your old one and you are ready to work it without any issues.
Part 2. Extended Knowledge about Migration Assistant
The below FAQ regarding the Migration Assistant will help you to know more about the app so that you can transfer the data hassle-free.
1.After the transfer of the data is complete, does Migration Assistant remove the files and other data from the old Mac?
No, the Migration Assistant only transfers the data from the old Mac to the new Mac and does not delete it. Thus, after the transfer is complete, the data on your old Mac is very much there.
2. Is a new user-account created by the Migration Assistant?
The data is moved by the Migration Assistant only to the user account which is not being used. To avoid creating a new account, you need to make the selections at the Setup Assistant when you turn on the new Mac as it launches. At SA, select the yes option when you are asked if you are moving the data from another Mac and then connect your new system to the old Mac. This way, your new Mac system will look completely like your old Mac with the same user account.
3. Can all the data and information transferred using Migration Assistant?
Yes, the Migration assistant supports transferring all the data, files, settings, apps, and other information between the devices. If you have selected to transfer everything from your old Mac to the new system, the new Mac will look just like your old system.
4. Migration Assistant app quit while transferring data between two Mac that are connected by the Thunderbolt cable?
Though in an ideal situation this should not happen and you can try again connecting and transferring your data. If even after the multiple trying you face the same issue, then most likely there is a corrupt file that causes the app to quit.
Your complete video toolbox

Other popular Articles From Wondershare

Kayla Morrison
staff Editor