Mac
- TRY FREE TRY FREE
- 1. Burn Video/Audio on Mac+
-
- 1.1 Convert AVI to MP4 on Mac
- 1.2 Convert AVCHD on Mac
- 1.3 Convert Audio on Mac
- 1.4 MP3 to WAV Converter Mac
- 1.5 WAV to MP3 Converter Mac
- 1.6 svg converter
- 1.7 music converter
- 1.8 dmg file
- 1.9 webp
- 1.10 online svg converter
- 1.11 ai to svg
- 1.12 music converter
- 1.13 md file
- 1.14 wpd file
- 1.15 djvu file
- 1.16 sf2 file
- 1.17 oga file
- 1.18 arj file
- 1.19 free svg converter
- 1.20 md5 converter
- 1.21 convert dmg to iso
- 1.22 dpi converter
- 1.23 Toast Titanium Alternative for Mac
- 1.24 Copy a CD on Mac
- 1.25 Best GIF Maker for Mac
- 1.26 PPT to Video on Mac
- 1.27 iPad Video Converter Mac
- 1.28 Top 6 Media Converter Mac
- 1.29 Top 8 File Converters for Mac
- 1.30 34 Best Free Video Converters
- 2. Recording Tips on Mac+
- 3. Edit Photos and Videos on Mac+
-
- 3.1 Photo Viewer for Mac
- 3.2 Crop a Picture on Mac
- 3.3 Top 10 Image Editor for Mac
- 3.4 How to Screenshot on Mac
- 3.5 Convert HEIC to JPG on Mac
- 3.6 Best Drawing Software for Mac
- 3.7 How to Resize Photos on Mac
- 3.8 Best Photo Editors for Mac
- 3.9 Convert PNG to JPG
- 3.10 TIFF to JPEG Mac
- 3.11 Convert Picture to SVG
- 3.12 Video Editing Software for Mac
- 3.13 4 Best MP3 Trimmer for Mac
- 4. Other Tips & Trick+
-
- 4.1 Fix Mac Running Slow Problem
- 4.2 How to Run Windows on Mac
- 4.3 How to Use Mac Magic
- 4.4 Best 12 Alternatives to CleanMyMac
- 4.5 How to Make a Collage on Mac
- 4.6 Best Free Voice Changer for Mac
- 4.7 Posting on Instagram from Mac
- 4.8 10 Easy Way Do Split-Screen on Mac
- 4.9 How to Airplay Video to Mac
- 5. Tips for Playing Videos+
All Topic
- YouTube Tips
-
- AI Tools Tips
-
- AI Photo Enhancer Tips
- Voice Changer Tips
- AI Thumbnail Maker Tips
- AI Script Generator Tips
- Smart Summarizer
- AI Subtitle Generator Tips
- Watermark Remover
- Vocal Remover Tips
- Speech to Text Tips
- AI Video Tips
- AI Image Tips
- AI Subtitle Translator Tips
- Video Extractor Tips
- Text to Speech Tips
- AI Video Enhancer Tips
- DVD Users
- Social Media Users
- Camera Users
- Photography
- Creative Design
- Movie Users
- Travelling Fans
- Educational Users
- More Solutions
- Holidays and Commemoration
- Game Lovers
- Other Tips
Top 4 MP3 Trimmer for Mac in 2026
by Kayla Morrison • 2026-01-21 18:55:43 • Proven solutions
If you’re an audiophile, you must know a thing or two about the MP3 audio format. Unlike other sound formats, MP3 is smaller in size and compatible with most music players. However, sometimes you might need the services of an MP3 trimmer for Mac to chop off the unwanted parts of your audio. In that case, read on to learn four beautiful methods of how to trim MP3 on Mac with zero quality loss.
- Part 1. Best MP3 Trimmer for Mac: How to Trim MP3 on Windows on Mac Easily
- Part 2. How to Trim MP3 Files in iTunes with Simple Steps
- Part 3. How to Trim MP3 Files with QuickTime Player
Part 1. Best MP3 Trimmer for Mac: How to Trim MP3 on Windows or Mac Easily
Wondershare UniConverter is undeniably the most complete and straightforward to use MP3 trimmer for Mac. With this tool, you can perform multiple sound editing tasks like converting, cutting, and merging. It supports all standard audio file formats such as OOG, AU, MP3, FLAC, M4A, etc. After trimming your MP3 file, you can also convert it to 10+ audio formats. What’s more, you can change your file’s name before converting it.
Wondershare UniConverter - All-in-One Video Converter
-
It supports the trimming of standard audio files like MP3, FLAC, M4A, M4R, etc.
-
Best free video editor for Mac to crop, rotate, cut, convert, add subtitles, and more.
-
90X faster conversion speed than any conventional converters.
-
Batch video/audio compression and conversion are allowed.
-
Toolbox with additional functions like Screen Recorder, VR Converter, GIF Maker, Fixing Media Metadata, and more.
-
Supported OS: Windows 10/8/7/XP/Vista, macOS 11 Big Sur, 10.15 (Catalina), 10.14, 10.13, 10.12, 10.11, 10.10, 10.9, 10.8, 10.7.
Below is how to trim MP3 on Mac with Wondershare UniConverter:
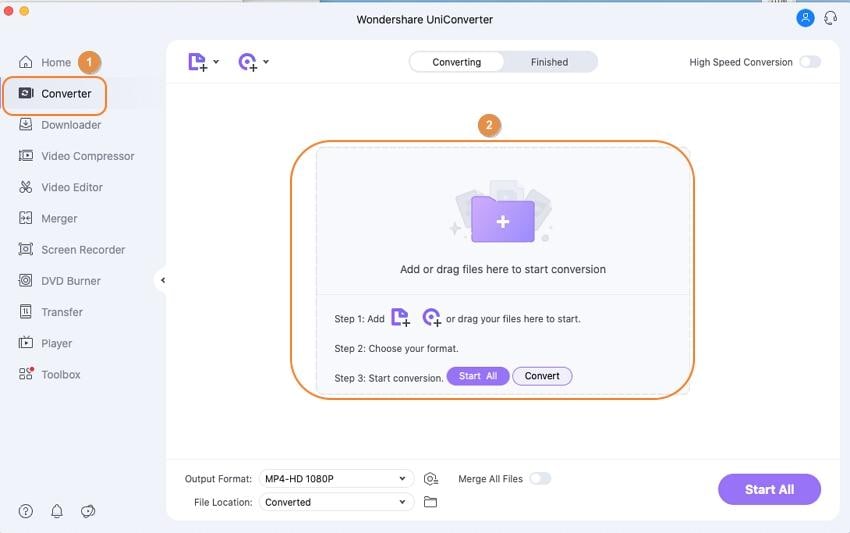
Step 1 Open the Audio Converter function.
Install and run Wondershare MP3 Trimmer and then click the Audio Converter tool. Now drag-and-drop your MP3 files on the Audio Converter window. Another way is to press the Folder icon at the top to open your local storage. You can import as many MP3 files as you like.

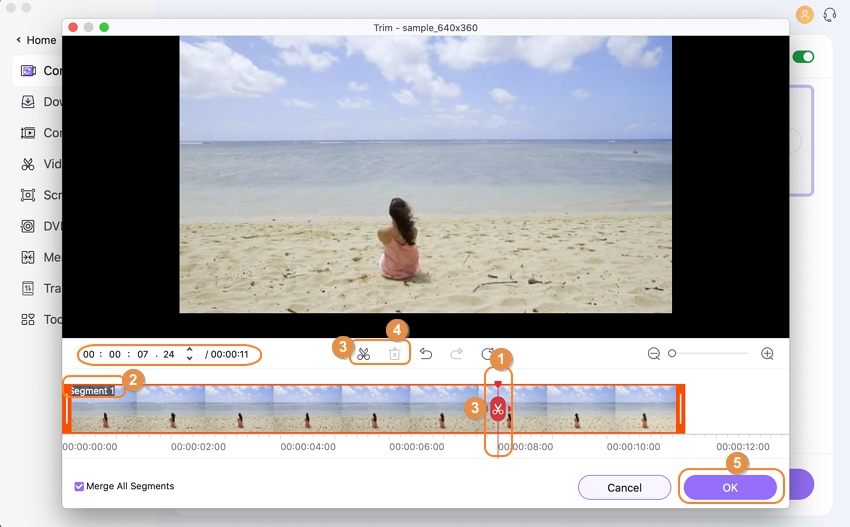
Step 2 Open the Trimming tool.
Now hoover your mouse cursor on your imported MP3 file and then click the Trim button. It’s the scissors-like icon. You can also click the Crop button to adjust the audio volume. And of course, you can click the Merge All Files toggle to combine multiple audio files when converting.

Step 3 Save your files.
If you want to convert MP3 to another format, click the Output Format menu and choose your target format. After that, press the Start All button to start trimming, merging, and converting audio.
![]()
Part 2. How to Trim MP3 Files in iTunes win Simple Steps
Did you know that iTunes can also trim MP3 files to make them sound more professional? Well, here is how to do it:
Step 1: Open iTunes on Mac and then click the File then choose the Add File to Library to import local MP3 files.
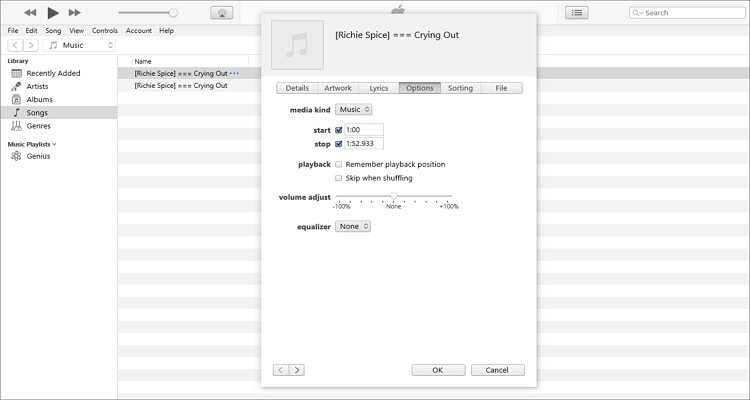
Step 2: Next, click the Edit tab and then choose the Song Info option.
Step 3: On the pop-up dialog, click the Options and manually enter the start and stop time for your new file. You can also adjust the sound volume and choose an EQ.
Step 4: Now click the File, choose the Convert, and then select the Create AAC Version option. You’ll see your new trimmed file right below the original MP3 audio.

Part 3. How to Trim MP3 Files with QuickTime Player
There is certainly no shortage of free MP3 trimmer for Mac. That’s because Mac users can also use QuickTime Player to cut MP3 files. Unlike the first two options, QuickTime Player comes bundled in Mac OS X as the native video player app. So, to get the most out of your QuickTime Player app below is how to trim sounds:
Step 1: Right-click on your MP3 file and then choose Open with > QuickTime Player.
Step 2: On the QuickTime Player window, click the Edit tab and then choose the Trim option.
Step 3: Now move the yellow trimming slides to set a new duration for your MP3 file.
Step 4: If satisfied, click the Trim button to cut off the unwanted parts.
Step 5: Finally, click the File > Save As to save your MP3 file.

Learning how to trim MP3 on Mac shouldn’t be a difficult task with the right method. Mac users can use the pre-installed iTunes or QuickTime Player apps to cut sounds quickly and easily. For Mac and Windows users, Wondershare UniConverter should be your go-to audio trimming solution. Overall, all these methods deliver excellent results.

Your complete video toolbox
 Trim video/audio file to multiple segments or delete unnecessary parts at will.


Kayla Morrison
staff Editor