Mac
- TRY FREE TRY FREE
- 1. Burn Video/Audio on Mac+
-
- 1.1 Convert AVI to MP4 on Mac
- 1.2 Convert AVCHD on Mac
- 1.3 Convert Audio on Mac
- 1.4 MP3 to WAV Converter Mac
- 1.5 WAV to MP3 Converter Mac
- 1.6 svg converter
- 1.7 music converter
- 1.8 dmg file
- 1.9 webp
- 1.10 online svg converter
- 1.11 ai to svg
- 1.12 music converter
- 1.13 md file
- 1.14 wpd file
- 1.15 djvu file
- 1.16 sf2 file
- 1.17 oga file
- 1.18 arj file
- 1.19 free svg converter
- 1.20 md5 converter
- 1.21 convert dmg to iso
- 1.22 dpi converter
- 1.23 Toast Titanium Alternative for Mac
- 1.24 Copy a CD on Mac
- 1.25 Best GIF Maker for Mac
- 1.26 PPT to Video on Mac
- 1.27 iPad Video Converter Mac
- 1.28 Top 6 Media Converter Mac
- 1.29 Top 8 File Converters for Mac
- 1.30 34 Best Free Video Converters
- 2. Recording Tips on Mac+
- 3. Edit Photos and Videos on Mac+
-
- 3.1 Photo Viewer for Mac
- 3.2 Crop a Picture on Mac
- 3.3 Top 10 Image Editor for Mac
- 3.4 How to Screenshot on Mac
- 3.5 Convert HEIC to JPG on Mac
- 3.6 Best Drawing Software for Mac
- 3.7 How to Resize Photos on Mac
- 3.8 Best Photo Editors for Mac
- 3.9 Convert PNG to JPG
- 3.10 TIFF to JPEG Mac
- 3.11 Convert Picture to SVG
- 3.12 Video Editing Software for Mac
- 3.13 4 Best MP3 Trimmer for Mac
- 4. Other Tips & Trick+
-
- 4.1 Fix Mac Running Slow Problem
- 4.2 How to Run Windows on Mac
- 4.3 How to Use Mac Magic
- 4.4 Best 12 Alternatives to CleanMyMac
- 4.5 How to Make a Collage on Mac
- 4.6 Best Free Voice Changer for Mac
- 4.7 Posting on Instagram from Mac
- 4.8 10 Easy Way Do Split-Screen on Mac
- 4.9 How to Airplay Video to Mac
- 5. Tips for Playing Videos+
All Topic
- YouTube Tips
-
- AI Tools Tips
-
- AI Photo Enhancer Tips
- Voice Changer Tips
- AI Thumbnail Maker Tips
- AI Script Generator Tips
- Smart Summarizer
- AI Subtitle Generator Tips
- Watermark Remover
- Vocal Remover Tips
- Speech to Text Tips
- AI Video Tips
- AI Image Tips
- AI Subtitle Translator Tips
- Video Extractor Tips
- Text to Speech Tips
- AI Video Enhancer Tips
- DVD Users
- Social Media Users
- Camera Users
- Photography
- Creative Design
- Movie Users
- Travelling Fans
- Educational Users
- More Solutions
- Holidays and Commemoration
- Game Lovers
- Other Tips
How to Resize Photos on Mac with Simple Steps
by Kayla Morrison • 2026-01-21 18:55:46 • Proven solutions
When it comes to editing images by resizing on desktops, Adobe Photoshop comes to mind. However, learning how to resize photos on Mac using the free Preview app can save you subscription money on top of being simple to use. So, this guide is going to teach you how to resize images professionally on Mac using some free excellent programs.
- Part 1. How to Resize Photos on Mac Easily and Quickly
- Part 2. The Easiest Way to Resize Photos on Mac
- Part 3. Top 8 Ways to Resize Photos on Mac 2022
Part 1. How to Resize Photos on Mac Easily and Quickly
Resizing photos on your Mac is as easy as counting 1,2,3 with the free Preview app. This tool comes pre-installed on all macOS computers and can help you polish your images with minimal fuss. Below is how to use it:
- Find the photo you wish to resize in Finder and then double-click to launch it in Preview. Alternatively, right-click the image, choose Open With, and then Preview.
- On Preview, click Tools and then choose Adjust Size.
- Now choose whether you’d like to edit the photo by percentage, pixels, mm, cm, or points.
- Finally, enter your preferred Height and Width for the image before clicking Ok. That’s it!
Part 2. The Easiest Way to Resize Photos on Mac
Although the Preview app is free and easy to use, it offers little customization options. In that case, use Wondershare UniConverter. With this free professional image converter for Mac and Windows, you can resize any image format, including JPG, PNG, TIFF, CR2, TIFF, etc. In addition to resizing, you can also crop, flip, apply watermarks, add effects, and convert to either TIFF, JPEG, PNG, or BMP format.
Wondershare UniConverter - All-in-One Video Converter
-
It supports all standard video file formats like MP4, MOV, MKV, VOB, etc.
-
Best free video editor for Mac to crop, rotate, cut, convert, add subtitles, and more.
-
90X faster conversion speed than any conventional converters.
-
Batch video/audio compression and conversion are allowed.
-
Toolbox with additional functions like Screen Recorder, VR Converter, GIF Maker, Fixing Media Metadata, and more.
-
Supported OS: Windows 10/8/7/XP/Vista, macOS 11 Big Sur, 10.15 (Catalina), 10.14, 10.13, 10.12, 10.11, 10.10, 10.9, 10.8, 10.7.
Below is how to resize photos on Mac using Wondershare UniConverter:
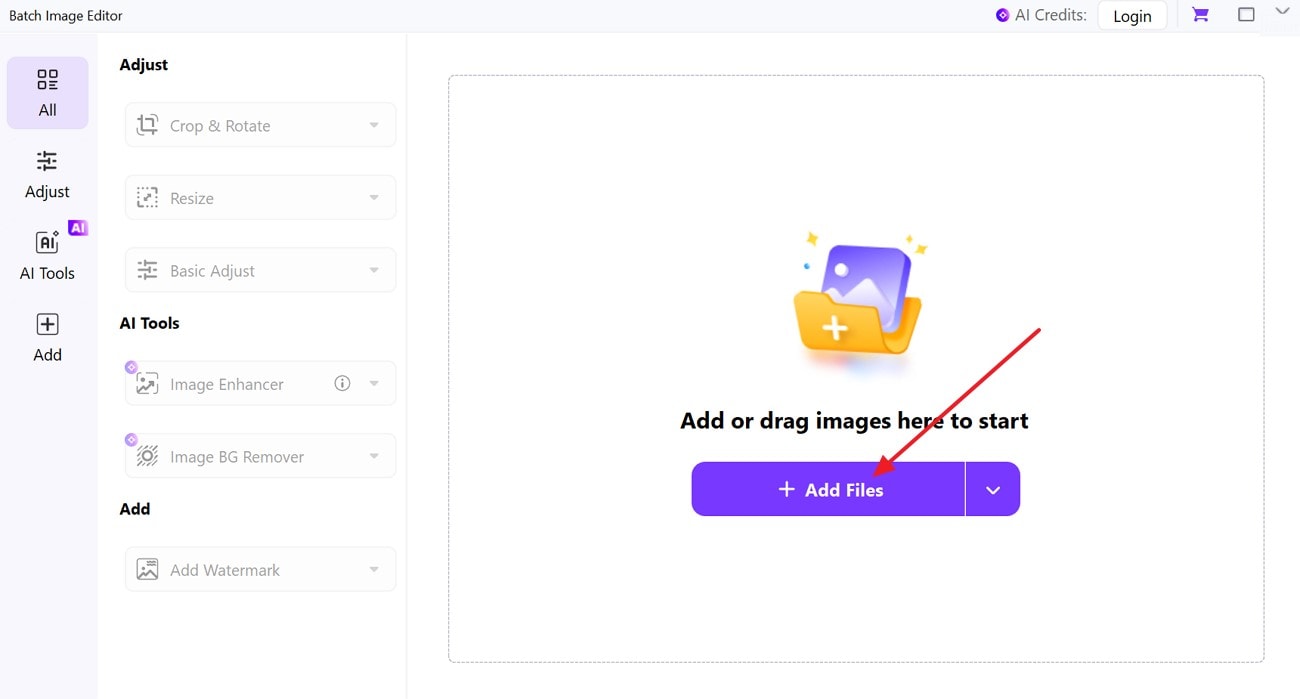
Step 1 Open the Batch Image Editor tool.
Download, install, and open Wondershare UniConverter on your Mac and then open Batch Image Editor function to launch it.

Step 2 Import images.
Drag and drop or click on "Add Files" to import your local images.
Step 3 Customize photos.
Now open Resize tab to choose or customize the size you want. On the Batch Image Editor window, you can do the following:
- Crop: Click the Crop & Rotate tab and start adjusting the image size by cropping it manually. You can also rotate and flip your images.
- Basic Adjust: Click the Basic Adjust tab to adjust your image brightness, contrast, and saturation.
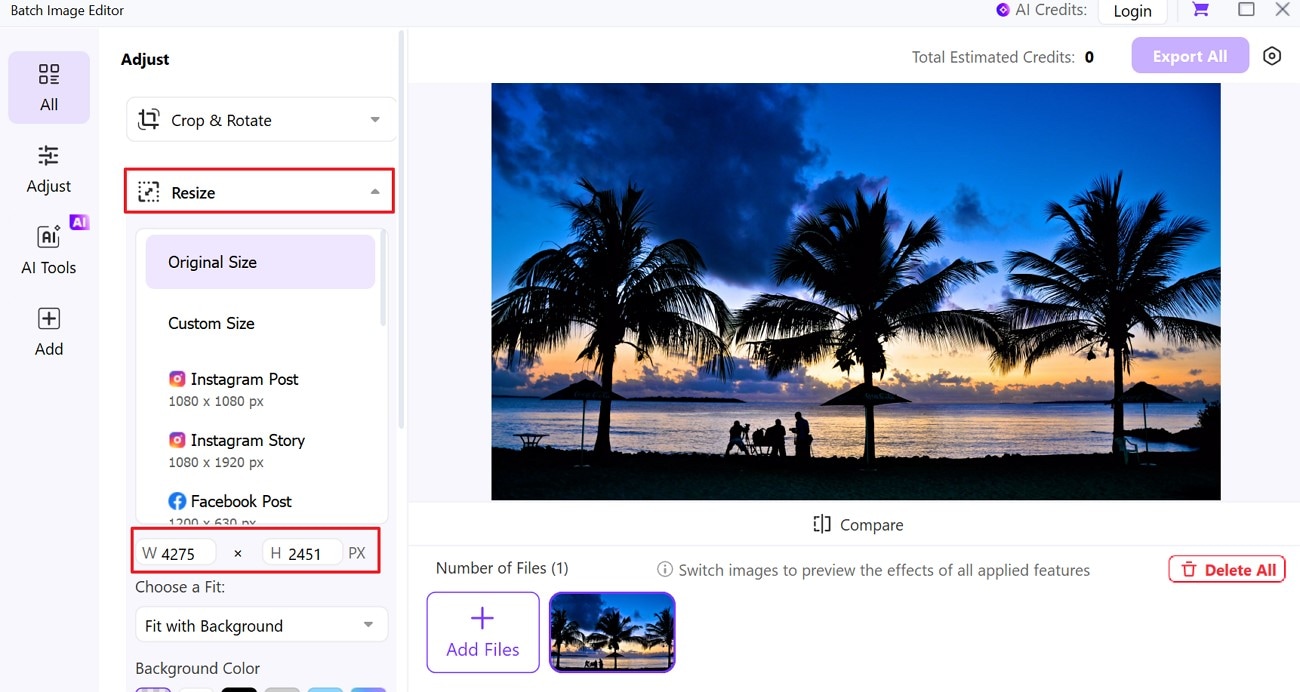
If you’re satisfied with the changes, click the Export All to save all resized images. You can also click the Settings icon on the top-right corner to customize the output format and saving location for your image.
Part 3. Top 8 Ways to Resize Photos on Mac 2022
Now let’s dive in and discuss some eight other image resizing tools for Mac.
1. Image Resizer
URL: https://apps.apple.com/us/app/image-resizer-resize-photos/id1188274404?mt=12
The name alone says it all! Image Resizer is tailor-made to help you resize and compress images on Mac quickly. Using this tool is a cakewalk as you only need to choose pictures from your Photos Library or any other folder and edit them accordingly. After importing a photo, you can now resize, rotate, crop, flip, and convert. When resizing, you can choose custom size or resize by percentage. Plus, Image Resize can edit single or batch photos.
Pros:
- Supports batch or single resizing.
- Easy image compression.
- Convert between image formats.
Cons:
- Cannot minimize the display.
- Doesn’t keep images in the original folder.

2. Sizerox
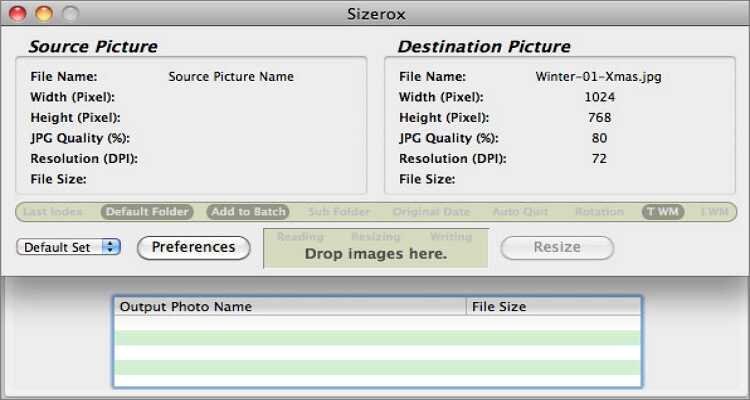
Sizerox is another simple method to rename, resize, rotate, and crop images. It’s a lightweight program that supports the simple drag-and-drop feature. Here, you can resize, TIFF, JPEG, PNG, and PSD images and export them to JPEG file. You can also add or remove watermarks on your photos from your scanner or digital camera. Sadly, Sizerox is only compatible with macOS 10.3 or later. Mac OS X 10.x won’t work.
Pros:
- Rotate images while resizing.
- Add or remove watermarks.
- Supports batch conversions.
Cons:
- Only exports to JPEG.
- Can’t work without licensing.
3. Photo Manager Movavi
URL: https://apps.apple.com/us/app/photo-manager-movavi/id1450145298?mt=12
Available on Mac App Store, Photo Manager Movavi is one of the most reliable image resizing tools you can find. It’s simple to use and can manage multiple images at a go. Apart from resizing, flipping, rotating, and cropping images, Photo Manager Movavi can also create photo albums automatically and arrange pictures according to date and GPS coordinates. Moreover, you can rename images in batch as well as add text and numbers.
Pros:
- Create photo albums automatically.
- Edit in viewing mode.
- Works with all standard formats.
Cons:
- Reduced functionality in the free version.
- Lags with big files.

4. Tweak Photos
URL: https://apps.apple.com/us/app/tweak-photos-image-editor/id1109965022?mt=12
If you’re looking for a photo editing app for Mac that can handle as many photos as possible, consider Tweak Photos. Here, you can edit bulk images quickly and easily, thanks to the straightforward controls and UI. Tweak Photos allows you to rename, resize, rotate, flip, and perform many other editing tasks. You can also convert between standard photo formats like TIFF, PNG, BMP, JPG, JP2, and GIF. Moreover, you can add logos or watermarks to your batch images.
Pros:
- Convert between images.
- Add logos or watermarks to photos.
- Add beauty frames.
Cons:
- Can’t rename and sort photos chronologically.
- Can be confusing at first.

5. Resize Sense
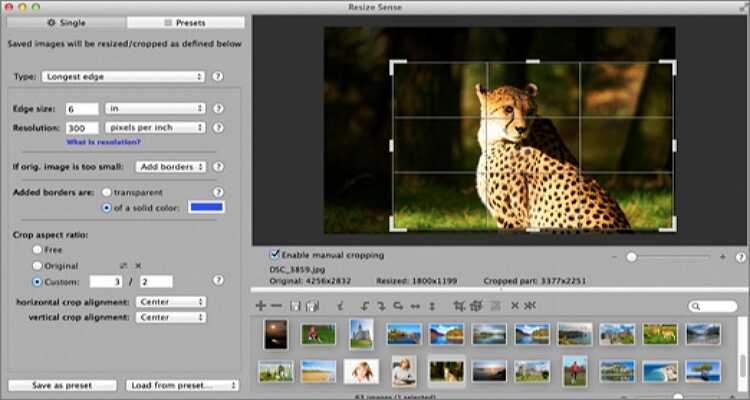
With Resize Sense, you will eliminate those tedious hours you spend editing photos by resizing, rotating, flipping, cropping, and renaming. You can use it to make your images smaller for uploading to email or social media. When resizing, you can define precise dimensions, specify the shortest or longest edge, and apply or remove watermarks. Overall, it’s the perfect example of simplicity and effectiveness in one sentence.
Pros:
- Simple to use.
- Apply or remove watermarks.
- Live image preview.
Cons:
- Can’t save in the original folder.
- Not entirely free.
6. JPEGmini
JPEGmini is a simple way of resizing your images on Mac without depleting your precious storage space. It supports high-quality photographs (up to 128MP) and can optimize them on your Mac or Windows with high speeds. All that you have to do is to drag and drop your images and then start resizing them by your own specifications. To save time, you can also select multiple custom sizes. However, you’ll need to pay at least $59 to get this app.
Pros:
- Easy to use.
- Supports multiple image formats.
- Several custom export resize options.
Cons:
- Expensive.
- Not for advanced users.

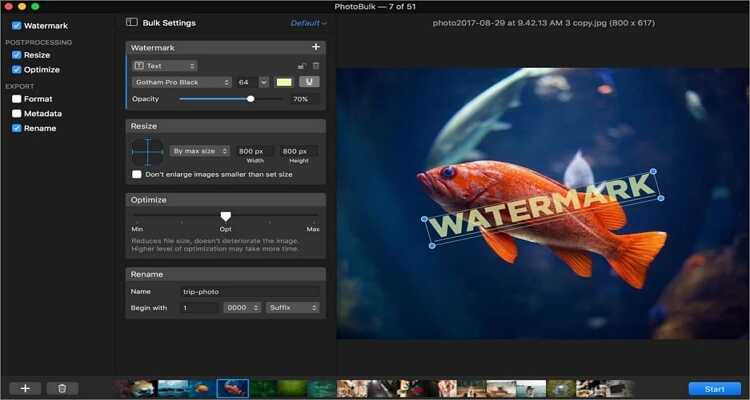
7. PhotoBulk
URL: https://apps.apple.com/us/app/photobulk-watermark-in-batch/id537211143?mt=12
PhotoBulk balances between simplicity and powerful editing tools perfectly. This simple to navigate platform lets you apply texts/watermarks, convert between image formats, resize images in bulk, and so on. When changing the image size, PhotoBulk allows you to adjust the width and height either manually or by percentage. You can also fill your images with text tags and unique watermarks.
Pros:
- Resize images easily.
- Apply watermarks with unique fonts.
- Bulk resize.
Cons:
- macOS 10.13 or later.
- creates a new Watermark folder automatically.
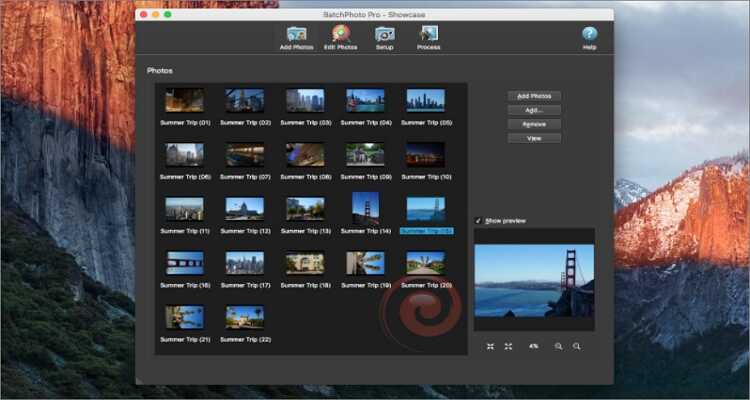
8. BatchPhoto
URL: https://apps.apple.com/us/app/batchphoto/id584369637?mt=12
Lastly, you can use BatchPhoto to edit images on your Mac in bulk. It’s simple to use and features a robust editing platform to help you to resize, apply effects, rotate, and so on. When resizing, BatchPhoto allows you to rotate your image to either landscape or portrait. You can also rename and convert among 170+ image formats, including PNG, JPG, TIFF, PDF, and more. What’s more, you can apply touch-ups and special effects like Sepia, Charcoal Sketch, Black & White, etc.
Pros:
- Add watermarks and unique fonts.
- Rotate photos to landscape or portrait.
- Convert between 170+ image formats.
Cons:
- Limited export formats.
Conclusion
These are the ten best ways of how to resize photos on Mac without breaking any sweat. With the Preview option, you have an app that’s not only free but also simple to use. However, because it has limited capabilities, I recommend Wondershare UniConverter for the best results.
Your complete video toolbox


Kayla Morrison
staff Editor