Mac
- TRY FREE TRY FREE
- 1. Burn Video/Audio on Mac+
-
- 1.1 Convert AVI to MP4 on Mac
- 1.2 Convert AVCHD on Mac
- 1.3 Convert Audio on Mac
- 1.4 MP3 to WAV Converter Mac
- 1.5 WAV to MP3 Converter Mac
- 1.6 svg converter
- 1.7 music converter
- 1.8 dmg file
- 1.9 webp
- 1.10 online svg converter
- 1.11 ai to svg
- 1.12 music converter
- 1.13 md file
- 1.14 wpd file
- 1.15 djvu file
- 1.16 sf2 file
- 1.17 oga file
- 1.18 arj file
- 1.19 free svg converter
- 1.20 md5 converter
- 1.21 convert dmg to iso
- 1.22 dpi converter
- 1.23 Toast Titanium Alternative for Mac
- 1.24 Copy a CD on Mac
- 1.25 Best GIF Maker for Mac
- 1.26 PPT to Video on Mac
- 1.27 iPad Video Converter Mac
- 1.28 Top 6 Media Converter Mac
- 1.29 Top 8 File Converters for Mac
- 1.30 34 Best Free Video Converters
- 2. Recording Tips on Mac+
- 3. Edit Photos and Videos on Mac+
-
- 3.1 Photo Viewer for Mac
- 3.2 Crop a Picture on Mac
- 3.3 Top 10 Image Editor for Mac
- 3.4 How to Screenshot on Mac
- 3.5 Convert HEIC to JPG on Mac
- 3.6 Best Drawing Software for Mac
- 3.7 How to Resize Photos on Mac
- 3.8 Best Photo Editors for Mac
- 3.9 Convert PNG to JPG
- 3.10 TIFF to JPEG Mac
- 3.11 Convert Picture to SVG
- 3.12 Video Editing Software for Mac
- 3.13 4 Best MP3 Trimmer for Mac
- 4. Other Tips & Trick+
-
- 4.1 Fix Mac Running Slow Problem
- 4.2 How to Run Windows on Mac
- 4.3 How to Use Mac Magic
- 4.4 Best 12 Alternatives to CleanMyMac
- 4.5 How to Make a Collage on Mac
- 4.6 Best Free Voice Changer for Mac
- 4.7 Posting on Instagram from Mac
- 4.8 10 Easy Way Do Split-Screen on Mac
- 4.9 How to Airplay Video to Mac
- 5. Tips for Playing Videos+
All Topic
- YouTube Tips
-
- AI Tools Tips
-
- AI Photo Enhancer Tips
- Voice Changer Tips
- AI Thumbnail Maker Tips
- AI Script Generator Tips
- Smart Summarizer
- AI Subtitle Generator Tips
- Watermark Remover
- Vocal Remover Tips
- Speech to Text Tips
- AI Video Tips
- AI Image Tips
- AI Subtitle Translator Tips
- Video Extractor Tips
- Text to Speech Tips
- AI Video Enhancer Tips
- DVD Users
- Social Media Users
- Camera Users
- Photography
- Creative Design
- Movie Users
- Travelling Fans
- Educational Users
- More Solutions
- Holidays and Commemoration
- Game Lovers
- Other Tips
How to Copy a CD on Mac by Easy Steps in 2026
by Kayla Morrison • 2026-01-21 18:56:08 • Proven solutions
Learning how to copy a CD on a Mac in different ways can look easy on paper until you try it out. Ripping a CD allows you to import external media files to iTunes and your local music library. It’s also another way to backup your precious CD without worrying about scratches and lost discs. So, let’s learn how to copy an optical disc on Mac in multiple simple ways.
Watch Videos to Learn How to Copy a CD on Mac
- Part 1. How to Load Your CD into Music on Mac
- Part 2. How to Copy a CD Using Disk Utility
- Part 3. How to Copy a CD Easily and Quickly on Mac
Part 1. How to Load Your CD into Music on Mac
Firstly, let’s quickly learn how to import tracks from CD to your Mac’s music library in less than 10 minutes. After doing this, you can enjoy your local AAC songs without your CD. Below is how to do it:
Step 1: First of all, you have to choose what happens to your disc after inserting it on Mac. In the Music app, click the Music > Preferences > General.
Step 2: Tap the When a CD is inserted pop-up dialog and then choose the Import CD.
Step 3: Now insert a music CD into your Mac’s disc drive and then go to the Music app. You’ll see your disc information appear automatically.
Step 4: On the pop-up window, choose whether you want to import all songs or add specific titles.
Step 5: Select the songs you want to import and then tap the Import CD button at the top-right corner.
Step 6: Choose your import settings before clicking the OK.
Step 7: Click the Eject button to remove the CD after you finish copying.
Part 2. How to Copy a CD Using Disk Utility
Luckily, macOS doesn’t only allow you to rip discs with ease. You can also copy files to your CD without losing the original quality via the Disk Utility function. Like with the first method, you should be done in minutes.
Step 1: Insert a music CD into your Mac’s optical drive.
Step 2: Navigate to the Finder, tap the Go, and then choose the Utilities. Click the Disc Utility.
Step 3: Choose your disc name from the right menu.
Step 4: Tap the New Image and then eject your CD after creating a new copy.
Step 5: Now insert a blank CD, select your created disc image on the left menu, and then tap the Burn.
Step 6: Click the Burn on the resulting dialog to begin copying a CD on Mac quickly.
Part 3. How to Copy a CD Easily and Quickly on Mac
With Wondershare UniConverter, you’ll be getting an all-in-one tool to help you rip and burn CDs on with minimal fuss. It's a lightweight app that works perfectly on Mac OS X 10.9 or newer and Windows 10/8/7. interestingly, this tool comes with a separate DVD Burner to help you rip and burn videos to DVD/Blu-ray discs with free menu templates. What’s more, it comes with an excellent video/audio editor for converting, compressing, cutting, and more.
Wondershare UniConverter - All-in-One Video Converter
-
Simple to use and 120x quicker than typical CD burning/ripping methods.
-
Best free video editor for Mac to crop, rotate, cut, convert, add subtitles, and more.
-
Best YouTube to MP3 converter for Windows/Mac to convert YouTube to MP3 with 120X faster conversion speed than any conventional converters.
-
Toolbox with additional functions like Screen Recorder, VR Converter, GIF Maker, Fixing Media Metadata, and more.
-
Supported OS: Windows 10/8/7/XP/Vista, macOS 11 Big Sur, 10.15 (Catalina), 10.14, 10.13, 10.12, 10.11, 10.10, 10.9, 10.8, 10.7.
Below is how to copy a CD on a Mac with Wondershare UniConverter:
Step 1 Open the CD Burner.
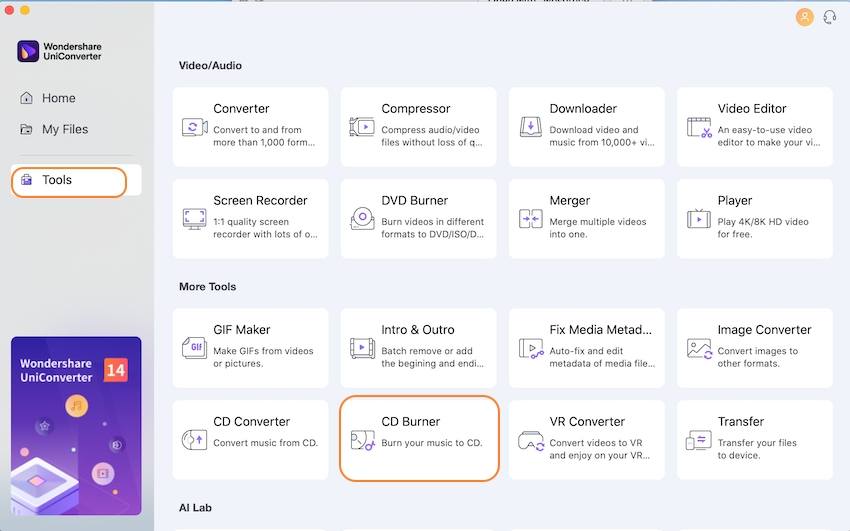
After installing the app, run it, and then insert your blank CD on your computer’s disc drive. Now click the Tools tab and then tap CD Burner. If you want to import CD files, click the CD Ripper.

Step 2 Upload files.
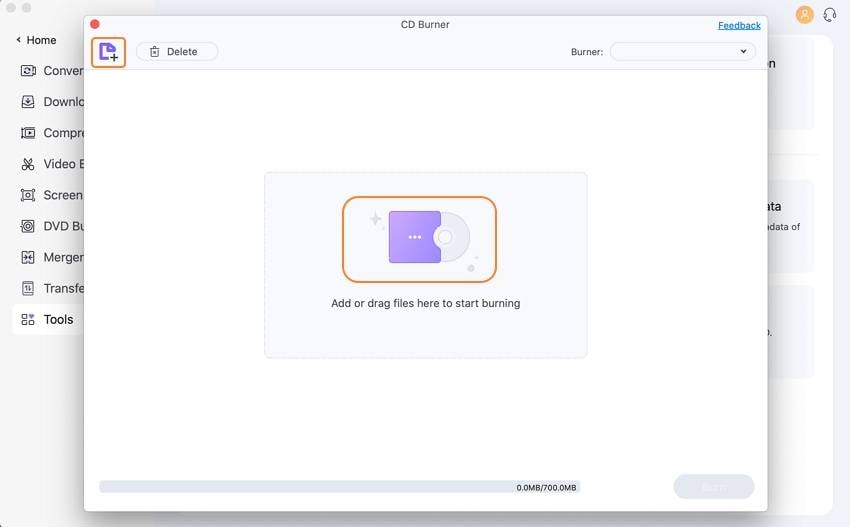
Click the Add button at the center of the window to upload your local audio files. You can add as many music tracks as you want.

Step 3 Burn CD.
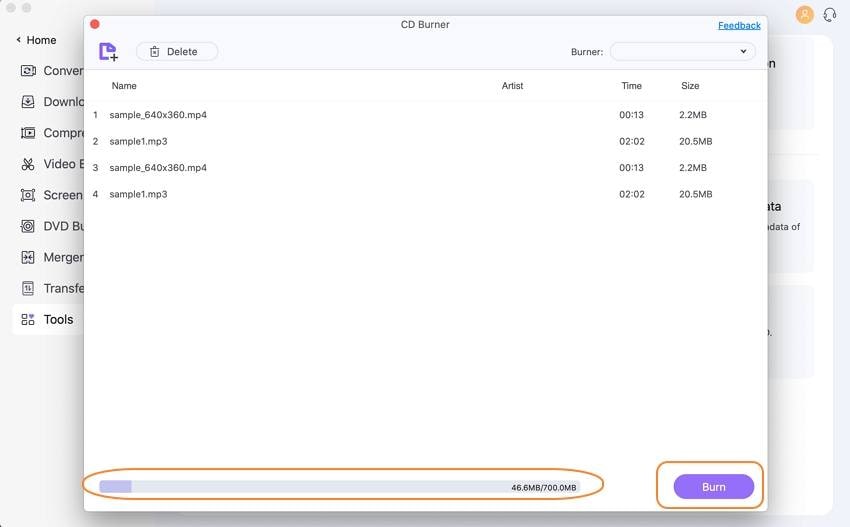
Change the track arrangement if you want to. After that, navigate to the Burner menu and choose your blank CD name. Lastly, hit the Burn to begin copying files to CD on Mac easily and quickly. It doesn’t get any simpler!

Conclusion
With these three simple methods, burning and ripping discs on Mac should be simple. However, I recommend Wondershare UniConverter because it’s simpler, faster, and supports both functions – burning and ripping CDs. Best of all, it comes with a collection of video/image/audio editing capabilities to give you a professional-looking CD. Enjoy!
Your complete video toolbox
 Burn multiple tracks to CD in varying audio formats like MP3, AAC, FLAC, etc.


Kayla Morrison
staff Editor