Mac
- TRY FREE TRY FREE
- 1. Burn Video/Audio on Mac+
-
- 1.1 Convert AVI to MP4 on Mac
- 1.2 Convert AVCHD on Mac
- 1.3 Convert Audio on Mac
- 1.4 MP3 to WAV Converter Mac
- 1.5 WAV to MP3 Converter Mac
- 1.6 svg converter
- 1.7 music converter
- 1.8 dmg file
- 1.9 webp
- 1.10 online svg converter
- 1.11 ai to svg
- 1.12 music converter
- 1.13 md file
- 1.14 wpd file
- 1.15 djvu file
- 1.16 sf2 file
- 1.17 oga file
- 1.18 arj file
- 1.19 free svg converter
- 1.20 md5 converter
- 1.21 convert dmg to iso
- 1.22 dpi converter
- 1.23 Toast Titanium Alternative for Mac
- 1.24 Copy a CD on Mac
- 1.25 Best GIF Maker for Mac
- 1.26 PPT to Video on Mac
- 1.27 iPad Video Converter Mac
- 1.28 Top 6 Media Converter Mac
- 1.29 Top 8 File Converters for Mac
- 1.30 34 Best Free Video Converters
- 2. Recording Tips on Mac+
- 3. Edit Photos and Videos on Mac+
-
- 3.1 Photo Viewer for Mac
- 3.2 Crop a Picture on Mac
- 3.3 Top 10 Image Editor for Mac
- 3.4 How to Screenshot on Mac
- 3.5 Convert HEIC to JPG on Mac
- 3.6 Best Drawing Software for Mac
- 3.7 How to Resize Photos on Mac
- 3.8 Best Photo Editors for Mac
- 3.9 Convert PNG to JPG
- 3.10 TIFF to JPEG Mac
- 3.11 Convert Picture to SVG
- 3.12 Video Editing Software for Mac
- 3.13 4 Best MP3 Trimmer for Mac
- 4. Other Tips & Trick+
-
- 4.1 Fix Mac Running Slow Problem
- 4.2 How to Run Windows on Mac
- 4.3 How to Use Mac Magic
- 4.4 Best 12 Alternatives to CleanMyMac
- 4.5 How to Make a Collage on Mac
- 4.6 Best Free Voice Changer for Mac
- 4.7 Posting on Instagram from Mac
- 4.8 10 Easy Way Do Split-Screen on Mac
- 4.9 How to Airplay Video to Mac
- 5. Tips for Playing Videos+
All Topic
- YouTube Tips
-
- AI Tools Tips
-
- AI Photo Enhancer Tips
- Voice Changer Tips
- AI Thumbnail Maker Tips
- AI Script Generator Tips
- Smart Summarizer
- AI Subtitle Generator Tips
- Watermark Remover
- Vocal Remover Tips
- Speech to Text Tips
- AI Video Tips
- AI Image Tips
- AI Subtitle Translator Tips
- Video Extractor Tips
- Text to Speech Tips
- AI Video Enhancer Tips
- DVD Users
- Social Media Users
- Camera Users
- Photography
- Creative Design
- Movie Users
- Travelling Fans
- Educational Users
- More Solutions
- Holidays and Commemoration
- Game Lovers
- Other Tips
How to Post on Instagram from Mac in 4 Ways
by Kayla Morrison • 2026-01-21 18:55:47 • Proven solutions
According to Statista, Instagram is the sixth-largest social media platform, boasting of over 1 billion users. With this kind of numbers in mind, it’s evident that most people are sharing photos and stories on Instagram every day. However, Instagram’s official app is limited to mobile platforms only. But luckily, you can use Instagram.com to upload video to Instagram from Mac or Windows using any updated web browser. So, read on to master a few tricks on how to post on Instagram from Mac effortlessly.
- Part 1. How to Post on Instagram from a Mac using Safari
- Part 2. How to Post on Instagram from a Mac using Google Chrome
- Part 3. Tips for Uploading to Instagram from Mac
Part 1. How to Post on Instagram from a Mac using Safari
If you and your Apple Safari browser are inseparable, you can use it to upload stories on Instagram from Mac instead of your phone. It’s simple to do that, and you’ll also enjoy a bigger screen to post comments and view images/videos.
Below is how to upload to Instagram from Mac using Safari:
Step 1: Open the Safari browser on your MacBook and then click the Safari > Preferences > Advanced.
Step 2: On the pop-up Advanced menu box, click the "Show Develop menu in menu bar" checkbox.
Step 3: Now visit your Instagram account using Safari by visiting Instagram.com.
Step 4: From the top menu bar, click Develop, choose User Agent, and then click Safari – iOS 10.3 (or whatever the current iOS version).
Step 5: After changing User Agent to iOS, the Instagram page will reload and look precisely like the iOS version.
Note: With this method, you can only upload a single photo and no videos or galleries.
Part 2. How to Post on Instagram from Mac using Google Chrome
Google Chrome is undoubtedly the most popular web browser for both mobile devices and desktops today. It’s a simple platform that runs smoothly without any hiccups.
Popularity matters aside; here is how to post on Instagram using Google Chrome:
Step 1: Launch the Chrome browser and then log into your Instagram account.

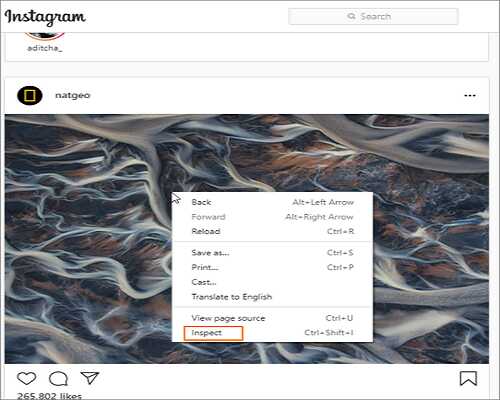
Step 2: Next, right-click anywhere and then tap the Inspect option in the pop-up menu.

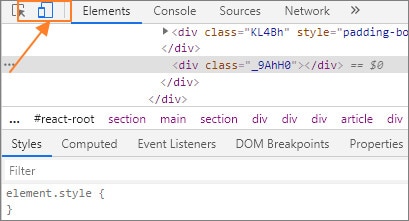
Step 3: On the right side, you'll see a section filled with codes. Go to the menu bar on that section and click the Toggle Device Toolbar icon. It's a small icon that looks like a tablet and a phone in front.

Step 4: Now refresh the page and close the coded window. You will see an Instagram page that looks like that of a mobile version but on a larger screen.
Part 3. Tips for Uploading to Instagram from Mac
Uplet is a third-party app that lets you upload multiple images to Instagram on Mac with zero quality loss. It’s a straightforward app as you only need to drag-and-drop your photos and share them in a flash. It also allows you to edit photos by adding relevant captions before uploading. Sadly, Uplet doesn’t come with multiple advanced editing features or filters. But that aside, here’s how to use it:

How to upload to Instagram from a Mac using Uplet:
Step 1: Install and launch Uplet and then log into your Instagram account from the top panel.
Step 2: Now, this is where things interesting. This program supports the seamless drag-and-drop feature that allows you to upload single or multiple photos seamlessly. Another alternative is to click the Add Photos button to upload videos or images.
Step 3: After uploading a photo successfully, you can choose to display it in a rectangular or square format.
Step 4: Next, go to the tagging and caption section and type in whatever text you want the viewers to read.
Step 5: Lastly, press the Share button to begin uploading your image to Instagram. You’ll receive a notification if the upload is successful.
How to upload to Instagram from a Mac with multiple Instagram accounts?
Are you tired of multiple re-logging each time you want to upload a picture on multiple Instagram accounts? Uplet is the solution once again.
Step 1: Launch Uplet and then log into your multiple Instagram accounts.
Step 2: Drag and drop your photo/video on the upload platform or click the Add button to upload multiple images.
Step 3: Now crop your video, add a caption, and then press the Share button to upload the video to multiple Instagram accounts on a Mac.
Conclusion
Hopefully, up to this juncture, you can now post a video on Instagram from Mac without breaking a sweat. With your Safari or Chrome browser, you will not only enjoy a smooth platform but a bigger one at that. With a third-party app like Uplet, Instagramers can enjoy multiple benefits such as posting on multiple accounts at once. Overall, it’s an excellent selection problem to have here.
Your complete video toolbox
 Convert video to MP4, MOV, MKV, AVI, and over 1000 video/audio formats with subtitles.


Kayla Morrison
staff Editor