Wondershare UniConverter
-
 Support batch conversion of videos and audios as well as other formats on Mac with simple clicks.
 - Built-in editor with a real-time preview, like Trim, Crop, Add subtitles, Apply Effects, etc.
- Versatile toolbox combines screen recorder, GIF maker, fix video metadata, etc.


Mac
- TRY FREE TRY FREE
- 1. Burn Video/Audio on Mac+
-
- 1.1 Convert AVI to MP4 on Mac
- 1.2 Convert AVCHD on Mac
- 1.3 Convert Audio on Mac
- 1.4 MP3 to WAV Converter Mac
- 1.5 WAV to MP3 Converter Mac
- 1.6 svg converter
- 1.7 music converter
- 1.8 dmg file
- 1.9 webp
- 1.10 online wpd converter
- 1.11 readme md
- 1.12 online svg converter
- 1.13 ai to svg
- 1.14 music converter
- 1.15 md file
- 1.16 wpd file
- 1.17 djvu file
- 1.18 sf2 file
- 1.19 oga file
- 1.20 arj file
- 1.21 free svg converter
- 1.22 md5 converter
- 1.23 convert dmg to iso
- 1.24 dpi converter
- 1.25 Toast Titanium Alternative for Mac
- 1.26 Copy a CD on Mac
- 1.27 Best GIF Maker for Mac
- 1.28 PPT to Video on Mac
- 1.29 iPad Video Converter Mac
- 1.30 Top 6 Media Converter Mac
- 1.31 Top 8 File Converters for Mac
- 1.32 10 Free Video Converter for Mac
- 2. Recording Tips on Mac+
- 3. Edit Photos and Videos on Mac+
-
- 3.1 Photo Viewer for Mac
- 3.2 Crop a Picture on Mac
- 3.3 Top 10 Image Editor for Mac
- 3.4 How to Screenshot on Mac
- 3.5 Use Snipping Tool on Mac
- 3.6 Convert HEIC to JPG on Mac
- 3.7 Best Drawing Software for Mac
- 3.8 Best Photo Organizer for Mac
- 3.9 How to Resize Photos on Mac
- 3.10 Best Photo Editors for Mac
- 3.11 Convert PNG to JPG
- 3.12 TIFF to JPEG Mac
- 3.13 Convert Picture to SVG
- 3.14 How to Edit MP4 on Mac
- 3.15 Video Editing Software for Mac
- 3.16 4 Best MP3 Trimmer for Mac
- 4. Other Tips & Trick+
-
- 4.1 An Intel Mac VS ARM
- 4.2 Fix Mac Running Slow Problem
- 4.3 How to Run Windows on Mac
- 4.4 Top 15 Mac Apps in 2020
- 4.5 Everything about macOS 11 Big Sur
- 4.6 How to Transfer Data between Macs
- 4.7 How to Use Mac Magic
- 4.8 Clear Space on Your Mac
- 4.9 15 Things for New Mac Owner
- 4.10 Best Games for Mac in 2020
- 4.11 Best 12 Alternatives to CleanMyMac
- 4.12 How to Make a Collage on Mac
- 4.13 Best Free Voice Changer for Mac
- 4.14 Posting on Instagram from Mac
- 4.15 10 Easy Way Do Split-Screen on Mac
- 4.16 How to Turn Off iMesages
- 4.17 How to Airplay Video to Mac
- 5. Tips for Playing Videos+
All Topic
- AI Tools Tips
- DVD Users
- Social Media Users
- Camera Users
- Photography
- Creative Design
- Movie Users
- Travelling Fans
- Educational Users
- More Solutions
- Holidays
- Game Lovers
- Other Tips
15 Things New Mac Owner Should Know in 2024
by Kayla Morrison • 2024-07-20 18:27:51 • Proven solutions
If you have finally decided to enter the Apple ecosystem club its time to know a few things about the Mac that will help you with the smooth working on the System. Being a new Mac owner, you will come across several new functions, shortcuts, commands, and other features that you need to get yourself used to.
To get used to working on the Mac and know its nitty-gritty we have below listed the 15 things that you must know about the system:
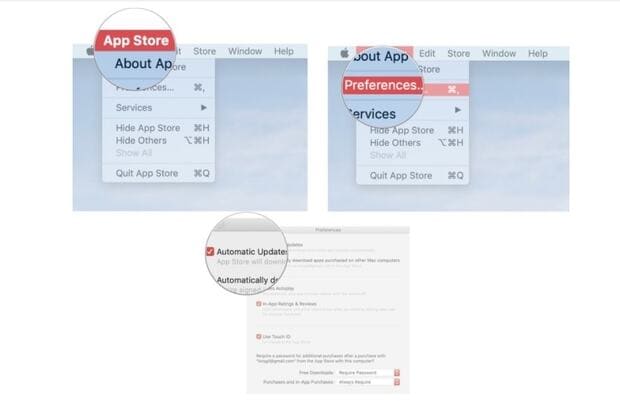
1. Setting up automatic downloads:
Mac keeps releasing updates for its system from time to time to add new features and improve earlier issues. Thus, to ensure that you do not miss any of the updates you can set up for automatic downloads that will keep running in the background.
The automatic downloads on your Mac can be enabled from the Preferences section in the Mac App Store.
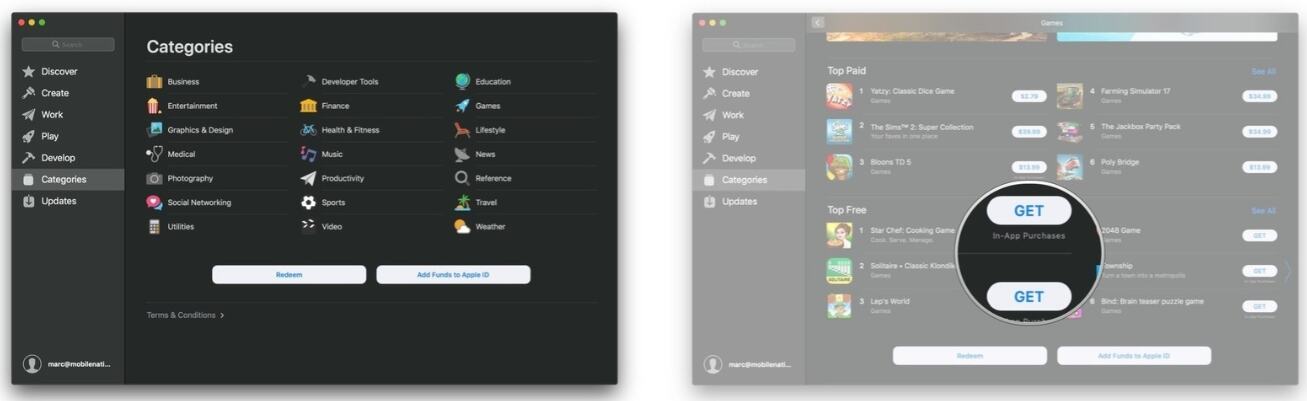
2. Apps and games download:
The app store on the Mac comes loaded with a wide range of apps in different categories including games. So, you can download productivity, utility, entertainment, or a gaming app from the Mac App Store. The downloaded app on your Mac will be available for download on all other Mac systems which are synced with the same Apple ID.
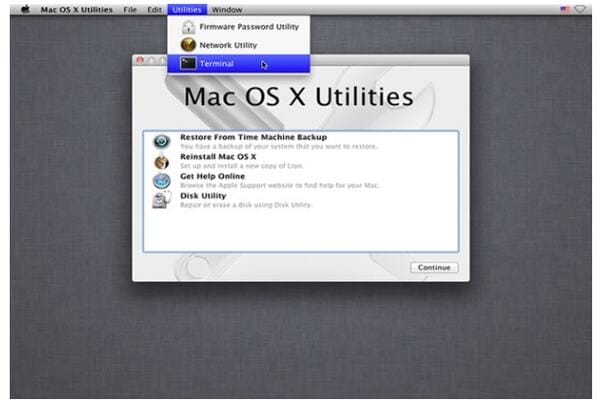
3. Bypassing and resetting the password when locked out?
If you have forgotten your Mac password then no need to worry as there are built-in ways using which you can again log into your Mac system. Both these methods are enlisted below: Recovery Mode:
Recovery Mode:
- First of all, turn off your Mac system and then press and hold the keys- Command +R and then press the power key. Keep the Command +R key holding until there is a progress bar under the Apple logo on the screen. When you see the progress bar it means that your system is now in the Recovery Mode.
- Next, from the Menu bar select Utilities > Terminal and a pop-up window will open. Here type the work "resetpassword" as one complete work and then click on the Return button.
- Now close the Terminal window and the Reset Password Tool will now appear. Here, all the user account list on your Mac will appear. You can now reset the password (resetting password for your account means setting a new password for all others as well).
Apple ID method:
- On your Mac, if you have entered the wrong password multiple times, you will be asked if you want to reset it using the Apple ID. Alternatively, you can also click on the question mark icon at the password tab and then the arrive icon to reach the same process
- Next, type your Apple ID email as well as the password. There will be an alert to bring to your notice that there will be a new keychain for storing the password that is created. Click on the OK button to confirm.
- As you follow the remaining prompts as said, you will be successful in creating a new password for your account.
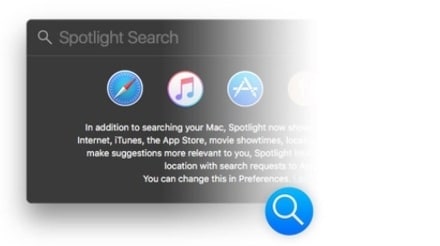
4. Activating Spotlight for searching:
Spotlight is a very useful and powerful feature of Mac that is a built-in search program that helps you find anything from the files, folders, apps, emails, and other content on the system as well as the web. To activate or open the Spotlight, you can either click on the Command + space buttons on your keyboard or tap on the magnifying glass icon present at the top-left of the menu bar. Spotlight can also be used as a calculator, currency converter, and several other tasks.
5. Setting up a backup plan for the Mac:
After the clean installation on the Mac is done, the next important step is to create a robust backup plan. Here we suggest "3-2-1 backup strategy" as the best plan that will provide the complete protection of the data. Data protection with backup allows quick restoring of the Mac in case of any unforeseen event or disaster. TimeMachine is the built-in app that helps to automatically backup the files of your Mac on an external HD. Third-party apps for the task are also available.

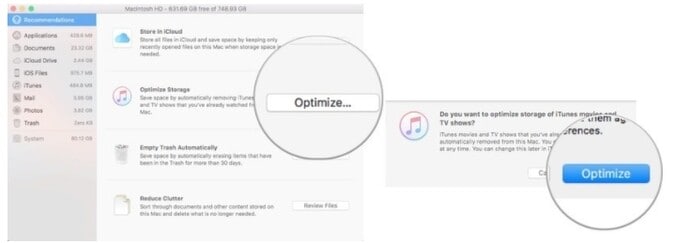
6. Setting optimized storage:
It is important to have optimized storage on your Mac for the smooth and fast working of the system. There are several solutions by Apple that help the Mac hard drive to get packed. You can follow the decluttering process and use the iCloud syncing option to keep your hard drive light.
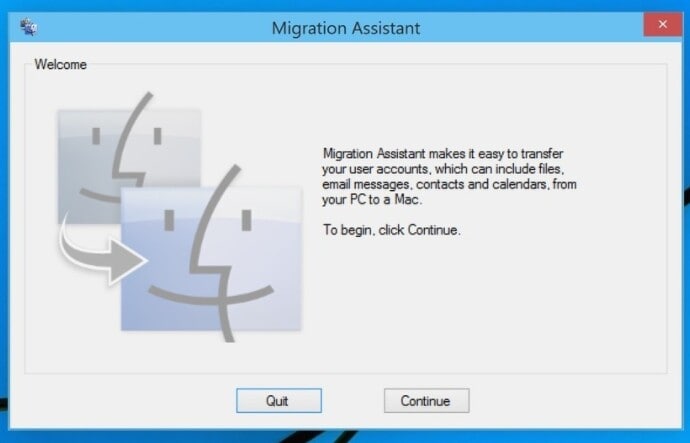
7. Migrating the files:
It is very essential to know the file migration process on the Mac to get all your data from the old system to the new Mac. Manually moving the files will not only be a cumbersome but a time-consuming task as well. Thus, to help you with the migration, Mac comes with a built-in function of Migration Assistant that helps to move the complete data from your old system to the new one.
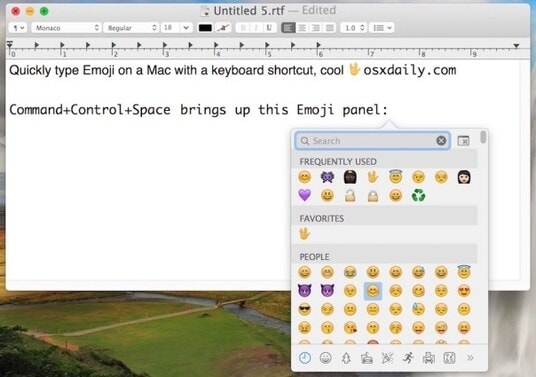
8. Typing emojis from the keyboard:
While chatting, using Google Docs or a word file, the need to insert an emoji may arise and the Mac supports typing emojis from their keyboard. To do so, expand the menu bar and select Edit > Emoji & Symbols option. A pop-up box showing the emojis will now appear and can be used as required. Alternatively, you can also open the emoji box by using the shortcut- Control + Command + Space
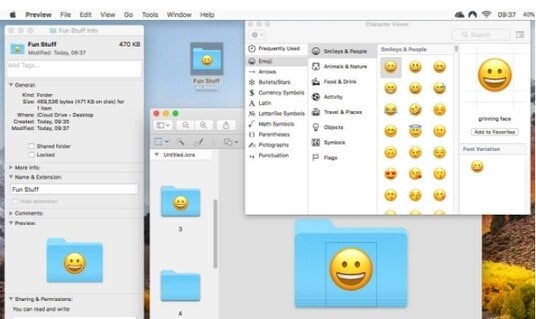
9. Turning desktop folders into Emoji:
To add a fun element to your desktop folders they can be turned into an emoji that will also make them easier to differentiate. The steps to tune a desktop folder into an emoji are as follows:
- First, your need to create a new folder on your Mac desktop by clicking File > New Folder.
- Next, search for the emoji desired from the Google Image search and then simply drag the image to the desktop.
- Next, you need to make the image as transparent and for this click on the magic wand looking markup icon and then tap on the image background, and moving outlines will appear around it. Hit on the Edit > Cut.
- Again, click on the markup icon and then click and drag the box around the selected emoji.
- Tap on the edit and select all. Next, press Command + C keys.
- Move back to the folder that was created on the desktop, right-click, and select Get Info option.
- Finally, at the pop-up screen hit on the blue folder icon and then press the keys- Command +V and your emoji will now be there.
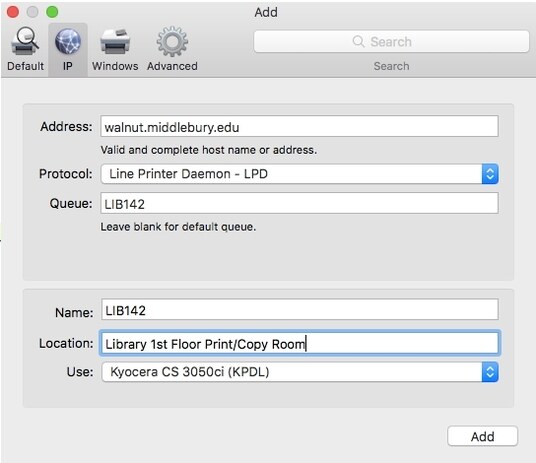
10. Connecting printers and other peripherals
To work smoothly on a Mac system, several peripherals like printers, keyboard, mouse, trackpad, and, more are required and if you a new owner of the Mac system, you should know how to connect the printer and other peripherals so that at the time of the need, you can quickly connect.
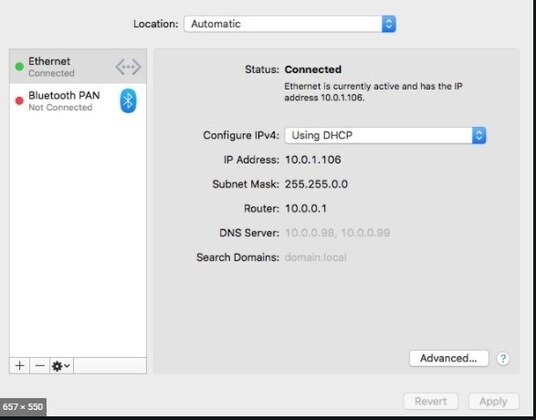
11. Checking internet connection:
For installation, setup, and all other major tasks on your Mac, an internet connection is required. So, while starting working with the Mac, check for the available connection and also keep its password ready.
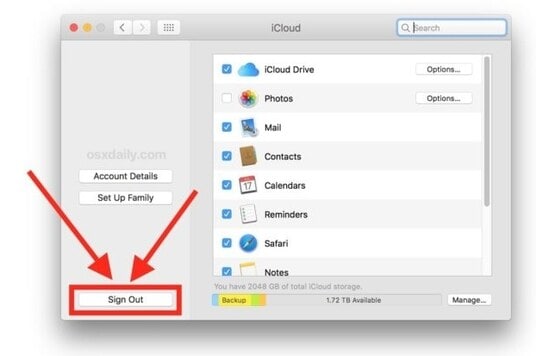
12. Setting iCloud and associated apps:
iCloud is one of the most used features that allows storing information not only on the Mac but all Apple devices. So, if any changes are made in any of the iCloud-based apps, they will be reflected across all the Apple devices like Mac, iPhone, and iPad. So, to work with iCloud and the apps associated with it, you need to select the services that you want for the iCloud from the System Preferences in the Apple menu.
Here you need to remember that Apple provides only 5GB of free iCloud space. If you have large data and requires more storage purchased as needed.
13. Setting up email and calendar:
Setting up the built-in mail and calendar app on the Mac device is important because many programs use these built-in apps as a jump-off point for data syncing. Moreover, if you are even using a third-party calendar or mail app, the synced built-in apps will come to your rescue in case of unforeseen events when third-party apps do not work.
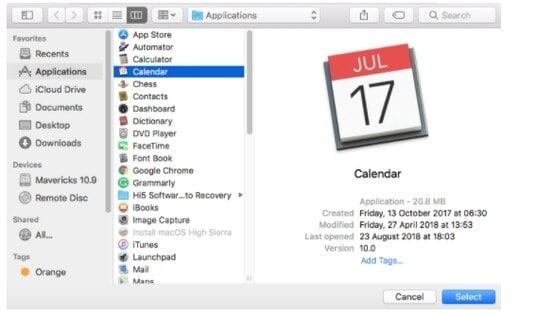
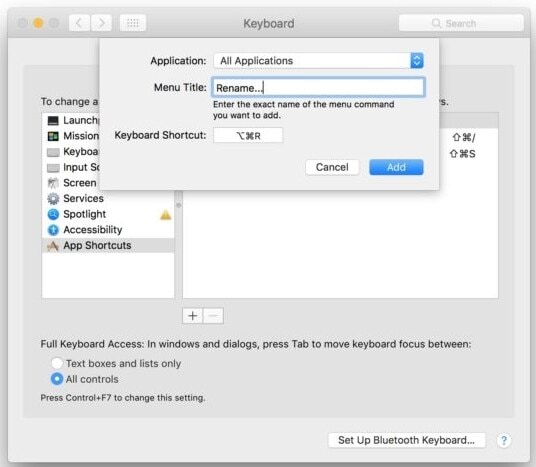
14. Creating shortcuts for various tasks
Mac has several keyboard shortcuts like Command +C for copy, Command +V for paste, and others that are widely used. In addition to these, you can even create your shortcut for various tasks and for accessing menu options. Steps for creating shortcuts are as follows:
- Open System Preferences > Keyboard> Shortcuts > App Shortcuts and then tap on the + icon.
- A pop-up box will open where you need to select the app or the menu command and then choose the keyboard shortcut as desired.
- Finally, click on the Add button and the shortcut will be created.
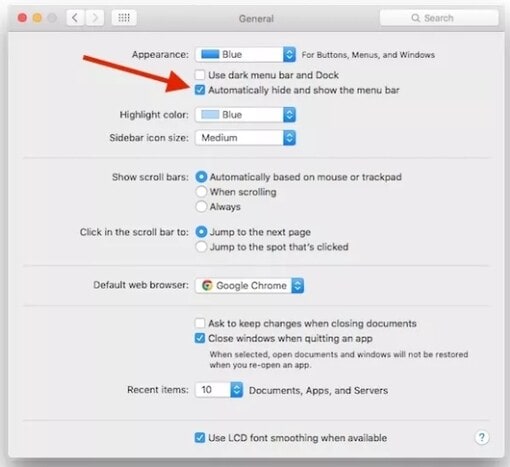
15. Hiding and customizing the menu bar:
On your Mac system, you can hide your menu bar if not required and you can even customize it as needed. To hide the menu bar, go to System Preferences > General and then tap on Automatically hide and show the menu bar option.
Menu bar customization can be done where you can move the icons to different places or can also remove them. Hold the Command button and then drag the icons to the desired location.
Once you learn the above essentials, working on the Mac will become quick and easy.
Your complete video toolbox

Other popular Articles From Wondershare

Kayla Morrison
staff Editor