

To remove flicker from video, you can use a desktop editor, an online tool, or a mobile app. Desktop tools are best for precise correction, online tools work well for quick fixes, and mobile apps are ideal for light edits on the go. Each method reduces flicker caused by lighting or frame rate issues and improves visual stability.
Video flicker usually appears as subtle or rapid brightness shifts, often caused by mismatched frame rates (50Hz vs 60Hz), LED lighting, or incorrect shutter speed during recording. It can make otherwise good footage look distracting or unprofessional.
The good part is, you don't need advanced editing skills to fix it. With the right approach and tool, you can remove flicker from video and restore smooth, consistent visuals in just a few steps.
Part 1: What Causes Video Flicker and How to Avoid It During Recording?
Video flicker is caused by inconsistent light capture between frames, usually due to mismatched camera settings or unstable light sources. You can avoid it by matching your frame rate and shutter speed to the local power frequency and using flicker-free lighting.
Common Causes of Video Flicker
Frame rate mismatch (50Hz vs 60Hz): If your camera's frame rate doesn't align with the power frequency in your region, lights can appear to pulse or flicker on video. This is especially common when shooting indoors under artificial lighting.
Shutter speed issues: Using a shutter speed that isn't synced with the lighting frequency can lead to uneven exposure across frames. As a result, the video may show subtle brightness shifts or noticeable flickering.
LED and fluorescent lighting (PWM flicker): Many LED and fluorescent lights rapidly switch on and off due to pulse-width modulation. While this isn't visible to the human eye, cameras can detect it, especially under certain shooting conditions.
Slow motion recording: When you record in slow motion, higher frame rates can make flicker more visible. This is because the camera captures more frames per second, increasing the chances of detecting light fluctuations.
Avoid Video Flicker While Shooting
Match your frame rate to your region: Choose a frame rate that aligns with your local power frequency. For example, 25 fps or 50 fps works better in 50Hz regions, while 30 fps or 60 fps is more suitable for 60Hz regions.
Set an appropriate shutter speed: Try to keep your shutter speed consistent with your frame rate. A common approach is to follow the 180-degree rule, which helps maintain natural motion and reduces flicker.
Use stable, flicker-free lighting: Whenever possible, rely on natural light or use high-quality lighting designed for video recording. Cheaper or inconsistent light sources are more likely to introduce flicker.
Avoid mixing different light sources: Combining natural and artificial lighting can create uneven light patterns, which may result in flickering in your footage.
Test your setup before recording: Record a short test clip and review it to catch flicker early, so you can adjust your settings before filming the full video.
Part 2: How to Remove Video Flicker for Free?
You can remove video flicker for free using online tools, desktop software, and mobile apps that help reduce brightness fluctuations and improve visual consistency. While some tools offer automatic fixes, others require manual adjustments, and the results may vary depending on the severity and cause of the flicker.
How to Remove Video Flicker Online?

Kapwing is a browser-based video editor that combines AI tools with basic editing controls, making it a practical option to remove flicker from video online for free. While it doesn’t include a dedicated one-click deflicker feature, you can reduce video flicker by adjusting brightness, contrast, and exposure, and by trimming or stabilizing inconsistent frames. It works best for minor flicker issues, especially in content created for social media or quick publishing.
Key Features of Kapwing
Provides browser-based editing, so you can remove flicker from video without installing software.
Includes brightness, contrast, and exposure adjustments to help reduce visible flicker.
Offers AI-powered tools like auto-subtitles, smart cut, and background cleanup alongside editing.
Supports timeline and transcript-based editing, making it easier to identify and fix problematic sections.
How to Remove Video Flicker Online with Kapwing
Here is the step-by-step guide to removing video flicker online
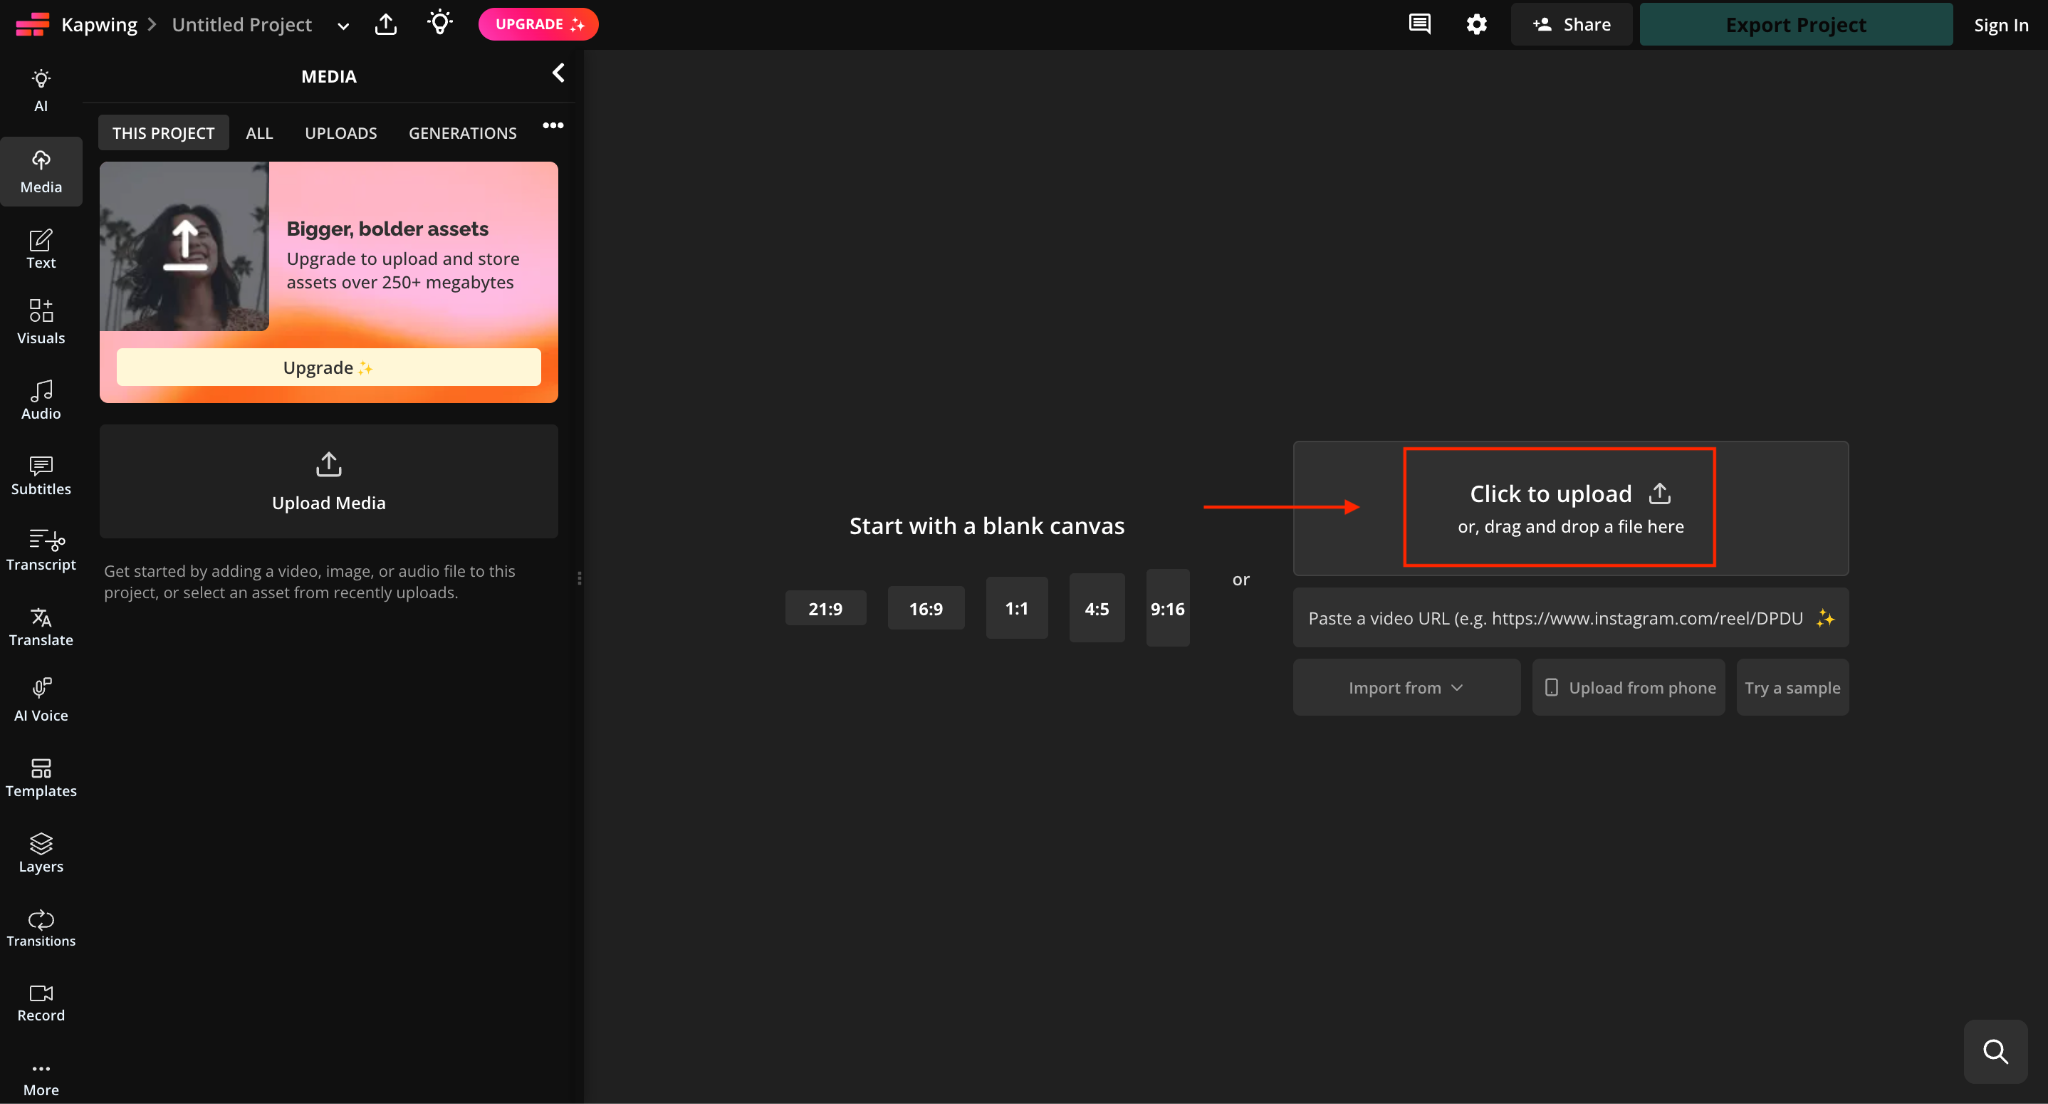
Step 1: Create an account on Kapwing, then click Upload Media or the Click to Upload option.
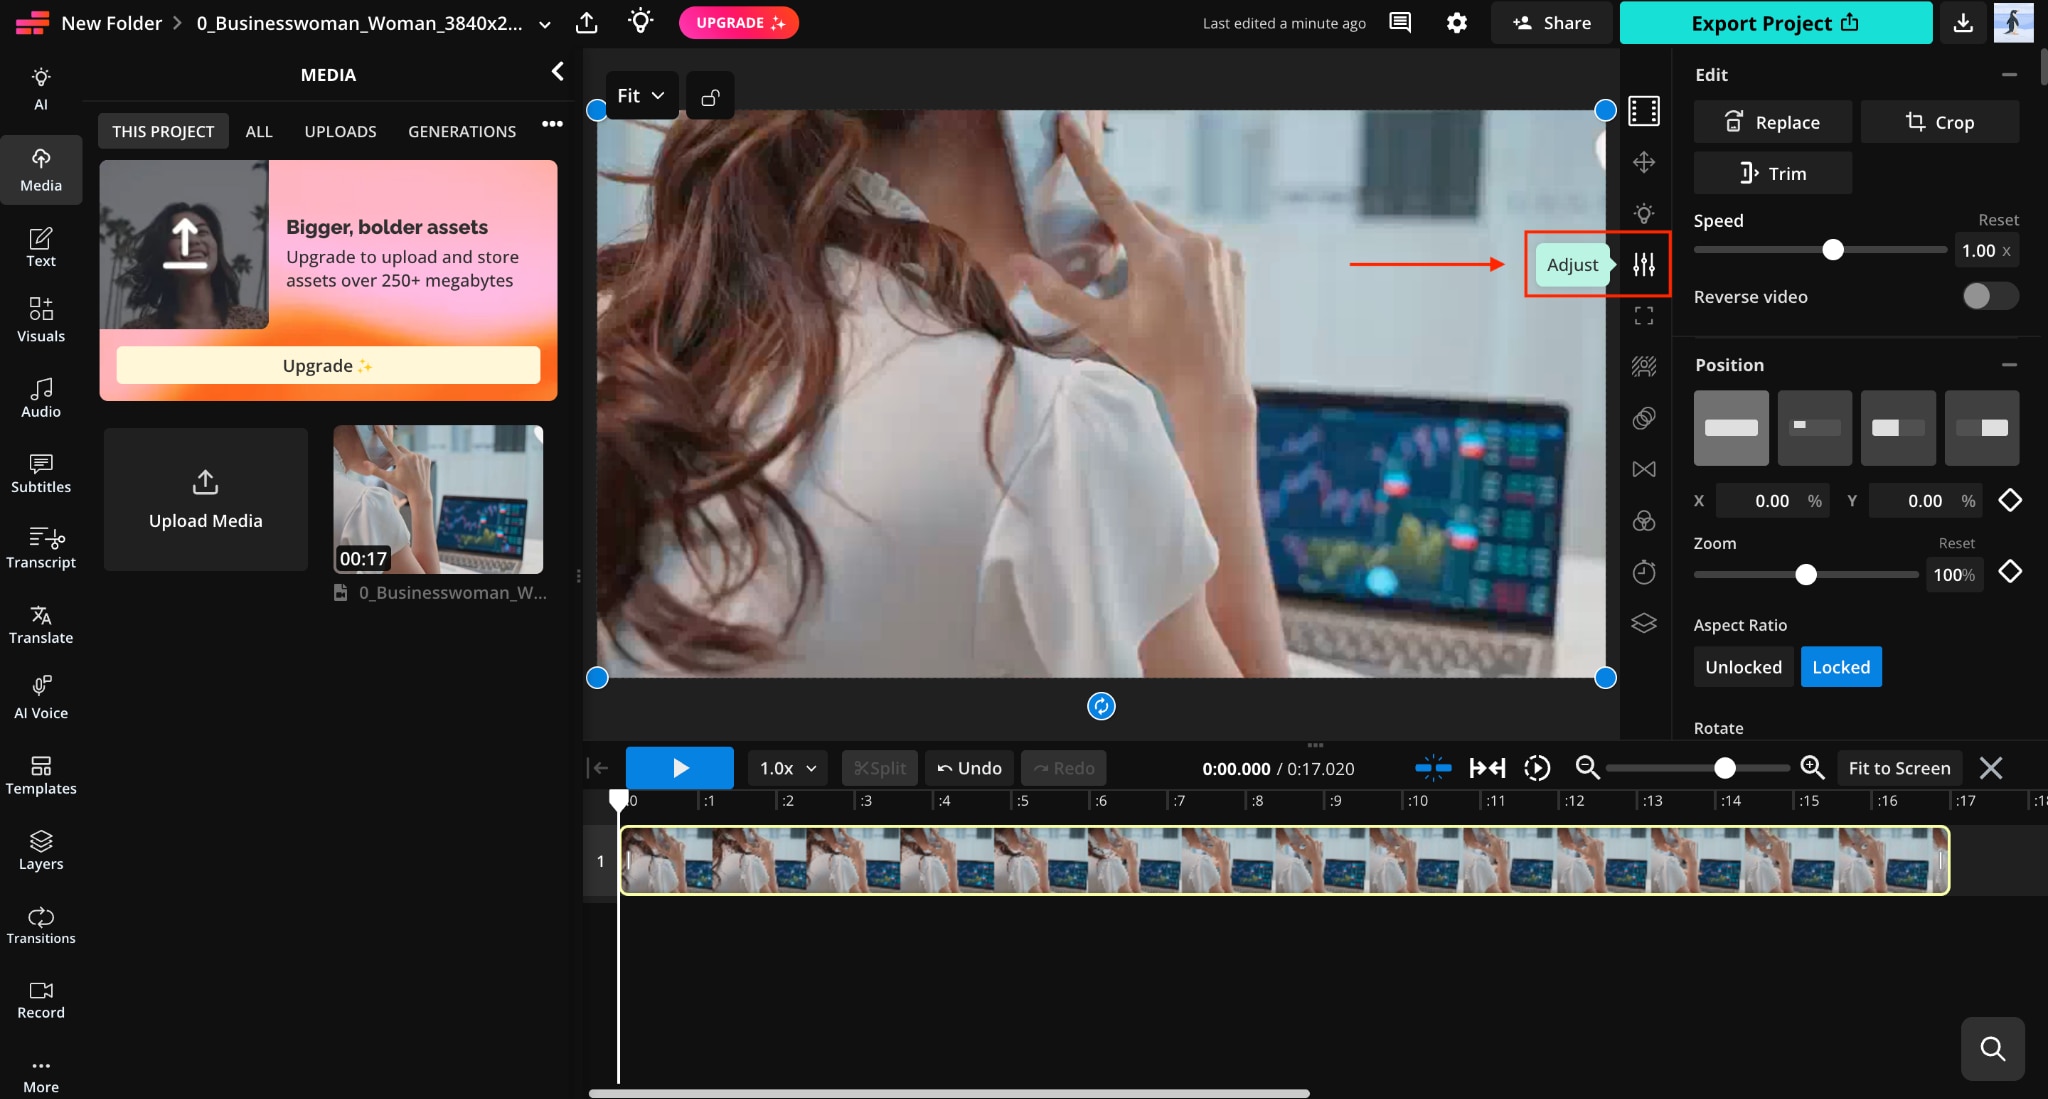
Step 2: Drag the uploaded video to the timeline, click the video, and select the Adjust option from the right-side menu.
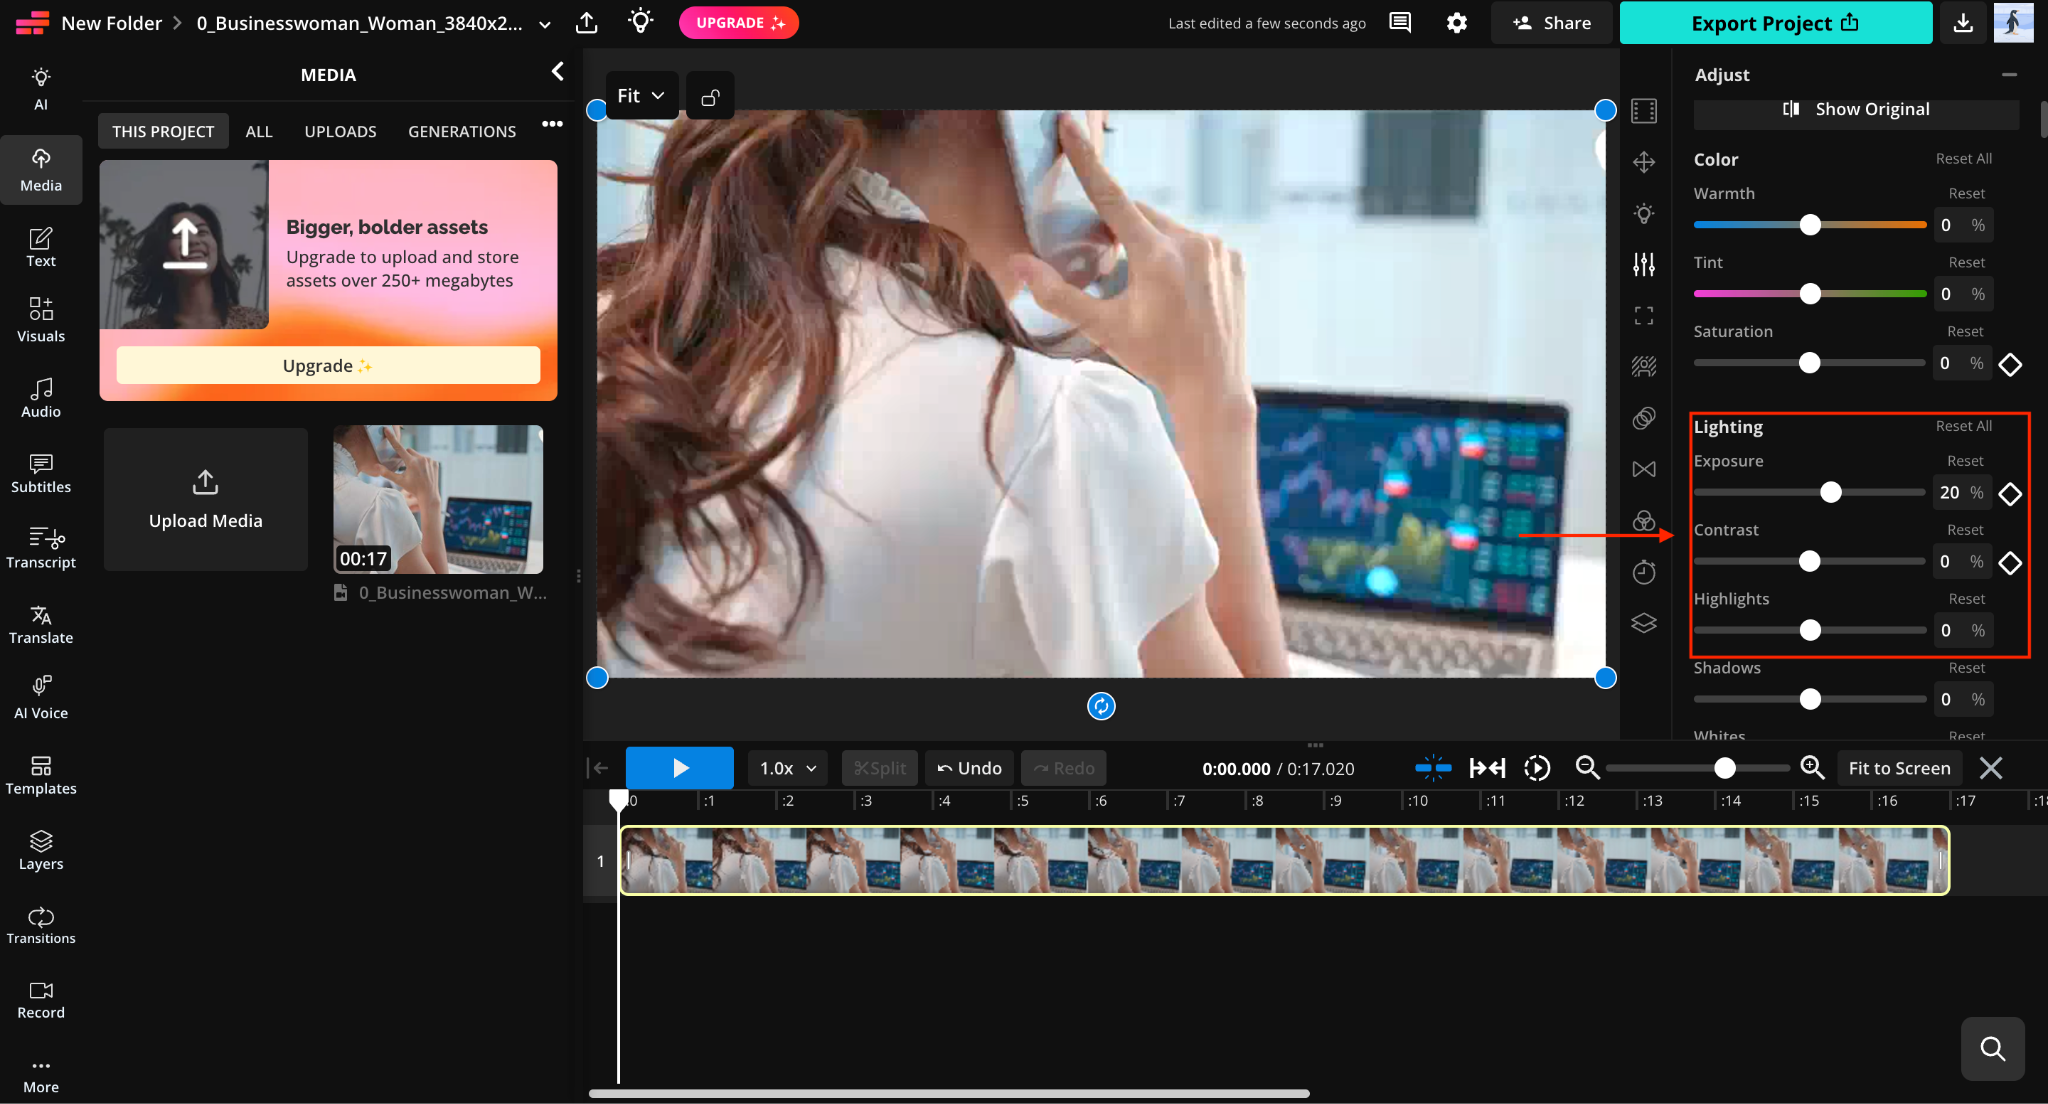
Step 3: Adjust the exposure, contrast, and highlights to remove flicker.
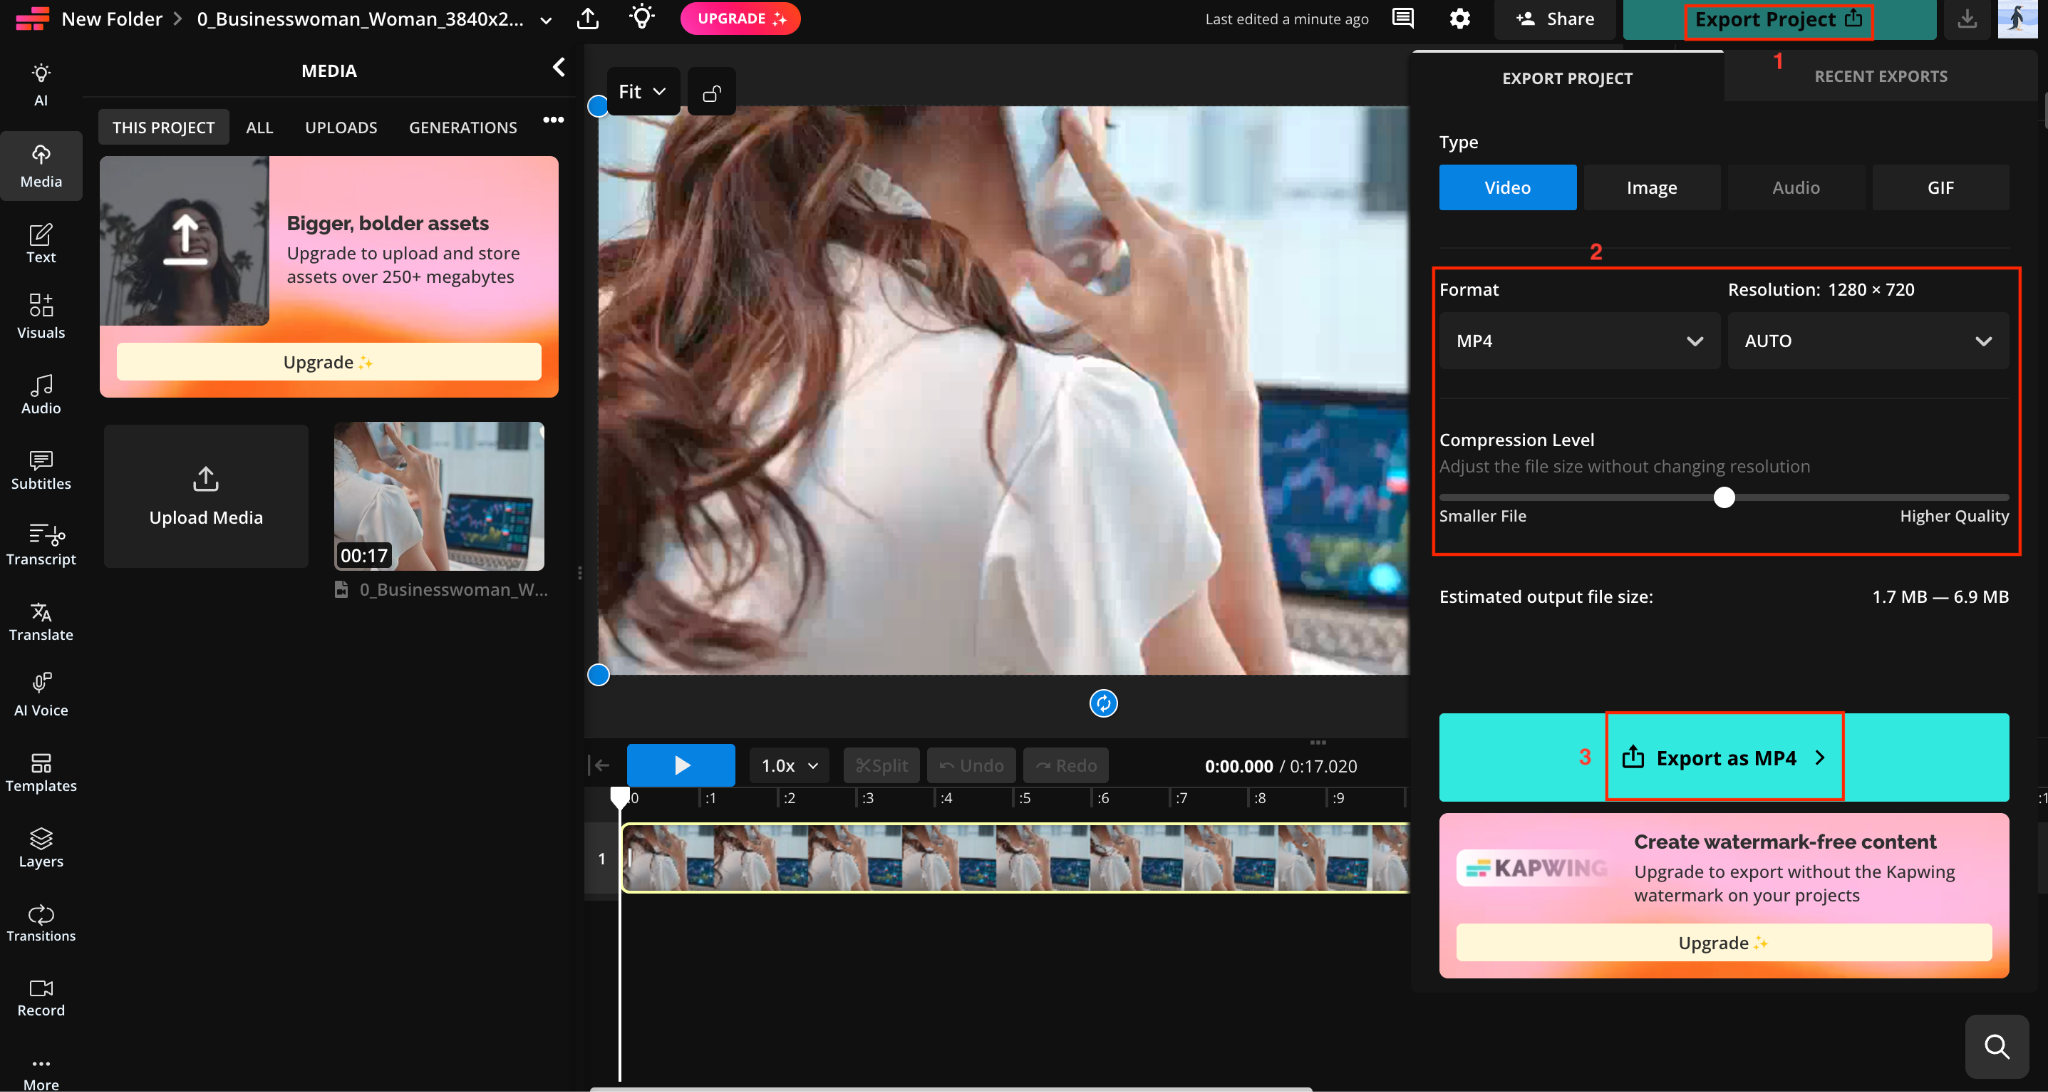
Step 4: Once done and satisfied with the results, click Export Project, choose format, resolution, and file size, and save the file.
How to Remove Video Flicker Offline [PC & Mac]?

Wondershare UniConverter includes a built-in video enhancement module that helps reduce video flicker caused by inconsistent lighting or exposure shifts. Instead of fully manual correction, it uses a slider-based adjustment system where you can set the intensity to weak, normal, or strong depending on how noticeable the flicker is in your footage. This makes UniConverter practical for users who want to remove flicker from video without dealing with complex editing timelines, especially after basic corrections or conversions.
Key Features of Wondershare UniConverter
- Works alongside AI video enhancement tools, allowing you to improve clarity while reducing flicker.
- Supports batch processing, so you can apply flicker reduction to multiple videos at once.
- Compatible with a wide range of formats, making it easy to remove flicker from video files without conversion issues.
- Integrates flicker reduction with other enhancement tools like noise reduction and resolution upscaling, so you can clean up flicker while improving overall video quality in one workflow.

All-in-One Multimedia Processing Tool
How to Remove Flicker From Video on Desktop
Follow these steps to remove video flicker offline:
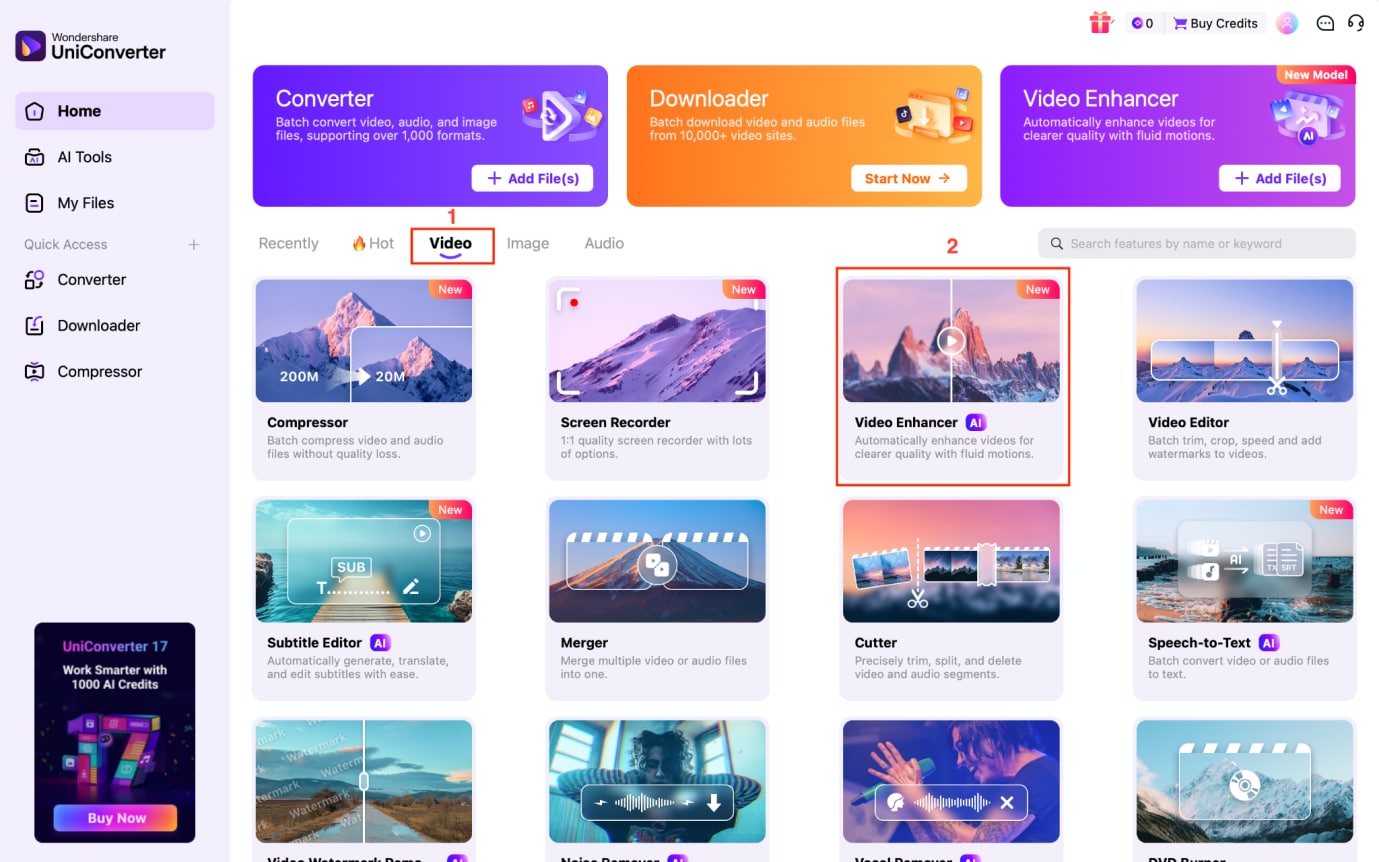
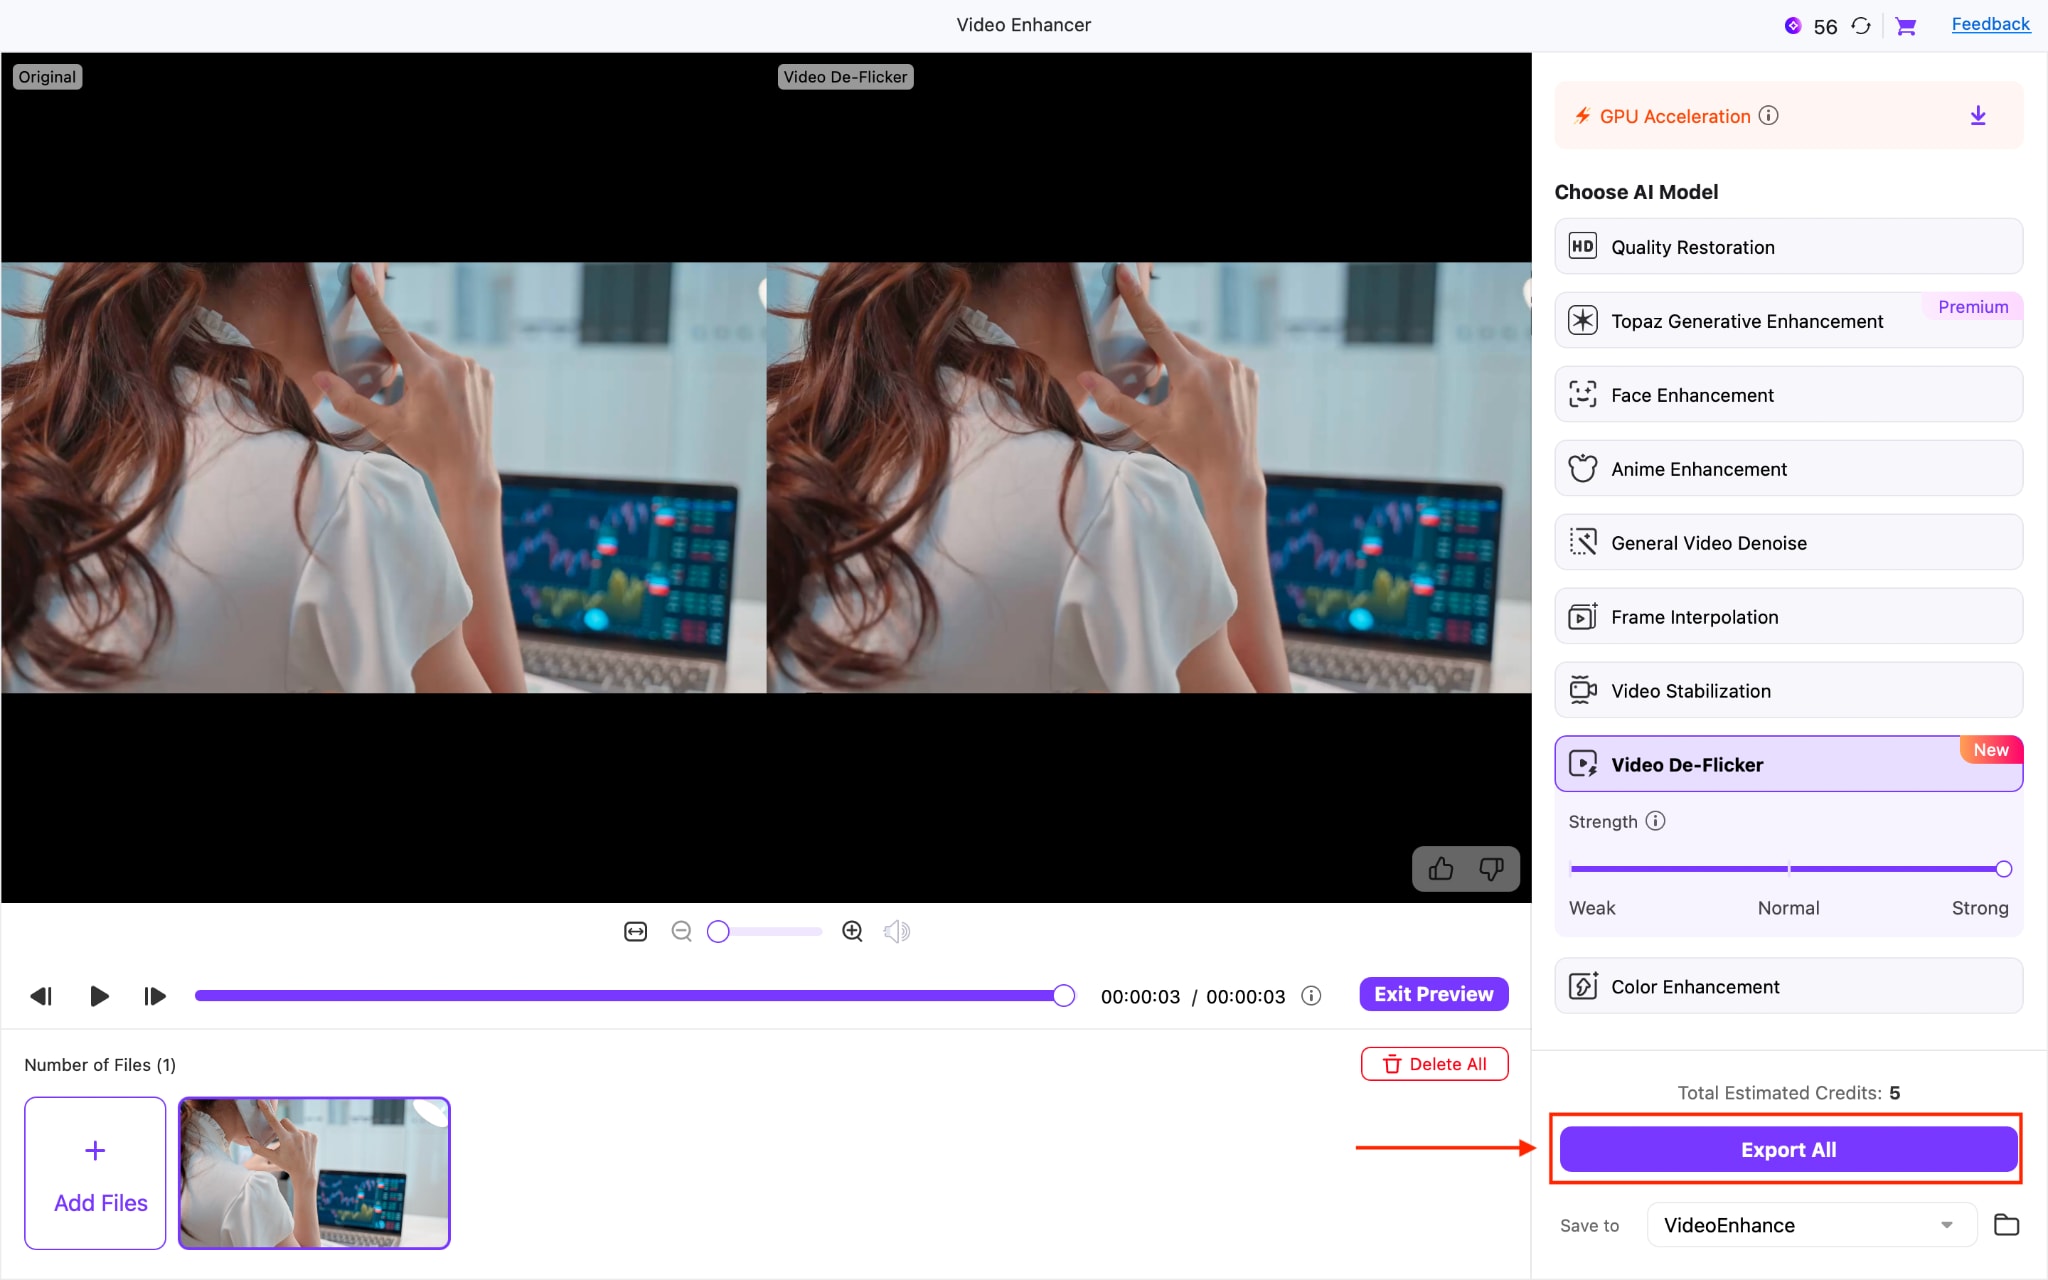
Step 1: On the dashboard, navigate to the Video section and choose Video Enhancer.
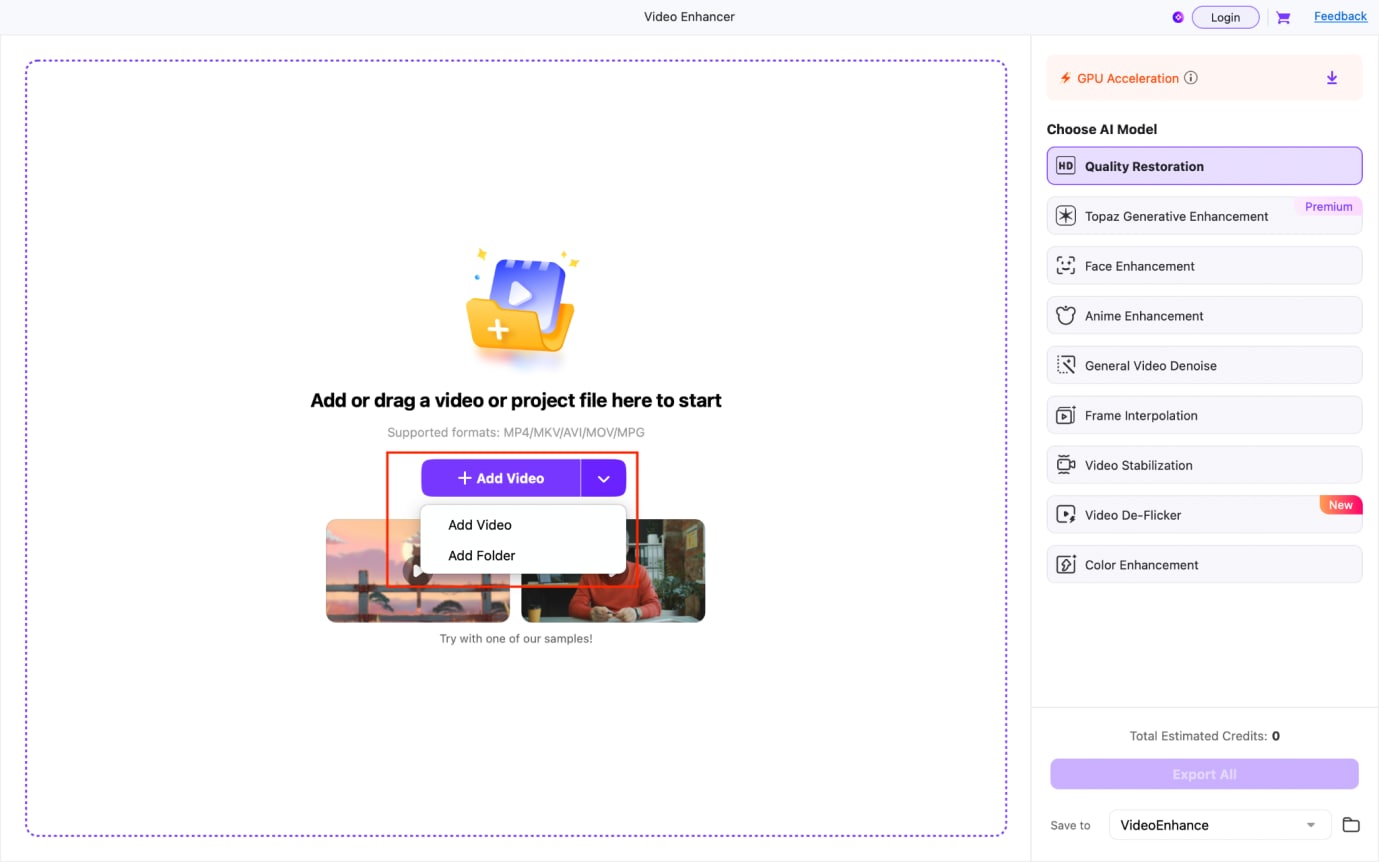
Step 2: Click the Add Video option to upload a single video file, or add an entire folder for batch processing.
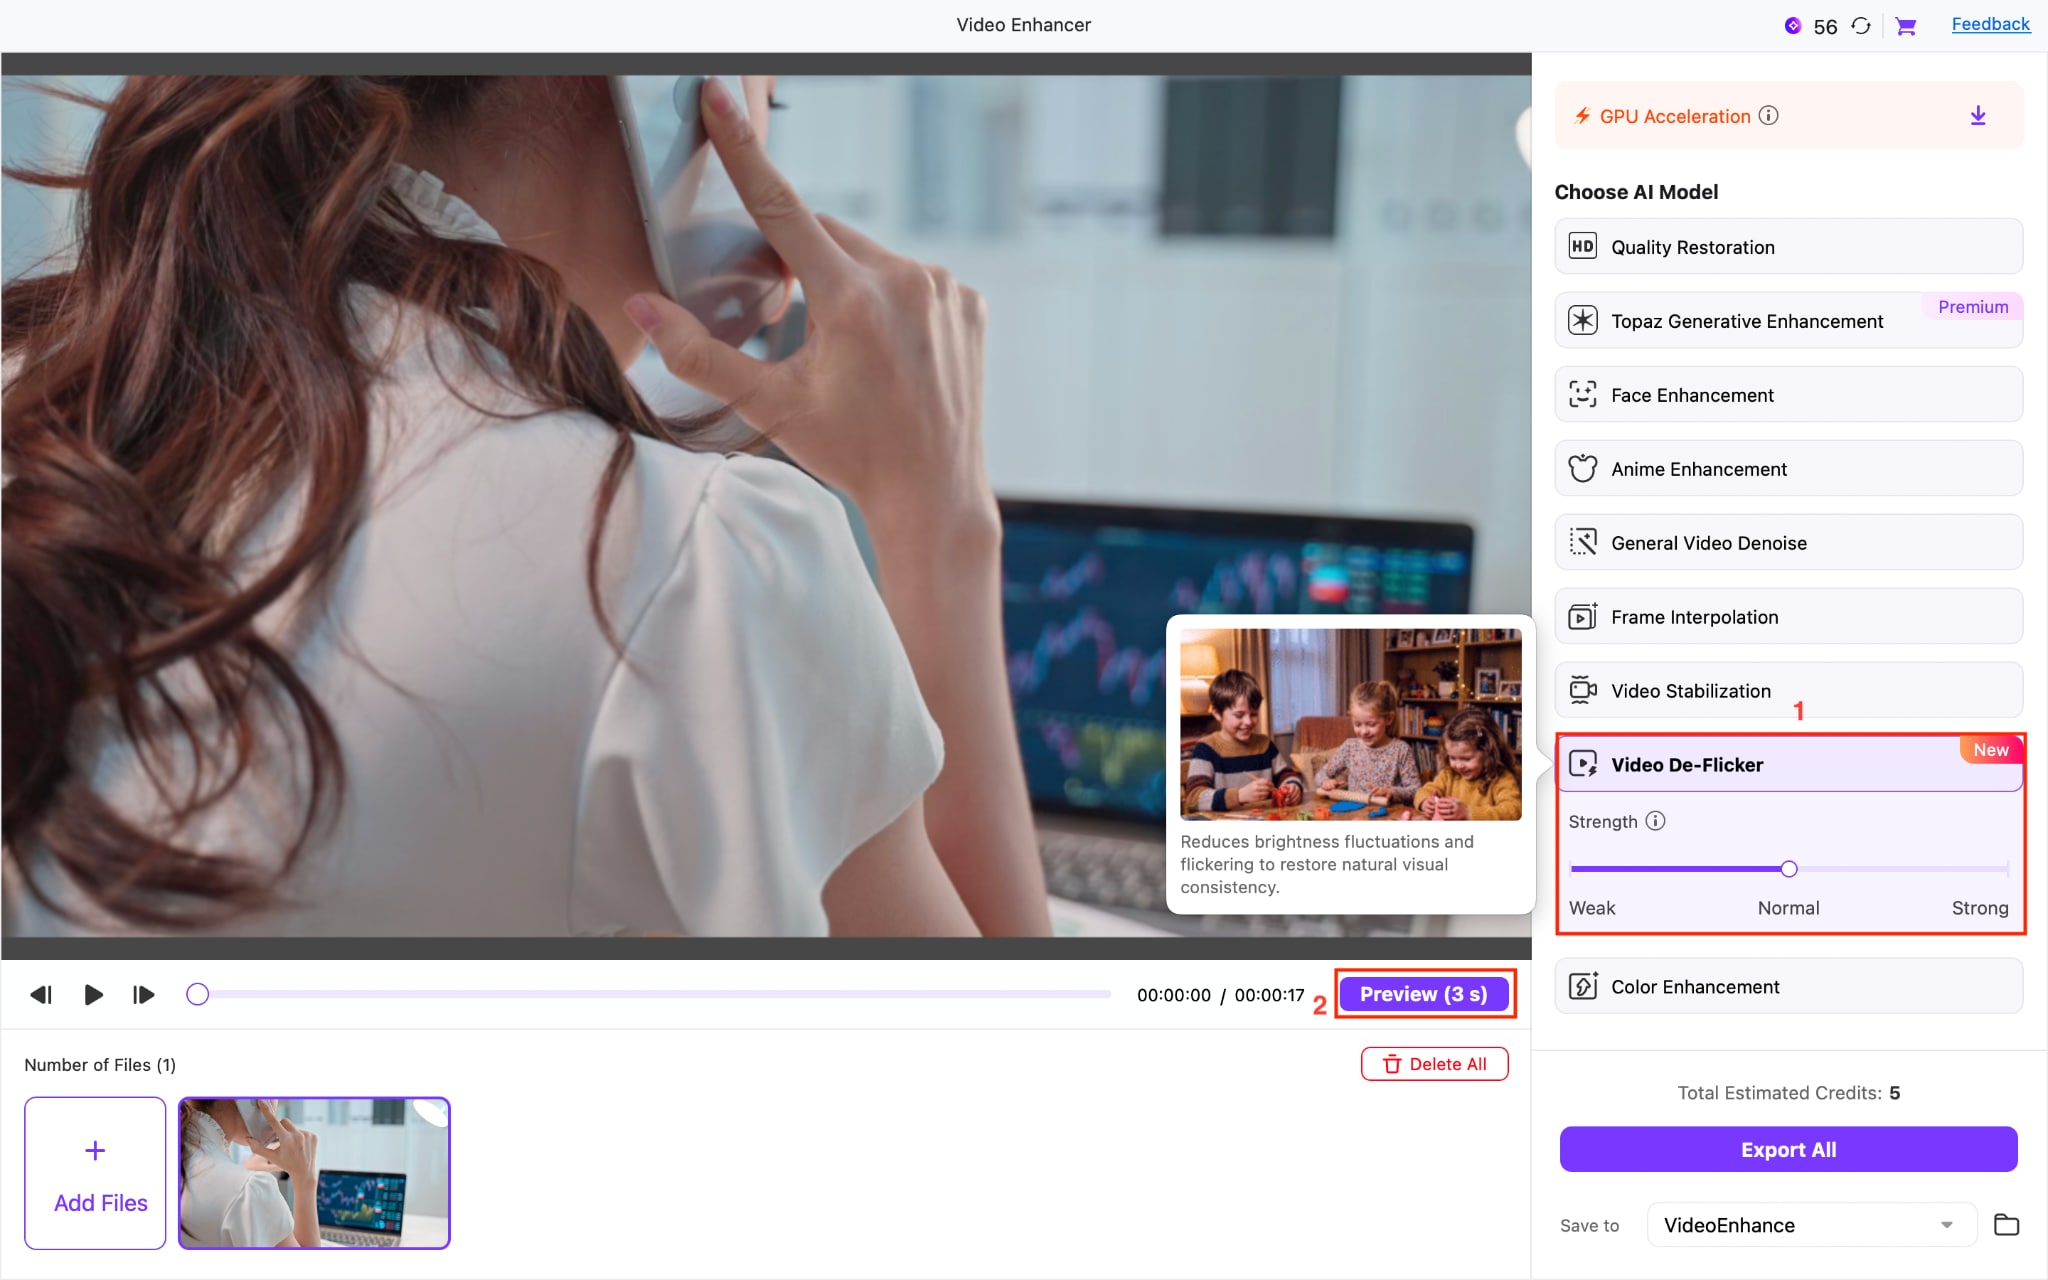
Step 3: Once you upload the file, choose the Video De-Flicker option, adjust the slider to Normal to Strong, and click Preview.
Step 4: See the results in real-time and click “Export All” to save the video.
How to Remove Video Flicker Using Mobile App [iOS & Android]

CapCut Mobile is a beginner-friendly video editing app that offers simple tools to reduce flicker and refine footage directly on your phone. While it doesn’t always provide advanced manual deflicker controls, it helps reduce visible flicker through filters, adjustments, and AI-based enhancements. It’s especially useful for short-form content where you need quick fixes without a complex setup.
However, CapCut is best suited for light flicker issues and quick corrections. It can smooth out minor brightness fluctuations, but for heavy or persistent video flicker, it may not deliver precise results. In such cases, desktop software is a more reliable option for accurate and controlled flicker removal.
Key Features of CapCut
Includes filters and adjustment tools that help reduce brightness fluctuations and smooth out flicker
Offers timeline-based editing, so you can apply changes to specific parts of your video
Provides AI-powered enhancements to improve overall video quality alongside flicker reduction
Allows easy frame selection, so you can capture screenshots directly from your video
How to Remove Flicker From Video With CapCut Mobile App
Follow these steps to remove video flicker for free with your mobile app:
Step 1: Click the New Video option, then upload the video file.

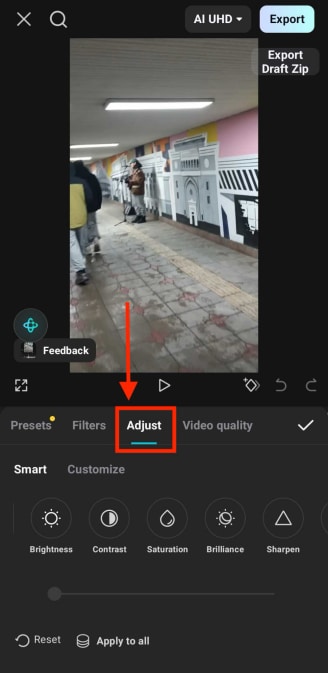
Step 2: Select the video clip on the timeline, then in the bottom toolbar, scroll right and click Adjust.
Step 3: In Video quality, select Remove flickers.
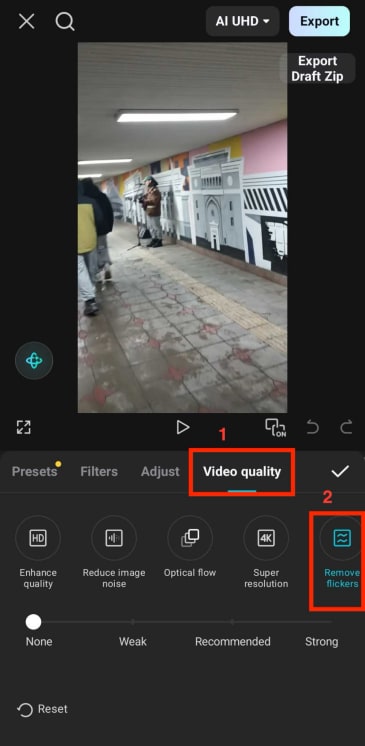
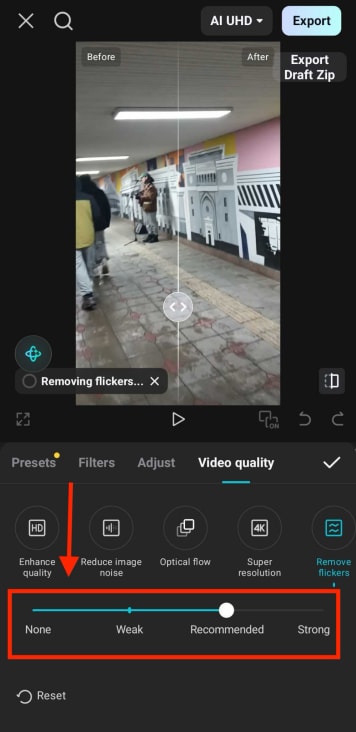
Step 4: Adjust the intensity (through the slider) according to your requirements and press the tick button.
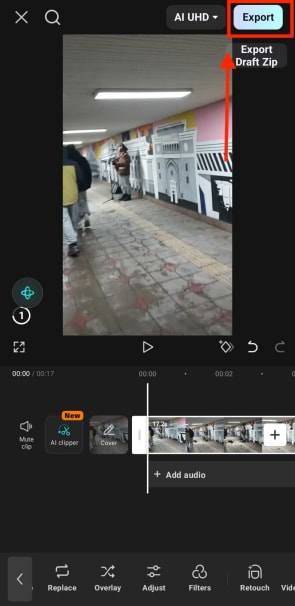
Step 5: Once done, download the video using the Export option at the top-right.
Part 3: Online vs. Desktop vs. Mobile: Which Video Flicker Method to Choose?
To remove flicker from video, the right method depends on your footage quality, editing needs, and the level of control you want over the final output. Online tools are quick, desktop software offers precision, and mobile apps are best for fast fixes on the go.
| Method | Best For | Skill Level | Main Strength | Main Limitation | Output Quality |
| Online Tools | Quick fixes for short clips | Beginner | No installation, fast and easy to use | Limited control, not ideal for heavy flicker | Moderate |
| Desktop Software | High-quality editing & control | Beginner to Pro | Precise flicker removal and advanced adjustments | Requires installation and higher system resources | High |
| Mobile Apps | Social media and quick edits | Beginner | Convenient, fast workflow on the go | Less accurate for strong flicker issues | Moderate to Good |
Online tools work well when you just need to remove flicker quickly without dealing with complex settings. They're convenient but can struggle with heavy flicker or large files.
Desktop software is the most reliable option for removing flicker from video, especially when the issue is caused by lighting or frame inconsistencies. You get more control over correction strength and output quality.
Mobile apps sit in the middle. They're useful for quick edits, especially for reels or short clips, but they usually don't offer the same level of precision as desktop tools.
Part 4: Tips to Prevent Video Flicker While Shooting
The easiest way to remove flicker is to avoid it in the first place. A few small adjustments while recording can save a lot of time on editing later.
Match your camera settings to the environment: Always align your frame rate with the local power frequency. This simple step reduces the chances of capturing flicker from artificial lights.
Keep your shutter speed consistent: Avoid experimenting too much with shutter speed in artificial lighting. Stick to values that naturally sync with your frame rate to maintain stable exposure.
Be careful with indoor lighting: Not all lights are camera-friendly. Some LEDs and fluorescent lights can introduce flicker, even if they look fine to your eyes.
Avoid mixing lighting sources: Shooting under both natural and artificial light can create uneven exposure patterns, making it harder to remove flicker later.
Test before recording important footage: A short test clip can reveal flicker issues immediately. It's a simple step, but it helps you fix problems before they affect your final video.
Getting these basics right ensures you won't have to rely heavily on tools to remove flicker later, and your footage will already look clean and stable.
Conclusion
To remove flicker from video, the best method depends on your editing needs and the severity of the issue. Online tools are suitable for quick fixes and short clips, especially when you want a simple, no-installation solution. Desktop software is the most effective choice for precise flicker correction and consistent output, particularly for longer or higher-quality footage. Mobile apps are ideal for fast, lightweight edits, helping reduce minor flicker in social media content.
Choosing the right approach comes down to how much control you need and the quality you expect from the final result. For best outcomes, match the method to your use case, whether it is quick edits, detailed corrections, or on-the-go adjustments, so you can improve visual stability without unnecessary complexity.

