Video content significantly boosts marketing, entertainment, and communication strategies.. However, many artists and professionals need help with video quality, mainly when working with lower-resolution video. Here is where video upscaler—using cutting-edge algorithms—helps improve your recordings' quality and sharpness. The six best artificial intelligence video upscalers that are accessible will be discussed in this post, together with their main advantages and characteristics. These videoupscaler tools will enable you to produce unique outcomes quickly, whether your goal is to upgrade your company's visual material or increase your video archive.
Choosing the best AI video upscaler depends on more than resolution claims — factors like output stability, and data safety play a key role.
- For a stable, batch-capable solution, Wondershare UniConverter offers an AI video upscaler designed for consistent quality enhancement, secure local processing, and efficient handling of multiple files.
- For cloud-based or professional workflows, tools like Pixop, Final Cut Pro, and Topaz Video AI provide advanced upscaling options, often with higher system requirements or steeper learning curves.
- For everyday creators, Movavi, VideoStudio Pro, and Vmake AI deliver accessible AI upscaling with varying levels of automation and control.
Overall, the best AI video upscaler balances quality, efficiency, and reliability based on your workflow needs.
In this article
Part 1. What is the best AI video upscaler?
In this part, we shall explore the top AI video upscaler now on the market. These instruments are unique in their ability to improve video quality. Thus, they are indispensable for producing content and hoping for professional-looking outcomes.
1. User-friendly interface: The tool should feature an intuitive design that allows users to navigate the platform with ease, regardless of their experience level. Even non-technical users should be able to apply video enhancements quickly and efficiently without needing a steep learning curve.
2. High-quality detail processing: A key feature of the best AI video upscalers is their ability to enhance resolution while preserving critical details, ensuring that the video remains sharp and natural. They must also prevent common issues like blurring or distortion that can occur during the upscaling process.
3. Fast processing speed: Efficient upscalers minimize rendering times, allowing for quick improvements without sacrificing video quality. This is especially important for professional projects where deadlines are tight and large amounts of data must be processed rapidly.
4. Support for various formats: The best tools can work with a wide range of formats, from MP4 to AVI, ensuring compatibility for different project requirements. This flexibility is crucial for content creators who work with diverse sources and need a tool that can handle them all seamlessly.
5. Customization options: Advanced controls over contrast, brightness, and saturation give users the freedom to adjust videos to meet their specific visual goals. This feature allows for fine-tuning that goes beyond basic upscaling, helping users create a polished, professional result.
Part 2. Top 7 AI video upscalers to enhance video quality
1. UniConverter
UniConverter is a powerful AI video upscaler designed to deliver exceptional video quality enhancements with ease. This flexible tool not only improves video resolution but also offers support for various video formats and customization options such as adjusting brightness, contrast, and saturation. It provides high-quality detail processing to maintain sharpness and clarity, along with fast processing speeds for efficient rendering. UniConverter also comes with additional features like noise reduction, video stabilization, and the ability to adjust frame rates, making it a versatile option for video upscaling and editing.

Best Video Quality Enhancer
Key Features:
● Handles MP4, AVI, MOV, MPG, and more.
● AI algorithms maintain sharpness and clarity.
● Easy navigation for all skill levels.
● Quick rendering without quality loss.
Step to using UniConverter's video enhancer
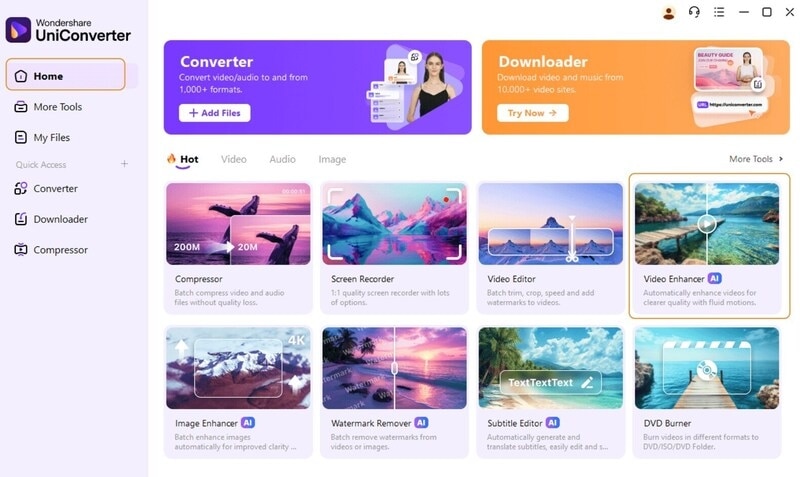
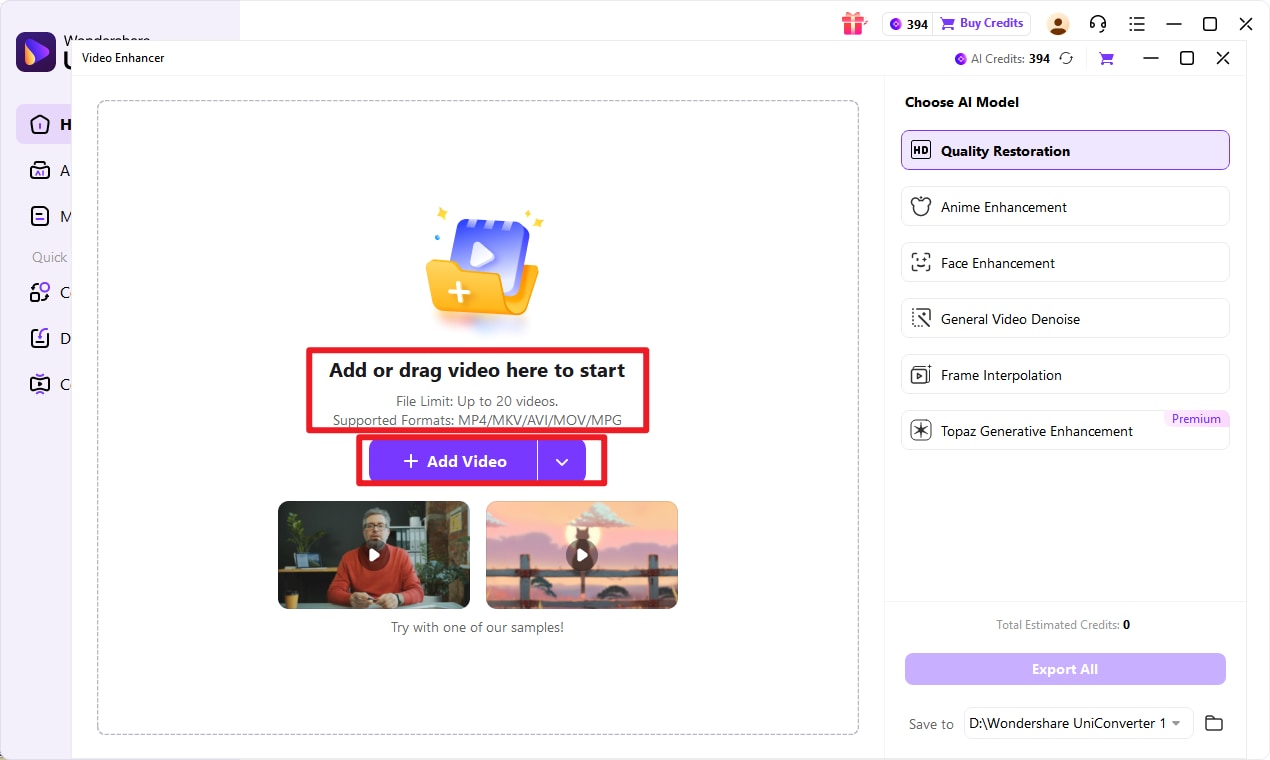
Step 1: Access UniConverter and upload your video
Navigate to the UniConverter website and login or create a new account. Click "Add Files" to upload your video, or drag and drop it into the upload area. Ensure your video is in a supported format like MOV, MP4, AVI, or MPG for smooth processing.


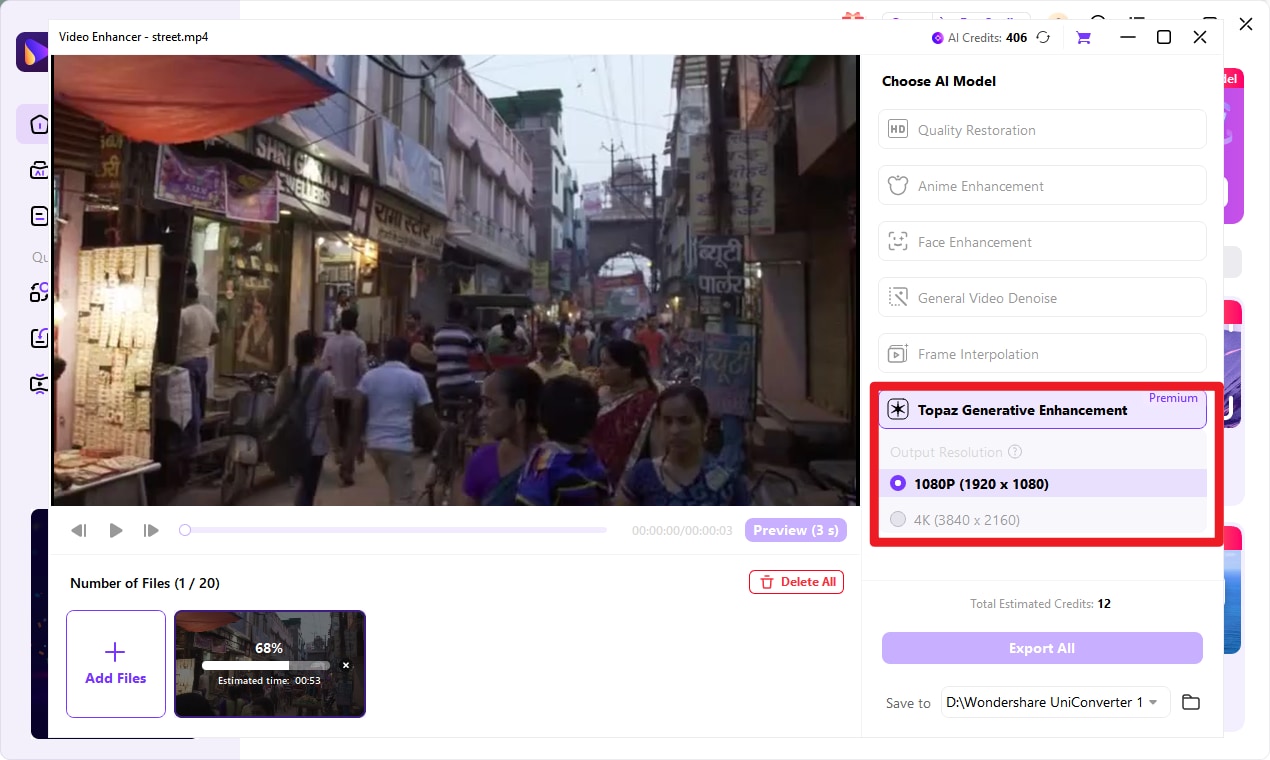
Step 2: Select enhancement settings
After uploading your video, select a resolution for upscaling, such as 2x or 4x. Use UniConverter's Denoiser to reduce background noise and Frame Interpolation to add extra frames for smoother motion. Preview the adjustments in real-time to ensure the changes meet your expectations before finalizing.

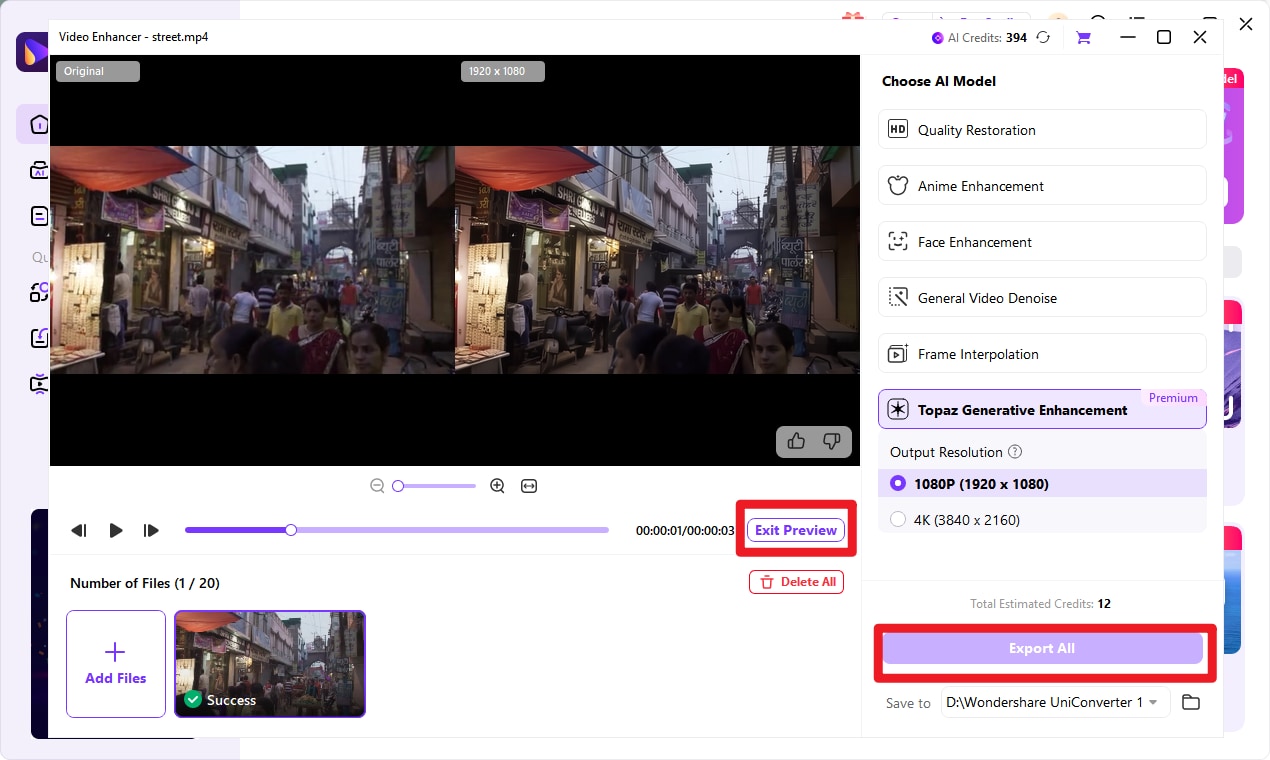
Step 3: Preview, upscale, and export
Once you're satisfied with the adjustments, start the upscaling process. UniConverter will apply the enhancements efficiently, with processing time varying by video length and settings. After completion, download your upgraded HD video, now featuring enhanced resolution and clarity, ready for sharing or further editing.

Tips : You can also choose Topaz Genenerative Enhancement model which has integrated Topaz video enhancer API, which offers a more versatile and more professinal visual effect. AI credits can be used to activate the Topaz enhancer in UniConverter, which delivers noticeable gains in edge sharpness and color fidelity. See for yourself how it brings clarity and balanced color back to your content.
AI Video Upscaler for Stunning Clarity
2. Pixop
Pixop is a cloud-based AI platform that enhances and upscales digital videos from standard definition (SD) to ultra-high-definition (UHD) 8K. Its advanced machine learning algorithms provide additional features like de-blurring and de-noising to improve video quality. With a user-friendly interface, Pixop delivers professional-grade results in a straightforward, accessible process. Ideal for users seeking high-quality video upscaling without complexity.

Key Features:
● AI-powered upscaling from SD to UHD 8K.
● De-blurring and de-noising capabilities.
● Cloud-based, no local installation required.
● Simple and user-friendly interface.
● Professional-grade video quality enhancement.
Steps to use Pixop:
Step 1: Sign up and upload
Create an account on the Pixop website and log in. Upload the video files you wish to enhance directly to the cloud.
Step 2: Select settings
Choose your preferred upscaling technique and target resolution, such as 4K or 8K. You can also apply additional features like de-noising or de-blurring.
Step 3: Process and download
Start the upscaling process and wait for the system to complete the enhancement. Once finished, download the improved video to your device.
3. Final Cut Pro
Final Cut Pro offers advanced video upscaling through its AI-driven machine learning tools, ensuring high-quality resolution enhancements. It includes customizable scaling options, allowing users to upscale from HD to 4K or even 8K with precision. Final Cut Pro also features integrated noise reduction, color correction, and motion graphics capabilities to further enhance video quality. Additionally, it supports HDR grading for vibrant, lifelike images, and frame interpolation to create smooth transitions and motion.

Key Features:
● Simple video assembly's magnetic timeline.
● Modern color grading instruments for maximum visual authenticity.
● Complete audio editing powers are built right into the platform.
● Support for HDR video editing to record color and light's minutiae.
● A large selection of other plugins offering enhanced capabilities.
Steps to use Final Cut Pro:
Step 1: Import your video
Launch Final Cut Pro and import your video file into the project. Drag the video into the timeline for editing.
Step 2: Apply upscaling and adjust settings
Use the "Video Inspector" to choose your desired resolution (e.g., 4K or 8K). Customize settings like noise reduction, color correction, and HDR grading as needed.
Step 3: Export enhanced video
After reviewing the upscaled footage, export the video by selecting the appropriate format and resolution for your intended platform.
4. Movavi
Movavi Video Converter uses AI-based technology to upscale videos while maintaining high quality, supporting resolutions up to 4K. The tool offers flexible format compatibility, allowing users to convert and upscale videos from various file types like MP4, AVI, MOV, and more. With its batch conversion feature, you can upscale multiple videos simultaneously. Movavi also includes customizable settings for brightness, contrast, and saturation, as well as automatic noise reduction to improve video clarity.

Key Features:
● Supports a broad spectrum of formats for output and input alike.
● Quick conversion rates with the most minor loss of quality.
● Built-in trimming, combining, and effect-adding video editing tools
● Capacity to extract audio from movies and translate it into several forms.
● Set profiles for different devices to simplify selecting the best settings.
Steps to use Movavi video converter:
Step 1: Upload video files
Launch Movavi, click "Add Media," and select the video files you want to upscale. You can upload multiple videos for batch processing.
Step 2: Choose output settings
In the "Video" tab, select your target resolution (e.g., 1080p, 4K) and apply enhancements like noise reduction or brightness adjustment.
Step 3: Start conversion and download
Click the "Convert" button to start the upscaling process. Once finished, download your upscaled videos in the desired format.
5. Topaz
Topaz Video AI is a powerful AI-driven video editor designed for high-quality video enhancement. It offers advanced features like upscaling, de-noising, stabilization, and frame interpolation. Using cutting-edge neural networks, it intelligently preserves details while reducing noise, making it ideal for both complex landscapes and detailed portraits. The tool provides professional-grade enhancements directly on your local workstation.

Key Features:
● AI upscaling to reach 8K resolution level.
● The possibilities of noise reduction help to improve clarity.
● Tools for stabilization to fix shaky video.
● Using frame interpolation produces fluid movements.
● Easy UI is meant to streamline the editing process.
Steps to use Topaz video AI:
Step 1: Import video files
Open Topaz Video AI and add your video files by dragging and dropping them or selecting them manually. Multiple files can be processed in batch mode.
Step 2: Select AI model and resolution
Choose the desired AI model based on your video’s needs (e.g., resolution enhancement, de-noising, motion interpolation). Select the target resolution, such as 4K or 8K.
Step 3: Process and export
Start the upscaling process. Once completed, review the enhanced video and export it in the desired format and resolution.
Secure Video Upscaler Without Uploading
6. VideoStudio Pro
VideoStudio Pro is a user-friendly video upscaler designed for quick and efficient video enhancement. It allows users to upscale videos to higher resolutions with easy-to-use tools for adjusting brightness, contrast, and color correction. The software supports a wide range of formats and offers additional features like motion tracking and video stabilization, making it a versatile option for both beginners and experienced editors.

Key Features:
● Simple UI, best suited for novices.
● Robust editing instruments include multi-track timelines.
● Several imaginative filters and effects.
● 4K video editing for output at a professional level.
● Stabilizing and tracking motion aspects.
Steps to use VideoStudio Pro:
Step 1: Install and launch
Download and setup VideoStudio Pro from the official website, then open the program and create a new project.
Step 2: Import and edit
Import your media files into the timeline, and use the editing tools to arrange, cut, and apply effects, transitions, or text as needed.
Step 3: Preview and export
Preview your edited video, make any necessary adjustments, and export the final version in your preferred format.
7. Vmake AI
Vmake AI is an innovative video upscaler that uses advanced AI algorithms to enhance video quality, offering upscaling up to 8K resolution. It features tools for noise reduction, motion stabilization, and color correction, ensuring clear, high-quality output. Vmake AI supports multiple formats and provides real-time previews, allowing users to see enhancements before finalizing.

Key Features:
● AI-driven best video upscaler editing features that save labour-intensive chores.
● Clever scene tagging and detection to facilitate navigating.
● Support of several video formats and resolutions.
● Choices for customizing to improve artistic freedom.
● Integration of clouds for flawless project access.
Steps to use Vmake AI:
Step 1: Login to website
Sign up for a Vmake AI account on the official website and browse through the application on your device.
Step 2: Start and edit
Launch the program, create a new project, and upload your video for editing. Use the AI tools to enhance video quality, adjust resolution, and apply any necessary improvements.
Step 3: Save and export
After editing, finalize your changes and export the enhanced video in your preferred format.
Part 3.Quick Comparison Table of 7 AI video upscalers
7 tools listed above differ mainly in AI strength, editing depth, platform, and target users. Here comes their detailed comparison table.
| Tool | Main role | AI enhancement strength | Editing depth | Platform / access | Best for users who… |
|---|---|---|---|---|---|
| UniConverter | Converter + basic AI enhancer | Good, general AI upscaling/denoise | Moderate (trim, effects, burn, etc.) | Desktop app (Win/Mac) | Need all-in-one convert, compress, light AI enhance. |
| Pixop | Cloud AI video upscaling | Strong 4K AI upscaling, denoise, grading | Light timeline tools | Browser, cloud-based SaaS | Want pro AI quality without heavy local hardware. |
| Final Cut Pro | Pro NLE editor | Limited built-in AI; strong manual tools | Very advanced, pro-grade NLE | macOS only, paid app | Do professional editing on Mac with rich plugins. |
| Movavi | Consumer video editor | Basic AI tools in newer versions | Easy, template-driven | Win/Mac, user-friendly suite | Prefer simple editing and quick social exports. |
| Topaz Video AI | Dedicated AI upscaler/denoiser | Very strong detail, upscale focus | Minimal editing | Desktop (Win/Mac) | Need max quality AI upscaling and restoration. |
| VideoStudio Pro | Beginner–intermediate editor | Some AI-style assist (stabilize, face FX) | Full timeline, effects, 360° | Windows desktop only | Want rich effects/360° on Windows with easier UI. |
| Vmake AI | AI talking-video creator | Good AI enhance, background, cleanup | Template-based, social focus | Mobile + cloud tools | Make talking-head, social, promo videos fast with AI. |
Part 4. How to achieve maximum quality in video upscaling
Maintaining visual integrity when working with video upscaling depends on reaching the best quality result. Here, we will discuss efficient methods and best practices to guarantee your films appear their finest when upgraded for bigger sizes.
● Start with high-quality source material: Always begin with the highest possible video resolution and quality to preserve clarity and detail during the upscaling process. Poor-quality source videos can result in blurred or pixelated output after upscaling.
● Use professional editing techniques: Maintain the integrity of the footage by applying expert editing methods such as frame interpolation and noise reduction before upscaling. This ensures smoother motion and fewer distractions in the final output.
● Leverage AI video upscaling tools: Utilize AI-powered upscalers to enhance resolution without sacrificing quality. These tools intelligently fill in missing details, providing a sharper and clearer video after upscaling.
● Avoid over-upscaling: Excessive upscaling can lead to visual artifacts, such as blurring or distortion. Stick to moderate upscaling levels to maintain a natural look and avoid degrading the overall video quality.
● Apply post-processing techniques: After upscaling, enhance the final output with post-processing methods like color correction, sharpening, and contrast adjustments to refine the video’s appearance and ensure a polished, professional result.
Fast Video Upscaler for Bulk Processing
Conclusion
In summary, leveraging advanced artificial intelligence video upscalers can dramatically enhance the quality of your videos, ensuring they maintain clarity and detail even when viewed on larger screens. By choosing the right AI video upscaling tool and adhering to best practices, you can transform standard footage into high-resolution masterpieces that captivate and impress your audience. Embrace the power of AI upscaling to elevate your video projects, ensuring they meet the highest standards of quality.
FAQs
1. Which video formats are supported by AI video upscalers?
Usually supporting a large spectrum of video formats, including MP4, AVI, MOV, MPG and MKV, AI video upscalers consult the particular upscaling tool's documentation for a complete list of supported formats always.
2. Is AI video upscaling suitable for professional use?
Indeed, professional use of artificial intelligence video upscaling is appropriate since it lets content creators effectively improve video quality while maintaining necessary information. Many experts depend on these instruments to get excellent quality for different uses.
3. Does AI video upscaling work on older or grainy footage?
Yes, AI upscalers are designed to improve the quality of older or grainy footage by reducing noise and enhancing details, making it ideal for restoring vintage or low-quality videos.
4. How long does the upscaling process take?
The length of the movie, the original footage's resolution, and your hardware's performance all affect the upscaling time needed.
5. Will upscaling affect the original video's frame rate?
Unless you manually change it in your editing tool, the frame rate will usually remain constant during upscaling.

