5 Pro Techniques to Denoise Video in DaVinci Resolve
Denoising videos is a process of minimizing unnecessary noises to uplift video quality. In video making, denoising is a post-production task that experts like to perform with Davinci Resolve. It is an editing software that assists Hollywood professionals in getting higher-quality products. With DaVinci Resolve denoiser, users can perform noise reduction in several ways.
This software has a robust noise-reduction feature to enhance your footage. However, removing noise from videos with Davinci Resolve is challenging for many users. Luckily, this guide will provide all the methods to use the DaVinci Resolve denoise feature. So, keep reading to uncover them all, along with an easier alternative.
In this article
Method 1. Optical Flow
The ultimate aim of using DaVinci Denoise is to improve video quality. It also ensures the removal of glitches and disruptions from video for smoother playback. Optical flow is a classy technology that analyzes motions between frames to generate new ones.
How Optical Flow Works?
This technology detects pixel movements between repeated video frames. After analyzing their movement, it predicts new frames apart from the original ones. It is particularly vital for slow-motion videos where standard frame rates might be lower, causing choppy playback.
Step-by-Step Method to Use Optical Flow
After going through the operation of optical flow, it’s time to try this feature. For your ease, below is a step-by-step guide to enhance video quality in DaVinci Resolve:
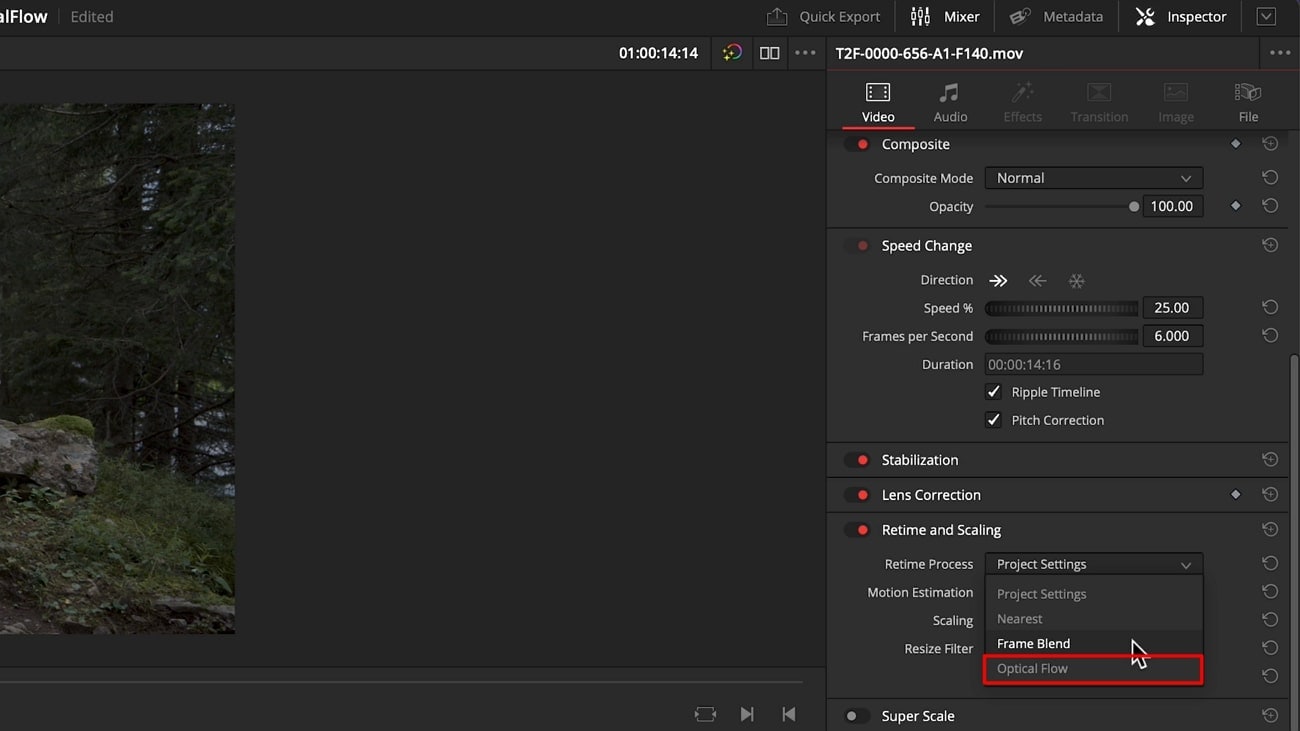
Step 1: Launch DaVinci Resolve on your device and import your footage to process. Now, go to the top-right side and choose the “Inspector” option to get an extended panel. From there, explore “Retime and Scaling” and tap on it.
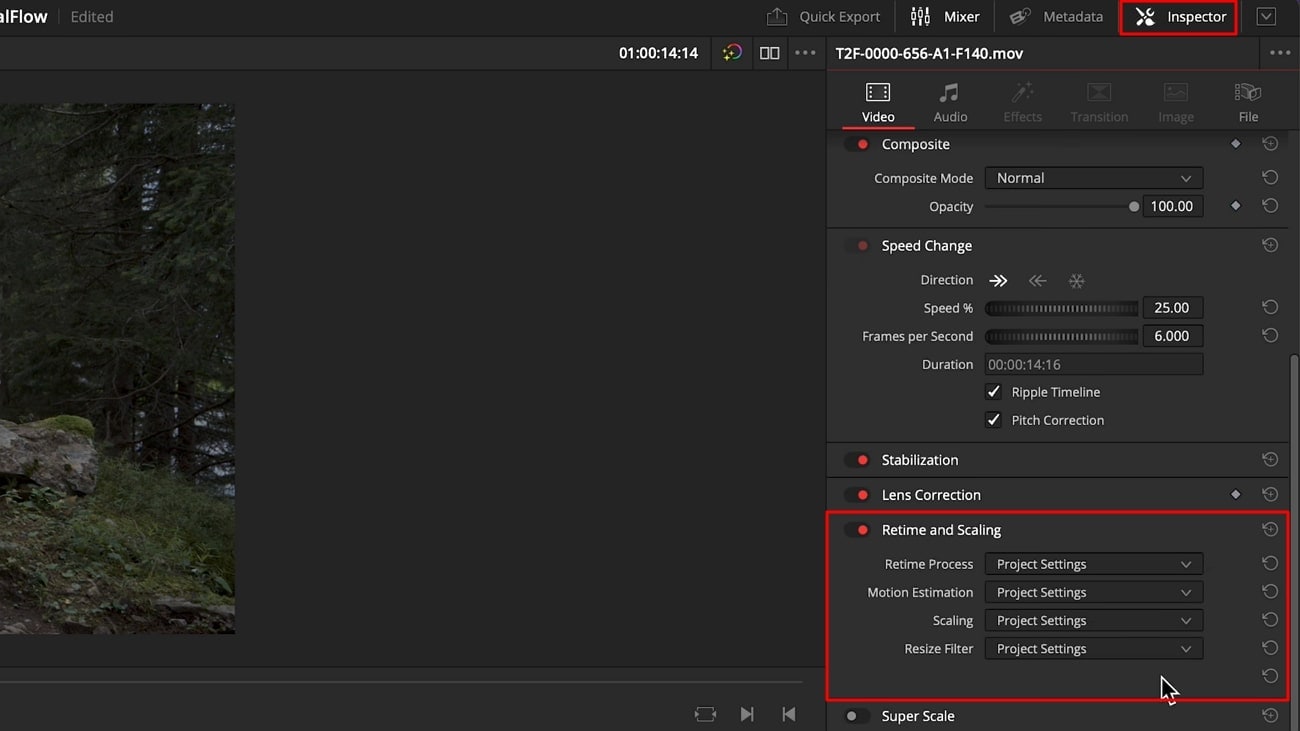
Step 2: After choosing the “Retime and Scaling” section, extend the “Retime Process.” Next, click the “Optical Flow” to enable it. You can play the video to observe a smoother frame rate.
Method 2. Neat Video Plug-in
Neat Video is a plug-in used with DaVinci Resolve to reduce digital noise and imperfections. It employs a noise-profiling approach to clean up videos accurately. Regardless of the source, any form of video can be upgraded with popular video editing applications.
How this Plug-in Works
This plug-in uses sophisticated mathematical algorithms to transfer clips into noise-free shots. It uses noise profiles for customized noise reduction of clips captured in a specific mode. Armed with noise profiling data, it treats digital noise with temporal and spatial filtering. Thus, Neat Video reduces noise while preserving original details.
Stepwise Method to Use Neat Video
As mentioned above, it's a plug-in with video editing tools. To use it, you have to install this plug-in and launch the DaVinci Resolve denoiser. Afterward, you can follow the step-by-step guide to reduce noise with the Neat Video plug-in:
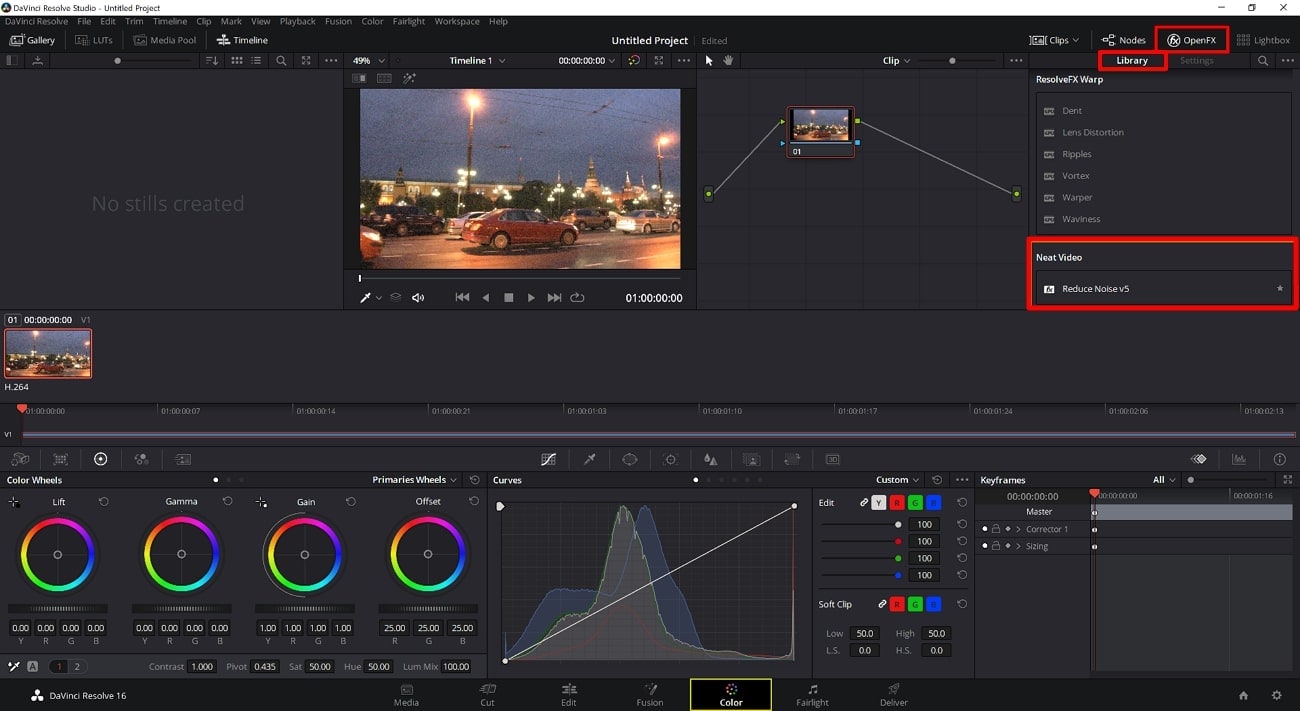
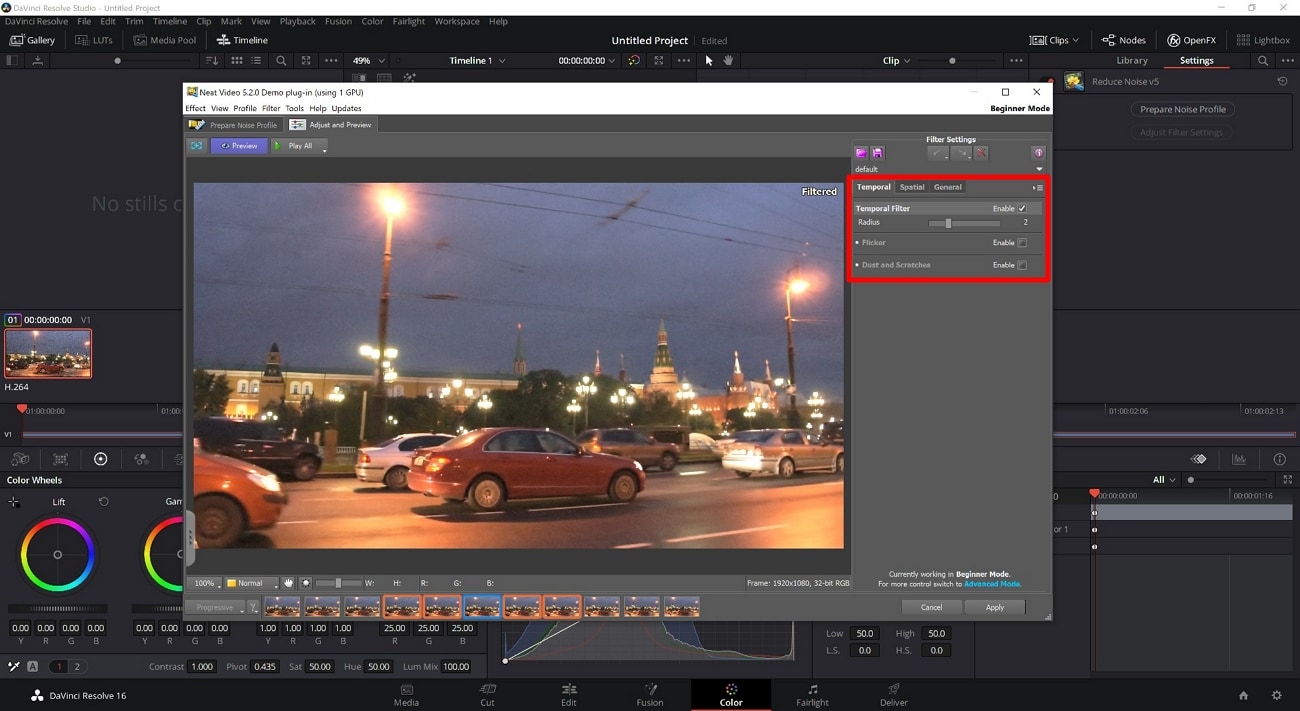
Step 1: After their installation, import media in DaVinci Resolve. Now, go to the “Color” tab located at the bottom toolbar. Then, go directly to the displayed section at the right and scroll to choose "Reduce Noise v5." You have to drag and drop this option to the “Node Tree.”
Step 2: Manually choose a frame with loud noise and click the “Prepare Noise Profile” button. This way, you will get another pop-up screen of the Neat Video. Upon that, hit the "Auto Profile" button from the top left. Select a flat area from the screen and click the "Build Profile" button again.
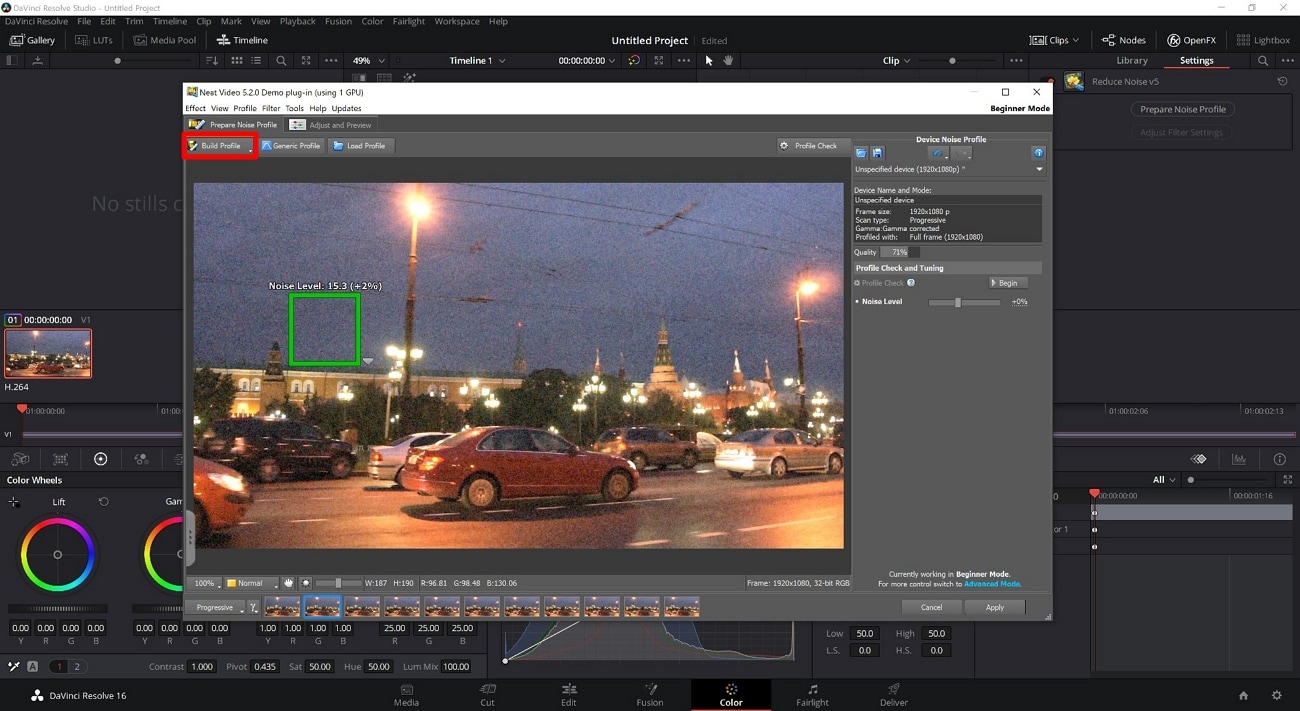
You can check the “Adjust and Preview” section to adjust some parameters. Otherwise, click “Apply” and save the changes.
Method 3. Temporal Noise Reduction
It’s the least destructive denoising technique that might slow down your computer. Yet, this method is worthwhile because it reduces noise in frames with no movements. For this, you must use “Temporal Threshold” settings to check how much reduction can be applied.
How Temporal Denoiser Works
This method analyzes the number of frames to compare noises across them. This feature compares multiple frames to remove the noise patterns. It concludes noise from those frames in a video sequence and draws results in clearer videos.
Step-by-Step Guide to Using this Option
The term “Temporal” is here referred to change over time across multiple frames. Let’s learn how this DaVinci Resolve denoiser works through the steps below:
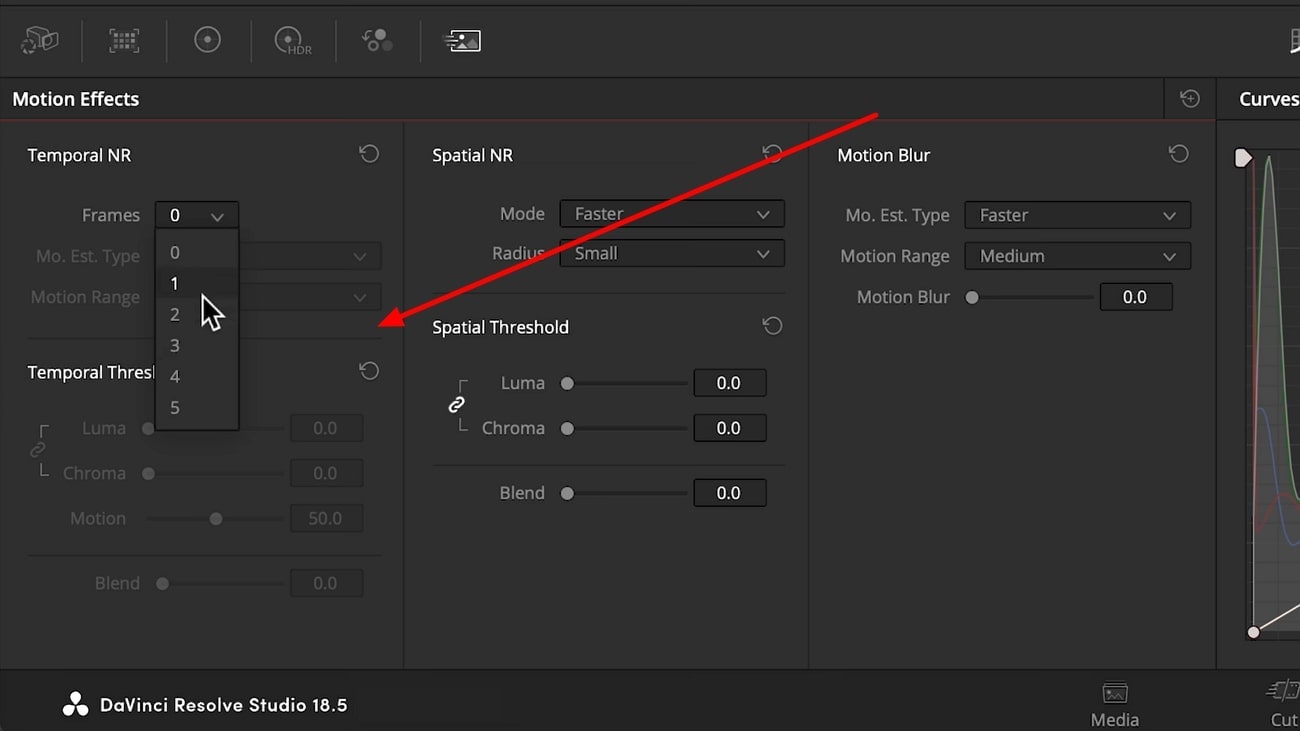
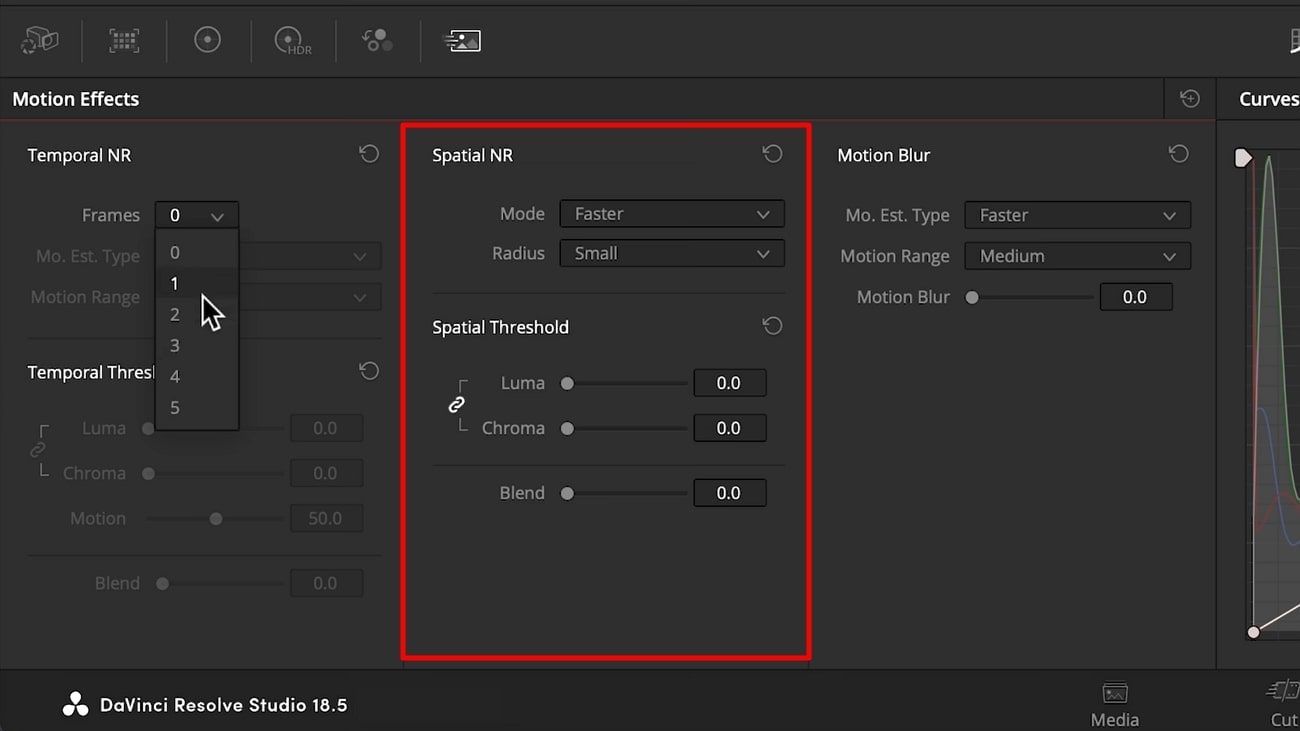
Step 1: From the editing interface of DaVinci, choose the “Color” interface from the bottom toolbar. There, click the “Motion Effect” icon and get a panel with 5 areas.
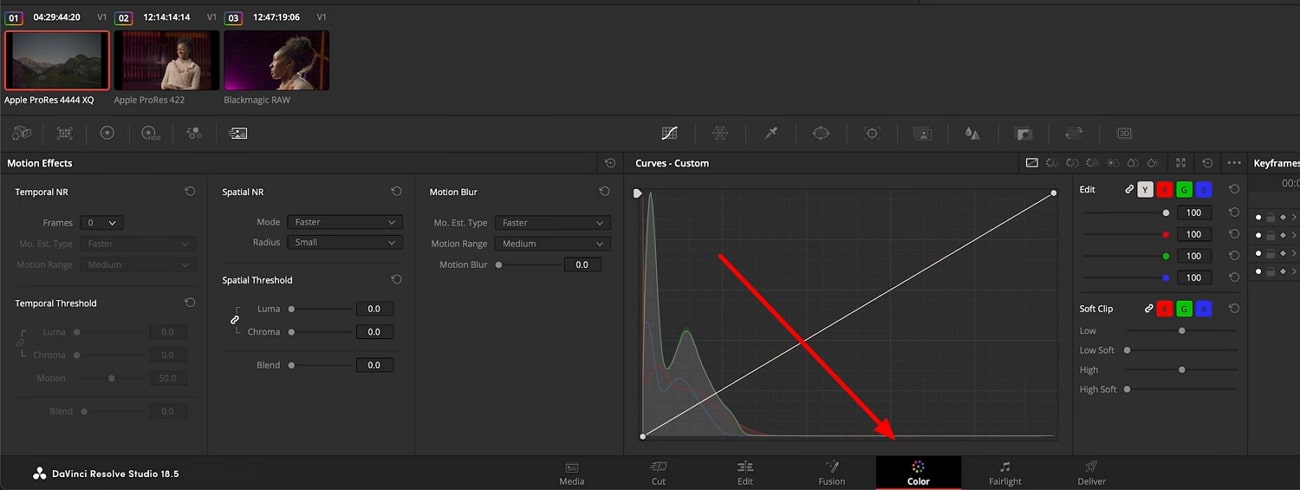
Step 2: Move to the "Temporal NR" section and select "Frames" from a drop-down list. Higher values of Frame are good for lower movements in video. Then, change the "Motion Estimation type" to "Better." Now, go to the "Temporal Threshold" section and move the "Luma" and "Chroma" sliders. Unlink with the unlink icon and increase Chroma, then Luma for better results.
Method 4. Spatial Noise Reduction
This method is more like the temporal noise reduction and denoise by retaining the clarity. It looks at each individual’s pixels to analyze and remove the noise.
How Spatial Denoiser Works
In DaVinci Resolve Denoise, spatial features work through nodes. The node uses classy algorithms to analyze each pixel, whether it is noisy or not. Afterward, it applies a smoothing effect to the noise while leaving its quality intact. You can manually adjust the strength of the effects with the help of sliders.
How to Use Spatial Features for Noise Reduction
If you are familiar with temporal denoiser, using spatial one will not prove difficult. Without further delay, check out the steps below that simplify the process for beginners:
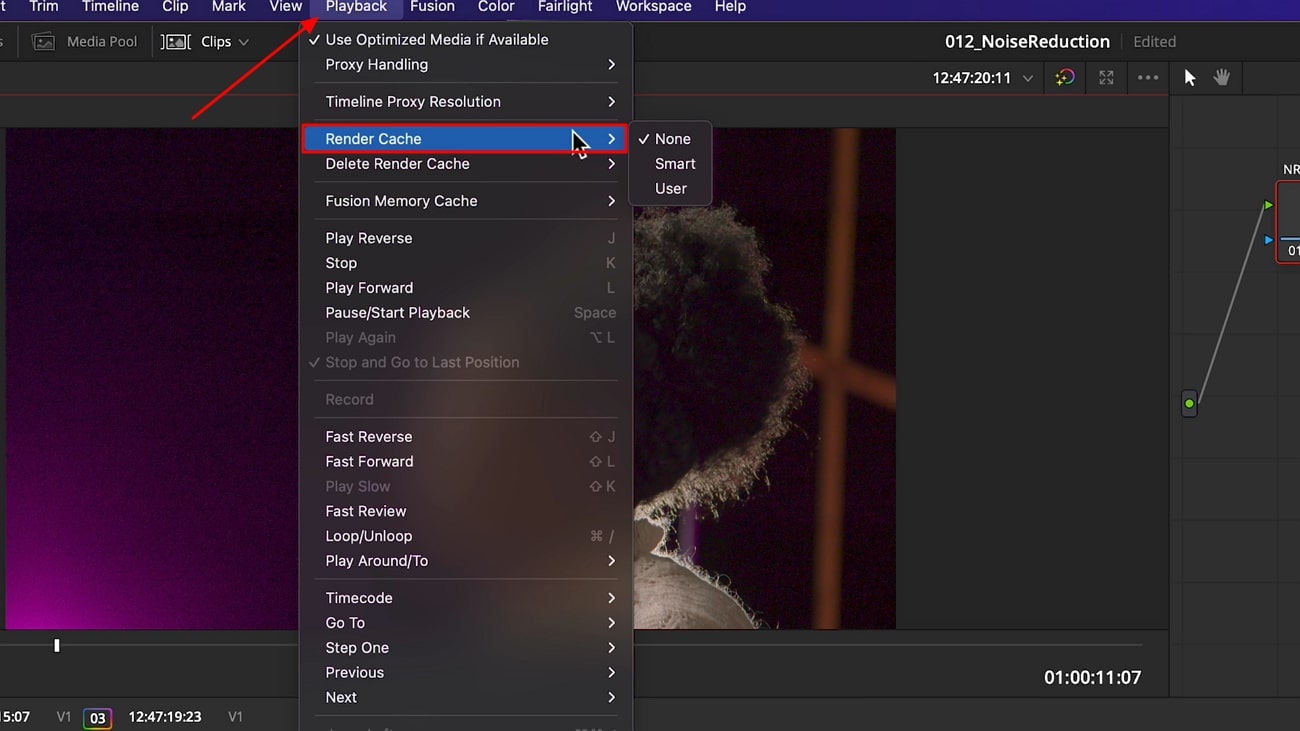
Step 1: Initiate this process by tapping on the “Motion Effect” from the “Color” section. There, direct to the “Spatial Threshold” part next to the “Temporal Threshold” part. Now, increase the “Luma” and “Chroma” with the slider simultaneously. From the “Spatial NR,” extend the “Mode” list and select the “Enhanced” based on your needs.
Step 2: Go to the top toolbar and click the “Playback” option. From its extended list, place your cursor at the “Render Cache” and select the “Smart” option. This will automatically enable a smooth playback, which you can review now.
Method 5. DaVinci Neural Engine (Interpolate Frames)
A key feature of DaVinci Resolve is DaVinci Neural Engine, which uses AI algorithms. With machine learning technology, it works to boost the efficacy and quality of the output. Moreover, it can assist video editors in upscaling videos and frame rate conversion processes. This feature can interpolate new frames in slow-motion clips for natural-looking playback.
Bonus Tip. Denoise Video With the Alternative to DaVinci Resolve in One Click
The above methods of DaVinci Denoise simplify the complex noise reduction process. Do you still perceive it as complex? Switch to Wondershare UniConverter, which is a much easier solution. This AI platform provides DaVinci Denoiser-like high-quality results with just a single click. Using this tool, you don’t have to go through a lengthy process when AI can automate this for you.
Although approaching and using the denoiser of UniConverter is simple for new users, here is a guide. It will show you how to reduce noise with a feature named General Denoise Model. So, follow the step-by-step method explained ahead:
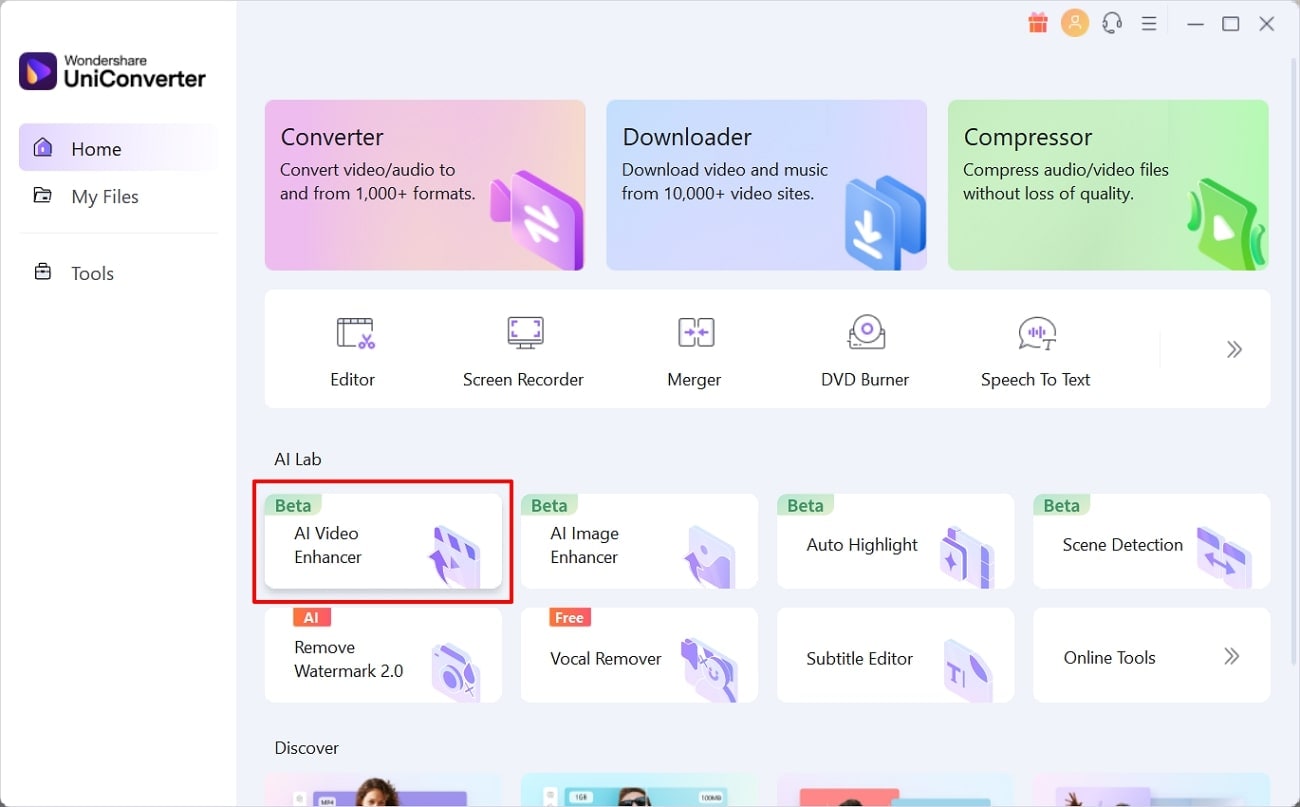
Step 1: Access AI Video Enhancer After Launching Latest UniConverter
First, install Wondershare UniConverter on your device to begin the process. Notably, ensure you download the newer version from its official site. After launching it, tap the “AI Video Enhancer” tab from its user-friendly interface.
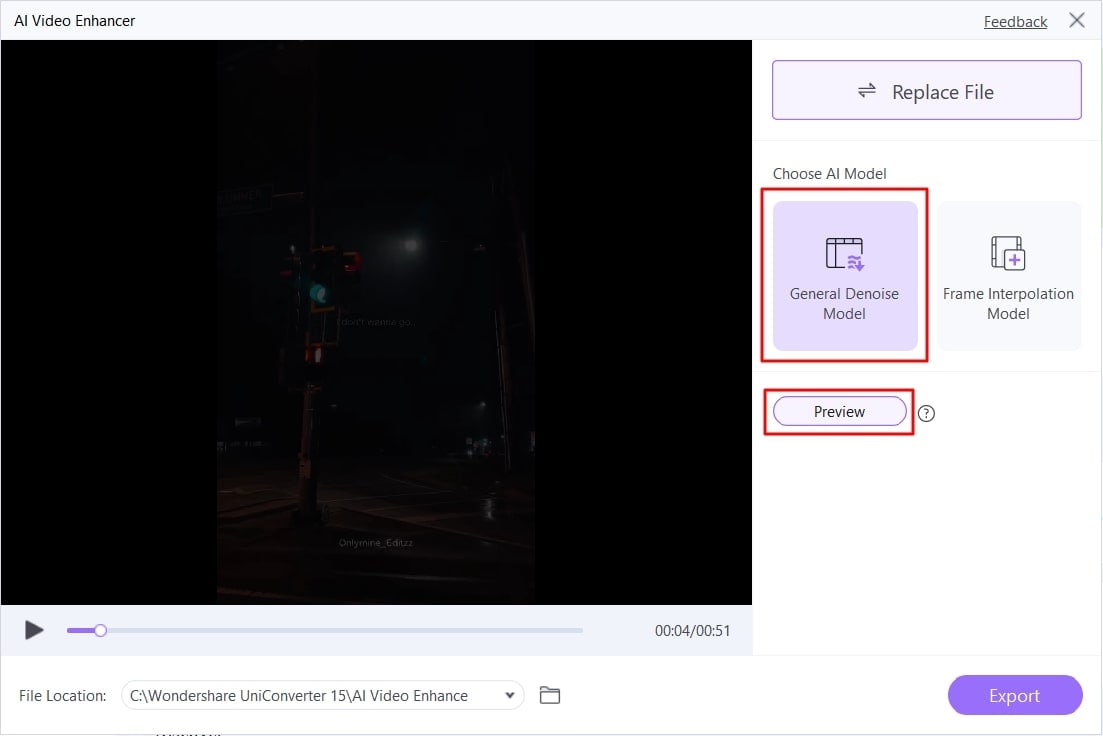
Step 2: Import Your Media and Choose General Denoise Model
From this screen, press the “+” (Add) icon and import your media by hitting the “Open” button. Once you get the video, click the “General Denoise Model” button. Then, tap the “Preview” button so AI can process further.
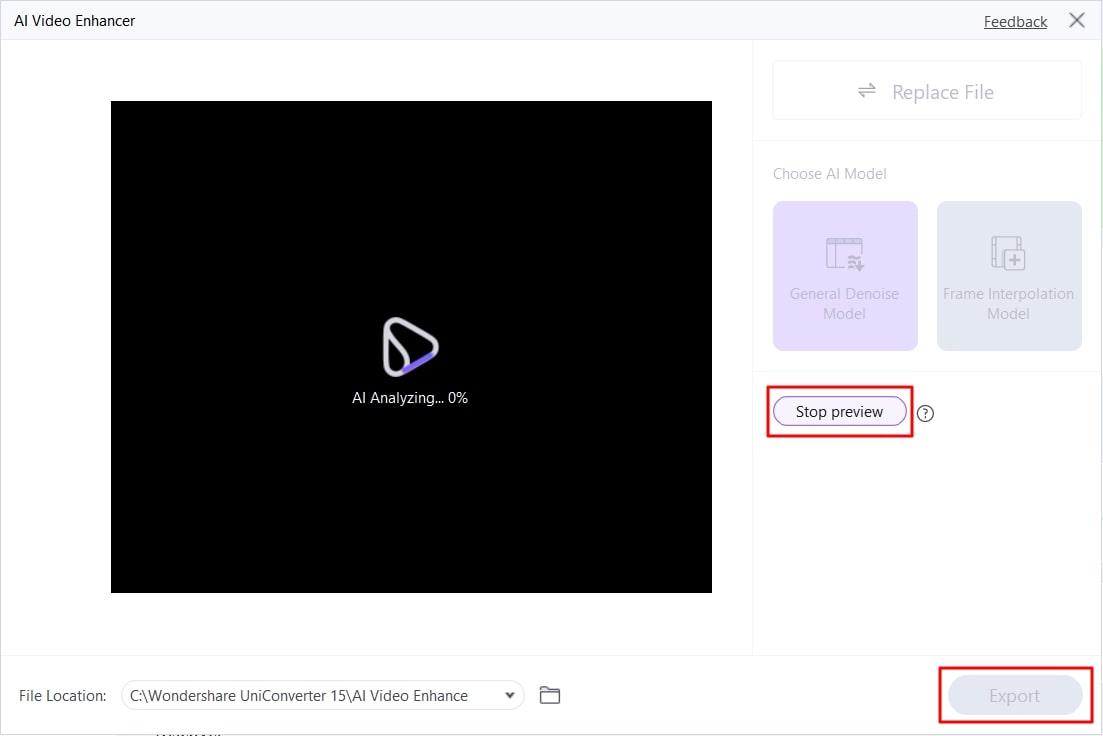
Step 3: Preview a High-Quality Output and Export the Results
When AI finishes processing, you will see the “Stop Preview” button. Click on it, preview the output, and if you are satisfied, save it by choosing the “Export” button.