

Adding subtitles can enhance the clarity and reach of your content, particularly when editing with professional tools like DaVinci Resolve.
In this guide, you'll learn how to effortlessly add and edit DaVinci Resolve subtitles, whether you're working with dialogue, tutorials, or multilingual content. We'll also introduce an efficient alternative—Wondershare UniConverter—that simplifies subtitle generation, translation, and editing in just a few clicks.
Whether you're a beginner or seasoned editor, this guide will walk you through step-by-step instructions, screenshots, and expert tips to polish your videos with precise, eye-catching subtitles.
Table of Contents
Part 1. How to Easily Add and Edit Subtitles in DaVinci Resolve
Adding subtitles to your video not only improves accessibility for viewers worldwide but also enhances engagement and ensures your message is clearly understood, especially in sound-off environments like social media. Fortunately, DaVinci Resolve makes it surprisingly easy to insert, edit, and stylize subtitles directly within your video timeline. Whether you're a filmmaker, content creator, or business communicator, this guide will walk you through the essential steps to create clean and professional DaVinci Resolve subtitles.
Let's break it down into three easy steps: creating a subtitle track, syncing your text with the dialogue, and customizing it with your unique style.
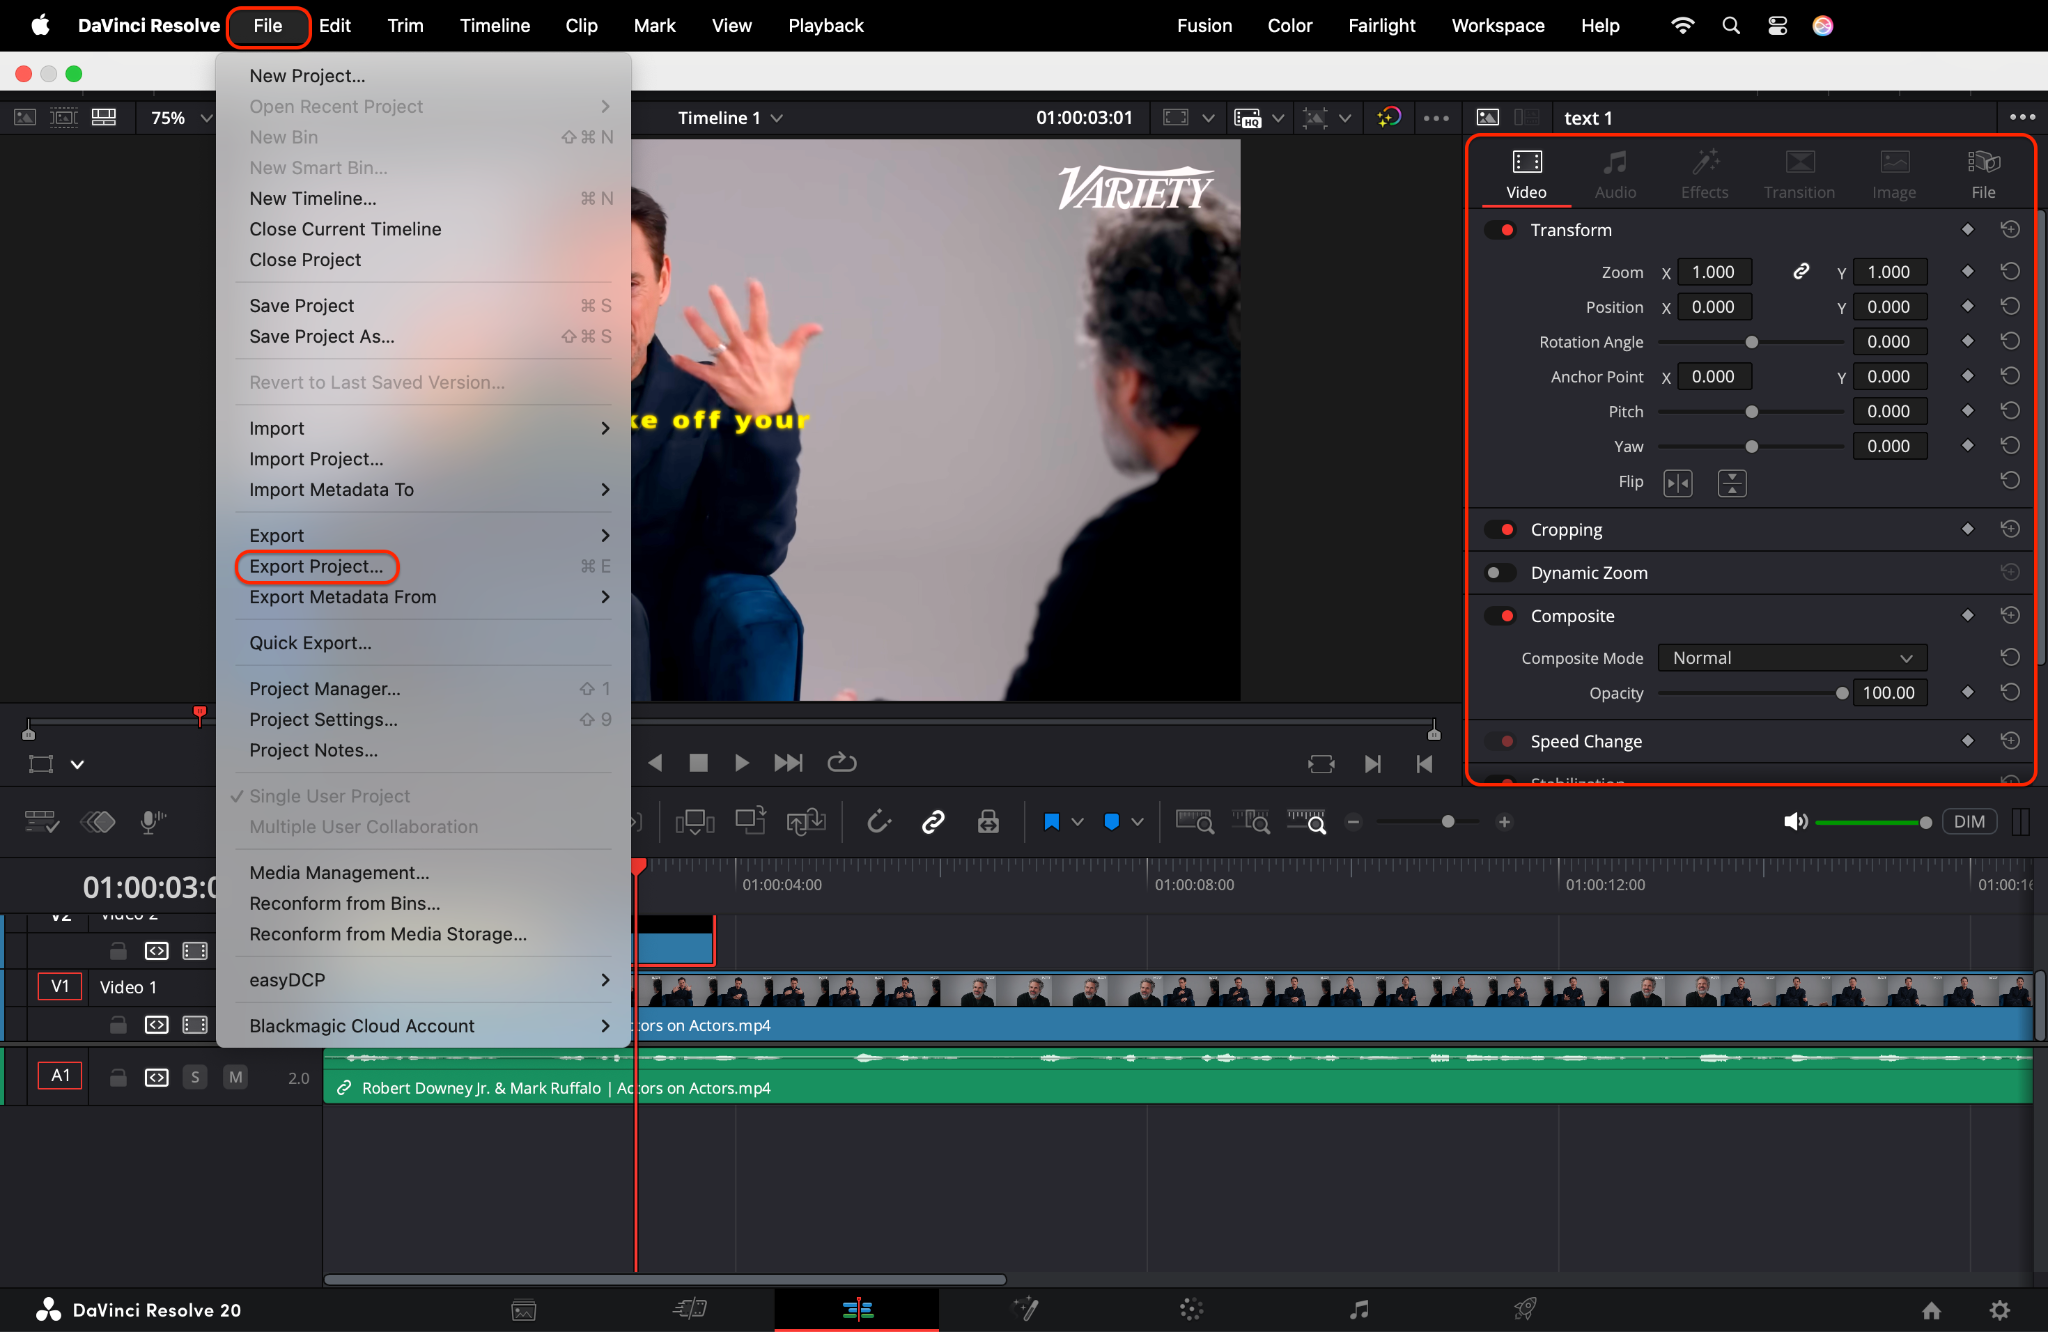
Step 1: Import Your Video and Add a Subtitle Track
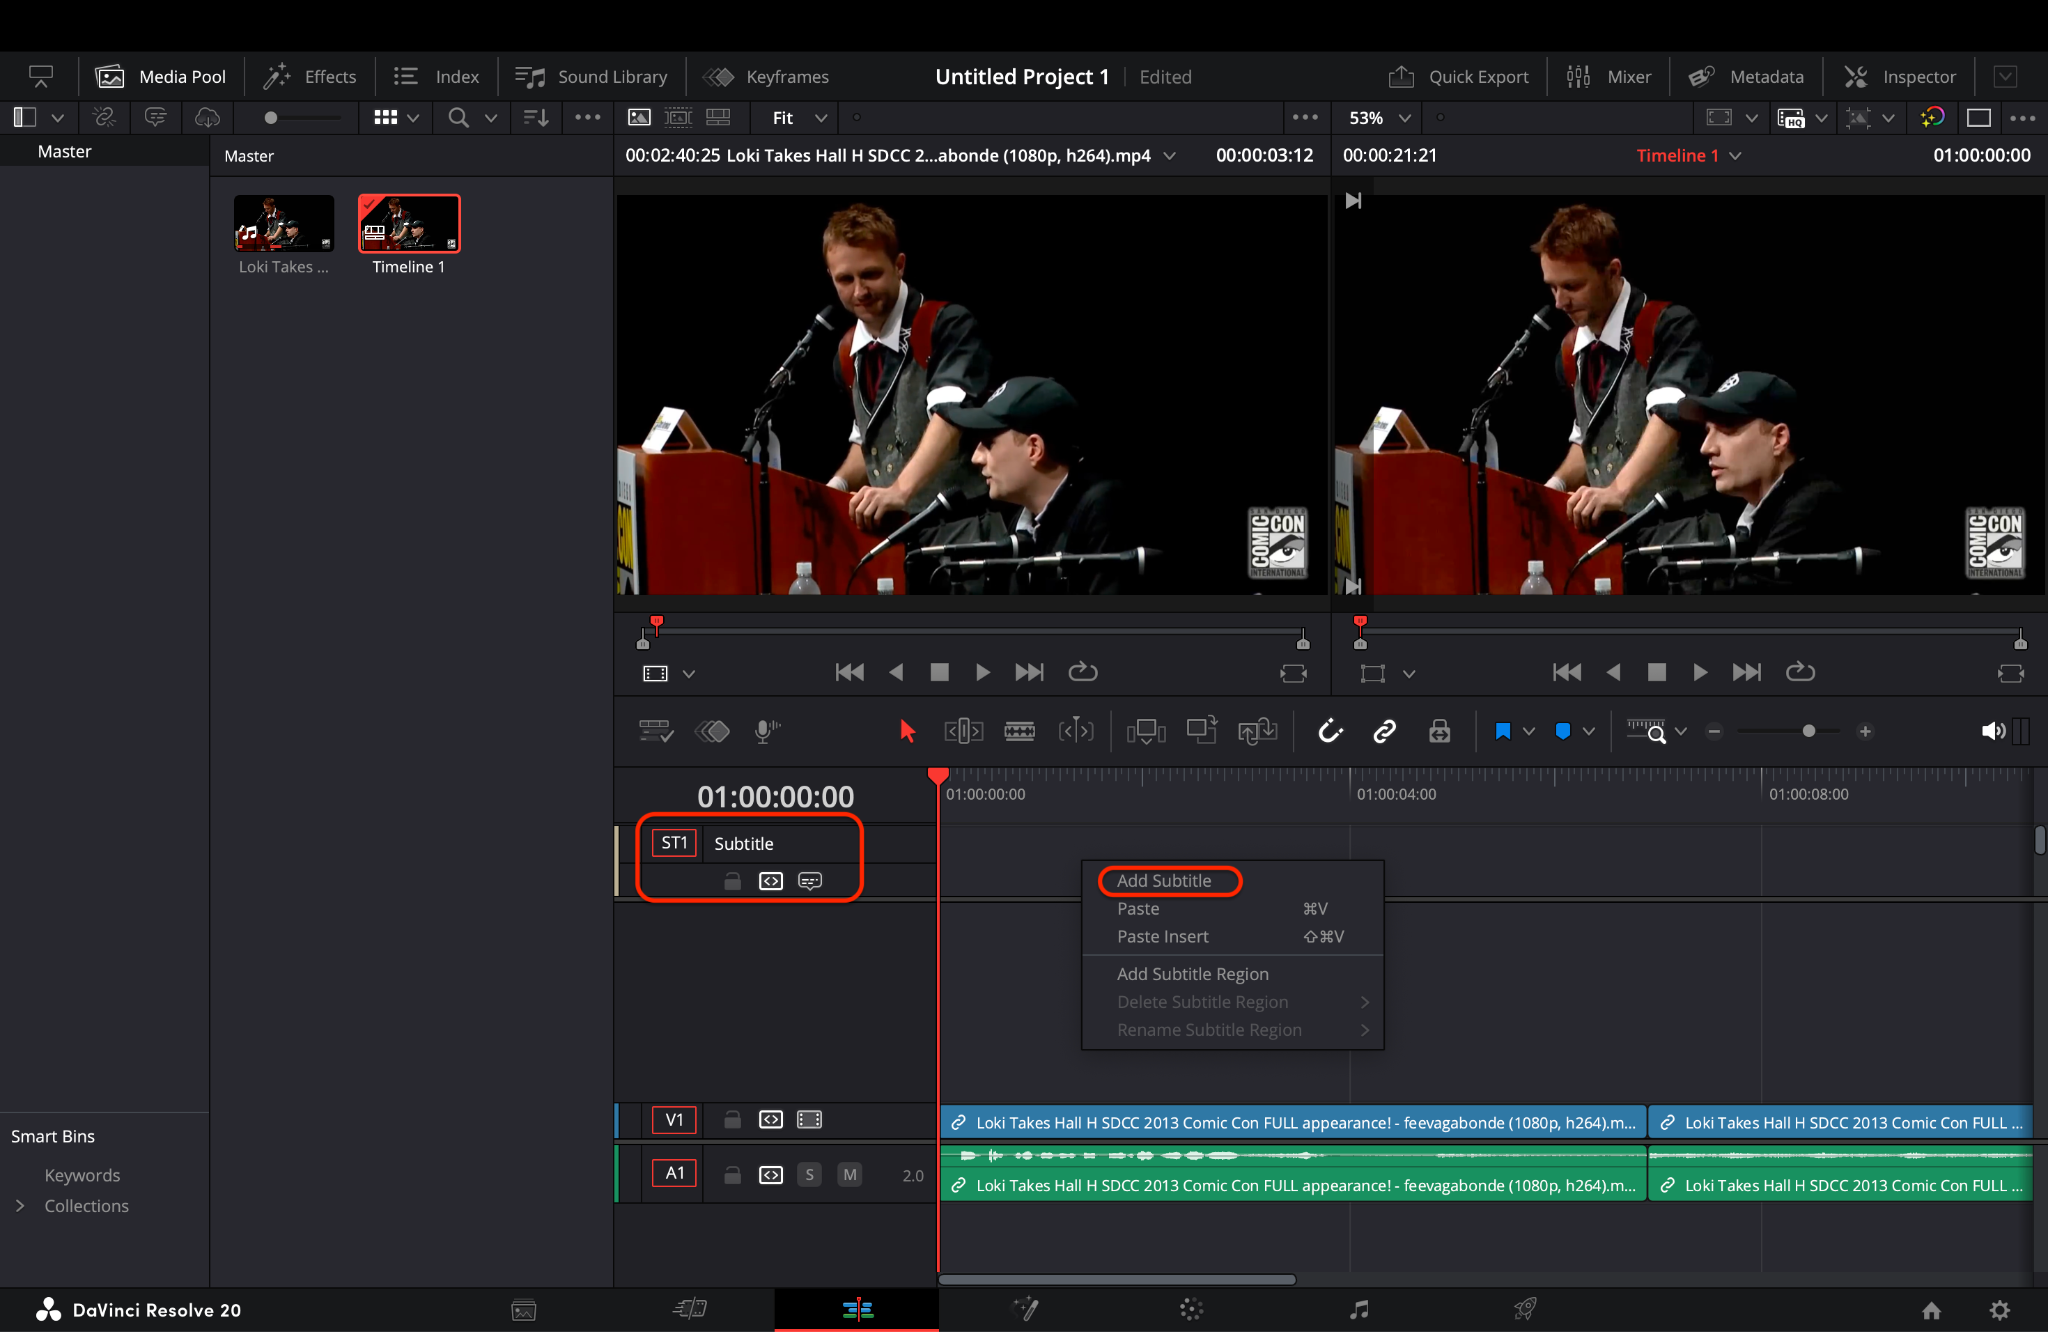
Pro Tip: Keep each subtitle visible for 2 to 6 seconds, giving viewers enough time to read naturally without rushing. A duration that is too short can cause readability issues, while one that is too long can break immersion. Always preview a few subtitle timings to see what feels most comfortable for your target audience.
Step 2: Enter and Sync Subtitle Text
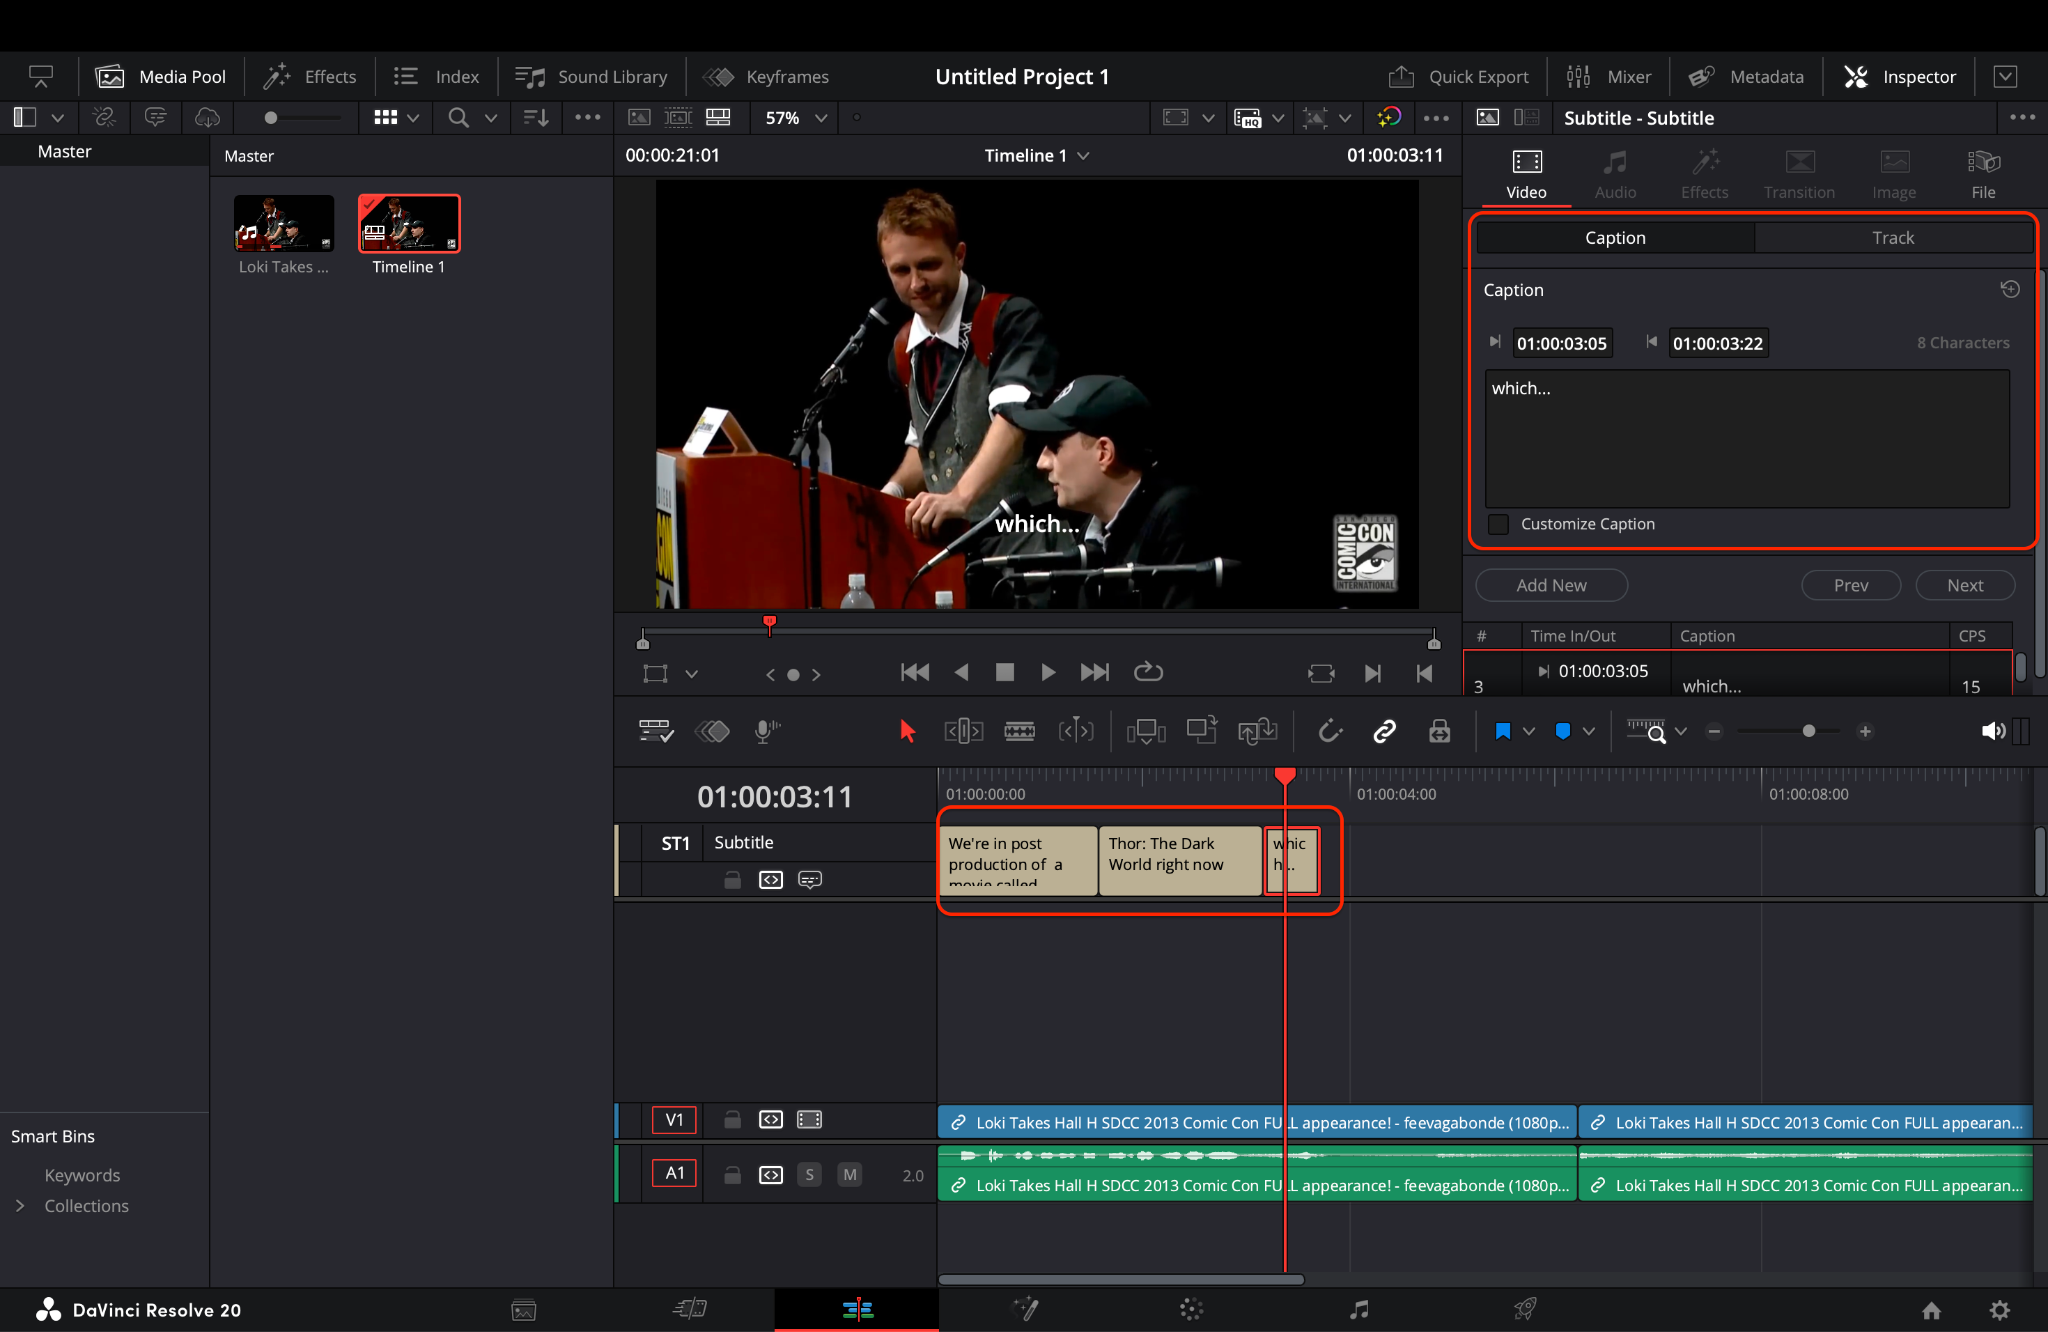
Pro Tip: Use Shift + Enter to create soft line breaks for better on-screen text flow. This helps prevent overcrowded lines and makes longer sentences easier to follow. Aim to break lines at natural pauses or between phrases for a smoother visual rhythm.
Step 3: Customize Font, Position, and Export Settings
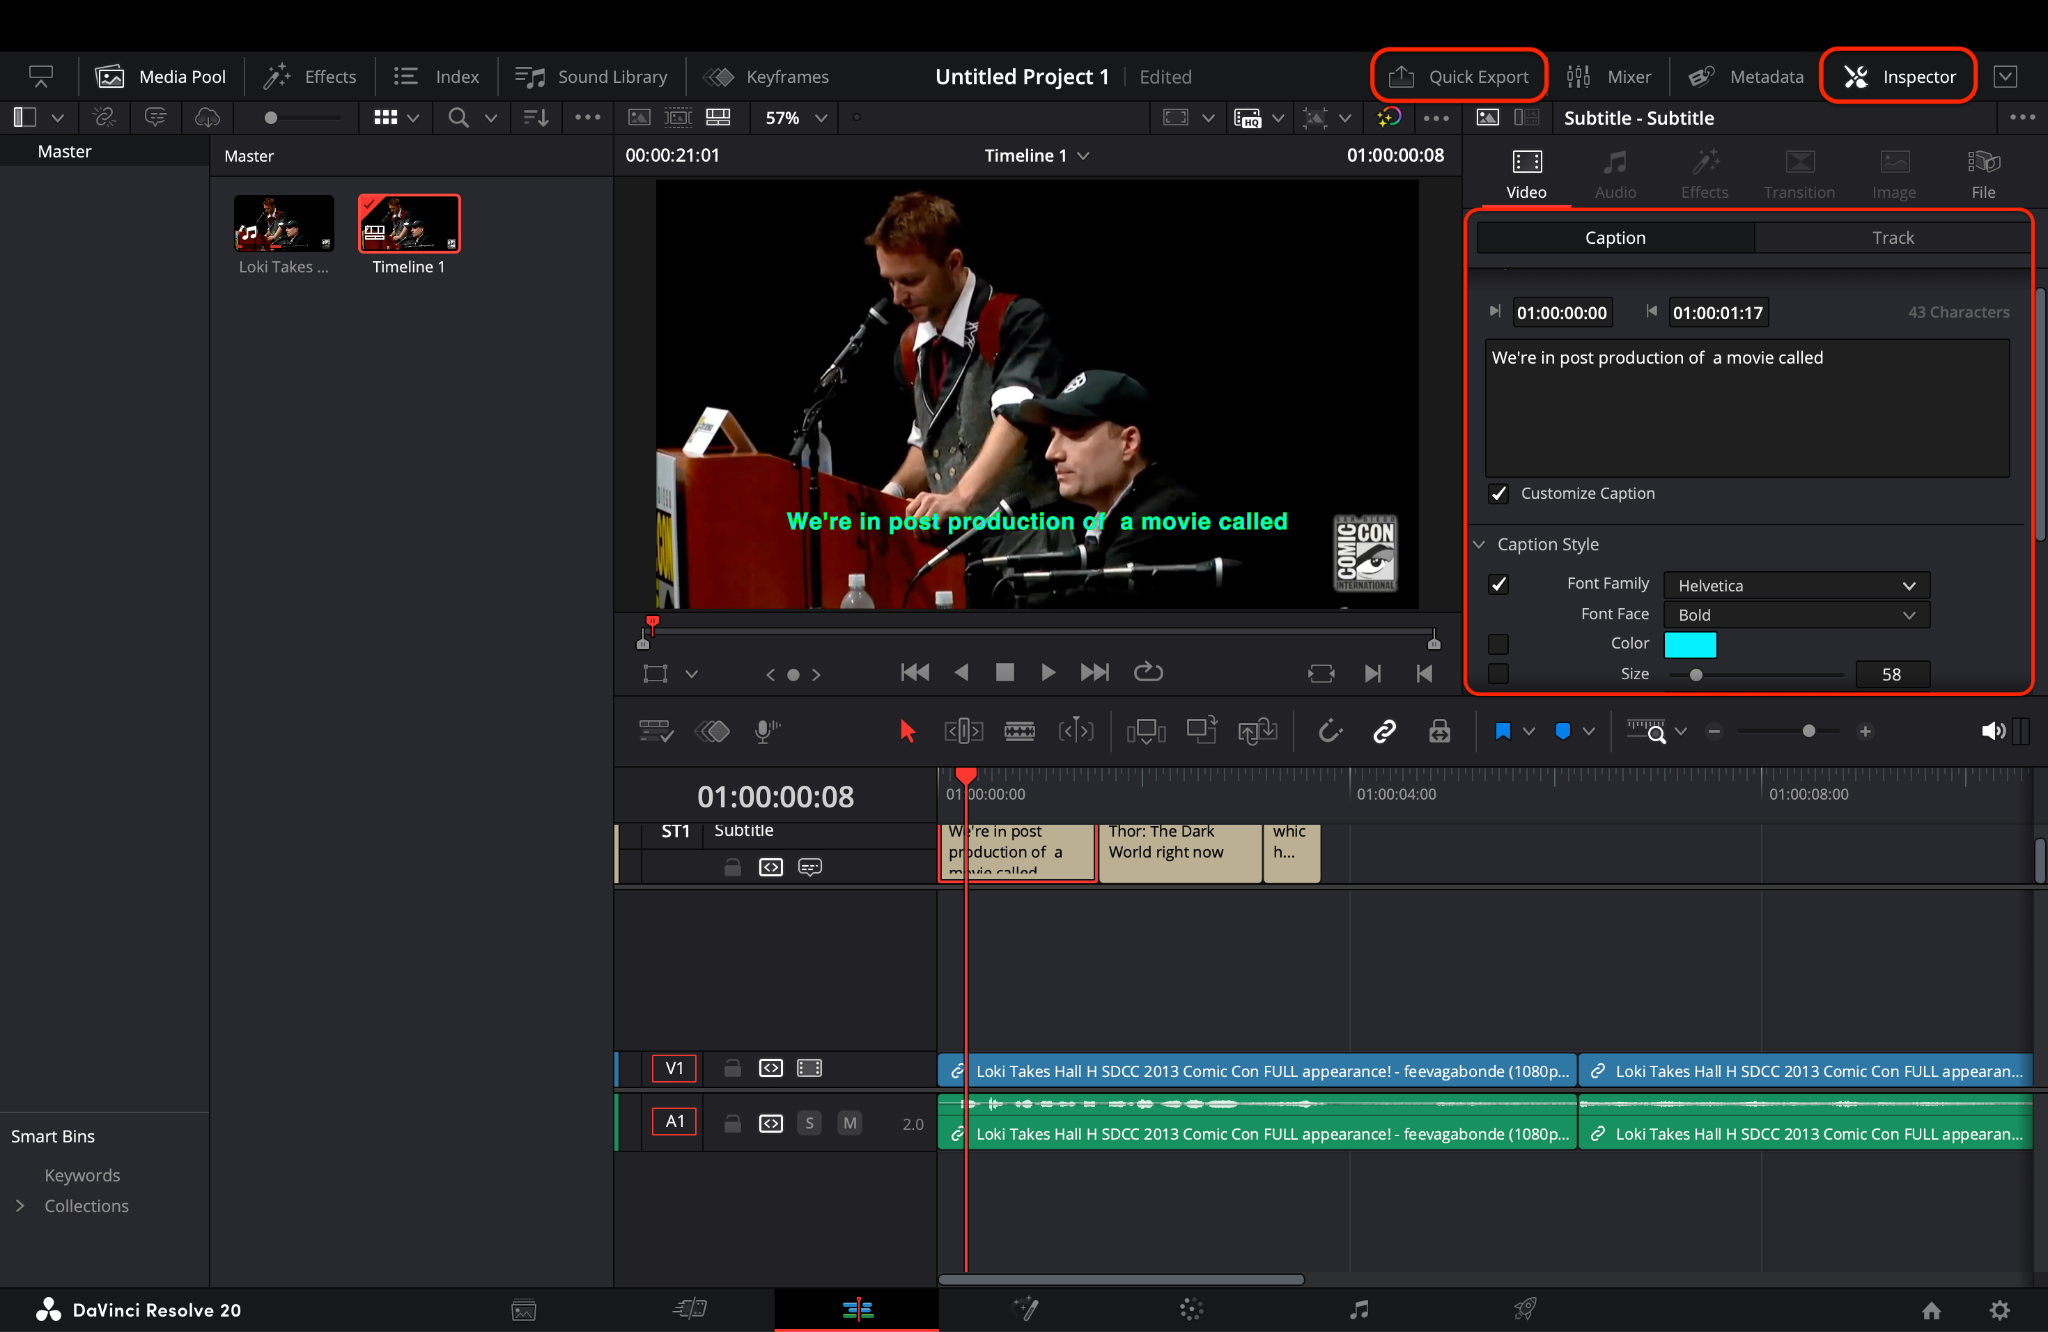
Pro Tip: Burn-in subtitles are ideal for platforms that don’t support toggling captions, such as Instagram or basic video players. On the other hand, exporting SRTs is beneficial for YouTube or multilingual audiences, as it enables better accessibility and customization. Always check your platform requirements before finalizing your export settings.
Part 2. How to Quickly Add and Edit Captions in DaVinci Resolve
Captions serve more than one purpose—they enhance accessibility, help viewers follow content in noisy or sound-off environments, and support SEO for platforms like YouTube. While subtitles and captions are often used interchangeably, captions can also include non-dialogue audio cues like [music playing] or [laughs], and DaVinci Resolve allows you to add both effectively.
In this tutorial, you'll learn how to quickly add and edit captions in DaVinci Resolve, whether you're working with interviews, vlogs, or tutorials. Based on the tools shown in Josh Olufemii's guide and Justin Brown's Primal Video, we've compiled a simple 3-step method with helpful pro tips.
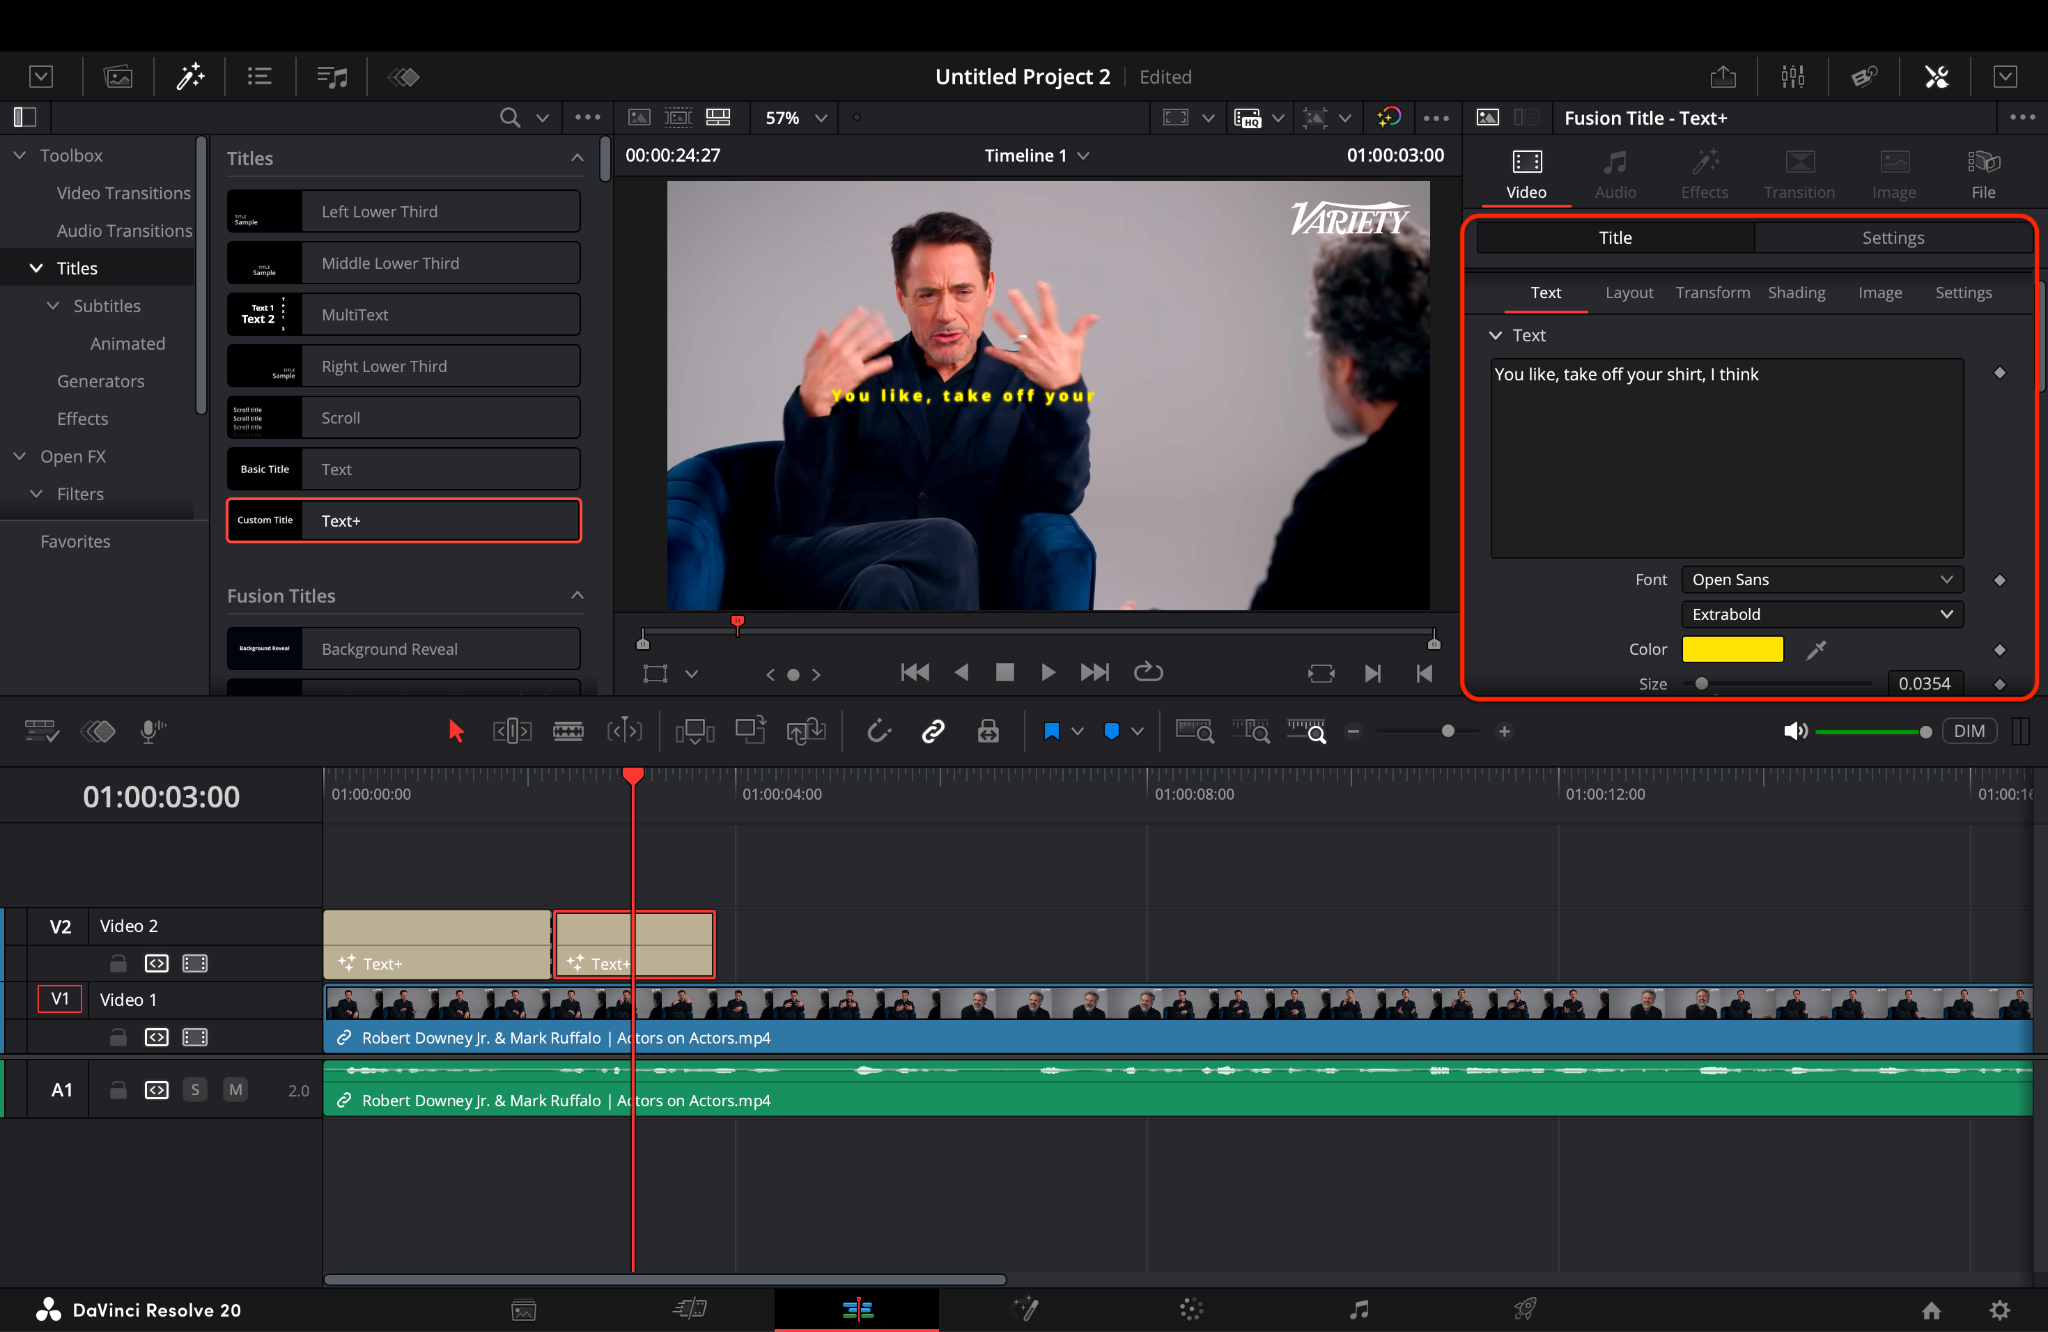
Step 1: Add a Text Caption Track to Your Timeline
To begin, open DaVinci Resolve and go to the Edit page. Drag and drop your video onto the timeline if it's not already there. Instead of using a dedicated subtitle track (as in traditional subtitling), this method uses Text+ titles to create flexible, styled captions directly on the video.

Pro Tip: Use Text+ instead of the basic Text title, as it enables advanced motion graphics and styling in the Fusion tab, making your captions more dynamic and modern.
Step 2: Edit Caption Text and Timing
With your Text+ clip in place, please select it and open the Inspector panel (located at the top right). You'll now be able to type in your caption text, choose the font, adjust size, alignment, and position. Positioning captions in the bottom center is standard, but you can move them based on your video composition.
Pro Tip: Use the shortcut Alt + drag on a caption clip to quickly duplicate it while maintaining the same styling. This helps you stay consistent with fonts and positions without having to set them manually each time.
Step 3: Style, Animate, and Export Captions
Now for the fun part—styling and animating your captions. Still in the Inspector, you can add shadows, strokes, background colors, and change font weights for improved readability. For smooth entrances, click the Settings tab inside the Inspector and apply a Zoom or Fade-in transition. You can also use keyframes for motion effects, like sliding in from the left or bouncing upward.
For more advanced users, jump into the Fusion page for granular animation control such as motion blur, elastic ease-outs, or glowing text effects. However, even simple fade transitions and opacity changes go a long way in making captions feel like an integral part of the design, rather than an afterthought.
Pro Tip: Want to reuse your caption style across multiple videos? Right-click on a caption clip and select "Create Compound Clip." Then, save it in your media bin as a reusable template.

Davinci Resolve Subtitle Generator Alternative
Part 3. Efficient Alternative: How to Auto-Generate or Translate Subtitles with UniConverter
While DaVinci Resolve offers powerful manual tools for subtitles and captions, not everyone has the time or patience to type each line, sync manually, or manage translations. If you’re looking for a faster, AI-powered solution, Wondershare UniConverter is your go-to tool.
With UniConverter’s built-in Subtitle Editor, you can automatically generate subtitles from any video using speech recognition, translate them into over 100 languages, and export or burn them into your video with just a few clicks. It’s perfect for content creators, educators, marketers, and social media editors who want efficiency without sacrificing quality.
Step 1: Launch UniConverter and Visit Subtitle Editor
Start by launching Wondershare UniConverter on your computer. From the left sidebar, click on “More Tools” if needed, and then select the “Subtitle Editor” tile from the main dashboard. This tool lets you automatically generate, translate, and fine-tune subtitles with ease.
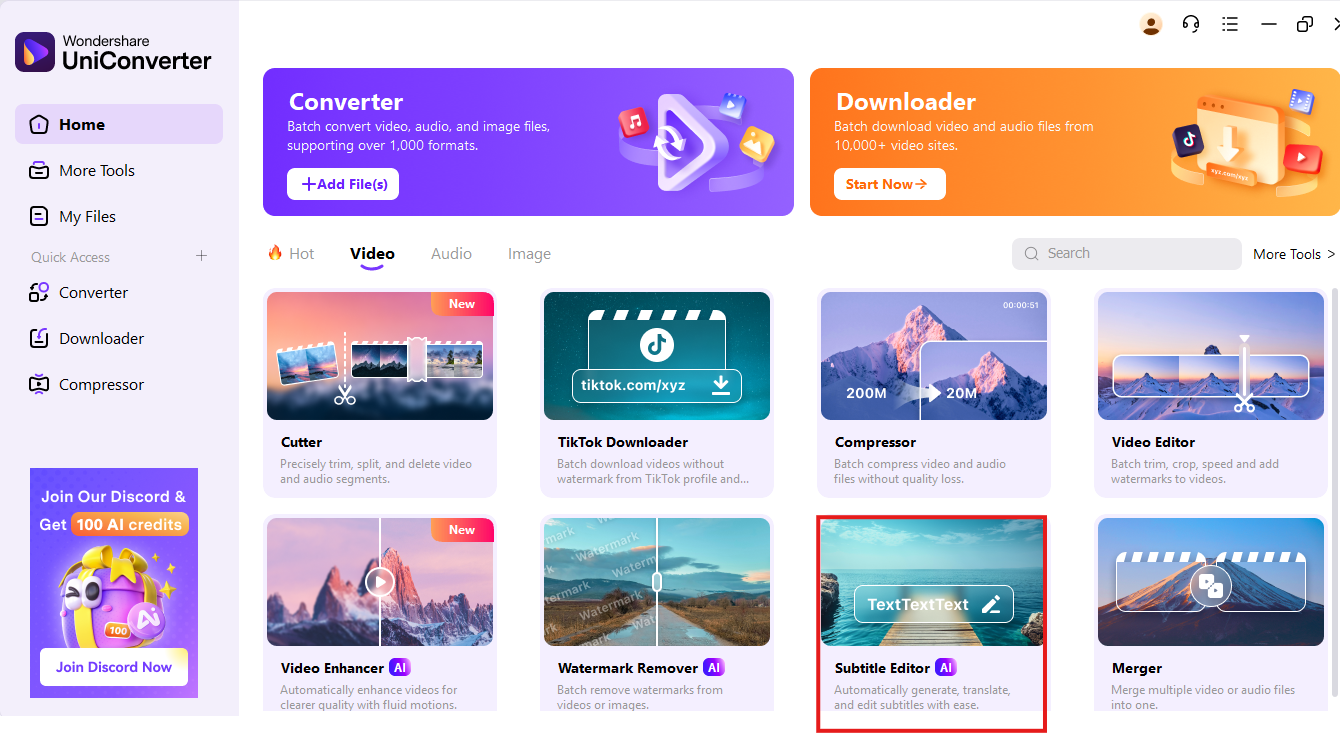
Pro Tip: Keep your video file name clean and relevant—it’ll be used as the default title in your subtitle file export.
Step 2: Add your Video or Clip
Click the + Add Video button in the center or drag your video file directly into the window. UniConverter supports multiple formats like MP4, MOV, AVI, and more. Once your file is uploaded, it will load into the timeline with subtitle creation options on the right-hand panel.
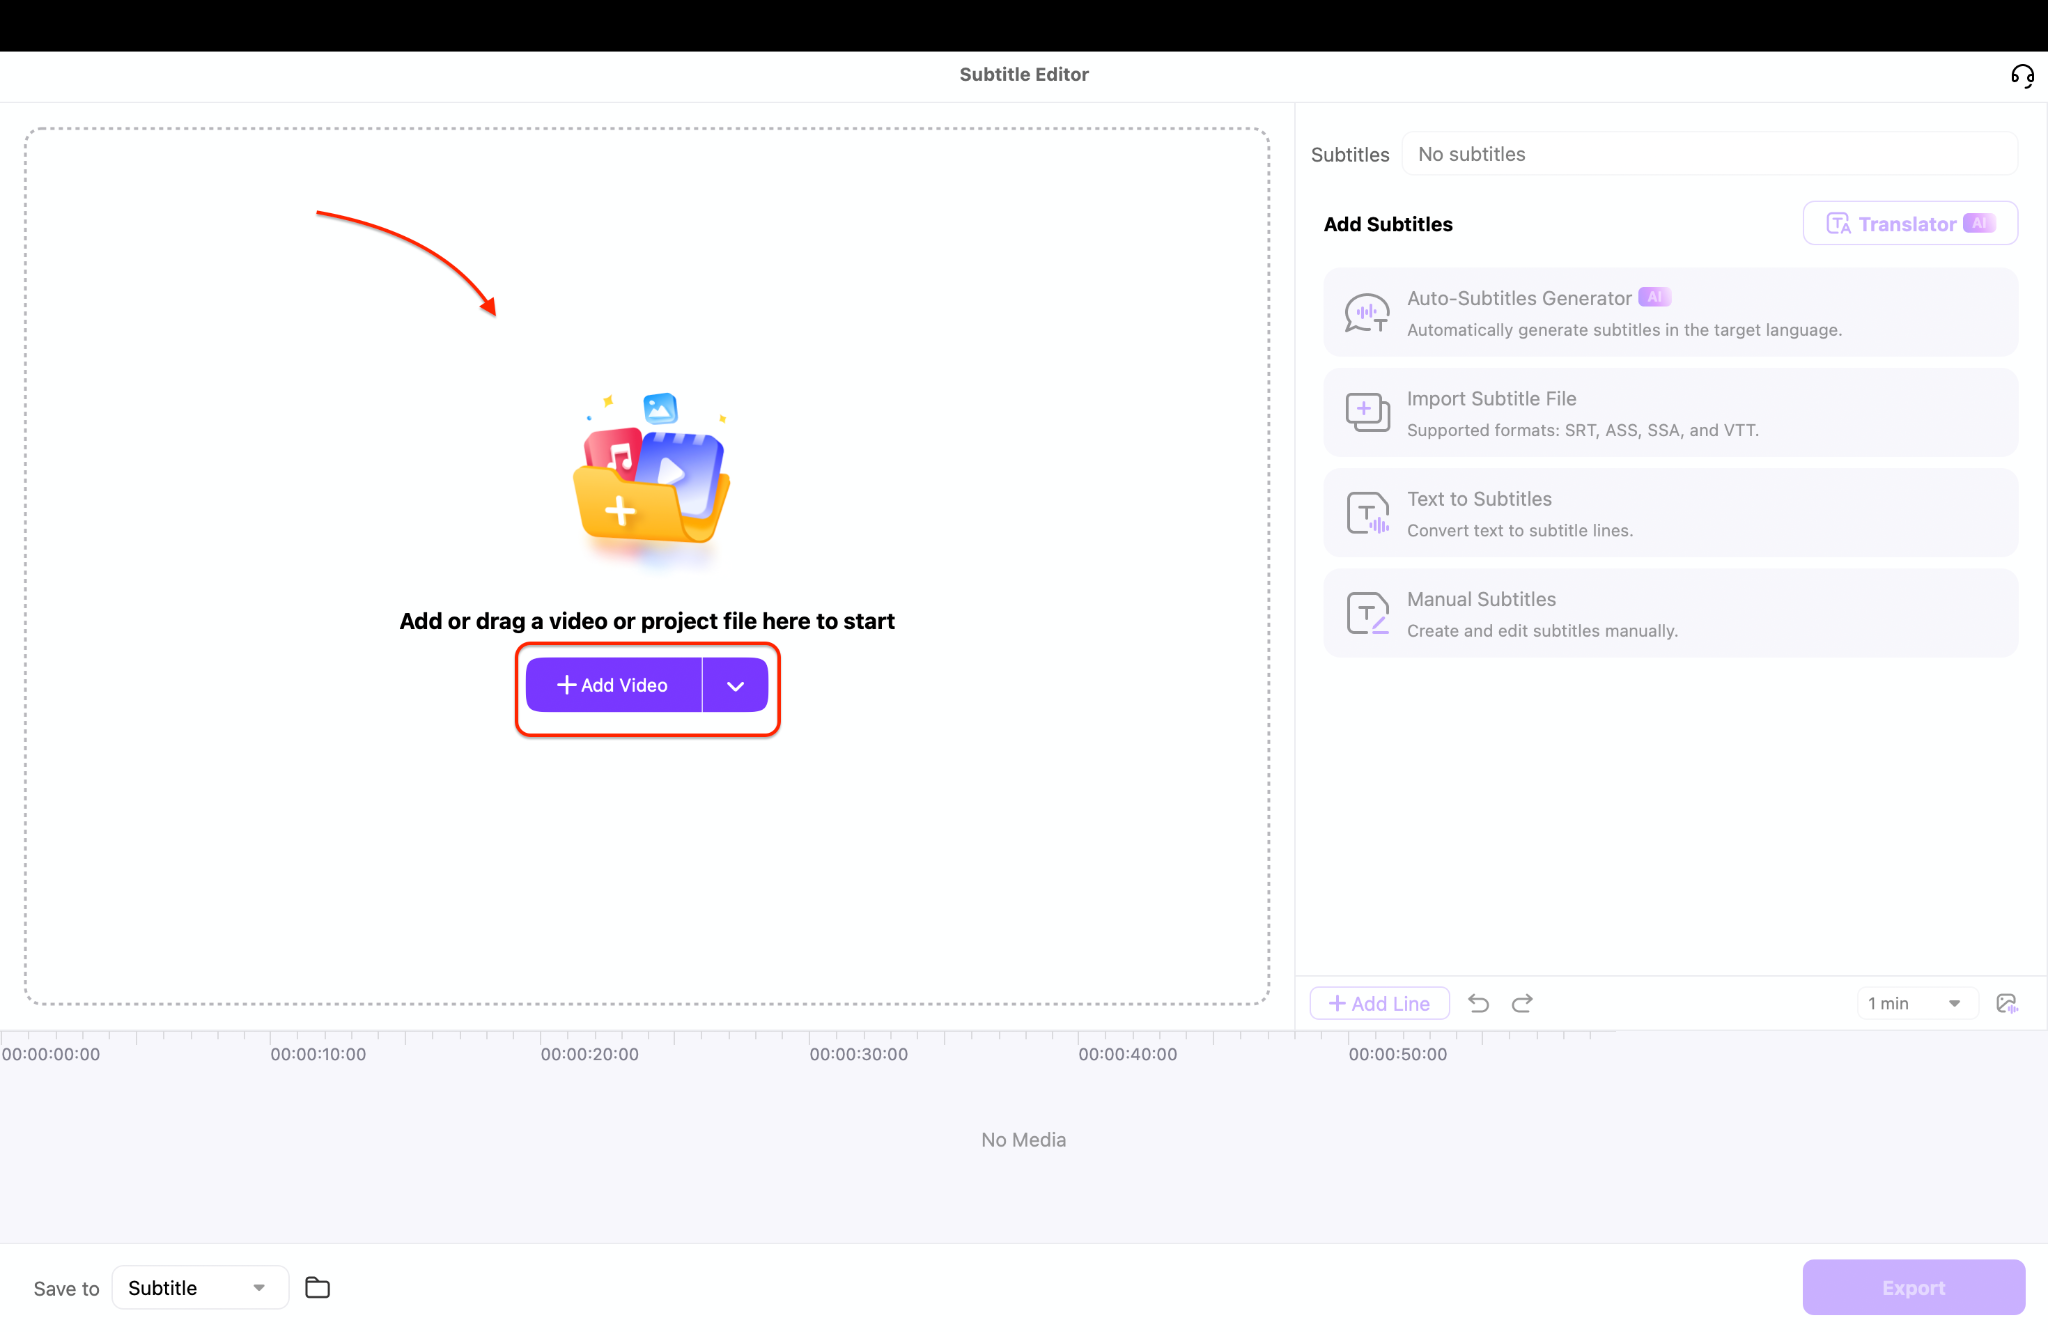
Pro Tip: For bilingual content or international distribution, export multiple SRT files in different languages. This saves time compared to redoing the process for each language separately.
Step 3: Generate and Export
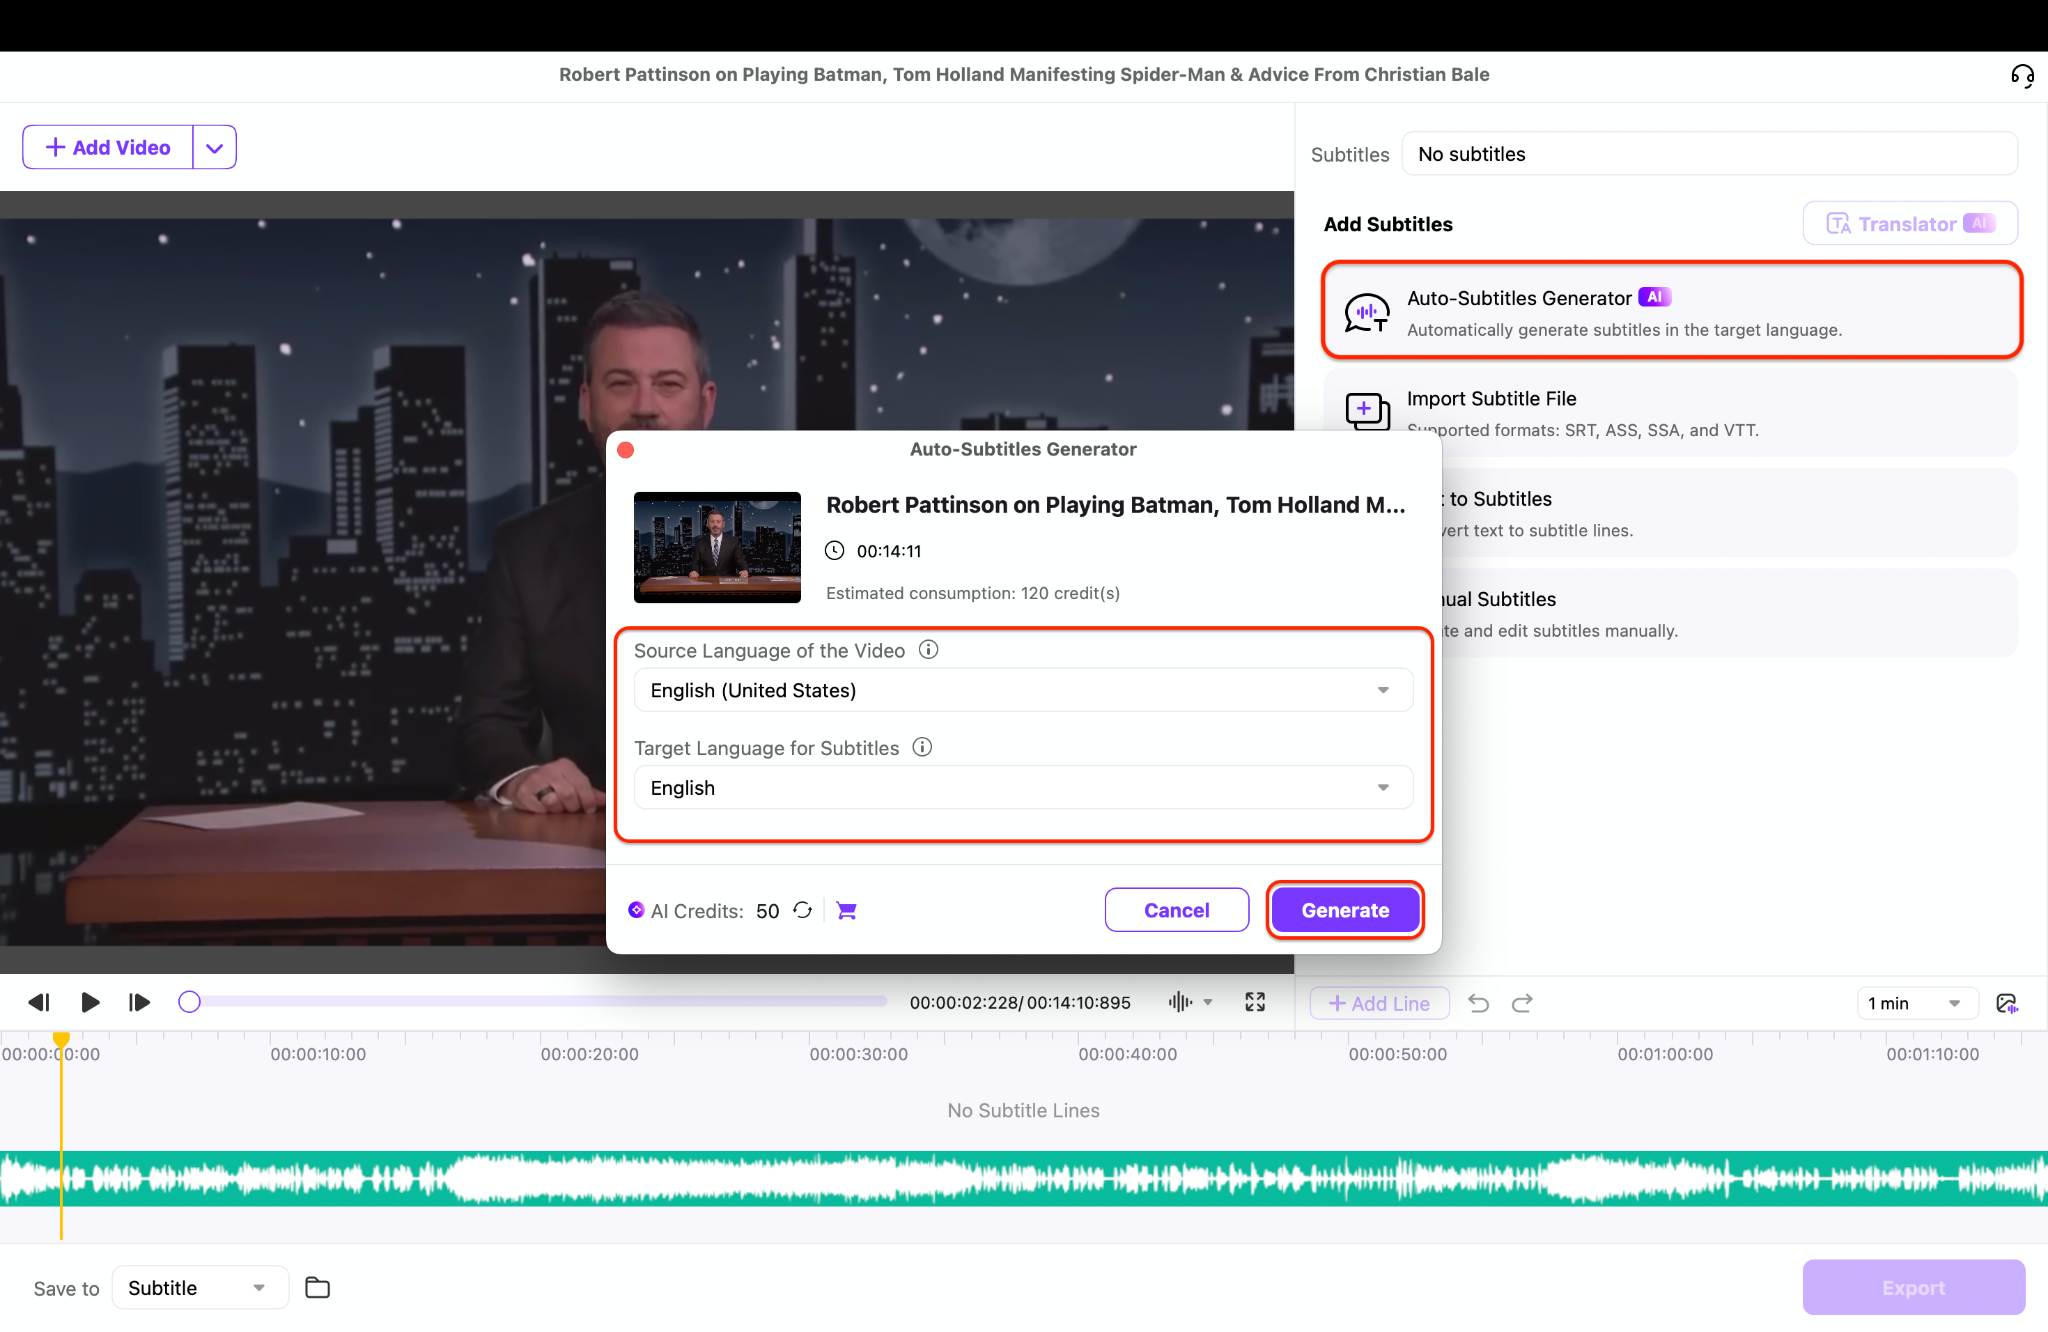
Pro Tip: Utilize UniConverter's batch processing feature to automatically generate and export subtitles for multiple videos simultaneously—a significant time-saver for YouTubers or training course creators.
Key Features of UniConverter Subtitle Editor
With auto-subtitle generation, UniConverter utilizes advanced AI speech recognition to transcribe spoken audio into accurate, time-coded subtitles, saving hours of manual editing.
- Its multilingual translation feature allows you to instantly convert subtitles into over 100 languages, including Spanish, Hindi, Arabic, and French, making it ideal for global audiences.
- Using custom styling options, you can adjust fonts, colors, positions, and backgrounds to match your video’s branding and ensure better readability.
- Thanks to flexible export formats, you can save subtitles as SRT, TXT, or ASS files, or burn them directly into the video for seamless playback across any platform.
- The batch subtitle processing tool lets you generate and edit captions for multiple videos at once—perfect for creators managing large content libraries.
Davinci Resolve Subtitle Generator Alternative
Conclusion
Subtitles and captions are no longer optional—they're a necessity for achieving global reach, ensuring accessibility, and enhancing user engagement. Whether you're editing cinematic videos, tutorials, or social media clips, DaVinci Resolve provides professional-grade tools to craft beautiful, manually synced subtitles and captions.
For users who require speed, automation, and translation support, Wondershare UniConverter provides an incredibly efficient solution with auto-generation, language support, and easy styling options—all in just a few clicks.
Ready to simplify your subtitle workflow and boost engagement? Try UniConverter now to auto-generate, style, and export captions effortlessly—no manual syncing needed!
FAQs
-
1. Is using a download manager like these alternatives legal?
The software itself is legal. However, what you download with it must be legal. Downloading copyrighted material without permission is illegal. Always ensure you have the right to download the content. -
2. Why is my antivirus flagging a download manager?
Some free managers, especially older versions or those downloaded from unofficial sources, may bundle adware that triggers alerts. Always download from the official developer website. Tools like UniConverter, IDM, and FDM, when downloaded from their official sources, are generally safe and should not cause false positives. -
3. What is the best JDownloader alternative for Android?
Advanced Download Manager (ADM) is widely considered the most powerful and feature-complete JDownloader alternative Android app available on the Google Play Store. -
4. Can these tools download from YouTube and other streaming sites?
Yes, many of them can. UniConverter, EagleGet, Video DownloadHelper, and web services like Loader are specifically designed for this. However, always respect copyright and terms of service. -
5. What makes UniConverter a better choice than a free online downloader?
Safety and quality. Online downloaders pose privacy risks and often inject watermarks or limit quality. UniConverter is a secure desktop application that downloads directly to your machine, often in higher quality, and includes a suite of editing and conversion tools, offering far greater value and security.

