Compress Videos
- 1. Compress Video/Audio in Different Formats+
-
- 1.1 Compress MP4 on Winodws & Mac
- 1.2 Reduce Size of MP4
- 1.3 Resize MP4 Videos Online
- 1.4 Compress MP4 Online
- 1.5 Free MP4 Compressors
- 1.6 Compress FLV
- 1.7 Compress MKV
- 1.8 Compress MOV
- 1.9 Compress MOV Online
- 1.10 Compress WMV
- 1.11 Comrpess M4V
- 1.12 Compress MPEG/3GP
- 1.14 Compress AVI File
- 1.15 Reduce Size of MKV
- 1.16 Top 5 WebM Compressors
- 1.17 Compress WAV Free Online
- 1.18 FLAC Compression Software
- 1.19 Top 5 Online MP3 Size Reducers
- 1.20 Compress M4A Files Free Online
- 2. Compress Video from Devices/Apps +
-
- 2.1 Compress iPhone Video
- 2.2 Compress Camcorder Video
- 2.3 Compress GoPro Video
- 2.4 Compress QuickTime Video
- 2.5 Compress Fraps Video
- 2.6 Top 12 File Compressor for Android
- 2.7 MMS Video Size Limit for iPhone/Android
- 2.8 Shorten Videos on iPhone
- 2.9 10 Video Compressor App Android/iPhone
- 2.10 Top 8 Video Size Reducers for Android
- 3. Compress Video with Different Apps +
-
- 3.1 Resize Video in iMovie
- 3.2 Make VLC Resize Video
- 3.3 Make Windows Movie Maker Resize Video
- 3.4 Different Apps to Compress Video
- 3.5 Compress Videos with Windows Media Player Alternatives
- 3.6 Use FFmpeg to Resize Video
- 3.7 Apple Compressor 4 Alternative
- 3.8 Top 6 Clipchamp Alternatives
- 3.9 Top 7 Video Cutter and Compressor
- 3.10 HandBrake Video Compressor Alternative
- 4. Compress Video for Different Purposes +
-
- 4.1 Compress Video for Email
- 4.2 Compress Video for Web
- 4.3 Compress Video for YouTube
- 4.4 Compress Video for Vimeo
- 4.5 Compress Video for Facebook, Instagram
- 4.6 Twitter Video Compression
- 4.7 Resize Facebook Video Size
- 4.8 Resize Instagram Video Size
- 4.9 Compress YouTube Video Size
- 4.10 Compress Video for DVD
- 4.11 Send Large Files via Email
- 4.12 Compress Files for WhatsApp
- 4.13 Send Long Videos on WhatsApp
- 5. Other Tips & Tricks +
-
- 5.1 Full Guide to Compress Video
- 5.2 Free Video Compressors
- 5.3 Top 13 Video Compressors
- 5.4 Top 10 Video Compressor for Mac
- 5.5 Top Audio Compressors
- 5.6 Top 8 Audio Compressor Free Online
- 5.7 Compress Files to Small Size
- 5.8 Compress HD/FHD (4K/1080P) Videos
- 5.9 Compress A Video
- 5.10 Compressed Video Formats
- 5.11 Top 8 Compression Software 2019
- 5.12 Top 9 File Compressors
- 5.13 How to Make A File Smaller
- 5.14 How to Make Video Smaller
- 5.15 Lossless Compression
- 5.16 Top 10 Ways to Reduce Video Size
- 5.17 Compress Files & Folders
- 5.18 Compress Folder Online and Free
- 5.19 Top 10 Ways to Send Large Videos
- 5.20 Top 5 Video Resizer
- 5.21 Top 6 File Size Reducer
- 5.22 Shorten a Video Online and Free
- 5.23 Change MP4/MP3 Bitrate
- 5.24 11 Ways to Compress Videos Free Online
All Topic
- AI Tools Tips
-
- AI Photo Enhancer Tips
- Voice Changer Tips
- AI Thumbnail Maker Tips
- AI Script Generator Tips
- Smart Summarizer
- AI Subtitle Generator Tips
- Watermark Remover
- Vocal Remover Tips
- Speech to Text Tips
- AI Video Tips
- AI Image Tips
- AI Subtitle Translator Tips
- Video Extractor Tips
- Text to Speech Tips
- AI Video Enhancer Tips
- DVD Users
- Social Media Users
- Camera Users
- Photography
- Creative Design
- Movie Users
- Travelling Fans
- Educational Users
- More Solutions
- Holidays and Commemoration
- Game Lovers
- Other Tips
How to Compress Files & Folders on Windows/Mac/Linux
by Christine Smith • 2025-10-21 20:08:13 • Proven solutions
As we all know, every single OS has a different interface, function, and usability. Thus, it is hard to find a tool that will enable file and folder compression on all OS. That's why most of the users rely on online folder compress tools, which are available on the most system. However, the most convenient and safe way to compress a folder is using its own OS on Windows/Mac/Linux. In this article, we will learn how to compress a folder to a smaller size on various OS, and the most easy-to-use compressor for Windows and Mac. Other tools that would let you create a compressed folder containing various types of files are also introduced.
- Part 1. Best Compressor for Windows/Mac to Compress Video Files Without Losing Quality
- Part 2. How to Compress Files or Folders on Windows 10/8/7
- Part 3. Compress Files & Folders on Mac with Simple Steps
- Part 4. How to Compress Folder on Linux Using tar Command
- Part 5. Other 3 Ways to Compress Files and Folders to Email
Part 1. Best Compressor for Windows/Mac to Compress Video Files Without Losing Quality
The toughest job is to compress large size videos files because media files are easy to lose their quality during the process. So at the very beginning, Wondershare UniConverter (originally Wondershare Video Converter Ultimate) is recommended here. It can help you compress video files without any quality loss on both Windows and Mac systems. The software is developed as an all-in-one tool for various video requirements. It can be used for video converting, downloading, editing, burning, and transferring. Moreover, the software also has a toolbox that has additional functions like fix media metadata, make GIFs, etc. Wondershare UniConverter supports over 1000 video formats so you can compress your files easily with so many features.
Wondershare UniConverter - Best Video Converter for Mac/Windows
-
Compress video files without losing quality on Windows/Mac.
-
Reduce file size with features of changing video resolution, bit rate, quality, size, and real-time preview.
-
Support 1,000+ video formats for compressing and converting with super fast speed.
-
Edit videos with features of cropping, trimming, rotating, adding watermarks, and others.
-
Transfer compressed videos from PC/Mac to iPhone/Android devices easily via a USB cable.
-
Download videos from YouTube and other 10,000+ video sharing sites by pasting URL.
-
Supports batch processing to compress and convert multiple video files at a time.
-
Toolbox with additional functions like Screen Recorder, GIF Maker, Fix Media Metadata, etc.
-
Supported OS: Windows 10/8/7/XP/Vista, macOS 11 Big Sur, 10.15 (Catalina), 10.14, 10.13, 10.12, 10.11, 10.10, 10.9, 10.8, 10.7.
Video Tutorial on How to Compress Video Files on Windows, Similar Steps on Mac
Steps to Compress Video Files on Windows/Mac
Step 1 Add Files to Wondershare Compressor
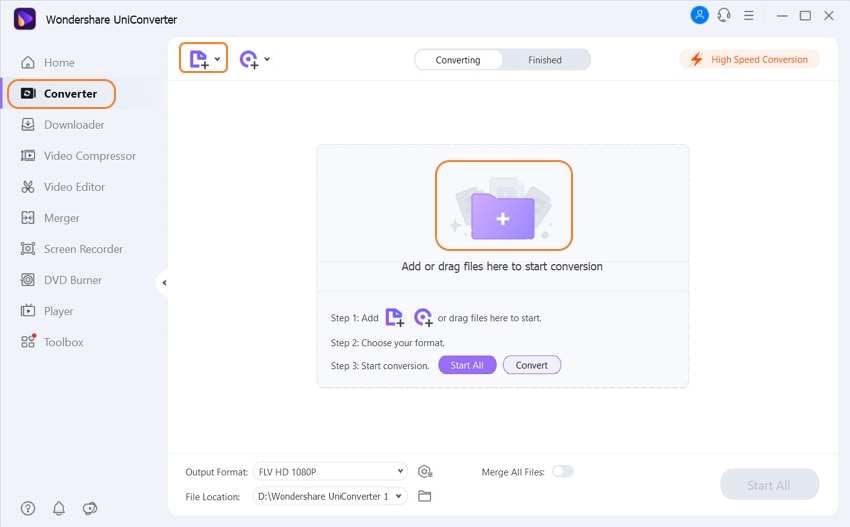
Open Wondershare UniConverter (originally Wondershare Video Converter Ultimate) on your PC/Mac after downloading and installing successfully. Then you'll come to the Video Compressor tab, where you can add video files by clicking on the  button or dragging and dropping. You can add multiple files here for batch compression.
Step 2 Choose File Size and Other Parameters
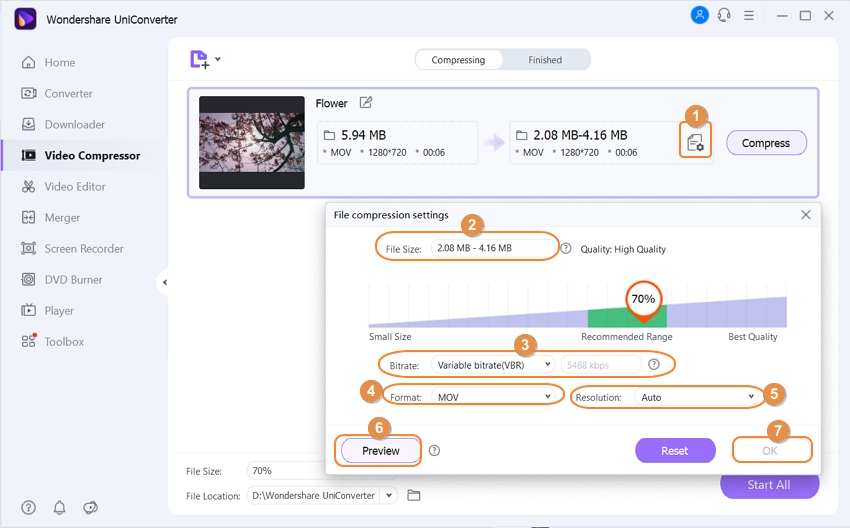
The added videos will appear with details and a thumbnail image. Click on the settings icon, and a new pop-up window will open where you can move the slider next to the File Size to select the desired size and the quality and set the Bitrate to Constant bitrate or Variable bitrate. You can even change the format and the resolution as required. Click on the OK button to confirm the settings.
Click on the Preview button to check the compressed video.
Step 3 Compress Files
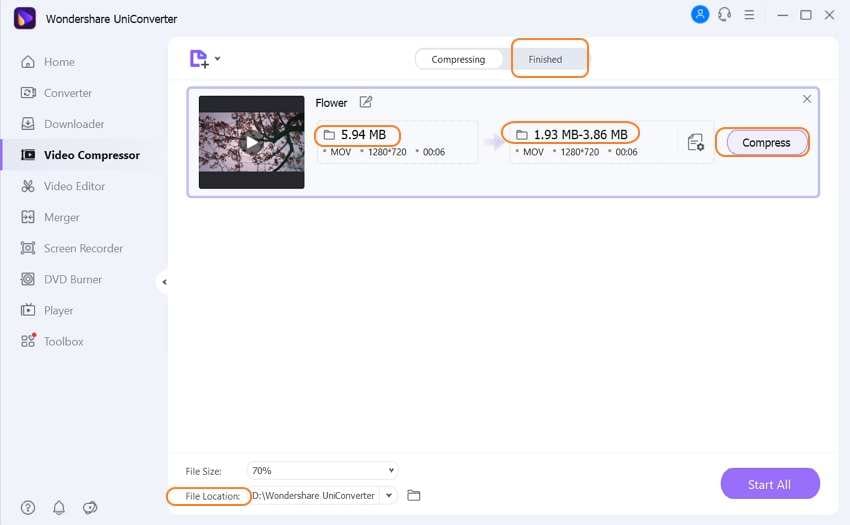
The desktop location to save the file can be selected from the File Location tab. After that, click on the Compress button to start processing the video. On the software interface, the compressed videos can be checked from the Finished tab
Step 4 Convert Files to MP4 on Windows/Mac
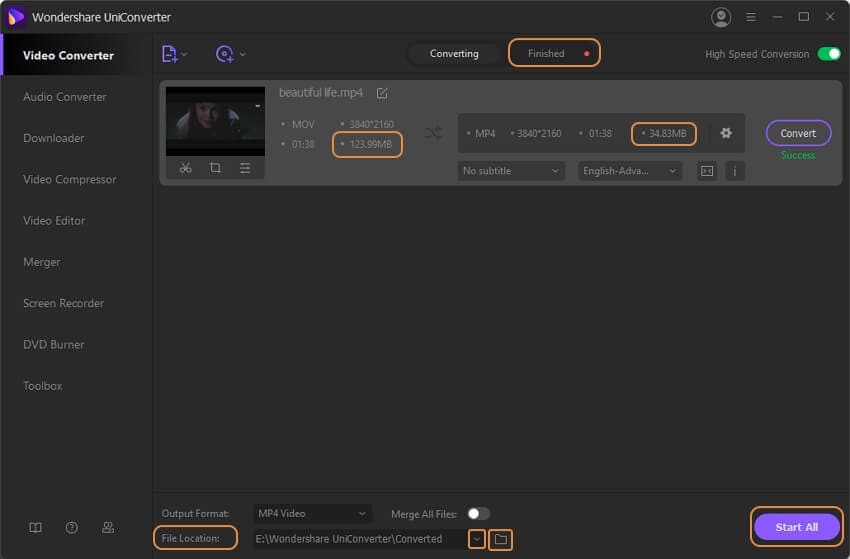
You can click the Convert category in the left pane, then click Add Files from the right window, and use the Open box to import the files. Click and open the Output Format menu from the bottom of the lower window, go to the Vedio tab, choose MP4, and select its model from the right. Finally, click on the Start All button to convert files in batch.
Pro-tip
If you don't need to batch compression and conversion, there is an easier way to compress video size without losing any quality. Click on How to Compress Video to Reduce Video Size to compress videos easily and quickly. To compress audio files, please go to the Converter tab to import your audio files, click on the Settings button and adjust the Bitrate lower to reduce it's file size.
Part 2. How to Compress Files or Folders on Windows 10/8/7
Before you learn how to create a compressed folder, you must know what a compressed folder is. A compressed folder is the one in which various types of files are zipped together in a comparatively smaller size so that space can be saved in the storage. The file and folder compression make it easier to share the files too. That's why users often compress a folder in Windows 10/8/7 and other OS too. The most popular format for compressing files in Windows is the zip format. You can embed pictures, emails, documents, videos, audios, and other files in a compressed folder.
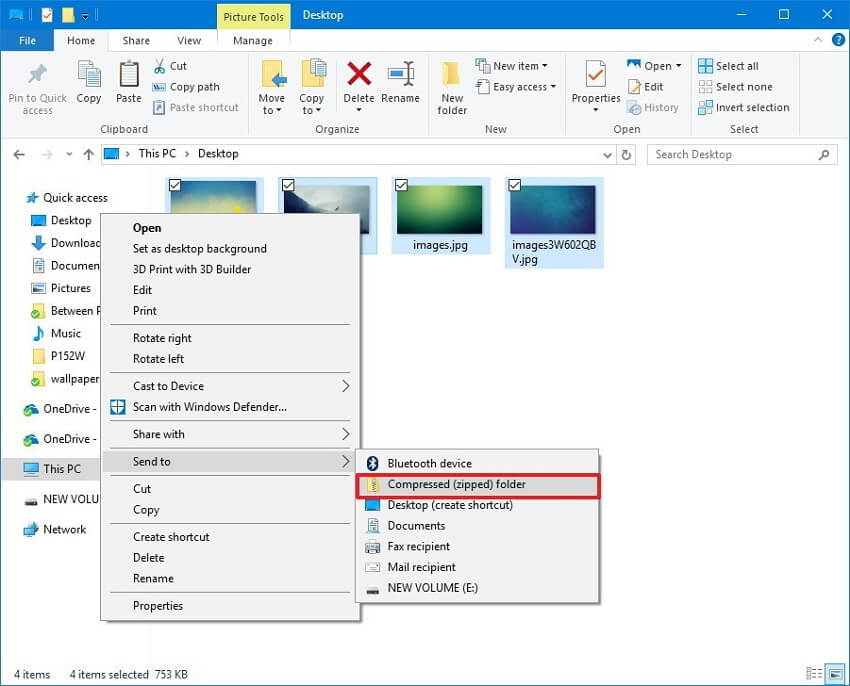
If you want to know how to compress files and folder on Windows 10/8/7, then the steps are given below:
Step 1: Open the file Explorer and collect the files you want to compress in a single folder.
Step 2: Right-click on an empty space, and several options will appear. Drag the cursor to the New option, and you will see further options. Select the Compressed (Zipped) Folder option, and a folder will be created.
Step 3: You can assign any name to the folder and hit enter to save folder. Now select the files that you want to transfer to the Compressed folder and cut them.
Step 4: Now open the compressed folder and paste the files in the folder. You can further add files in the folder by simply cut and paste method in any version of Window.
There is another method to compress files in Windows. You can also use this method to compress the files:
Step 1: Store all the files that you want to compress in a single folder.
Step 2: Select all the files at once and right-click on any of the files. Some options will appear on the screen.
Step 3: Select the Send To option and further click on the Compressed (Zipped) Folder. This will automatically create a compressed folder containing all the files. You can rename the folder anything you want.
Part 3. Compress Files & Folders on Mac with Simple Steps
Creating a folder which contains compressed files on Mac is very easy. You don't need any additional software to create compressed folders and files. If you don't know how you can create compressed folders on Mac, then here is the guide.
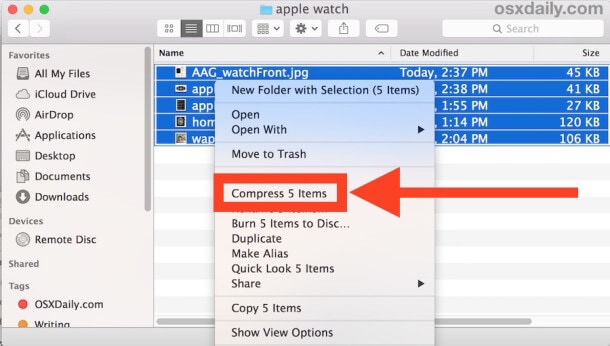
The steps you have to follow to learn how to reduce file size on Mac are given below:
Step 1: Locate the files in the storage which you want to compress in the Mac Finder.
Step 2: Right-click on any of the file or folder and select the Compress Items option.
And that's it. You will have a new Zip folder, which will contain all the existing files copy in a smaller size.
Part 4. How to Compress Folder on Linux Using tar Command
As we already know, the Linux OS is very different from Windows and Mac. Thus, the method to compress the file in Linux is also different. In Linux, you can compress a whole directory so that you can further use the file for backup, email, and can also send the software to other systems. For this purpose, the GNU tar command is used. The command can be used on remote UNIX and Linux servers to compress directory, folder, and files.

To create an archive in Linux and compress a folder, follow the steps below:
Step 1: To compress an entire directory in Linux, you will have to use the following command:
Command: tar- czvf name-of-archive.tar.gz /path/to.directory-or-file
Where the alphabets mean:
- -c: Create Archive
- -z: Compress Archive with gzip
- -v: Verbose mode, which will display the process of creating an archive
- -f: Specify the filename of the archive
Step 2: As you enter the command for a directory, a compressed folder in Linux will be created.
You can create as many directories as you want using this command. Just provide the list of files or directories and add multiple files in the archive at once.
Part 5. Other 3 Ways to Compress Files and Folders to Email
Don't think that the above-listed methods are the only way to create and compress files and folders. There are some other tools available that can zip files together and allow the users to use them for various needs.
1. 7Zip
7Zip is free and open-source software. This means that the software can be downloaded and further used on various platforms. You just have to obtain a 7-Zip License, and you can use this tool to compress folder size. The software offers a high compression ratio in 7Z format and uses strong encryption technology to protect the files. This file archiver can compress files and folders to a very large ratio.
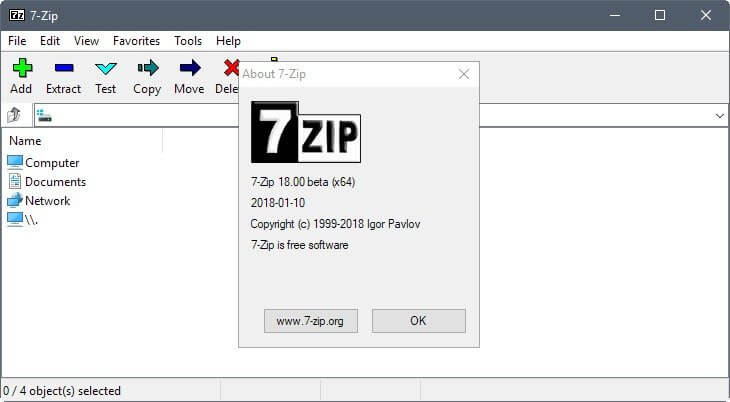
Pros:
- It also has a command-line version.
- The software has a self-extracting
- It is easy to use and can compress almost every file.
Cons:
- The software is only integrated with Windows shell.
- The interface is sparse.
2. WinRAR
As compared to Zip format, the Rar format for compression is less documented. The WinRAR software can compress, encrypt, package, and create a backup with just this utility software. This file and folder compression tool offer an efficient and secure way for file transfer, e-mail transmission, and data organization.
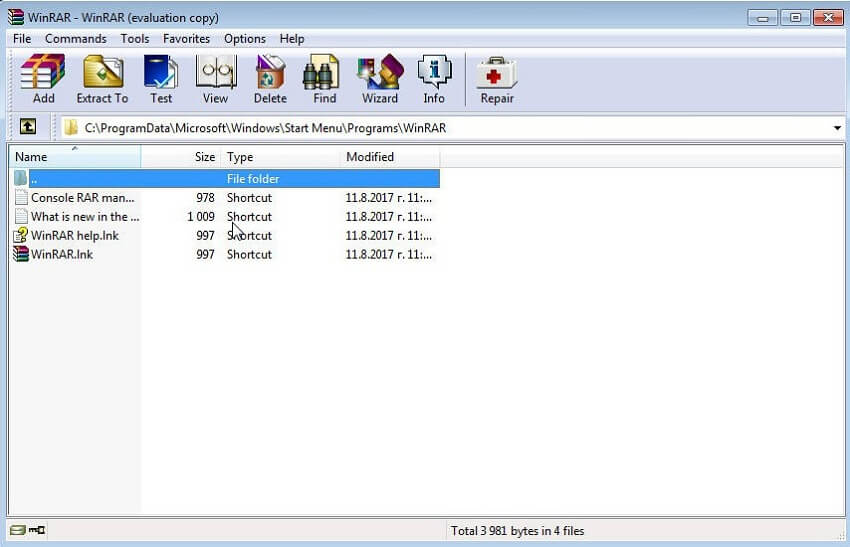
Pros:
- It supports a wide array of formats for compression.
- The software is available for free up to 40 days.
- WinRAR has an intuitive interface.
Cons:
- The software is available for 64-bit systems only.
- Not available for Mac and other OS.
3. WinZip
WinZip is also a very popular compression utility. It can be used to compress a folder on Mac and Windows both. The software offers other features, including protection, management, and sharing of the files quickly and easily. It is one of the most powerful compression tools. You will have to buy the software license to use it as there is no trial version available.

Pros:
- WinZip offers an easy installation process.
- The software has improved AES encryption.
Cons:
- The software is very expensive.
- It affects the working of the Operating System and slows it down.
Now you have learned that there are several ways to compress a folder in Windows, Mac, and Linux. Whatever the OS is, it is always possible to keep the files zipped so that the storage space can be minimized. For Windows and Mac, you can find some tools to zip the files to reduce their size. Or you can use Wondershare UniConverter (originally Wondershare Video Converter Ultimate) to compress the video files easily and quickly without losing any quality.
Your complete video toolbox
 Compress video files without any quality loss on Windows/Mac.


Christine Smith
chief Editor