Top 5 Methods to Compress Video Files (With Step-by-Step Images)
Whether it’s your favorite Hollywood Blockbuster, or a home movie, deleting a video file because it’s too large is a hassle. Knowing how to minimize video file size lets you retain all the data and video quality.
There are many reasons to compress a video, including:
-
Slow upload speeds: A large file is slower when sending a video through email or uploading the file to a flash drive. Learning how to reduce the video file size speeds up your upload times.
-
Storage space: Videos require plenty of space on your hard drive and other digital storage devices. Smaller files free up space for multiple video files to be stored.
-
Unsupported by your device: Sometimes large video files aren’t supported by tablet or mobile phone video apps. Compressing and converting the file lets you play it on multiple platforms.
In this blog, you’ll learn how to make video file smaller in 5 different ways, use a video compressor tool, trim your video, convert to a different file type, change the resolution, or apply custom settings. All these methods are easy to accomplish with Wondershare UniConverter.
In this article
-
What is Wondershare UniConverter?
If you’re wondering how to reduce video file size without losing quality, Wondershare UniConverter has been the industry standard for over 17 years. With more than 20 features to streamline the process, you can compress 10 or more 4K, 8K, and HDR files simultaneously.
Wondershare UniConverter also provides access to several tools including:
DVD burning, Video converter, AI video enhancer, Text-to-speech, Watermark editing, Scene detection, Visual effect application, Subtitle adding, Merging clips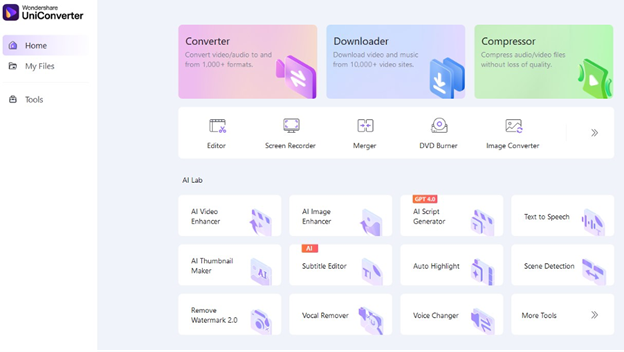
Through Wondershare UniConverter you can learn how to compress video on Mac or Windows in several ways. Let’s explore 5 ways to downsize your video file without losing quality in audio or visual data.
Method 1. Use Wondershare UniConverter to Compress Video File
The obvious and most straightforward method of compressing a video file is through the Wondershare UniConverter platform. Compressed video files require less data to present the same content without downgrading quality. Most of the videos you see online have been compressed for streaming purposes.
Video compression is a simple process. To begin, simply download the Wondershare UniConverter app for Windows or Mac. Next, follow these steps:
Step1Open Wondershare UniConverter and select compressor.

Step2Add your video file by selecting the + icon or dragging and dropping.
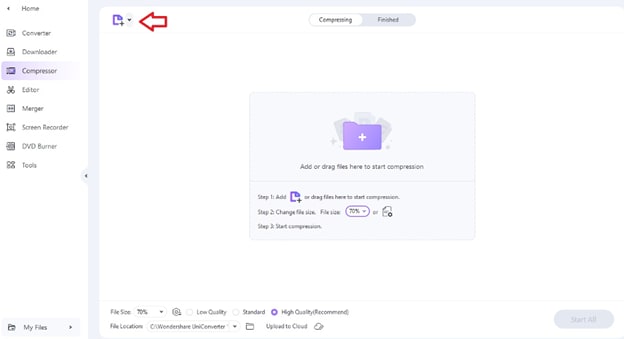
Step3Choose your compression settings at the bottom of the screen (High-quality compression at 70% is the standard recommended setting).
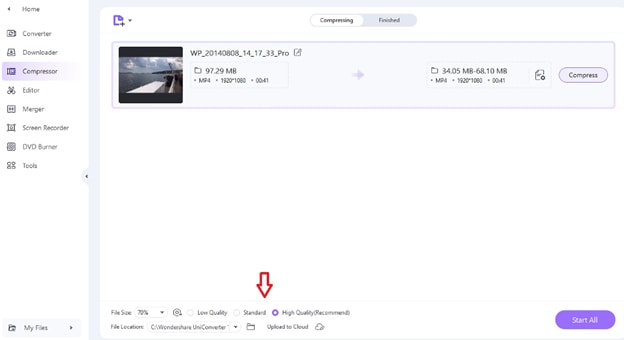
Step3Select compress or start all (for multiple files).
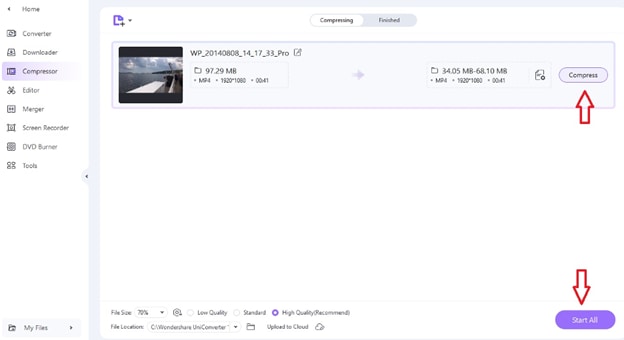
The result is a compressed video file to your specifications. Easy storage, with no loss of visual or audio quality.
Methos 2. Trim Your Video to Make the Video File Smaller
Another way to make a video file smaller is to trim the video. Any unnecessary portions of a clip can be removed to shrink the file. The more you trim, the smaller the file gets. This is a great option for those who want to avoid physically compressing the file or changing any of the video’s formatting.
Several tools let you trim videos, but Wondershare UniConverter will quickly trim over 40 standard video formats (MOV, MP4, VOB, WebM, MTS, AVI, MKV, etc.). It also offers access tosmart trim options to trim out people’s portraits or delete silent clips.
To use the standard trimming option in Wondershare UniConverter, open your UniConverter platform and follow these steps:
Step1Select tools and then smart trimmer.
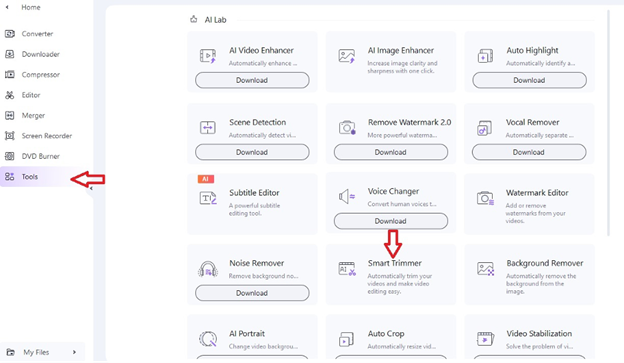
Step2As with the instructions for compression above, choose a video file by clicking the + icon, or dragging and dropping.
Step3Click remove silent segments or specific portrait to trim the desired portions. If the trimmer doesn’t start running automatically, click run.
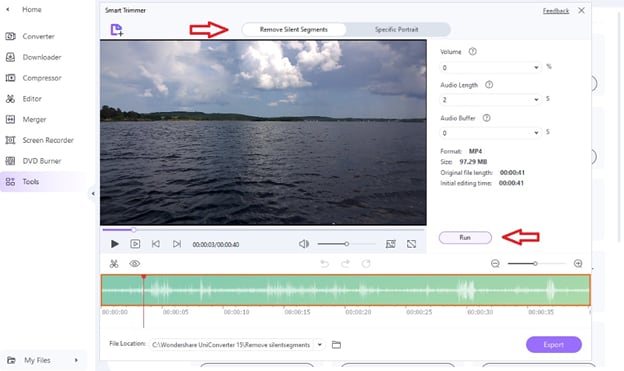
Step4You can also select the portion to trim by moving the cutting tool on the video bar. When you’re happy with the file, click export to save the newly trimmed video file.
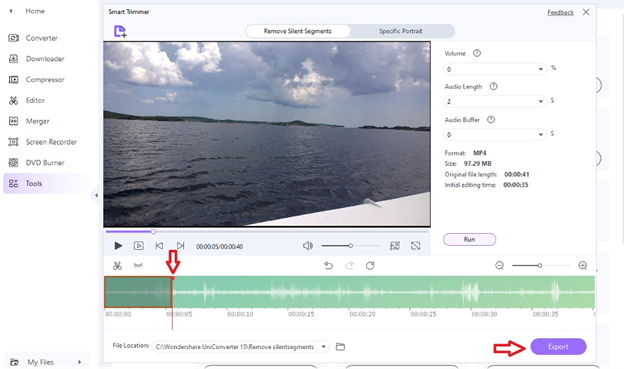
The format, size, original file length, and initial editing time are listed on the right. This lets you see how the file size changed from your original file.
Method 3. Convert Video File into New Format
Still wondering how to minimize video file size? Apart from fully compressing, or cutting up your video, you can make the file smaller by changing the format with the converter tool. For example, changing a video file from an MP4 to a WMV makes the file smaller while retaining quality.
File format is how video data is stored in your computer (or other device). All video files are comprised of a:
Codec: The codec compresses and decompresses video data by encoding and decoding it.
Container: The container is the part of your file format that contains all the elements that make up the video, including audio, image, and subtitles. Container often dictates your file extension.
How the codec compresses and decompresses your video file impacts the quality and size requirements of the file. Some codecs cause the file to remove data or merge data to compress it, resulting in some quality loss. Other codecs are considered lossless; that is, they don’t result in quality loss when they compress the file.
To convert a video file using Wondershare UniConverter, follow these steps:
Step1Select converter from the home screen and add your desired file by clicking the + icon or dragging and dropping.

Step2Open the output format dropdown menu and select video followed by your desired format.
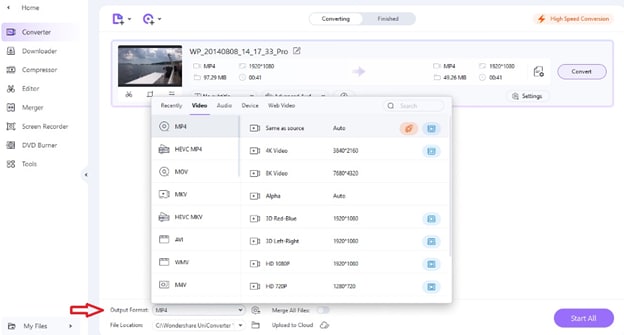
Step3Select your preferred resolution.
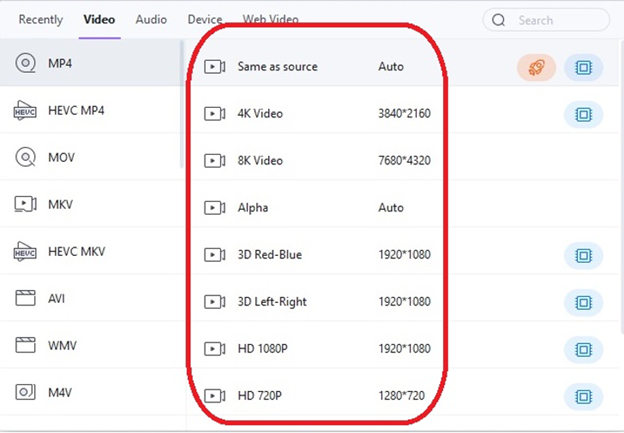
Step4Click convert or select all.
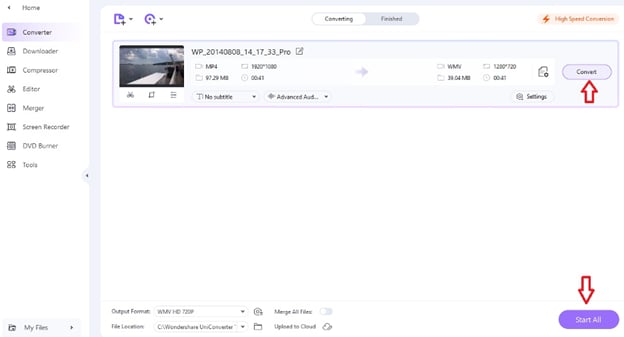
Converting a file from one file type to another can drastically change the size of a video file. Like the compressor tool, you can convert more than one file at a time.
Method 4. Change Video Resolution for Smaller File
If you’re looking to learn how to reduce video file size, a simple fix is changing the video resolution. Resolution options depend on the file type. For an MP4 video, for example, you can choose from 7 resolution options.
The video resolution reflects the video file size in pixel values. The more pixels in a video or image, the higher the resolution and the higher quality of the video. Unfortunately, the more pixels, the larger the file size. By changing the video resolution, you can change the video size.
To change the video resolution using Wondershare UniConverter, follow these steps:
Step1Start by repeating steps 1 to 3 for the conversion tutorial above. This time, retain your initial output formatin the dropdown; you’re only changing the resolution.
Step2Click the settings button and select your desired resolution from the resolution drop-down menu to customize the resolution further.
Step3Finish the process by clicking convert or start all as you would with regular file conversion.
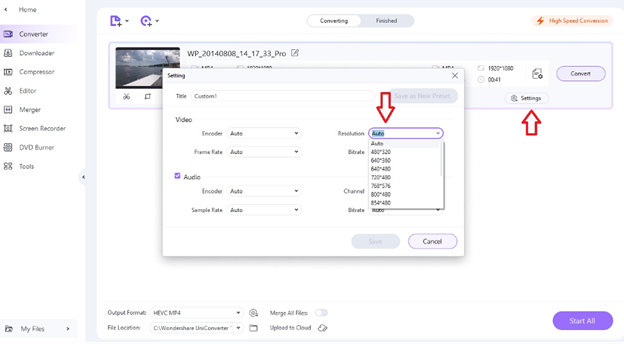
The finished product will be in a smaller, but enjoyable resolution, letting you store or share the video more easily.
Step44. Apply Custom Settings to Condense Video File
Customizing settings on a video file makes a big impact on size. As you saw with how to make a video smaller by changing resolution, you can also make a file smaller by altering:
Bitrate
A bit is the smallest way to measure data. In the example of a video, it is a measurement of video data as it is processed or transferred. The bitrate is the rate at which this process occurs.
The best bitrate for your video depends on the frame rate and quality you’re aiming for. For example, in a 1080p video file, 12 Mbps is a good bitrate for high frame rates of 48 to 60, while 8 Mbps works well for standard frame rates of 24 to 30.
Wondering how to make a video smaller by changing the bitrate in Wondershare UniConverter? There are two ways: through the compressor or the converter. To use the compressor, follow these steps:
Step1Follow steps 1 to 2 in the compression tutorial above, launching UniConverter and adding a file with the +icon or by dragging and dropping.
Step2Click the file settings icon on the right of the file (It looks like a sheet of paper with a + on it).

Step3Slide the bubble across the quality bar to select your bitrate. You’ll notice the file size change in the file size bar in the top left of the window. Click ok and then compress or start all.
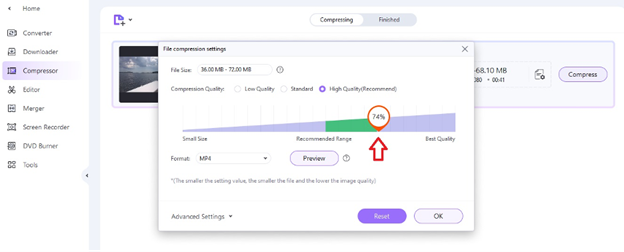
To change the bitrate using the converter, follow these steps:
Step1Access the converter tool from the home screen as you would when converting the file type. Add your video by clicking the + icon or dragging and dropping the file.
Step2Click settings and choose the appropriate bitrate from the bitrate drop-down menu. Press save and convert or select all.
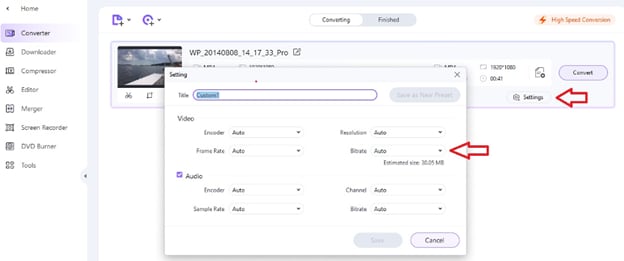
Frame Rate
A frame is a still image within a video file. Videos are composed of hundreds, or thousands, or more frames, depending on the length of the video. Frame rate is the rate at which those frames change and is measured in frames per second (FPS).
The standard frame rate for film and streaming video files is 24 FPS. The higher the frame rate, the smoother the transition from one frame to the next, and, in turn, the higher the quality of the video.
The issue with a high frame rate is that you’re storing more video stills in each second of film. These stills take up precious space and increase the overall size of your video file. By decreasing the frame rate, you can compress the video into a smaller file.
To decrease the frame rate using Wondershare UniConverter, follow these steps:
Step1Open the converter tool from the home screen and add your video by clicking the + icon or dragging and dropping the file.

Step2Click settings and select the frame rate drop-down menu to choose your frame rate from rates between 23.97 FPS and 50 FPS.
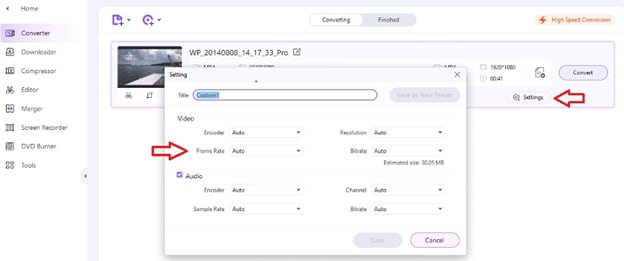
Step3Click save and then convert or select all.
Encode
While trying to learn how to compress video on Mac or Windows, you’ll discover the encoding process. Video encoding changes the RAW video file format into a digital file. The encoded file is compressed, making it smaller and easier to store.
To encode a video file, you need to use an encoder. Fortunately, Wondershare UniConverter includes an encoder tool. To compress your video file through the UniConverter encoding tool, follow these steps:
Step1Open the converter tool from the home screen and load your video by pressing the + or dragging and dropping the file.
Step2Click settings and then select the encoder dropdown menu for video and/or audio to change the settings.
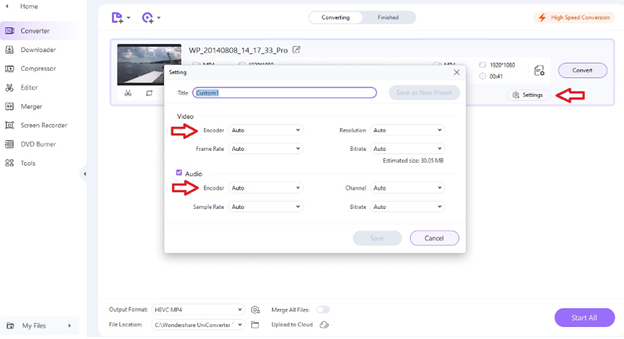
Step3Click save and then convert or start all.
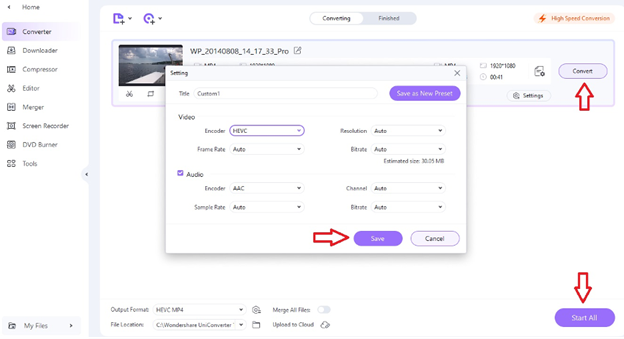
Encoded files are much smaller because unnecessary data is removed during the process. This will save you space and time loading your video to digital platforms.
Try Wondershare UniConverter Today
Wondershare UniConverter is a full-service video file management platform. From adding AI elements to your video to editing visual and audio data, compressing, and beyond, UniConverter can help.
Interested in learning more about how to minimize video file size? Download Wondershare UniConverter for free today and try it for yourself.

