If you are still struggling with how to add subtitles in iMovie, you've come to the right place, here we will introduce you to the best possible step-by-step guide on how to add captions in iMovie. Besides, you will get to know the best iMovie alternative to create the subtitles for your movies or videos automatically. Read on!
Part 1. How to add subtitles iMovie?
You can use various different ways to add subtitles in iMovie. However, here we will introduce you to the best possible step-by-step guide to allow you to know how to add captions in iMovie.
Step 1: Open iMovie and Select the Clip and Click the Titles.
First, you need to launch iMovie to select and import the video for adding subtitles. After that, simply drag the clip from the media library into the timeline of the program. After it, click on the Titles in your browser, and a new screen will pop up where you can add those subtitles.

Step 2: Select Font Style.
In the next window, you will find a lot of font styles and formats to select. And, to check how these font styles will look on your clip, you can either tap on that subtitle window to bring your cursor over it, and it will provide you a preview of that particular subtitle.
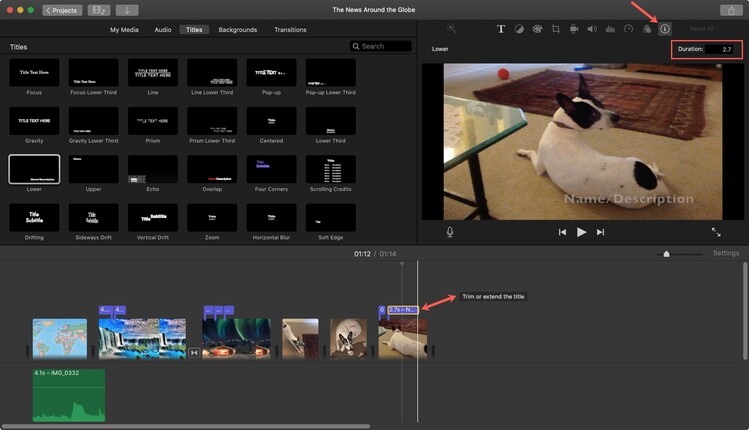
Step 3: Add/Drag a Title to Your Clip.
Now, if you have selected a particular style of title/subtitle for your clip, you need to drag that title box onto your clip, or you can double click the title to select it for your film.
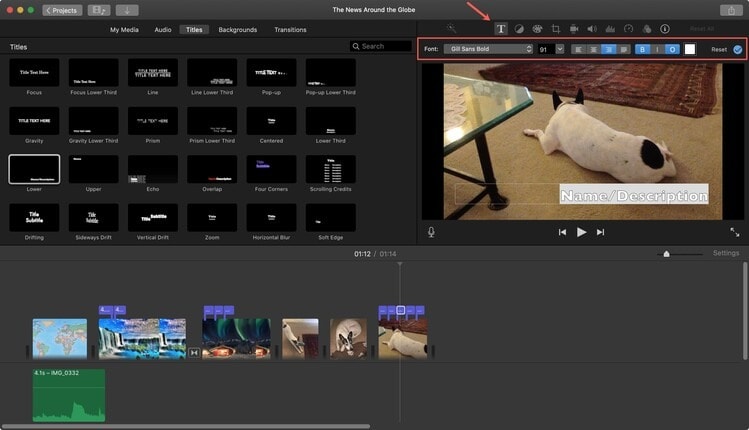
Step 4: Enter Text.
Now go to the viewer and here you can enter the text content to add subtitles into the video.
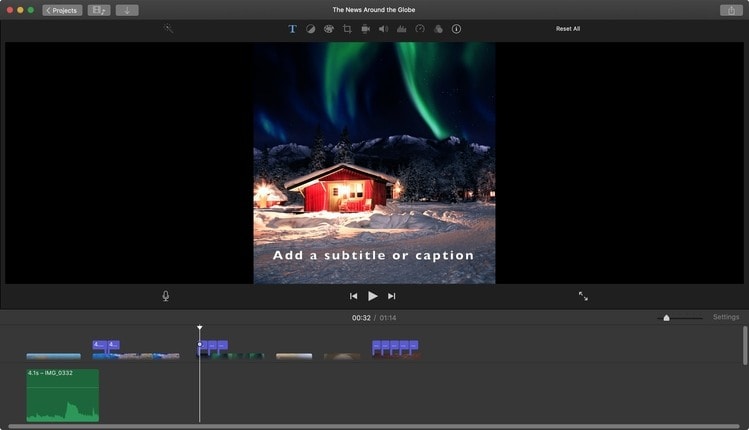
Step 5: Follow the Same Cycle for More Subtitles.
If your video is big enough to accommodate more subtitles, you need to repeat the same cycle, and you will be able to add more subtitles to your video. You will follow this pattern until the video ends, and by simply selecting the video's portion, you can add subtitles to your desired time/location.

Part 2. Best iMovie alternative to adding subtitles to movies easily
We know that you must be looking for other alternatives to add captions in iMovie, and for this, we suggest you bet on Wondershare UniConverter. It can convert MOV to MP4, MKV to MP4, AVI to MP4, WMV to MP4, and MP3 to MP4. This tool fully supports all the latest versions of windows and it has a very user-friendly interface that will definitely be easy for you to handle.
Key Features of UniConverter Subtitle Editor:
- It can convert almost all movie formats to MP4.
- It is compatible with YouTube, Facebook, Vimeo, Instagram, TikTok, Amazon, and eBay.
- It supports 4k HD video, 3d Red-Blue, and 3D Left-right format.
- Its smart recognition features automatically recognize videos from your internal as well as external storage.
- You can schedule your conversion and subtitle, adding tasks quickly on this tool.
Wondershare UniConverter — Best Movie Subtitle Editor for Windows and Mac
Add subtitles to movies including MP4, MKV, AVI, MTS and any other media file.
Create custom subtitles, or download and modify subtitle files (font, color, size) and synchronize them with your movies.
Transfer movie files from laptop to iPod, iPhone, Android, and other devices quickly.
Compress movie files of large size with just one click.
90X faster conversion speed to convert your movies to 1,000+ video formats without quality loss.
3 ways to add subtitles to a movie using UniConverter:
Option 1: Create Subtitle.
Step 1 Launch UniConverter and Subtitle Editor.
Open the UniConverter and select the Toolbox option from the left menu bar. Then choose Subtitle Editor to begin the process.
Step 2 Import Video and Create Subtitle.
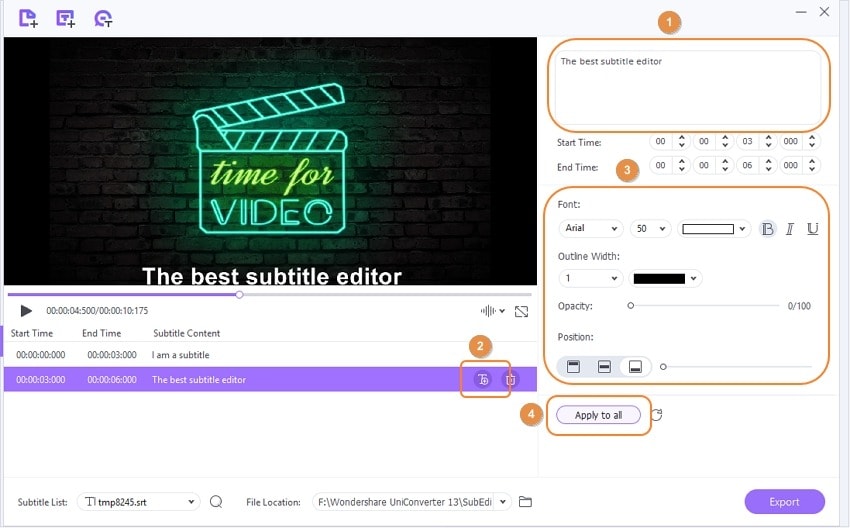
Next, you can click on the +/Add button to import the video clip into the program. When the importing is done, click on New to type in subtitle content. Here you can adjust the starting & ending time of the subtitle, also set the position.
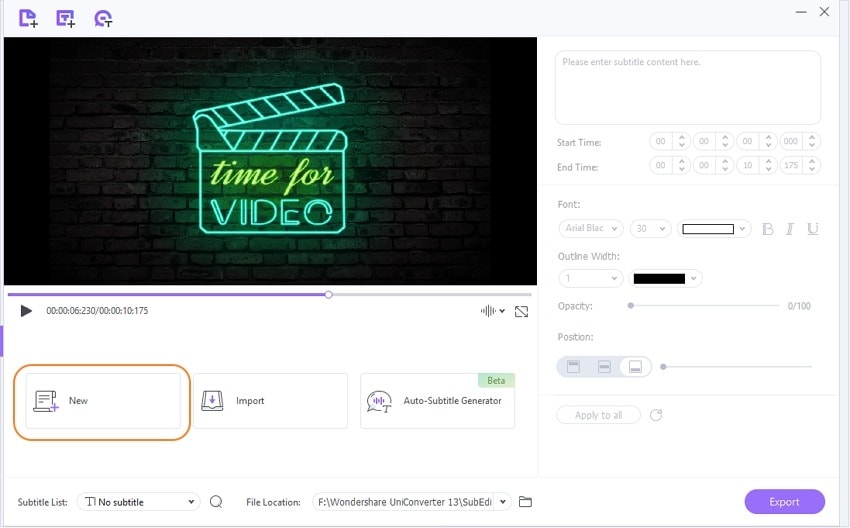
After that, change or select the font color/size/type/opacity of the text for subtitles. After setting everything, you can click on Apply to all.
Step 3 Export Video with Subtitles.
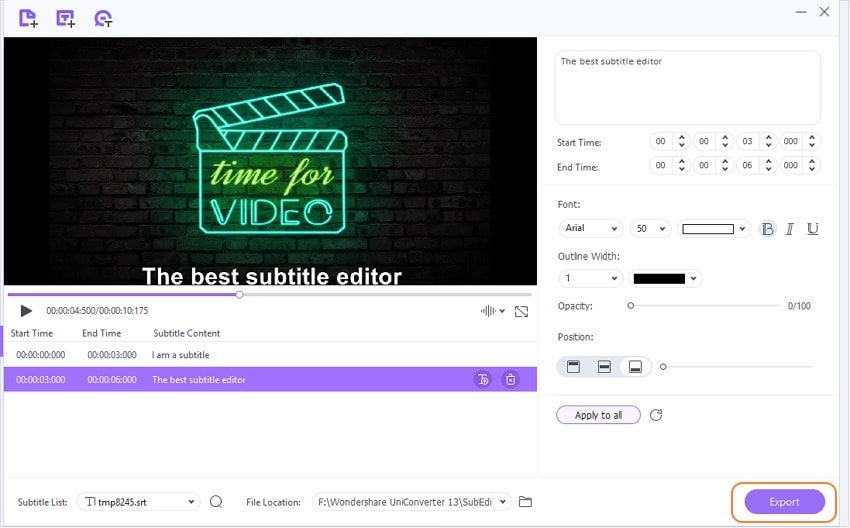
Finally, go and select the File Location for the final video and then click on the Export button to save the video.
Option 2: Import/Download Subtitle Online
UniConverter allows you to import and add an existing subtitle file to a video, which you have already downloaded from any online subtitles library. Try the steps below:
Step 1: Import Subtitle.
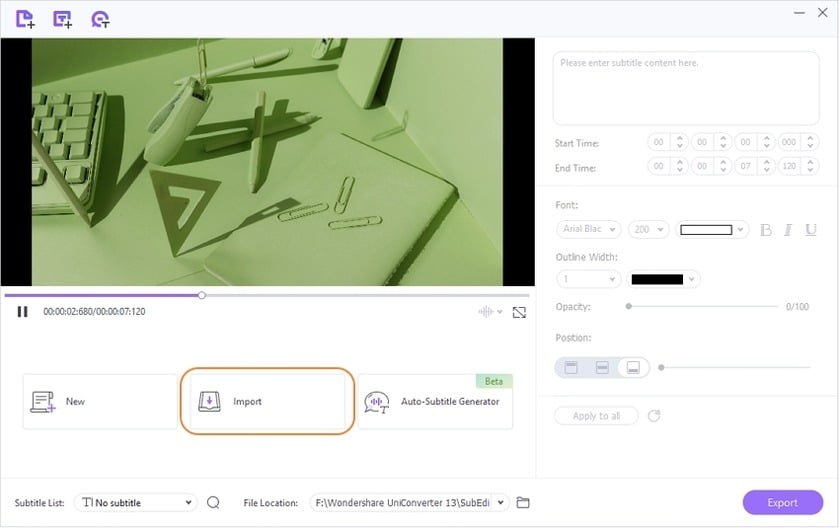
Same way, launch UniConverter and open the Subtitle Editor, and import the video into program. Then go and click on the Import button to add the subtitle file from your File Location on Computer.
Step 2: Adjust Subtitle and Export Video.
Finally, adjust the subtitles for the video and properly sync the starting/ending time. Then choose the File Location, and tap on Export to complete the process.
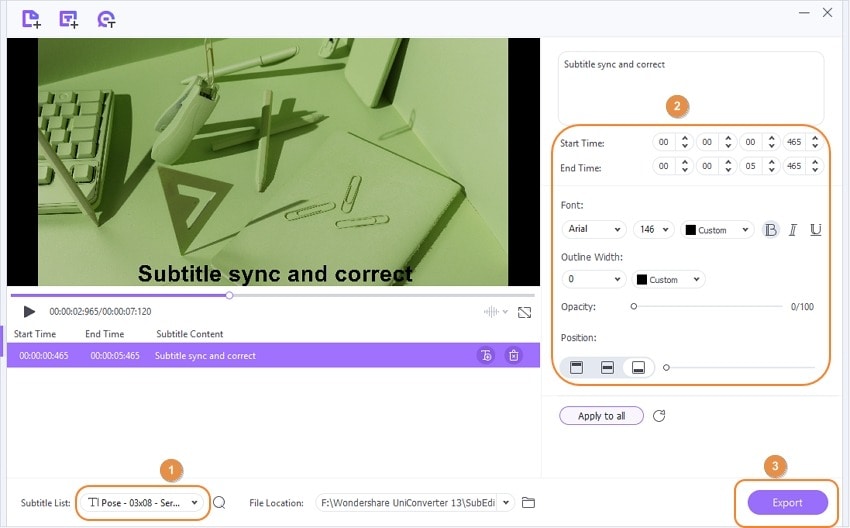
Tip: Click on the Search icon, you can search more subtitles for your video online.
Option 3: Auto-Subtitle Generator
Wondershare UniConverter has an Auto-Subtitle Generator feature that can automatically detect the videos audio and create subtitles for it. Follow the below steps to use this feature:
Step 1: Open Auto Subtitle Generator.
Click on the Auto-Subtitle Generator option from the Subtitle Editor after upload your video to begin the process.
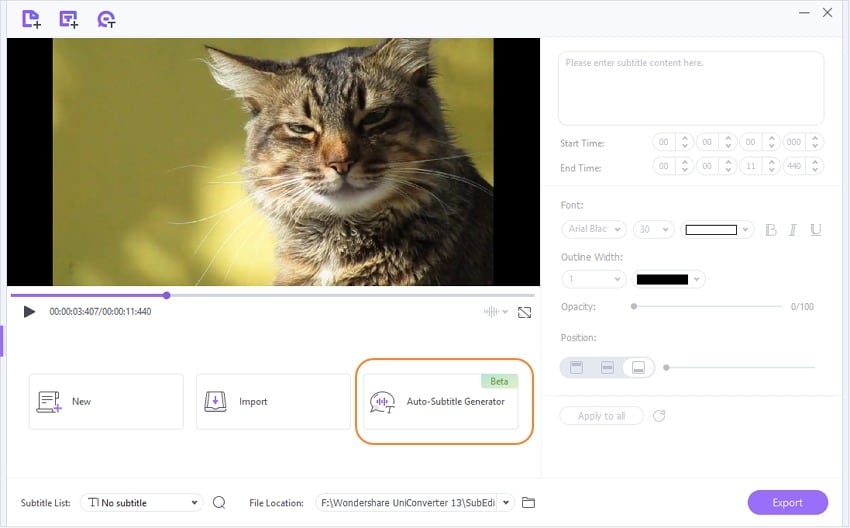
Step 2: Export Video.
Finally, when the program has completed generating subtitles, click on Export to save it into the selected location.
Part 3. Bonus: Everything you need to know about subtitling movies
Adding subtitles to videos can be frustrating if you are new to this. So you'll need some professional tips while doing it by yourself. Hope these tips can help you enough –
What does the SRT file stand for?
An SRT file stands for SubRip Subtitle file. It is a plain-text file that provides essential information about subtitles, including the start and end time codes of your text. It makes sure that your subtitles match your film.
What subtitle format should I use?
To know about using the best subtitle format, you first need to learn about different subtitle formats. So, here we have five of the best subtitle formats you can use.
SRT.
SRT is the best and most commonly used subtitle format throughout the world. It enables you to understand every single detail related to your subtitles and video. It owns everything you need, whether it is a start and end-time code or matching video to subtitles.
WebVTT
WebVTT is one of the finest subtitle formats used for displaying timed text tracks. It only allows you to add text overlays to your video.
TTML
It is an interchange and distribution format, but you must not use it because it is pretty complex for your videos. Broadcast industries mainly use the TTML caption format.
STL
It is a European Broadcasting Union Subtitles. The European broadcasting industry mainly uses it, and its scope outside Europe is negligible.
SUB
It is one of the best subtitle formats, second only to SRT. It allows the user to add subtitles to a video and provides cues and points for playing each subtitle.
After reviewing all of the five subtitle formats, it is crystal clear that SRT is the finest subtitle format to use for your videos. It is easy to use, owns almost all of the qualities of other subtitle formats, and it's accepted across the globe.
Which is better, VTT or SRT?
There is no doubt that SRT is better than VVT. SRT separates seconds from milliseconds with a comma, but VTT has no use of a period instead. And, there is less freedom to edit in VTT than in SRT.
What subtitle formats do social media and video platforms support?
Most of the Social media platforms use SRT as their core subtitle format. Taking the example of some of the biggest social media networks, Facebook, Twitter, LinkedIn, and Snapchat uses SRT as their primary subtitle format.
Part 4. FAQs about adding subtitles in iMovie
Q1: Can you add subtitles in iMovie on iPhone?
Inevitably, you can add subtitles in iMovie on iPhone.When it comes to adding subtitles to a film, there is no better option than Apple. Whether you are using a Mac or iPhone, you can easily add subtitles in iMovie on iPhone. Apple allows iPhone users to add subtitles in iMovie using their smart iPhone. Though there is no official tool for adding subtitles, the title option in iMovie allows you to add subtitles using an iPhone.
Q2: How do I manually add subtitles to a video?
First, you need to have a subtitle-adding tool. It may be iMovie, UniConverter Subtitle editor, or any other tool. After it, select the video you need to add subtitles.
Then, you'll have to choose the subtitle style and format. Once done correctly, you will have to type, transcribe or upload the subtitle to the title box. Now you can edit and save the file accordingly, and you are done with adding subtitles manually.
Q3: How do I get subtitles on a video?
To get subtitles on a video, the conventional method is to get a tool to select your video, type your subtitles on the video and edit the file. For this, you may use iMovie. It works perfectly for adding subtitles.
But, a modern way allows you to get subtitles automatically; many tools like VEED will enable you to embed subtitles automatically to your videos. You only need to select the language, and the rest will be done by the tool.
Q4: How do I add captions to a video?
Adding captions to a video is no longer a hard nut to crack. If you have your captions ready, then go to iMovie or UniConverter Subtitle Editor, and you can add captions to your videos by following some simple steps (selecting the title style, dragging it to your video, writing/transcribing the titles, and editing). And, if you want to go for a simpler way, we suggest you try VEED at least once. It will allow you to add captions automatically.
Conclusion:
This article has finely guided you on various ways to add subtitles to your videos and films. The article has tried its best to enrich you with all the information you need to add subtitles to your videos. You can try adding subtitle to your videos via iMovie, but we'll suggest you to use Wondershare UniConverter. It's an amazing tool that can help you beyond your imagination.


