Subtitles are helpful written texts below the video you're watching on YouTube that can be in any language. They are used so that you can clearly understand what the video is about. YouTube can display subtitles as well. And a beginner YouTuber who uploads movies might need a tutorial on how to add subtitles to a movie on YouTube. So in this article, we will give you a tutorial on how to add subtitles in YouTube movies in any language on your computer with the best subtitle editor.
Part 1. How to put English subtitles on YouTube?
To know how to put English subtitles on YouTube, we need to know what type of format YouTube supports. YouTube supports many kinds of subtitle formats, but the SRT (.srt) file is highly recommended. It's the simplest one that you can easily edit without any problem. Below is a tutorial on how to add English subtitles on YouTube:
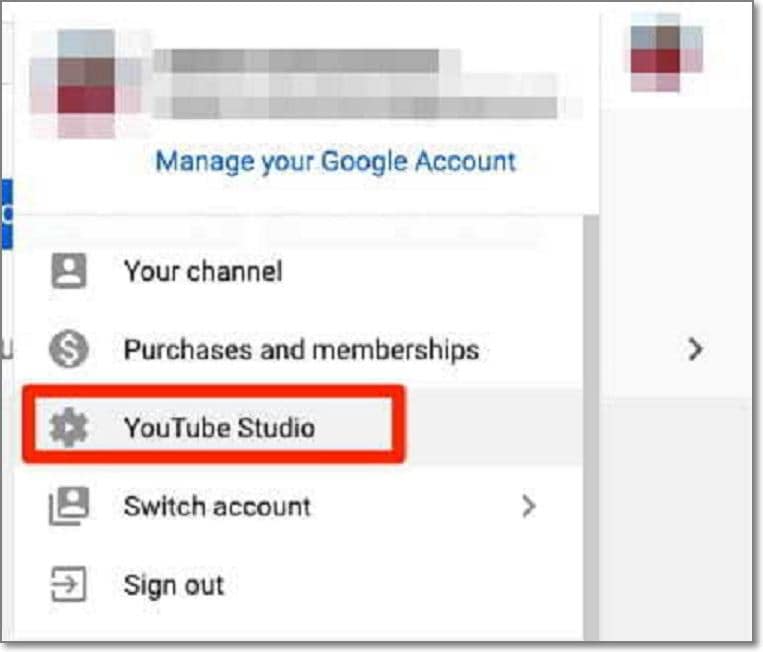
Step 1: Open YouTube, sign in to your account and go to Settings on the right corner. Select YouTube Studios from where you will start editing your video and add subtitles to it.
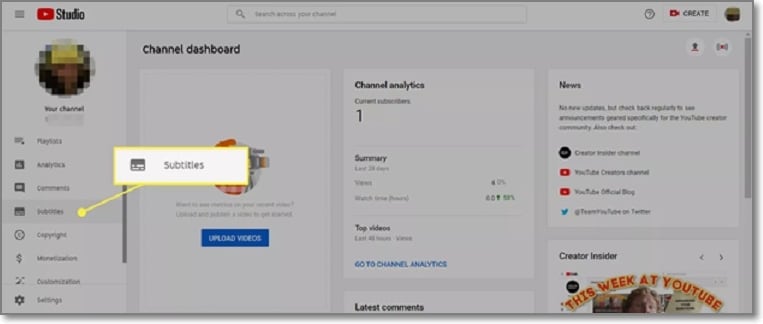
Step 2: After getting into YouTube Studios, on the left, you'd see a list of different options for different functions, select the one saying 'Subtitles'.
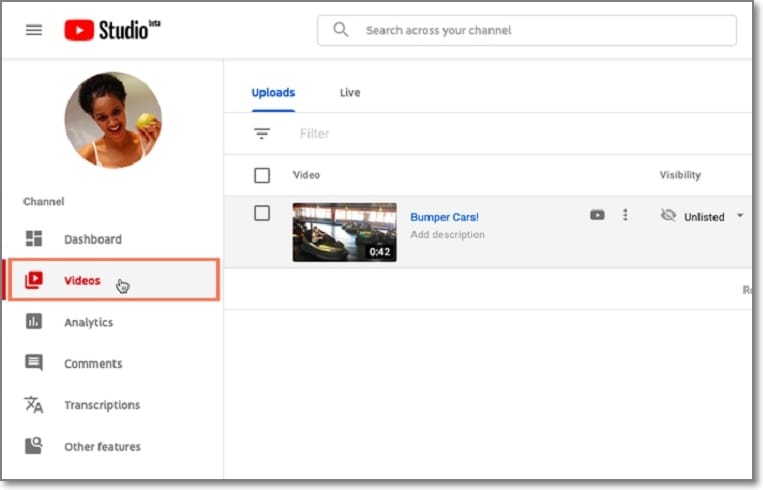
Now, a list of videos you've added to YouTube will appear. Select the video you want to add subtitles.
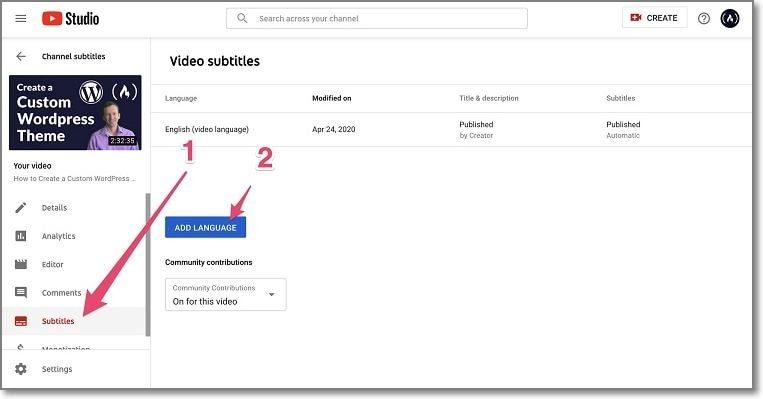
Step 3: After selecting your video, you'd then see an option "Add Language" click on it and choose the language for your video like English.
Step 4: After selecting your language, click on Upload File, then another option will come up. Now click on Subtitle File to choose .srt.
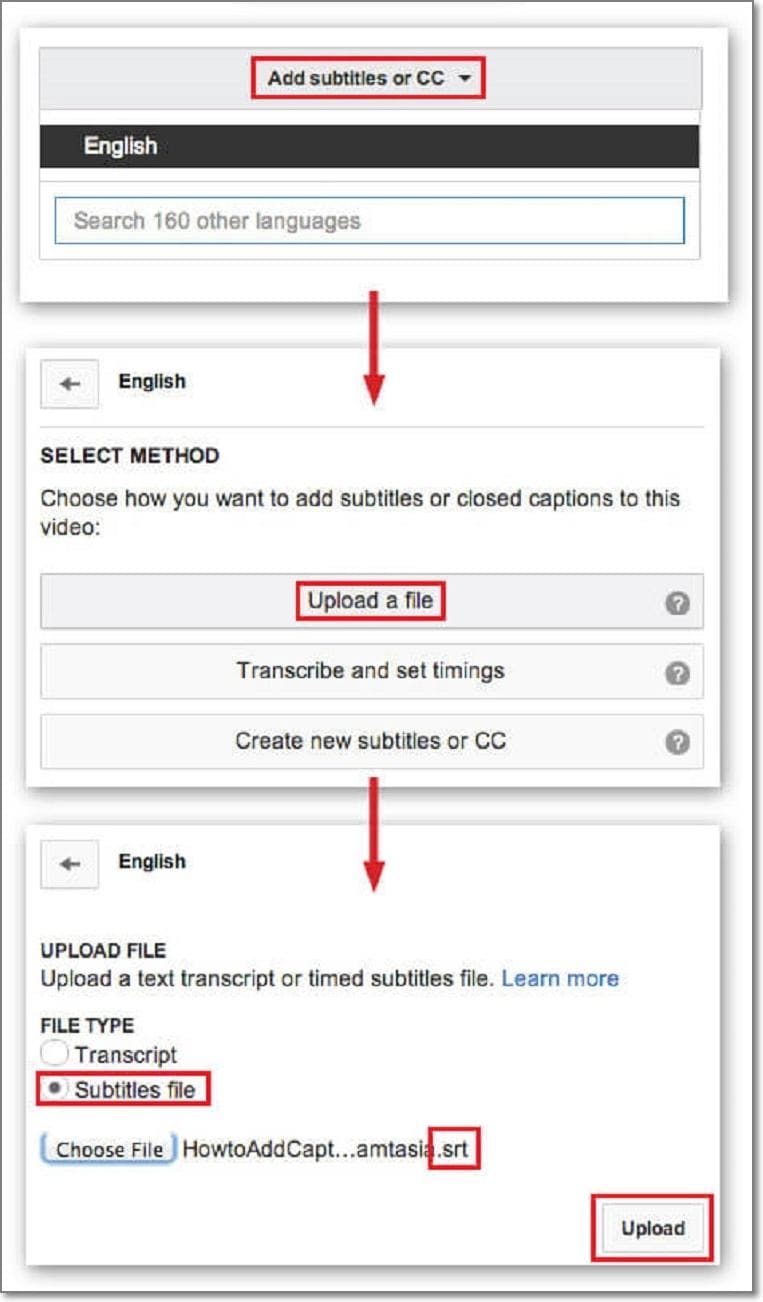
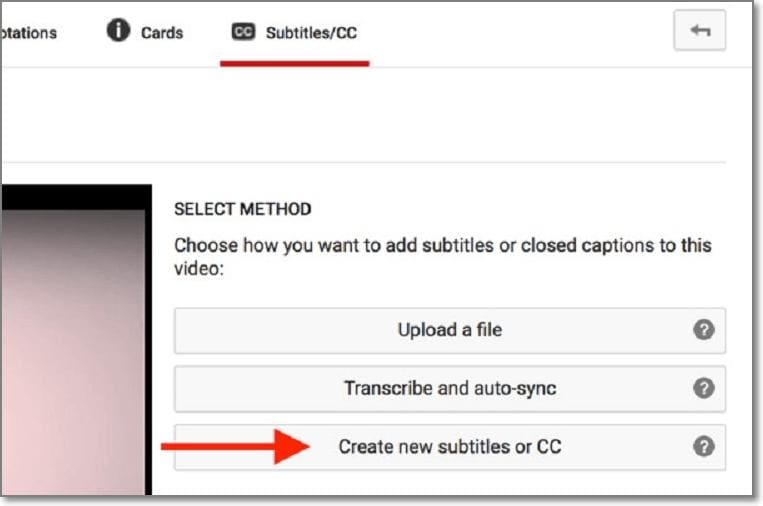
Step 5: You can add your subtitles by clicking the "Create new Subtitles or CC. You can also upload your subtitle file, then publish the video.
Part 2. The quickest way to add English subtitles to a movie in YouTube
Wondershare UniConverter Subtitle Editor is a desktop app that is said to be the best for editing subtitles. This app makes your editing subtitles work easier like you can import and edit local subtitles. When you're adding subtitles to a movie, this app can be very helpful. It's one of the easiest-to-use apps you can get for editing subtitles on your video for YouTube you can complete your work effortlessly. If you're a beginner YouTuber, you should get this app because it'll make your work easy and will save a lot of your time.
Key Features:
- You can easily add subtitles in 3 different ways by using this tool.
- It allows users to convert movie files into 1,000+ formats without any hassle easily.
- You can remove the watermark from movie files easily.
- You can easily compress the movie of a large size at 90X faster.
- Users can extract audio from the movie and separate them to edit and get the best result.
There are 3 ways to add subtitles to a movie using UniConverter:
Option 1: Create Subtitle.
Step 1 Launch UniConverter and Subtitle Editor.
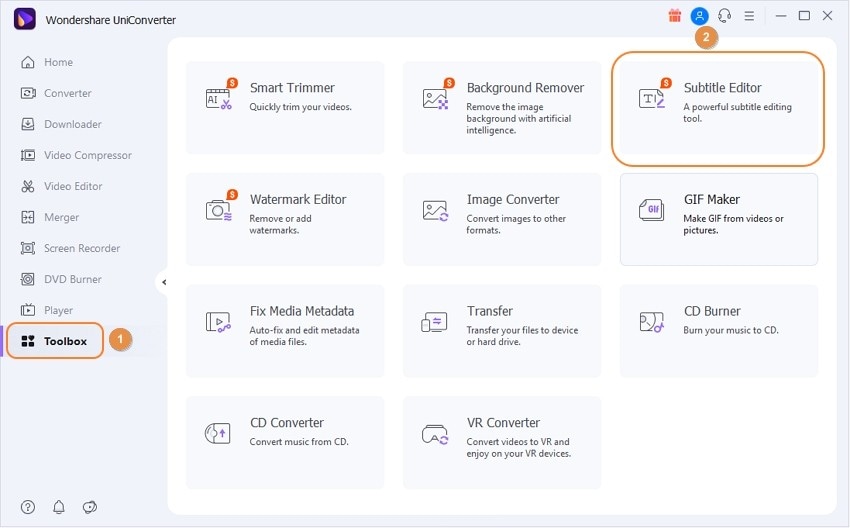
Open the UniConverter and select the Toolbox option from the left menu bar. Then choose Subtitle Editor to begin the process.
Step 2 Import Video and Create Subtitle.
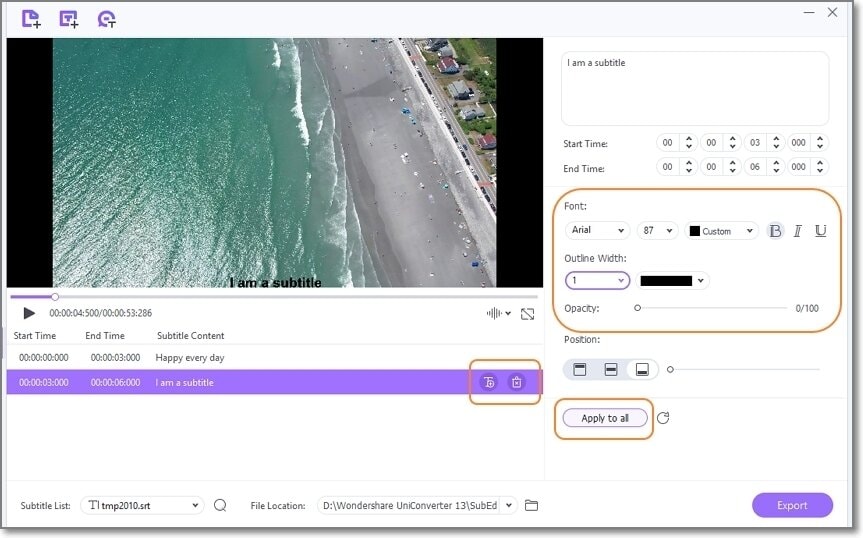
Next, you can click on the +/Add button to import the video clip into the program. When the importing is done, click on New to type in subtitle content. Here you can adjust the starting & ending time of the subtitle, also set the position.
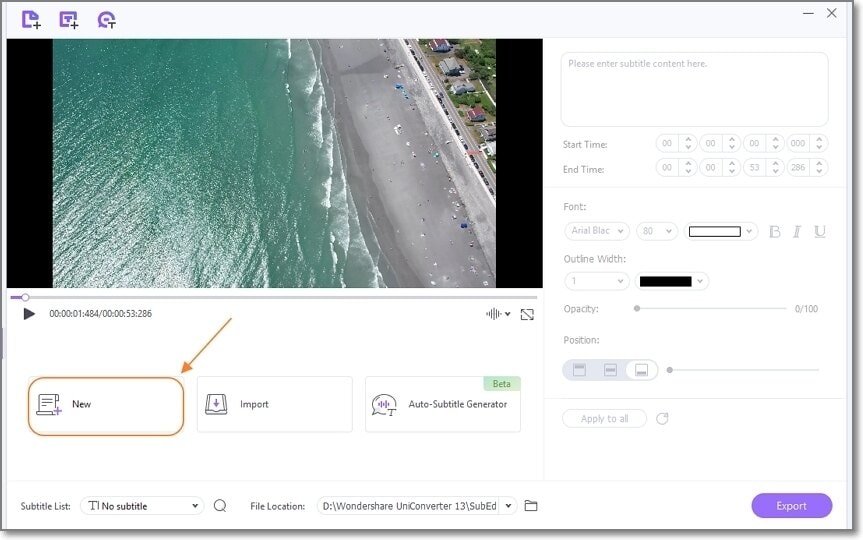
After that, you can change the font color, size, type, and opacity of the text for subtitles. After setting everything, you can click on Apply to all.
Step 3 Export Video with Subtitles.
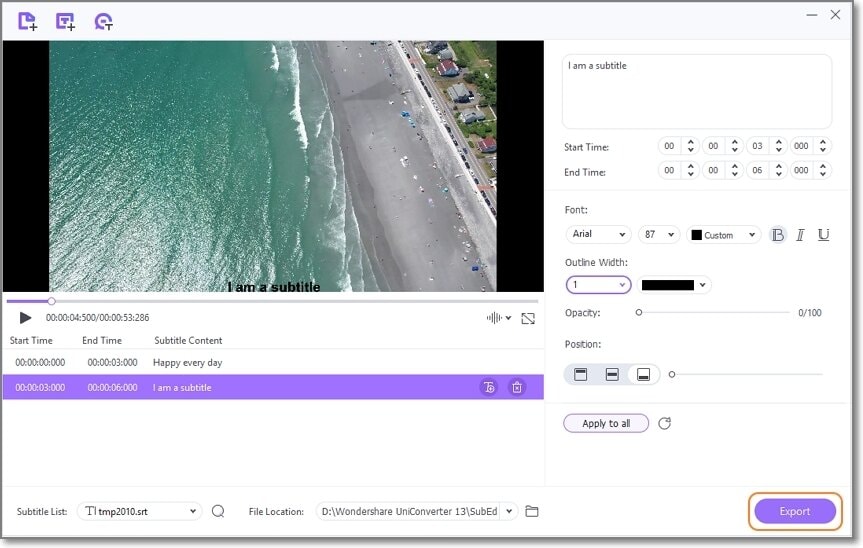
Finally, select the File Location for the final video and then click on the Export button to save the video.
Option 2: Import/Download Subtitle Online.
UniConverter allows you to import and add an existing subtitle file to a video, which you have already downloaded from any online subtitles library. Try the steps below -
Step 1: Import Subtitle.
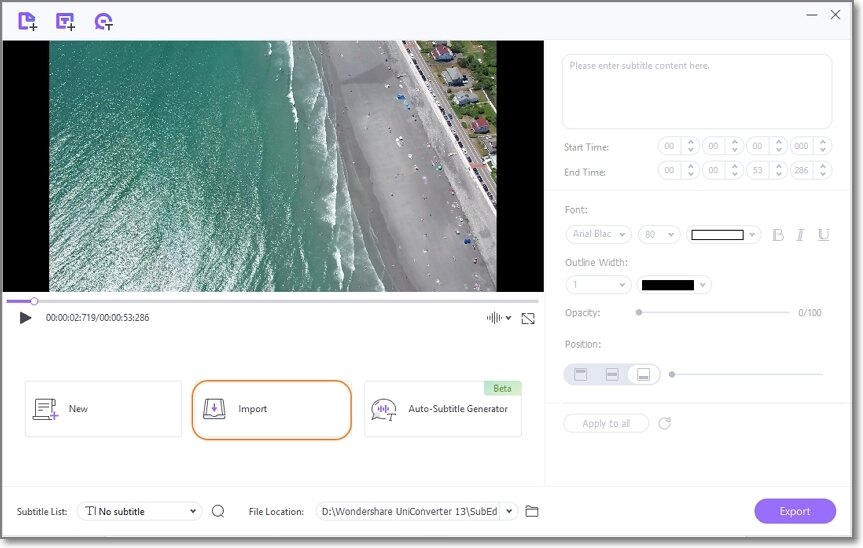
Same way, launch UniConverter and open the Subtitle Editor, and import the video into the program. Then go and click on the Import button to add the subtitle file that you previously downloaded or created.
Step 2: Adjust Subtitle and Export Video.
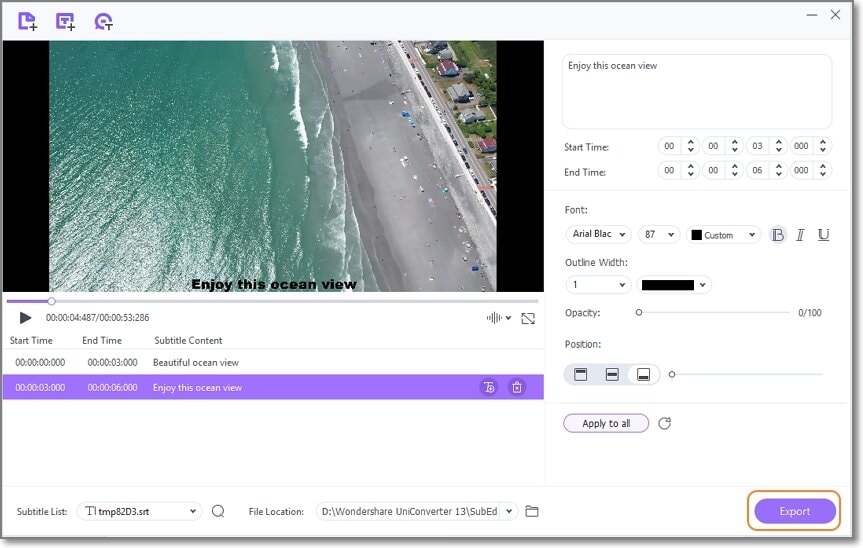
Finally, adjust the subtitles for the video and properly sync the starting/ending time. Then choose the File Location, and tap on Export to complete the process.
Option 3: Auto-Subtitle Generator.
Wondershare UniConverter has an Auto-Subtitle Generator feature that can automatically detect the audio and create subtitles for it. Follow the below steps to use this feature:
Step 1: Open Auto Subtitle Generator.
Click on the Auto-Subtitle Generator option from the Subtitle Editor after upload your video to begin the process.
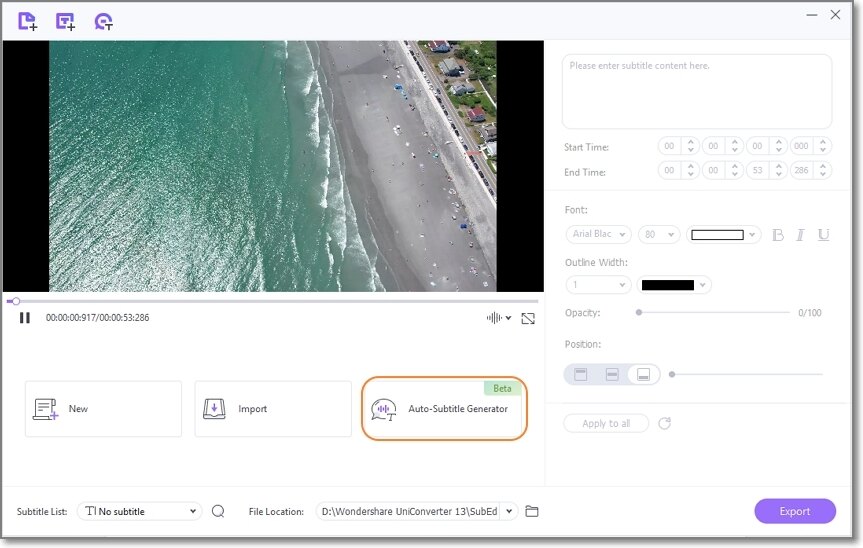
Step 2: Export Video.
Finally, when the program has completed generating subtitles, click on Export to save it into the selected location.
Wondershare UniConverter — Best Movie Subtitle Editor for Windows and Mac
Add subtitles to movies including MP4, MKV, AVI, MTS, and any other media file.
Create custom subtitles, or download and modify subtitle files (font, color, size) and synchronize them with your movies.
Transfer movie files from laptop to iPod, iPhone, Android, and other devices quickly.
Compress movie files of large size with just one click.
90X faster conversion speed to convert your movies to 1,000+ video formats without quality loss.
Part 3. Frequently asked questions about adding English subtitles on YouTube
Most questions that people frequently ask like how to add subtitles in YouTube movies. Well, I've been an editor for the past couple of months and I've been learning about editing since I've started my YouTube channel. I like to add subtitles so that my bilingual fans can enjoy them. Check the questions that we have answered below, to clear some of your confusion:
Q1: How can I get English subtitles on YouTube?
You can add subtitles to your video by either using auto-generated mode or import the subtitles from file location. I have been using this Wondershare UniConverter app which makes my work easy to do. It is my go-to app whenever I have to edit subtitles to my video.
Q2: How can I add subtitles to other languages on YouTube?
You can add subtitles in the same way by using auto-generated mode and selecting the language you want them to be in your video. You can also edit them in your way. In this way, you can also change the style and colour of the fonts or use borders on those fonts to make them clear. By adding your subtitles now a bilingual person can enjoy watching and understanding the video.
Q3: How do I turn on auto subtitles on YouTube?
You can turn on your subtitles by an option below your video 'CC' which means subtitles. You need to click on it and all the subtitles will be generated automatically by YouTube. And then your subtitles will appear below your video. You may now enjoy the video by watching it and understanding what it is about.
Q4: How long does YouTube auto-generated subtitles?
Adding subtitles doesn't take too long. It takes seconds to generate them and correctly align them for viewers to understand and enjoy a video. Auto-generated mode is quite easy like you click on it, and then the subtitles for your whole video automatically get generated.
Conclusion:
This was my article on how to add English subtitles on YouTube. I have described every way and method above so that a beginner YouTuber may know how to add subtitles to a YouTube movie. Adding subtitles into a move is easy once you have proper guidelines to follow. I recommend you to get this Wondershare UniConverter app to add subtitles to your videos without any problem.


