Compress Videos
- 1. Compress Video/Audio in Different Formats+
-
- 1.1 Compress MP4 on Winodws & Mac
- 1.2 Reduce Size of MP4
- 1.3 Resize Videos
- 1.4 Compress MP4 Online
- 1.5 Free MP4 Compressors
- 1.6 Compress MKV
- 1.7 Compress MOV
- 1.8 Compress WMV
- 1.9 Compress AVI File
- 1.10 Reduce Size of MKV
- 1.11 Top 5 WebM Compressors
- 1.12 Compress WAV Free Online
- 1.13 FLAC Compression Software
- 1.14 Top 5 Online MP3 Size Reducers
- 1.15 Compress M4A Files Free Online
- 2. Compress Video from Devices/Apps +
- 3. Compress Video with Different Apps +
- 4. Compress Video for Different Purposes +
-
- 4.1 Compress Video for Email
- 4.2 Compress Video for Web
- 4.3 Compress Video for YouTube
- 4.4 Compress Video for Vimeo
- 4.5 Resize Facebook Video Size
- 4.6 Resize Instagram Video Size
- 4.7 Compress YouTube Video Size
- 4.8 Compress Video for DVD
- 4.9 Send Large Files via Email
- 4.10 Compress Files for WhatsApp
- 4.11 Send Long Videos on WhatsApp
- 5. Other Tips & Tricks +
-
- 5.1 Full Guide to Compress Video
- 5.2 Free Video Compressors
- 5.3 Top 13 Video Compressors
- 5.4 Top 10 Video Compressor for Mac
- 5.5 Top Audio Compressors
- 5.6 Top 8 Audio Compressor Free Online
- 5.7 Compress Files to Small Size
- 5.8 Compress HD/FHD (4K/1080P) Videos
- 5.9 Compress A Video
- 5.10 Top 8 Compression Software 2019
- 5.11 Top 9 File Compressors
- 5.12 How to Make A File Smaller
- 5.13 How to Make Video Smaller
- 5.14 Top 10 Ways to Reduce Video Size
- 5.15 Compress Folder Online and Free
- 5.16 Top 10 Ways to Send Large Videos
- 5.17 Top 5 Video Resizer
- 5.18 Top 6 File Size Reducer
- 5.19 Shorten a Video Online and Free
- 5.20 Change MP4/MP3 Bitrate
- 5.21 11 Ways to Compress Videos Free Online
All Topic
- YouTube Tips
-
- AI Tools Tips
-
- AI Photo Enhancer Tips
- Voice Changer Tips
- AI Thumbnail Maker Tips
- AI Script Generator Tips
- Smart Summarizer
- AI Subtitle Generator Tips
- Watermark Remover
- Vocal Remover Tips
- Speech to Text Tips
- AI Video Tips
- AI Image Tips
- AI Subtitle Translator Tips
- Video Extractor Tips
- Text to Speech Tips
- AI Video Enhancer Tips
- DVD Users
- Social Media Users
- Camera Users
- Photography
- Creative Design
- Movie Users
- Travelling Fans
- Educational Users
- More Solutions
- Holidays and Commemoration
- Game Lovers
- Other Tips
Apple Compressor 4: How to Use Final Cut Pro Compressor on Windows/Mac
by Christine Smith • 2026-01-21 18:54:49 • Proven solutions
You must have heard about the Final Cut Pro X Compressor 4 which is widely used by Mac users. But the unfortunate thing is that the software is available only for Mac users. That's why in this article, we are going to learn how to use the FCPX compressor and find which software would be the best Final Cut Pro Compressor alternative for Windows users, also Mac users who want to simplify the process.
- Part 1. What is Apple compressor software
- Part 2. How to use Apple compressor 4 with Final Cut Pro
- Part 3. Best alternative to compress and convert video/audio files on Mac/Windows
Part 1. What is Apple compressor software?
Apple Compressor is the software is the one which integrates with the Final Cut Pro to make it more powerful and flexible for video conversions and compression. The Final Cut Pro Compressor is the tool which used advanced encoding to allow the users to customize the output settings, enhance images and videos on a Mac. The software is capable of importing and organizing the movies, trailers, captions, descriptions, subtitles and much more in an iTunes compliant package.
The various features embedded in the Final Cut Pro Compressor are listed below:
- The Compressor can change the encoding settings very easily and they will automatically appear in the FCP.
- It can perform pristine format conversion and manipulate the videos and images as per requirements.
- Users can speed up the videos, slow it, adjust the frame rate, and can also burn the files on a disc.
- The software also has editing options like image filters, watermarks, timecode overlay, etc.
- You won't require an additional application for various purposes as distributed encoding feature are added in the Compressor.
Pros:
- The FCPX compressor is Mac specific software, therefore, the functions and resources are designed more efficiently.
- The software allows the users to organize the workflow and makes them more productive.
- Even the video editing features are very easy to use and fast with keyboard shortcuts.
Cons:
- You will surely need a manual to learn how to use the software.
- The software lags in the extensive projects.
- The features are not comprehended with the layout.
- It will disappoint the users if they try to work on multiple projects at once.
Part 2. How to use Apple compressor 4 with Final Cut Pro.
If you want to use the Apple Compressor 4 to convert and compress videos, then follow the steps given below.
Step 1: Open a new sequence or use an already existing sequence in the Final Cut Pro. Add any HD video in the sequence and select the section that you want to export. Then Click on the Add File button and select the Export button. In the Export option, you will find compressor, click on it to open the Compressor window.

Step 2: In the settings window, click on the Settings tab and find Apple formats. Drag the stream on to the file where the Drag Settings and Destinations Here option appears on the screen.

Step 3: Now select the Program Stream and the file. Click on the Inspector Window and check if the resolution, frame rate and aspect ratio of the video are correct or not.

Step 4: Click on the drop-down button and select the resolutions. Change the aspect ratio and frame rate in the same way. You can also add video and audio effects in the files in the inspector pane.

Step 5: Once you have specified all the fields according to your needs, click on the Submit button to save the changes. You will have the video in the desired size and format.

Part 3. Best alternative to compress and convert video/audio files on Mac/Windows.
As you have seen that using Final Cut Compressor is a professional and complicated task. The software is so compact and advanced that a beginner won't be able to understand what is going on. And it is not even available for Windows system. Therefore, the users have to rely on other alternative tools which can replace the Final Cut Pro Compressor on both Windows and Mac OS. Wondershare UniConverter (originally Wondershare Video Converter Ultimate) is the software designed with the purpose to provide easy and efficient video compression and conversion functions.
Wondershare UniConverter - Your Complete Video Toolbox for Windows/Mac
-
Compress video and audio files in 1000+ formats without any quality loss on Windows and Mac system.
-
Change video resolution, bit rate, convert video format, and customize file size to compress video size.
-
Edit videos with features of cropping, trimming, rotating, adding watermarks, and others.
-
90X faster speed and real-time preview to compress and convert videos easily.
-
Transfer converted videos from PC/Mac to iPhone/Android devices easily via a USB cable.
-
Download videos from YouTube and other 10,000+ video sharing sites by pasting URL.
-
Supports batch processing to compress and convert multiple videos at a time.
-
Toolbox with additional functions like Screen Recorder, DVD Burn, GIF Maker, Fix Media Metadata, and more.
-
Supported OS: Windows 10/8/7/2003/Vista/XP, Mac OS 10.15 (Catalina), 10.14, 10.13, 10.12, 10.11, 10.10, 10.9, 10.8, 10.7, 10.6.
Steps to Compress Videos Using Apple Compressor 4 Alternative
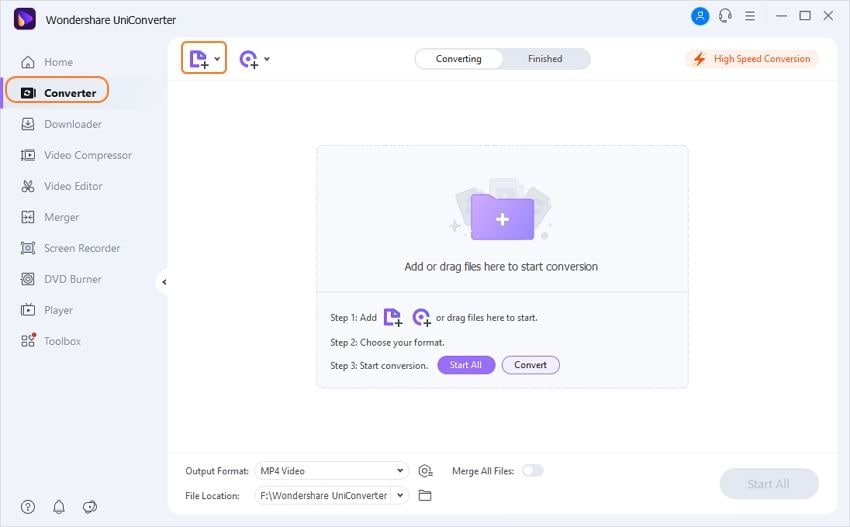
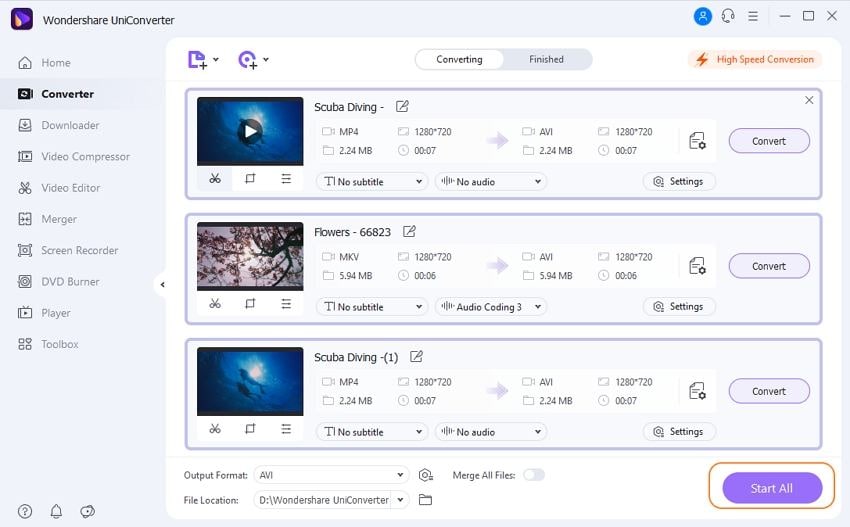
Step 1 Add files to Apple compressor 4 alternatives.
Launch Wondershare UniConverter (originally Wondershare Video Converter Ultimate) on your PC/Mac. From the Converter interface open up, click on the ![]() button to add videos. Dragging and dropping method can also be used here.
button to add videos. Dragging and dropping method can also be used here.
Step 2 Edit videos (Optional).
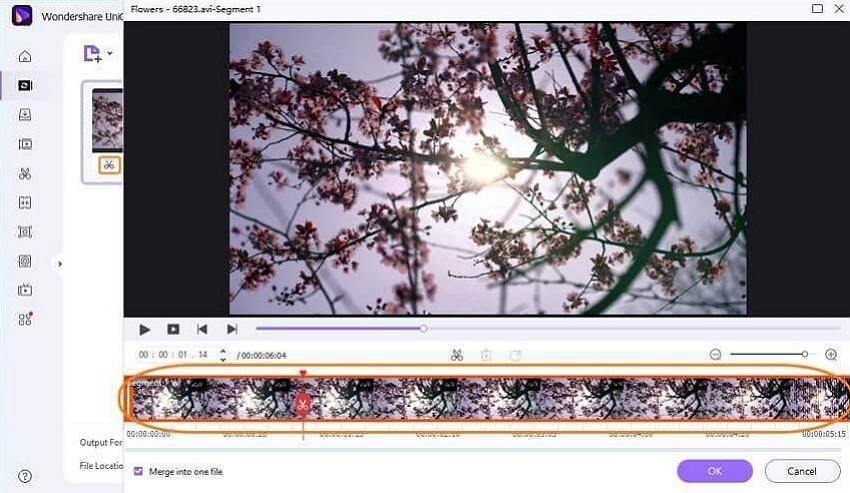
You're allowed to edit the video by clicking the edit icons on the thumbnail. Click on any of the icon and a small window will open up where you can add effects, watermark, subtitles and crop, trim, cut, and rotate video. You can skip this step if you don't need to make changes.
Step 3 Choose output video format.
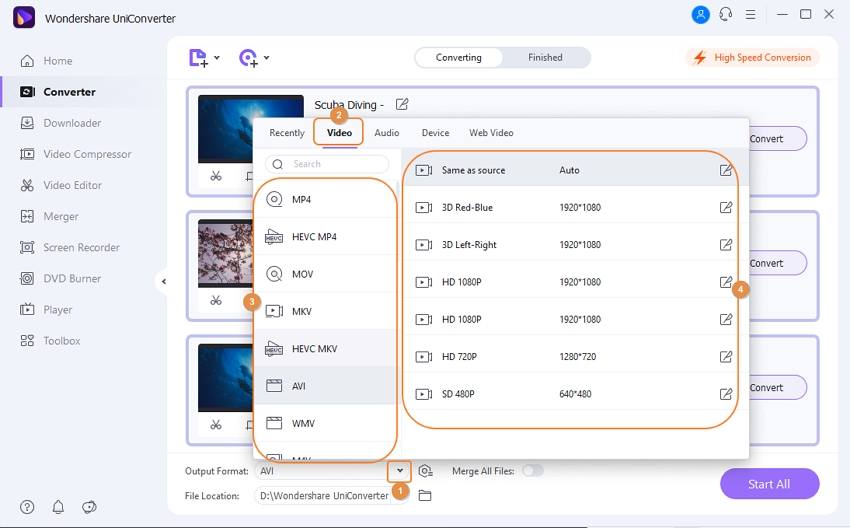
Then click on the Output Format: option and a drop-down menu will appear on the screen. Select any format you want to from the Video tab.
Step 4 Reset compression settings.
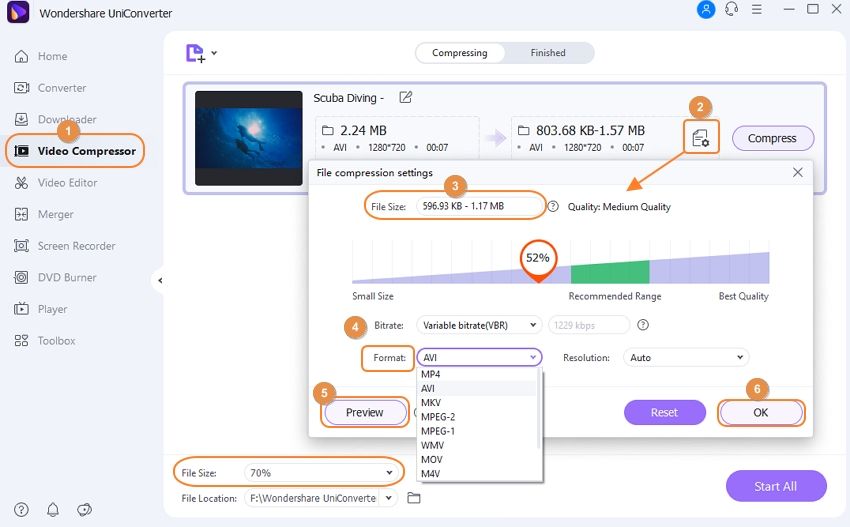
After you have specified the format, click on the compress icon on the Target tab and a small window will appear. You can drag the cursor to change all the aspects at once accordingly, or change video resolution, bit rate, and others one by one. Click on the Preview button to have a 20 seconds preview of the video to see what it would look like after compression.
Step 5 Compress and convert videos with Apple compressor alternatives.
At last, click on the Start All option at the bottom of the screen to compress and convert videos. Once the process is finished, you will have the same video in a smaller size which can be used for various purposes. You can also directly transfer the file to any device from the Transfer tab >>.
Pro-tip
If you want to compress a video size in a much easier way, then you can learn How to Reduce Video Size Easily >> without editing features by Wondershare UniConverter on Windows/Mac.
No matter you are a Windows user or a Mac user, you can free download and use Wondershare UniConverter as the best alternative to Final Cut Pro Compressor to compress and convert videos with simple steps list above.
Your complete video toolbox
 Best alternative to Apple Compressor to compress videos easily on Windows/Mac.


Christine Smith
chief Editor