Convert
- TRY FREE TRY FREE
- 1. Convert Video to Any Format+
-
- 1.2 MOV vs MP4
- 1.3 Top 7 MP4 Converter Downloader
- 1.4 Anything to MP4
- 1.5 WebM vs MP4
- 1.6 FLV to MP3
- 1.7 Convert Stereo to Mono Easily
- 1.8 MPEG vs MP4
- 1.9 Convert VHS to Digital
- 1.10 Top 5 Mono to Stereo Converters
- 1.11 Convert Anything to Anything
- 1.12 10 Ways to Turn Video into Audio
- 1.13 Top 10 Song to Ringtone Converters
- 1.14 Easy Steps to Convert Video to Live Photos
- 1.15 Trim Videos on Windows Media Player
- 1.16 Best Tools to Trim MP4
- 1.17 Convert TS to MP4 with VLC
- 1.18 Easy Steps to Convert Videos to MIDI Files in 2026
- 1.19 How Can You Convert MP4 to MIDI Format in 2026
- 1.20 How to Convert WMA to MP4 Format with VLC in 2026
- 1.21 Best Way to Convert 3GPP to Other Formats in 2026
- 1.22 How to Use Handbrake to Convert WebM to Any Video Format
- 2. Convert Picture to Any Format+
- 3. Tips and Tricks+
-
- 3.1 What is M4B File
- 3.2 What is M4A File
- 3.3 What is TS File
- 3.4 What is FLAC File
- 3.5 What is Cloudconvert
- 3.6 What is MXF File
- 3.7 9 Zamzar Converter Alternatives
- 3.8 10 Best Free Key Converters
- 3.9 Free VLC Batch Convert Feature
- 3.10 How to Convert Files
- 3.11 Top 10 Easy Converters
- 3.12 Top 11 Video Clip Converters
- 3.13 Online Convert Com Alternative
- 3.14 10 Vector Converters Alternative
- 3.15 How to Open ISO File
- 3.16 Freemake Video Converter Review
- 3.17 Top 10 Online Converter MP4
- 3.18 Top 10 File Type Converters
- 3.19 Top 6 Free Sound Converters
- 3.20 Top 9 ISO Extractors
- 3.21 AVI vs MP4
- 3.22 10 Solutions to Combine Files
- 3.23 Top 8 TS File Players
- 3.24 6 Tips for Converting SWF Files in 2026
- 3.25 Best Way to Convert MIDI to WAV Format in 2026
- 3.26 How to Convert WAV to MIDI Format in 2026
- 3.27 5 Recommended Ways to Convert AC3 Format in 2026
- 3.28 Top 3 Nintendo 3DS Converters
All Topic
- YouTube Tips
-
- AI Tools Tips
-
- AI Photo Enhancer Tips
- Voice Changer Tips
- AI Thumbnail Maker Tips
- AI Script Generator Tips
- Smart Summarizer
- AI Subtitle Generator Tips
- Watermark Remover
- Vocal Remover Tips
- Speech to Text Tips
- AI Video Tips
- AI Image Tips
- AI Subtitle Translator Tips
- Video Extractor Tips
- Text to Speech Tips
- AI Video Enhancer Tips
- DVD Users
- Social Media Users
- Camera Users
- Photography
- Creative Design
- Movie Users
- Travelling Fans
- Educational Users
- More Solutions
- Holidays and Commemoration
- Game Lovers
- Other Tips
Multiple Ways to Convert HEIC to JPG on iPhone
by Christine Smith • 2026-01-21 19:01:32 • Proven solutions
We want to introduce you to the multiple ways to help convert HEIC images to JPG on iPhones. You will find a detailed step-by-step procedure that will make your conversion relatively easy and convenient. You will find options that will be a good fit for your devices as you will find that some of the methods have their limitations.
- Part 1. Can I convert HEIC to JPG on iPhone?
- Part 2. [Method 1] How to convert HEIC to JPG on iPhone with its Most Compatible Setting
- Part 3. [Method 2] How to change HEIC To JPG on iPhone with its Automatic Transfer Setting
- Part 4. [Method 3] Convert HEIC to JPG on iPhone with Wondershare UniConverter
Part 1: Can I convert HEIC to JPG on iPhone?
Yes, it’s entirely possible for you to convert HEIC to JPG on iPhone. Come to think of it, did you know that there are many apps that can convert the HEIC to JPG?
Most newer iPhones run on the iOS 11 operating system and therefore captures images in the HEIC format. The HEIC picture format is Apple’s version of the HEIF or High-Efficiency Image File format. It is intended to be a better way to save your pictures, making your images smaller in terms of data without compromising on quality.
With that being said, yes, you can convert HEIC to JPG on iPhone. There are a variety of ways to do this if you choose to, including its built-in features, copy and paste to file app, sharing with a third party, and online tools specifically designed to convert HEIC to JPG on iPhones. But what changed?
After the iOS11 update, iPhones now capture images in a HEIC format. Besides squeaky-clean pictures, this image format takes up relatively small space compared to other standard image patterns.
While this format is highly ranked, it is not widely supported on most devices; hence the need for conversion of images from HEIC to JPG and other standard image formats presents itself. iPhones have been able to convert HEIC images to JPG when shared with a third-party app like Instagram, Twitter, mail, etc. That said, Compatibility issues may arise with HEIC photos if you use Android, Mac, Windows, or even older iPhones.
There are multiple ways you can convert iPhone pictures to JPG to mitigate these compatibility issues. And there are so many ways that you can move your photos to your new phones with even better quality
Part 2: [Method 1] How to convert HEIC to JPG on iPhone with its Most Compatible Setting
You must first configure the camera capture format using the iPhone’s Settings app to switch from HEIC to JPG. There are two options of camera capture settings - High Efficiency and Most Compatible. Heigh Efficiency shoots HEIC, while Most Compatible captures photos in JPG.
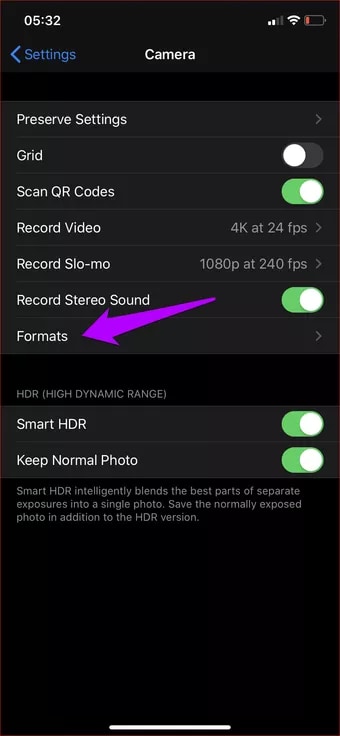
Step 1 : pull up the Settings app on your iPhone. Scroll down and click on Camera. Then, select Formats from the list of Camera settings .
Step 2 : when you have tapped on “format”, a window will be pulled up where you will select Most Compatible under Camera Capture .
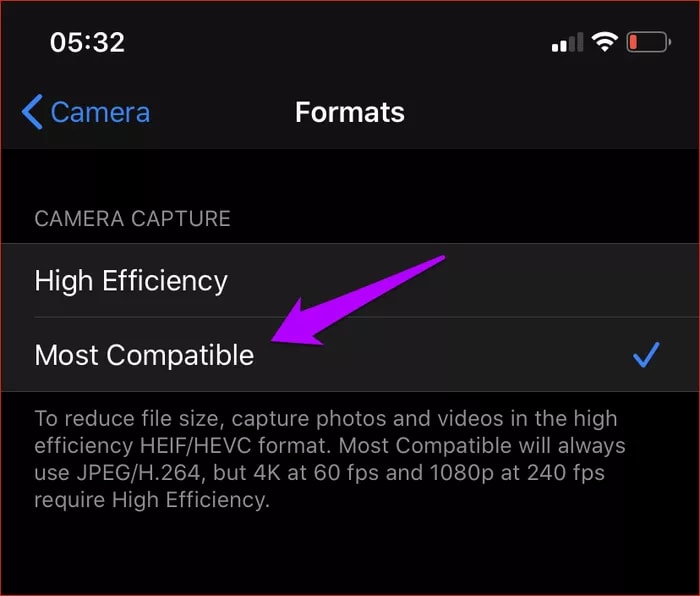
Your iPhone will start to capture images in JPG format, and your new unshot photos will be in this format after this conversion is done.
Part 3: [Method 2] How to change HEIC to JPG on iPhone with its Automatic Transfer Setting
In method 1, we demonstrated how to change your HEIC to JPG on iPhone, but this method is limited in function because your old photos will still be in the HEIC format. This scenario is why you might opt to apply Automatic Transfer Setting to transfer old photos to Windows, Mac, Androids, etc.
Transfer your files to a PC or Mac with the Automatic transfer setting enabled. To do this, open up your iPhone settings and tap on the photo’s icon, and tap “automatic transfer” under Mac or PC. Windows are fine too. The transfer will be to the JPG format.
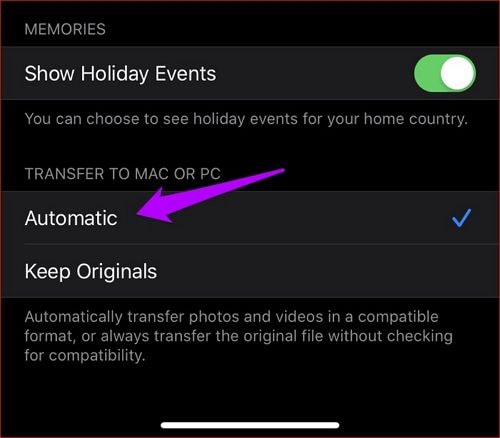
This transfer automatically stores your file in JPG format. While this may appear easy and convenient, it is essential to point out that windows may not be able to open or view files that are initially of the HEIC format, which is why the following method is highly recommended.
Another way you can convert HEIC to JPG is to use the iPhone’s inbuilt “Files” app, added in iOS 11. The app is native to iPhones and iPads.
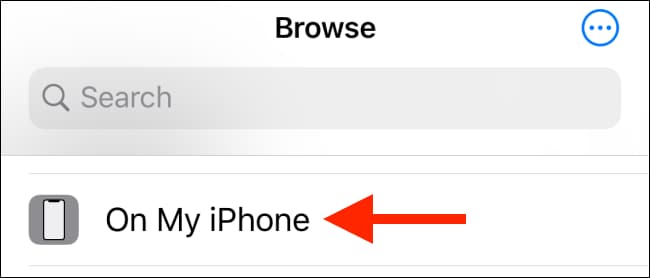
Step 1: The first thing you should do is open the “Files” app. Select the “On My iPhone” location. You can also select a cloud storage option if you prefer that. But mind you should go with the latter; the photos might not always be available offline since you’re saving in the cloud.
Step 2: Tap and hold anywhere in the empty area. Select the “New Folder” option when you see the pop-up and Name the folder anything you want.

Step 3: Click on the “Done” button. Open the phots app and go to the album that has the HEIC photos.
Step 4: Click on ‘Select” located at the top toolbar.

Step 5: Choose all the photos you want to convert.
Step 6: Touch the “Share” button located at the bottom-left corner.

Step 7: You’ll see a “Share sheet”, so select “Copy Photos”.
Step 8: By doing that, the photos will now be in your clipboard. Launch the “Files” app again and go to the folder you already created and named in the previous steps.
Step 9: Tap on any part of an empty area and select “Paste” from the pop-up menu.
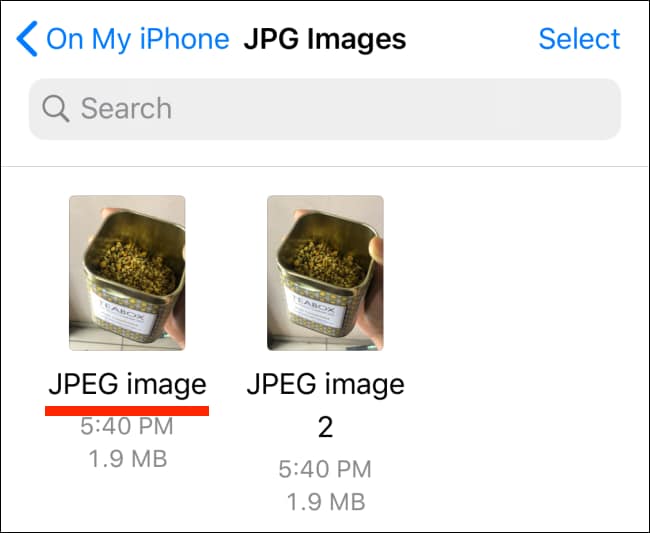
Step 10: You’ll finally see your HEIC photos appear and in JPG format.
Part 4: [Method 3] Convert HEIC to JPG on iPhone with Wondershare UniConverter
As we’ve already seen, some of the image conversion methods mentioned earlier have severe limitations; this is why your best bet is Wondershare UniConverter. A powerful all-in-one tool that will help you convert iPhone HEIC photos to JPG/JPEG, TIFF, PNG, and BMP formats. You can also apply Wondershare Picture Converter to reduce your pictures data-wise by tweaking the size of the image and so on. This app can also encode video/audio formats like MP3, MP4, FLV, 3GP, MPEG, and more.
We strongly recommend using Wondershare UniConverter to convert your iPhone images from HEIC to JPG because of some of these outstanding features that it possesses.
Wondershare UniConverter - Best Video Converter for Mac/Windows
-
Wondershare uniconverter can transfer images to iOS, Android, Blackberry, Camcoder, etc.
-
It is embedded with a wide range of photo editing tools that can crop images, change appearance, and apply effects, etc.
-
It can comfortably convert iPhone pictures of iOS models before iOS 11 from HEIC to JPG or any other standard image format while retaining its original quality.
-
It is the fastest conversion tool available in the app market, with a conversion speed that is 90x faster than the rest.
How to use Wondershare Uniconverter to convert your old iPhone images from HEIC to JPG.
Let’s get into how to convert iPhone pictures to JPEG format using Wondershare Image Converter. You’ll first have to upload your photos from iPhone to Mac using the “Image Capture” function. Here’s how to do it:
Step 1: Ensure your iPhone is connected to your PC and unlock it. (must be a trusted device)
Step 2: Open the Image Capture application on Mac and select your iPhone under the Devices or Shared option.
Step 3: Hit the “Import” To pop-up window and choose your image destination or the app that should open the images.
Step 4: Choose the photos that you want to use, then click “Import”. To import all your photos, click or hit “import all” to import all your pictures at once.
When you have followed these steps and successfully uploaded the images you wish to convert to your Mac, follow these next steps to convert your iPhone images from HEIC to JPG.
When you have completely uploaded your photos to your PC, you can now follow these steps to convert them to JPEG format:
Step 1Download the Wondershare UniConverter app and send in your photos from your PC.
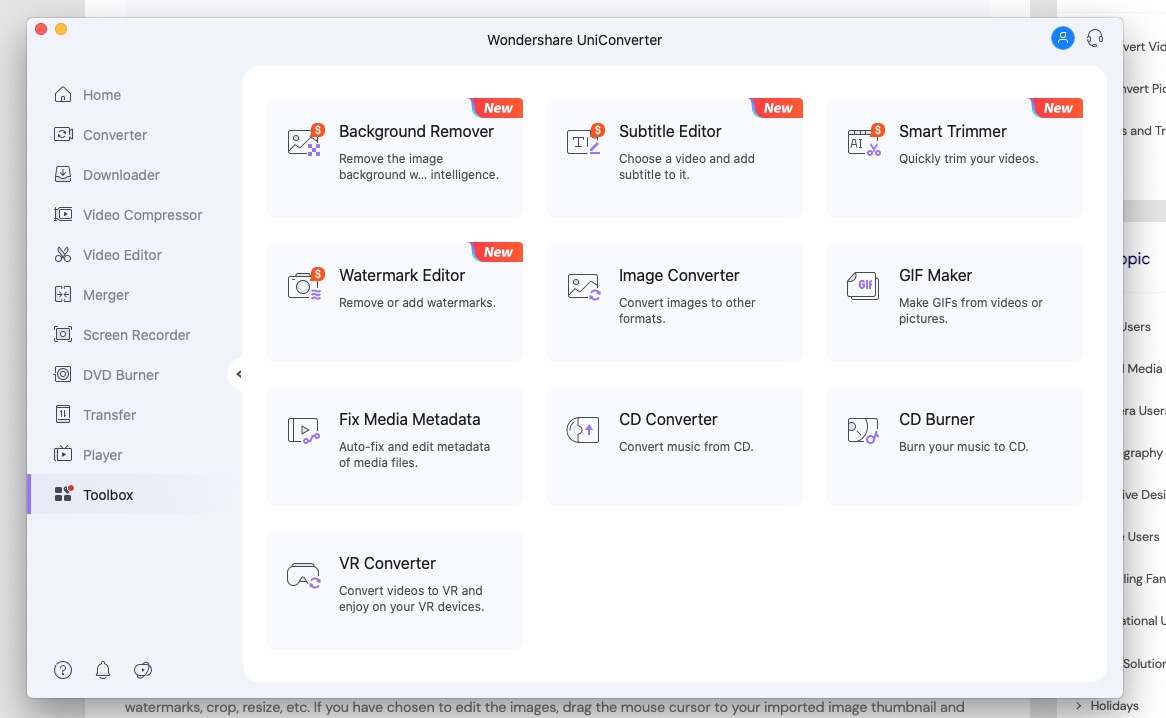
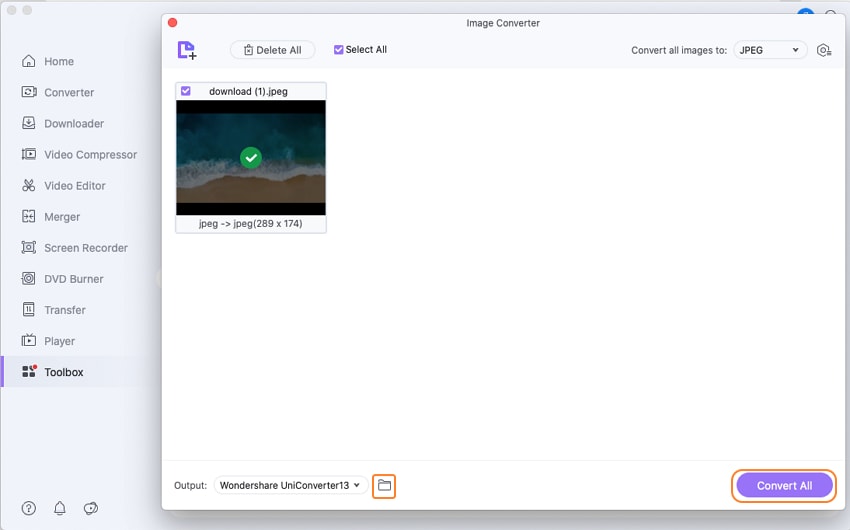
Get Wondershare Image Converter from the app store, install, and run it onto your system, then click the Toolbox tab. Now select the Image Converter option.
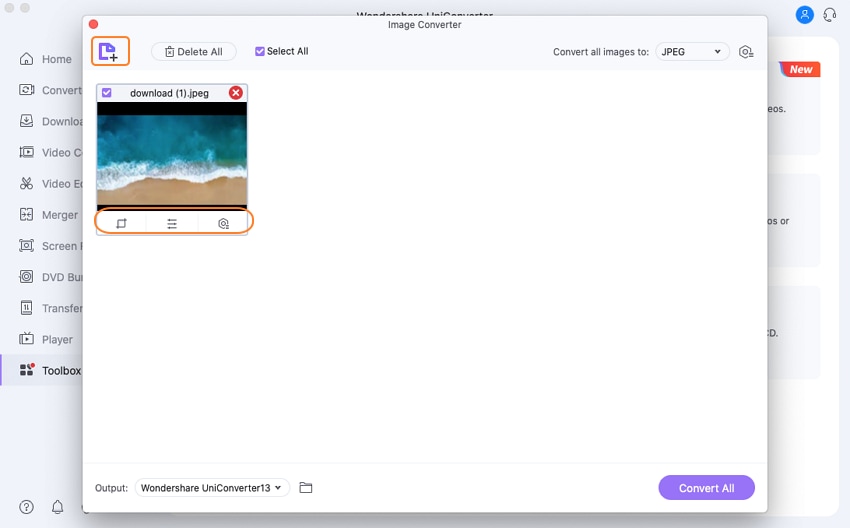
Step 2Edit your images (Optional).
When you have successfully carried out the first step, go ahead and click the +Add Images icon to begin importing your images. If you choose to, you can edit your pictures by removing watermarks, cropping, applying effects, and change the image size. To do that, drag the mouse cursor to your imported image thumbnail and click on the edit.
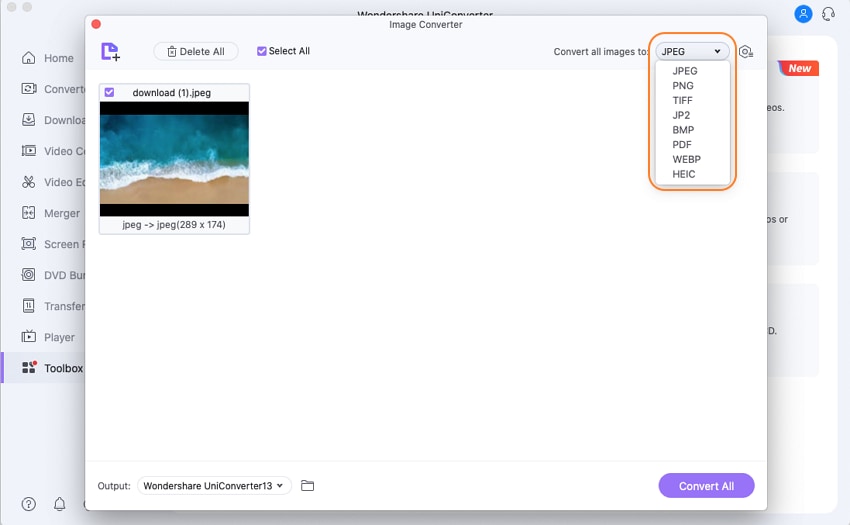
Step 3Choose JPEG as a target format.
Open the drop-down button from the Convert all images to section and choose the JPEG option.
Step 4Convert HEIC to JPEG
make a destination folder for your photos next, under the Output section. And lastly, click the purple “Convert All” button to begin converting iPhone photos to JPEG with 100% original quality.
Conclusion
These are relatively easy methods that you can follow and run your image conversion at the speed of lightning. Personally, Wondershare uniconverter is a more standard tool for file conversion, editing, compressing, watermarking, and almost all forms of modification without compromising the quality of your file. It also has excellent video modification tools that can convert HEIC to JPG or other 1000+ formats in few clicks. You could give it a try!
Your complete video toolbox
 Aid you easily convert HEIC files to popular image formats, like JPG, PNG, GIF and more.


Christine Smith
chief Editor