File size can be a huge liability to processing files and workflow. While recording the screen to provide a complete view of the screen and the elements used across it, the file sizes usually get quite large. This leads to the need to compress recording to send it across appropriate channels. This article shall discuss how users can compress screen recording Mac and Windows or online with the right means.
Part 1. How to compress screen recording on Mac easily?
To compress a video to perfection, a powerful tool with explicit compression features is a necessity. Wondershare UniConverter provides you with an exceptional interface with customizable settings that can be easily managed to compress recording as per the users' requirements. With support for the most popular file formats, including 1,000+ video and audio formats, UniConverter makes itself a premium option in compression tools.
The tool compresses videos according to the platform that the user needs to send the video. This makes it extremely diverse in separately specifying file sizes for email platforms, mobile devices, and social media. With the support of high-quality compression, users can essentially use the tool for compressing a batch of files altogether. This is what makes UniConverter a special tool for reducing screen recording size.
Wondershare UniConverter — The Complete Video Toolbox for Mac and Windows.
Lossless compression.
Convert videos to any format at 90X faster speed.
Compress screen recording at high speed.
Compress 4K and 8K video easily.
Add watermark, music, intros and outros to Vlog videos easily.
Save any online video from more than 10,000 platforms and sites.
Since you are in search of how to compress recording across your Mac using UniConverter, you should look across the following set of steps for a better understanding of the process:
Step 1 Access the compression tool and import the recording.
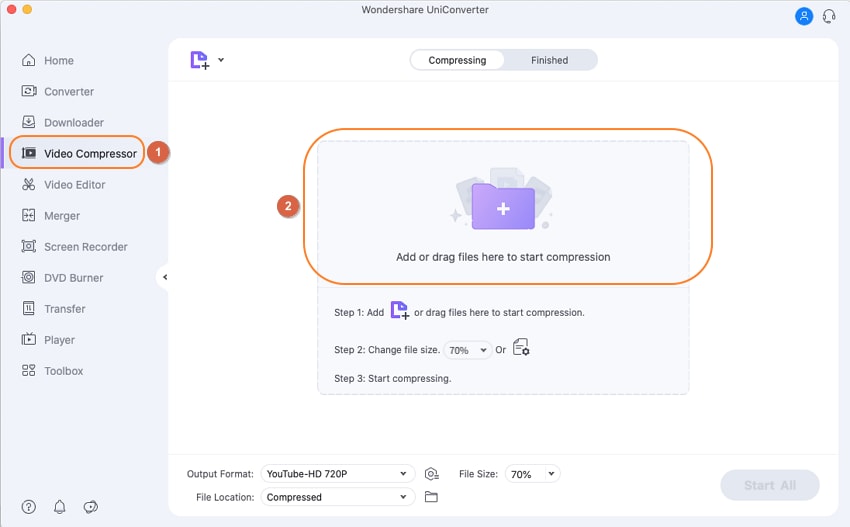
Download and install Wondershare UniConverter on your Mac. Launch the platform and proceed to the Video Compressor section on the window's left pane. Click on the Add Files button on the top of the window pane to import the file that is to be compressed.
Step 2 Set quality and other settings.
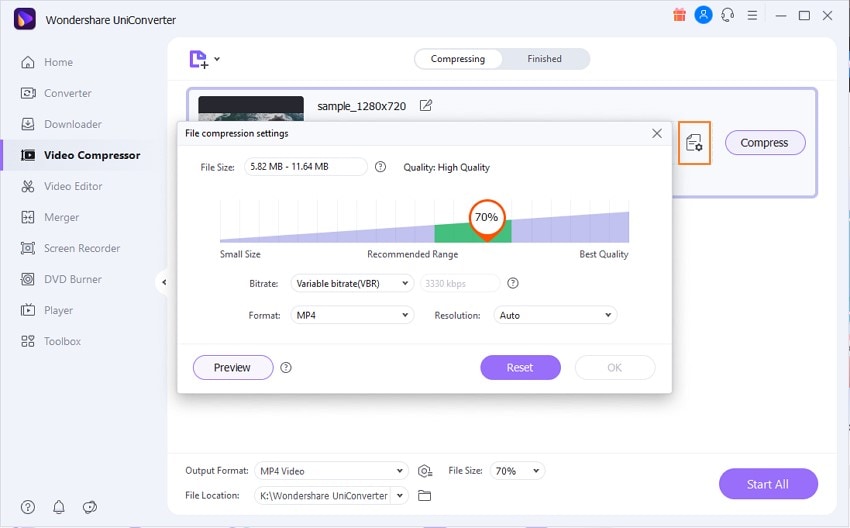
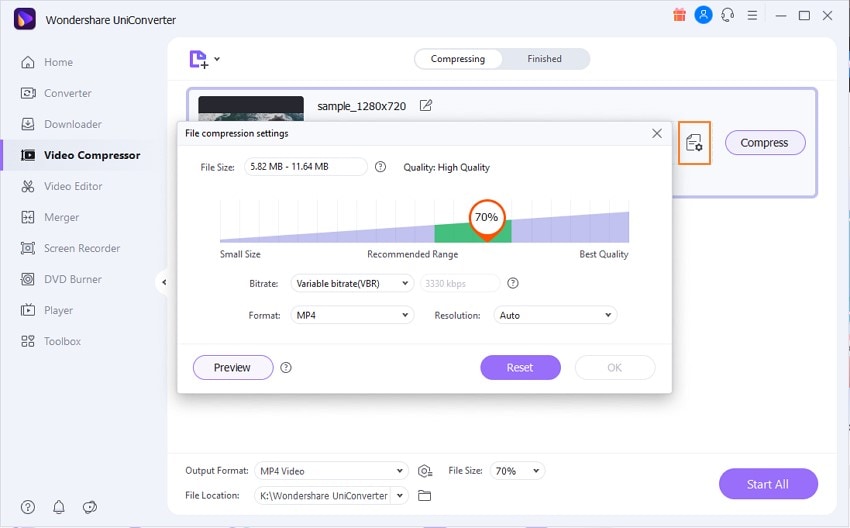
As the file gets imported, you need to click on the icon present next to the Compress button to open a new screen. On the screen, you need to specify the quality of the video through the slider. Set the bitrate, format, and resolution of the video across the screen. Click OK once done.
Step 3 Compress the video file.
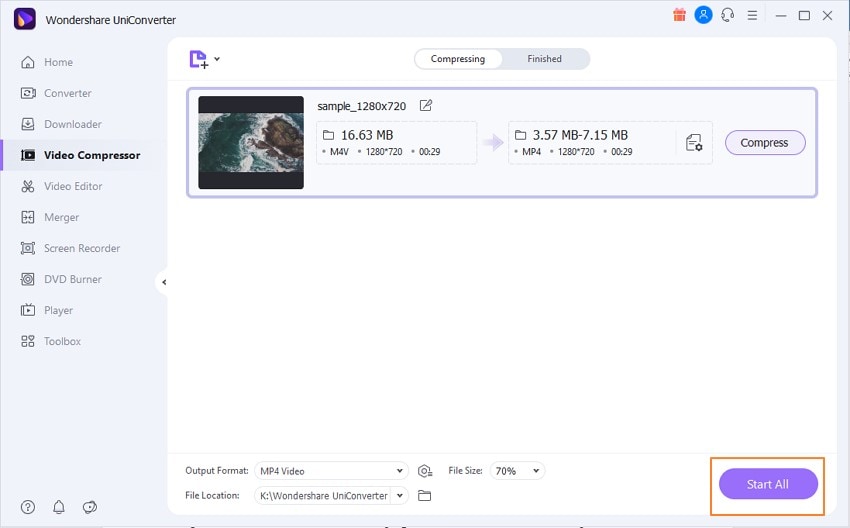
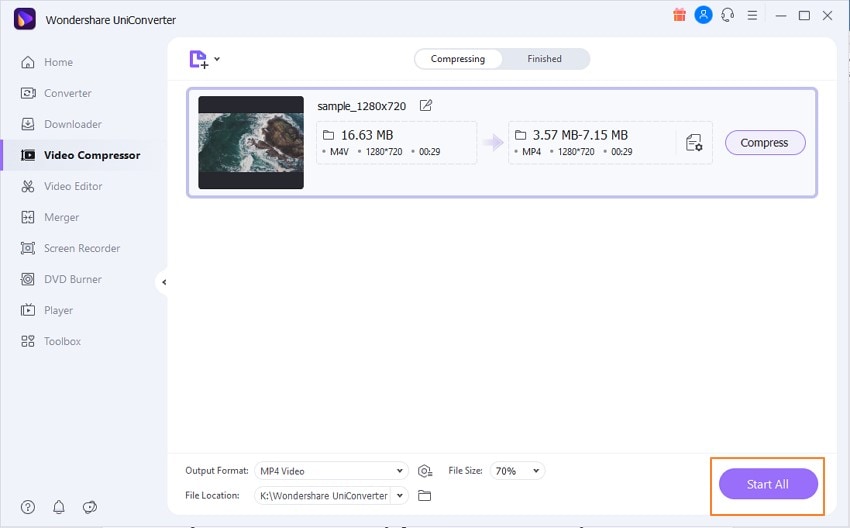
Locate the Output Format option to select the compressed video format. Set the location for the compressed file and click on Start All.
Try Wondershare UniConverter for free now!
Over 3,591,664 people have downloaded it to try the advanced features.
Part 2. How to compress recording on Windows easily?
This part shall explain to Windows users the step-by-step guide on how to compress recording on Windows PC using Wondershare UniConverter:
Step 1. Launch the Compressor to upload the recording.
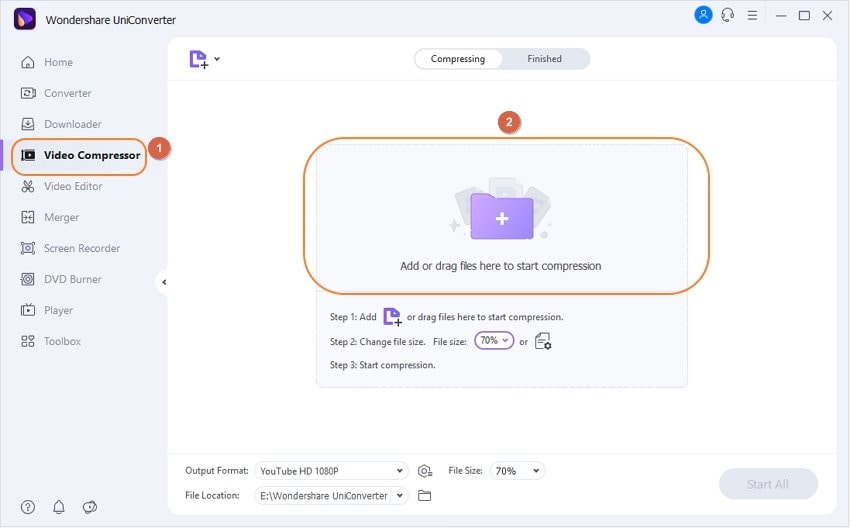
Launch Wondershare UniConverter on your Windows PC and proceed into the Video Compressor tool present on the left side of the screen. Click on the Add Files icon on the top of the next window to add a file for compression.
Step 2. Manage compression properties.
Upon adding the file, click on the icon right next to the Compress button to open a new window. The pop-up window allows you to set up the bitrate, format, and resolution of the video according to your requirements. You can set the quality percentage of the video file through the slider.
Step 3. Compress video recording.
As you revert to the previous screen, set up the output format and location of the compressed video file on its bottom. Click on Start All to compress your video recording.
Try Wondershare UniConverter for free now!
Over 3,591,664 people have downloaded it to try the advanced features.
Part 3. How to compress screen recordings online?
UniConverter not only allows for screen recording compression on Windows or Mac, but supports online compression for more convenient experience. You can simply upload your files, choose the compression ratio, and then tap on "Compress" to finish the whole process, without installing any softwares.
Compress Screen Recordings Online:
Part 4. How to reduce screen recording size with iMovie/VLC/QuickTime on Mac?
We shall go across some of the best platforms that can be used to reduce screen recording size to help you figure out the appropriate option that can be used to compress video recording.
1. Reduce screen recording size with iMovie
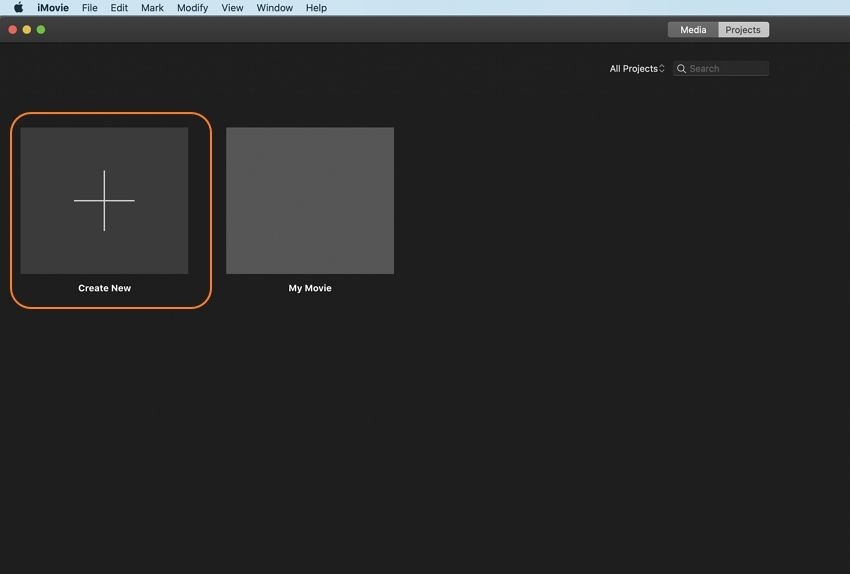
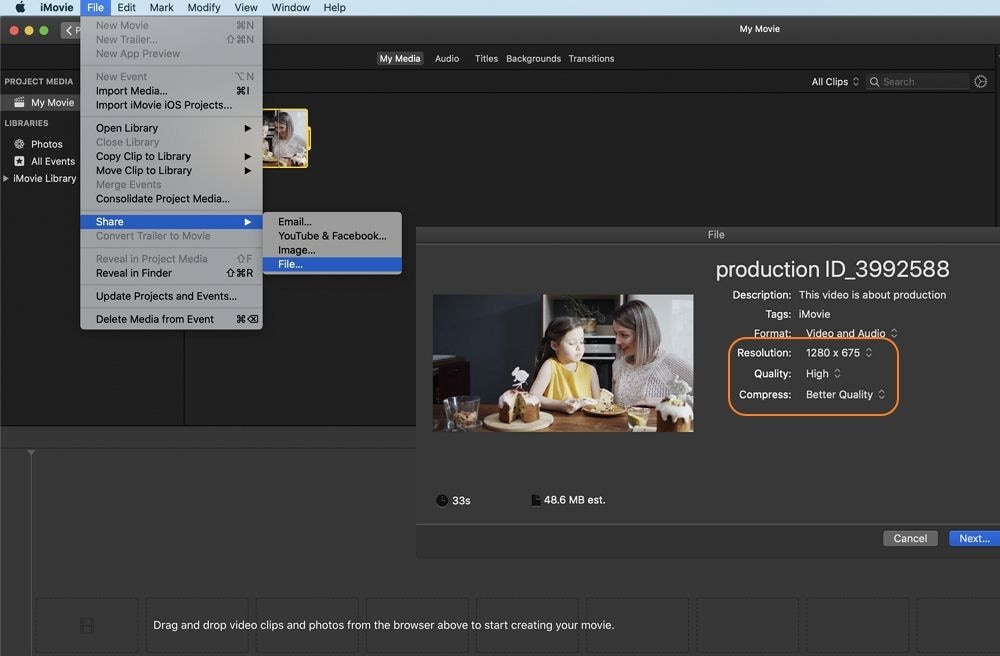
Step 1: Launch iMovie on Mac and click on "Create New" to add the file to compress. You will find the option of "Movie" across the menu that appears.
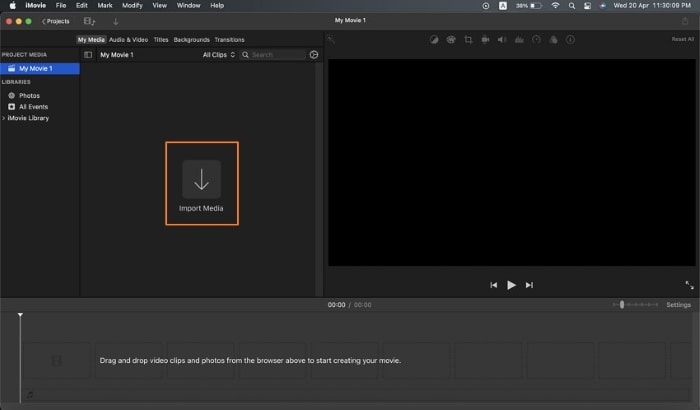
Step 2: As a new screen opens up, click on the "Import Media" button to add the recording. Drag it onto the timeline.
Step 3: Click on the "Share" button on the top right corner of the screen and select "Export Media." The pop-up window allows you to change the "Quality," "Resolution," and "Compress Speed" of the recording. Review the size of the video that would be calculated according to the settings. Click "Next" and specify the location for saving the compressed video recording.
2. Reduce screen recording size with VLC
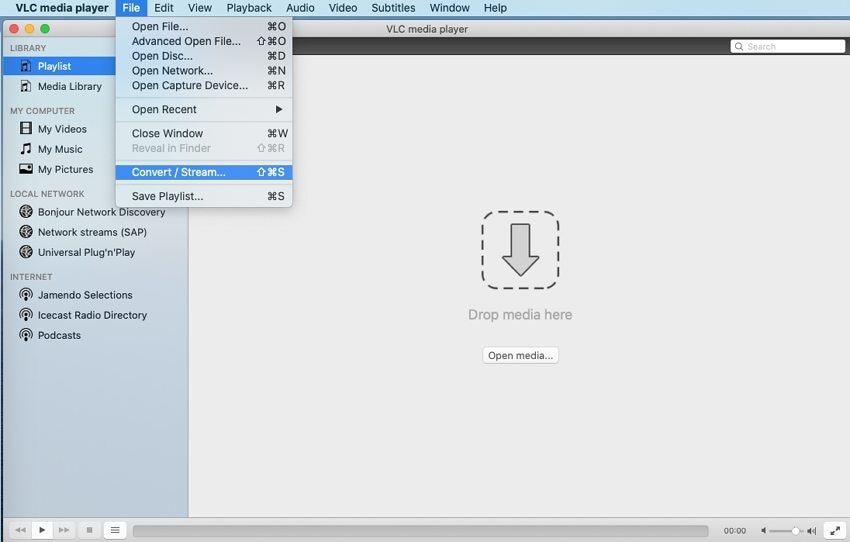
Step 1: Launch VLC Media Player for Mac and click on the "File" tab to select the "Convert/Stream" option from the drop-down menu.
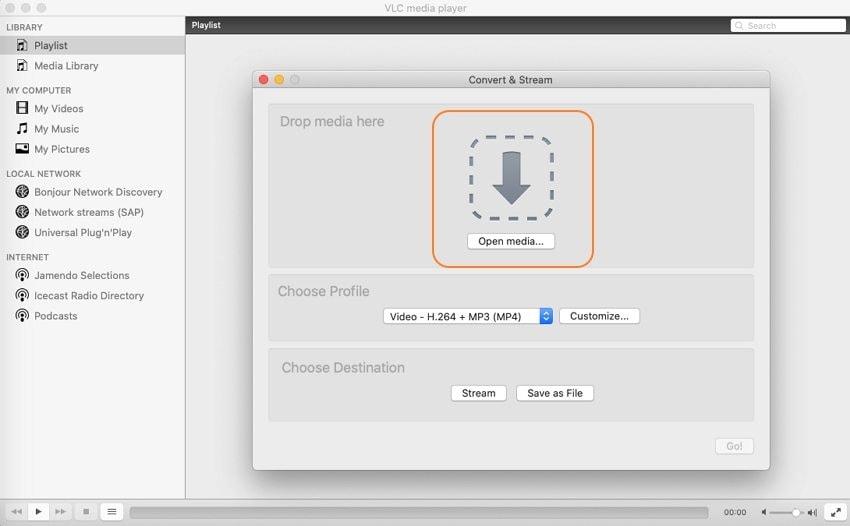
Step 2: Click on the "Open media…" in the next window for importing the video recording.
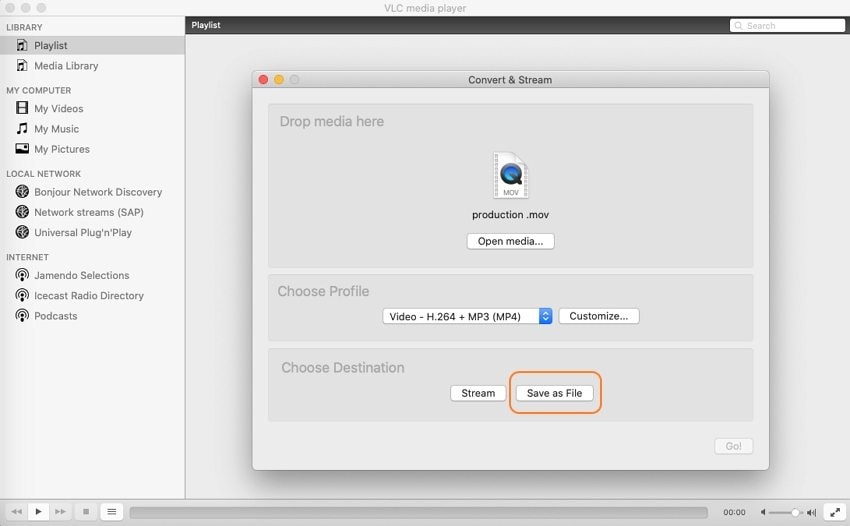
Step 3: Select the profile from the available list to compress the recording according to it. You can also make changes in the compression settings by clicking on "Customize." Specify the location of the compressed video and click "Save" to execute the process.
3. Reduce screen recording size with QuickTime
Step 1: You need to open the screen recording file that you wish to compress with QuickTime.

Step 2: Navigate to the "File" tab and select "Export As." Figure out the appropriate file compression quality from the menu that opens up.
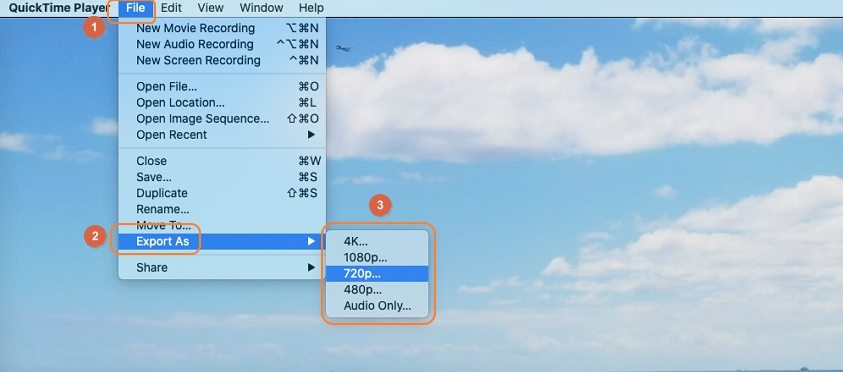
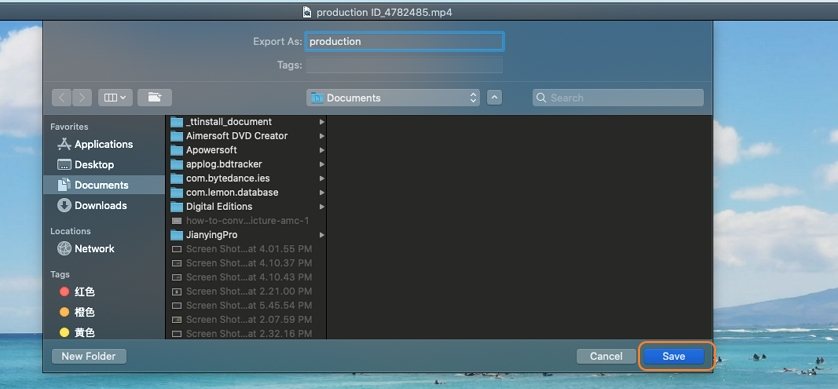
Step 3: Specify the name and location of the compressed recording. On selecting "1080p" as the quality of compressing video, check the "Use " option for effective results. Tap on "Save" to execute the process.
Comparison Between Four Screen Recording Compressors
Video Compressor for Mac |
UniConverter |
VLC |
QuickTime |
iMovie |
| Supported Input Format | 1000+ | 100+ | 4+ | 5+ |
| Supported Output Format | 1000+ | 10+ | 1 | 2 |
| Support Batch Compression | ✓ | ✖ | ✖ | ✖ |
| Quality of Output Video | Perfect | No Option Available | No Option Available | Low, Medium, High, Best (ProRes), Custom |
| Speed Of Conversion | 90x Faster | Not Specified | Not Specified | Faster, Better Quality |
Conclusion
The article has proficiently defined some effective techniques that can be used to compress recording on Mac and Windows with the help of the best tools in the market. You should look across the provided steps to understand the procedures in a better way.


