iMovie
Top 7 Ways to Make a Slideshow in iMovie Easily on Windows/Mac
by Kayla Morrison • 2025-01-13 14:34:07 • Proven solutions
I've just returned from a family vacation and would like to create a photo slide show using iMovie. Is there a really quick and easy way where I can just do a batch import all the photos (and a few video clips), and some music and export the slide show?-----------------Question from Apple Communities
Making an iMovie photo slideshow is one of the best things any Apple device users can come across. That's because iMovie can help you make the most professional-looking slideshow presentations. You can even edit your slideshow in several ways by cropping, trimming, rotating, etc. However, iMovie's layout and controls can be intimidating at first. So in today's guide, we want to learn how to make a slideshow in iMovie and other recommended methods.
- Part 1. How to Create a Slideshow in iMovie Easily
- Part 2. Top 6 Free iMovie Memorial Slideshow Online
- Part 3. How to Share your Slideshow File to Any Device in Just One Click
Part 1. How to Create a Slideshow in iMovie Easily
With iMovie, you can make professional and exciting motion picture movies with background music. You can even add tons of visual effects, transitions, and animated texts. To do that, follow these steps:
Step 1: First of all, edit and arrange your pictures on iPhoto because it's much easier to do it there than on iMovie.
Step 2: Launch iMovie and then tap the Create New. To create a slideshow with photos, music, and videos, select the Movie.
Step 3: The next thing to do is click the My Media and then tap the Photos under the Libraries section. If you haven't arranged your photos on iPhoto yet, click My Media > import or download icon to import your photos, music, or movie.
Step 4: Your photos will appear in the order that you had arranged them on iPhoto. You can, however, make some changes to iMovie. You can add effects and transitions such as fade, cross blur, and cross-dissolve to make the slideshow more presentable. To add a transition, drag-and-drop it between two images.
Step 5: Adding tiles and texts will make your slideshow look cool as well. To add a title, click the Titles and then select one of the templates before dropping it on the timeline. You can now enter your preferred text in the preview window.
Step 6: Now, we'll add some royalty-free music to our slideshow as the background sound. To do that, drag the music to your slideshow and release the mouse when a green + button appears. Your successfully added background music will be in green.
Step 7: Play your slideshow in the preview window to see if it meets your standards. You can now save it on your Mac or share it on Vimeo, YouTube, etc.

Part 2. Top 6 Free iMovie Memorial Slideshow Online
The best thing about technology is that it offers excellent alternatives to everything. So if you're an Android or Windows user, you can use the following sites to create unique slideshows quickly.
1. Wondershare VidAir
This is an online slideshow maker for Mac, you can easily combine pictures into video easily. And add text effects, stickers, background music and other elements for each photo. Don't worry about the quality, VidAir provides templates for your reference, and you can use free picture and video resource for you slideshow video. Works for both Chrome and Safari browser.
Step 1: Visit the templates page: https://vidair.wondershare.com/templates.html and then select a video template you like. Click on it and hit the Use This Template button.
Step 2: Next, you'll get a new editing interface. From the left panel, you can see the options of Text, Photo, Video, Stickers, Audio, Upload. Add video clips or photos on the timeline zone to start making a slideshow.
Step 3: After all changes have been done, click on the Export button on the top-right corner. You can download the slideshow to your local Mac.

2. Pholody
This is a free and fast platform that will help you put together your cherished photo memories in video format minus any tricky decorations or black-stripe. You can even add background sounds to your slideshow. However, the only supported output format is MP4.
Step 1: Visit https://www.pholody.com/editor and then click the Load Music.
Step 2: Next, click the Load Picture to locate and import locally saved images. You can also import from the web by merely entering a URL link.
Step 3: Now drag and drop your images to the imported music in the sequence you'd like them to appear. Click the Play icon to preview your changes and then hit the Publish to save your slideshow.

3.Adobe Spark
Adobe Spark is another extremely easy-to-use website thanks to thanks to its simple-to-understand menus and clearly-labeled options. Here, you'll get pre-designed graphics and images from famous artists all over the world. Even better, you can add videos and audios to your slideshow to make the whole clip more interesting. Now, let's see how to use Adobe Spark to create photo slideshows.
Step 1: Visit https://spark.adobe.com/make/slideshow-maker/ and then sign up if you haven't yet. Now tap a slideshow layout then click the + sign. Next, choose Photo > Upload Photo to import an image. Repeat the same process on different layouts until you exhaust your pictures.
Step 2: After choosing your images and credits, click the Music tab located on the far-right side, then select Add my music. You can now import your favorite background sound. You can also click Resize and Theme to customize your slideshow's size and theme, respectively.
Step 3: Lastly, click the Preview to cross-check your slideshow and then tap Download to save it on your device.

4. Kapwing
Next, we'll discuss Kapwing, which allows users to create, edit, and share files on its simple-to-use platform. Here users can create professional slideshows with subtitles, videos, texts, and background sounds.
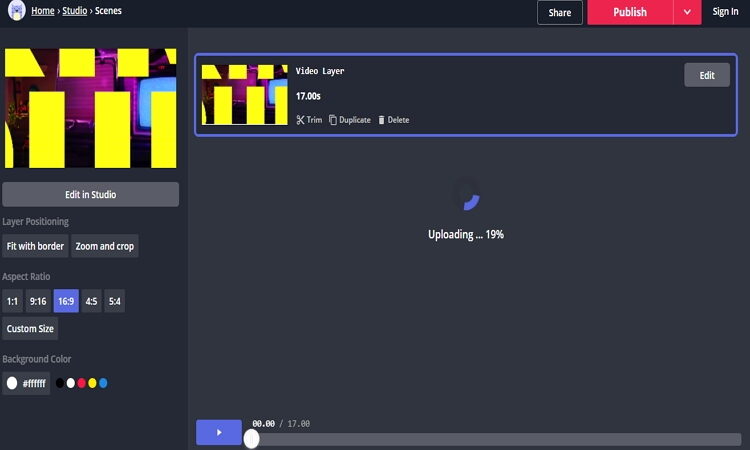
Step 1: Visit https://www.kapwing.com/studio/editor/scenes and then drag-and-drop your images to the interface.
Step 2: Now, make several changes to your slideshow. You can change the aspect ratio, background color, etc. Users can also click on a specific image to edit it further and add things like transitions, background music, text, subtitles, etc.
Step 3: To preview your slideshow, click the play icon, then tap Publish. You will see a download link to your slideshow in no time.

5. Clideo
With Clideo, you can create some excellent slideshows within minutes. That's because Clideo is easy-to-use and doesn't have any ads on the interface. It also supports many standard audio and video formats.
Step 1: Visit https://clideo.com/slideshow-maker then tap Choose File to import images for your slideshow.
Step 2: Click the + Add Audio button to import your background audio. Next, tap the Format to choose a target format like MP4, MOV, DV, etc.
Step 3: Click the Create for Clideo to start making your photo slideshow with a background sound.

6. Animoto
Last here is Animoto, which is an award-winning slideshow maker. With it, you can make several fun video slideshows and share them with family and friends. It's also quick to learn, so you don't need any prior experience to use it.
Step 1: Visit https://animoto.com/make/slideshow-video and then click Make a Slideshow Video.
Step 2: Scroll down the page then click Start from Scratch before selecting a template and style for your slideshow. Now tap ADD A BLOCK to add a block with a text and then click UPLOAD to add photos. Now drag-and-drop your imported photos to the blocks.
Step 3: Tap Music > Change > Upload Song. You can now set your favorite track as the background song. Finally, click Produce to save your slideshow.

Part 3. How to Share your Slideshow File to Any Device in Just One Click
Now that to know how to make a slideshow on Mac using iMovie, it's now time to learn how to share it easily on your desktop. You might want to share it on Facebook, Vimeo, YouTube, or external storage devices like smartphones, flash drives, etc. To do that, you'll need to install a professional desktop app like the Wondershare UniConverter. You can transfer slideshows to YouTube, Vimeo, iPhone, Android, camcorders, etc. You can even convert your slideshow video to YouTube, Vimeo, Instagram, Facebook, iPhone, Apple TV, and many other optimized formats.
Wondershare UniConverter - Your All-In-One Tool
- Built-in editor for cutting, trimming, adding subtitles, and many other file editing tasks.
- Convert movies files to optimized preset for almost all devices.
- Download videos from popular sites like YouTube, Dailymotion, Vevo, etc.
- 90X faster conversion speed than any conventional converters.
- Edit, enhance & personalize your videos file.
- Download/record videos from YouTube and other 10,000 video sharing sites.
- Versatile toolbox combines video metadata, GIF maker, video compressor, and screen recorder.
- Supported OS: Windows 10/8/7, macOS 11 Big Sur, 10.15, 10.14, 10.13, 10.12, 10.11, 10.10, 10.9, 10.8, 10.7, 10.6.
Below are the steps to transfer slideshows to YouTube, Vimeo, or an external device
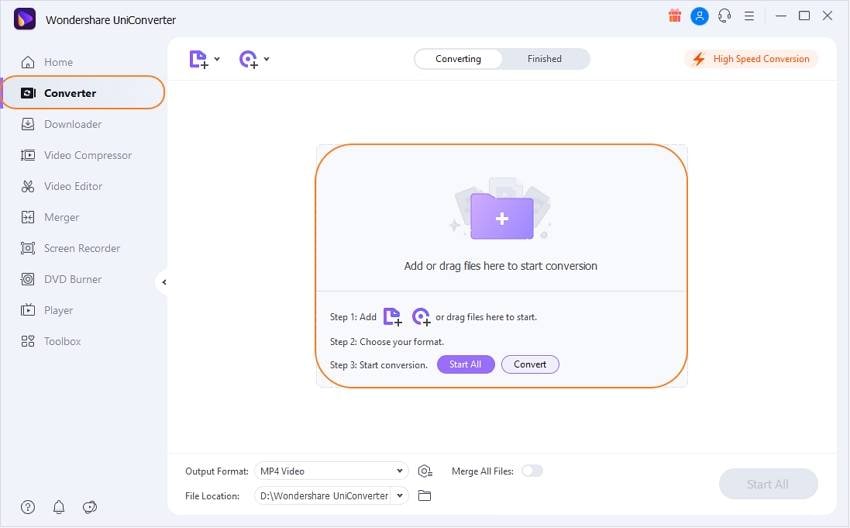
Step 1 Import your iMovie slideshow.
Install, and run Wondershare UniConverter, and then hit the +Add Files to add your photo slideshow.

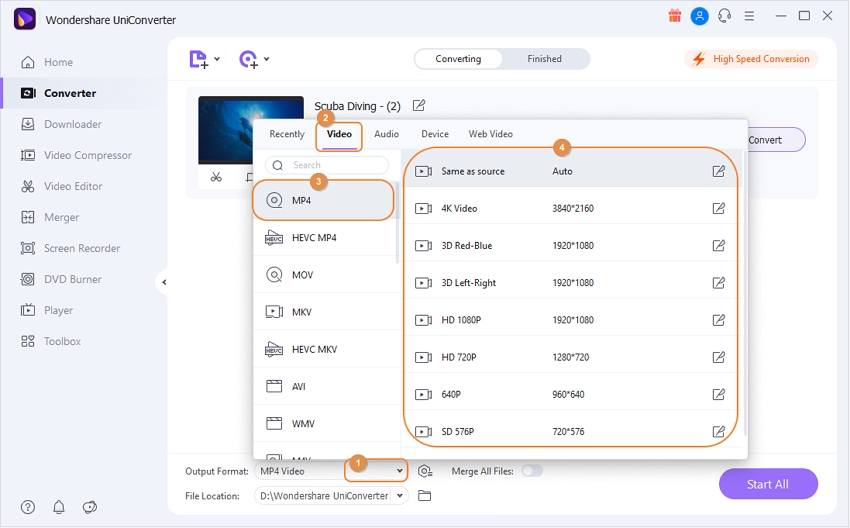
Step 2 Convert iMovie slideshow to another format.
Click the Output Format and then tap the Video. From there, scroll down the available formats and choose either YouTube, Vimeo, Instagram, Facebook, or MP4. The reason why you should choose MP4 is that it's compatible with any platform or device. If you want to transfer the slideshow to Samsung, LG, iPhone, Apple TV, or any other specific device, click the Device tab and then select your device's name.

Step 3 Convert your iMovie slideshow.
Now hit the Convert to begin converting your iMovie slideshow to a format of your choice. After the conversion process, your photo slideshow will be saved on the Finished tab. From there, you'll see a share icon, which you'll click on to upload your video on either YouTube or Vimeo.
![]()
Note: You can also share your converted slideshow to other devices by right-clicking on it then choosing the Add to Transfer List option. Now tap the Transfer tab and then connect your iDevice, Android, flash drive, etc. to your Mac using a USB cable. You can now quickly transfer the photo slideshow to other connected devices.
![]()

Kayla Morrison
staff Editor