
“How to embed subtitles into video permanently? I was hoping to add subtitles in multiple languages to my video. However, after I hardcoded them, I could only access one language. Is embedding the subtitles different than hardcoding them?”
Subtitles are frequently offered in different formats. Some of the most common subtitle file types include SRT and VTT. Typically, subtitles are hard-coded into a media file that plays on a website or platform like YouTube in English.
However, it’s also possible to embed subtitles into the video file, which is quite helpful because it allows you to create your own subtitles files in various languages. Still, if you do not know how to embed subtitles into a video, then this article will guide you through the entire process.
Part 1. Best Subtitle Editor to Embed Subtitles in Video
Using Wondershare UniConverter, you can edit videos in 1000+ formats and merge them with the relevant subtitles, thanks to the powerful Subtitle Editor. In addition, it helps you convert video files into popular video formats.
This application is easy to use for both new users and advanced users (you are free to choose whether or not you want to let others customize your videos). It is compatible with every active Windows and macOS version.
Also, you can customize your video by adding a watermark, removing or adjusting the background, and resizing it quickly with the help of 90x processing speed.
The Subtitle Editor in the Wondershare UniConverter has plenty more to offer. Check out the list below to know its additional features:

Wondershare UniConverter — All-in-one Video Toolbox for Windows and Mac.
Best Subtitle Editor for Mac and Windows that offers manual and automatic ways to add/edit subtitles.
Put subtitles on movies to watch without any hassle.
Convert videos to 1000+ formats at 90x faster speed than online ways.
Batch Compress videos without quality loss.
Easy-to-use video editor to trim, cut, crop, add watermark, change video speed, etc.
Nice AI-based features include Watermark Editor, Smart Trimmer, Auto Reframe, Background Remover, and more.
Powerful Toolbox including GIF Maker, Image Converter, CD Burner, Fix Media Metadata, etc.
The step-by-step tutorial on how to embed subtitles into video through the assistance of the Wondershare UniConverter is mentioned as follows:
Step 1 Open Subtitle Editor on Wondershare UniConverter
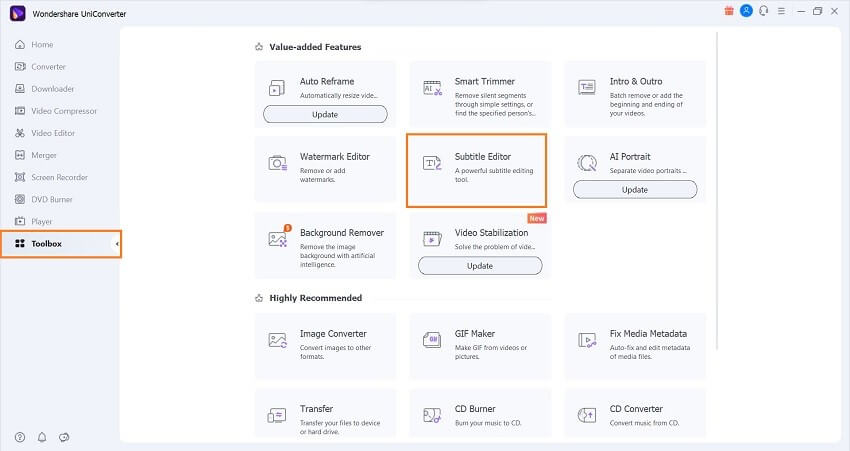
Double-click the UniConverter’s icon to launch it on your Windows or Mac system. On the interface, look to the left and click on Toolbox. Next, under the Value-added Features, select Subtitle Editor. Now once you see the new editor window, click Add+ to import the video you intend to merge with the subtitle.
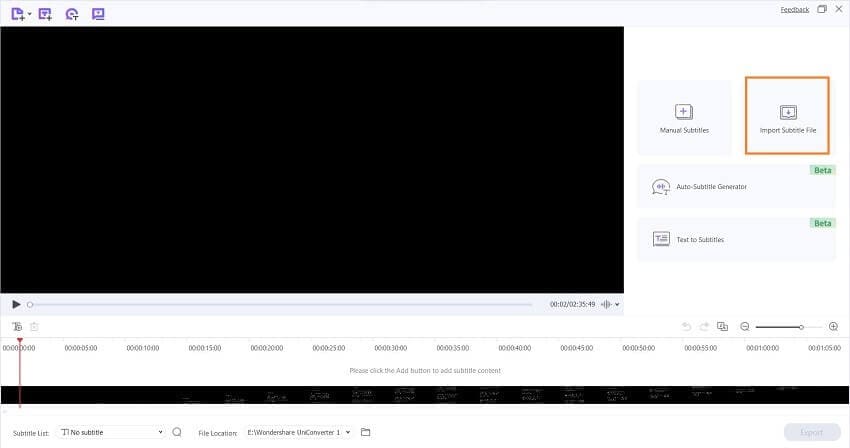
Step 2 Add the Subtitle File
On the right, click Import Subtitle File to upload the SRT subtitles to merge with the video.
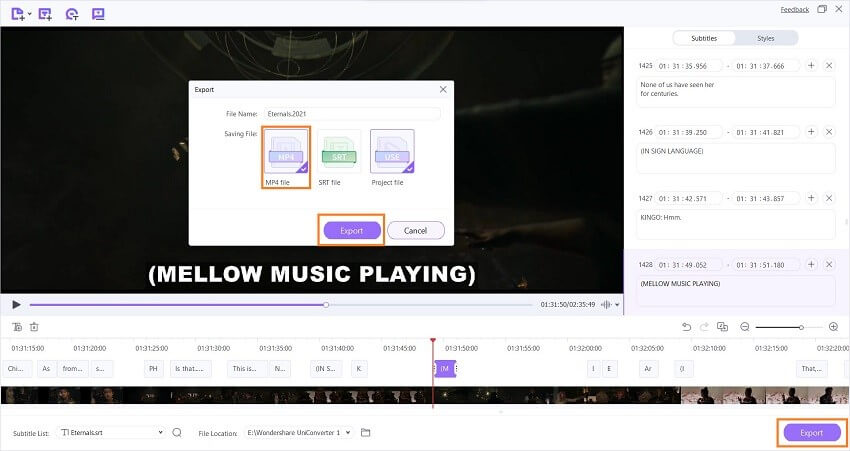
Step 3 Embed the Subtitles with Video Permanently
Edit the subtitles by adjusting the position, size, font type, and color. Also, check for any spelling mistakes. Once all is clear, click Export, select “MP4 file,” and click Export again to download the video with embedded subtitles.
If you do not have the SRT file with you, then you can use the Manual Subtitles function to create new captions for the video. Moreover, using the Auto-generate Subtitles feature, you can get help from advanced AI to make the subtitles using the video’s audio.
Part 2. How to Embed Subtitles into Video Permanently for Free?
There are other cross-platform editors that are capable of inserting subtitles into video permanently. If you wish to know their ins and outs, then check out the contents of this section below:
1. Handbrake
Handbrake is a video tool that can embed subtitles into your video projects. It’s open-source software, which means it’s completely free and works smoothly with various platforms. Moreover, the tool supports audio and video encoding.

Supported Platform: Windows, macOS, Linus
Pros
Free
Easy to use
Fast
Cons
It only exports videos in MP4, MKV, and WebM
Check out the method below to learn how to embed a subtitle file into a video using Handbrake:
- Open the video on Handbrake
- Select the Subtitles tab, and click Import Subtitle before choosing the SRT file you want to embed.
- Click Start Encode for the process to begin.
2. VLC
Who hasn’t heard of VLC Player, a famous media player across all platforms? What only a small fraction of people know is that it is a handy tool to embed subtitles to video.
Supported Platform: Windows, macOS, Android, iPhone
Pros
Accessible
Subtitle Downloader
Cons
Doesn’t edit subtitles
The steps below will show you how to embed subtitles in video using the VLC Player:
- Launch VLC, and click the Media tab on the Menu Bar.
- From the list, click on Stream. Next, select Add to import the video.
- Also, check the “Use a subtitle file” option to add the subtitle to VLC.
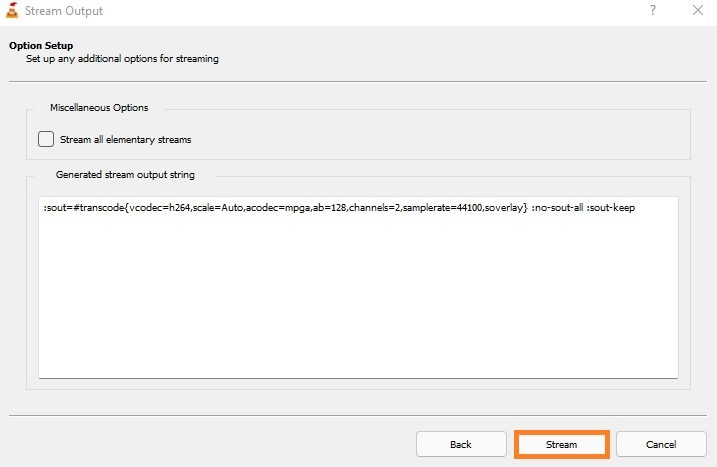
- Again, click on Stream and select the Next tab.
- Tick the “Activate Transcoding” option, and click on the Wrench icon.
- There, click the Subtitles tab and check “Subtitles” and “Overlay subtitles on the video” options one by one.
- Next, click Save and Next button again.
- To end, click on Stream to embed the subtitles with your video.
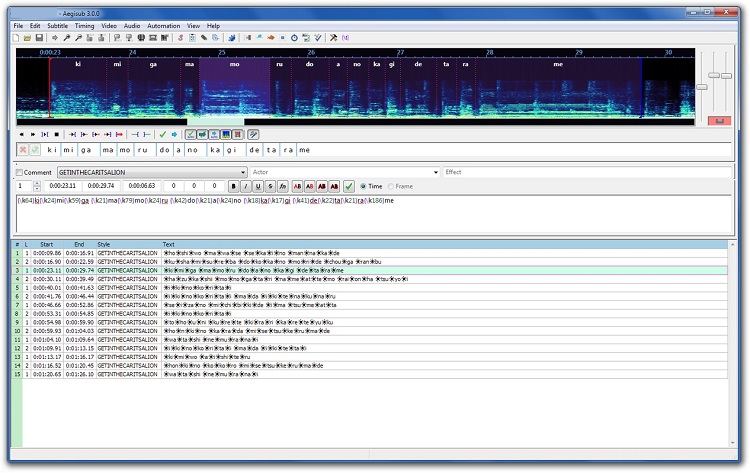
3. AegiSub
AegiSub is a powerful subtitle editor that can convert a subtitle file in multiple formats, such as SSA, SRT, and SUB, into another one with any modification you want. You can also embed the subs permanently and enable the tool to translate the audio into different languages.
Supported Platform: Windows
Pros
Supports multiple languages
Open-source
Cons
Limited to Windows
Understand how to embed subtitles into a video using AegiSub by applying the solution below:
- Run the tool, and open the video.
- Click the Subtitle tab to import the text file.
- Adjust the parameters, and click the Save icon to finish the changes.
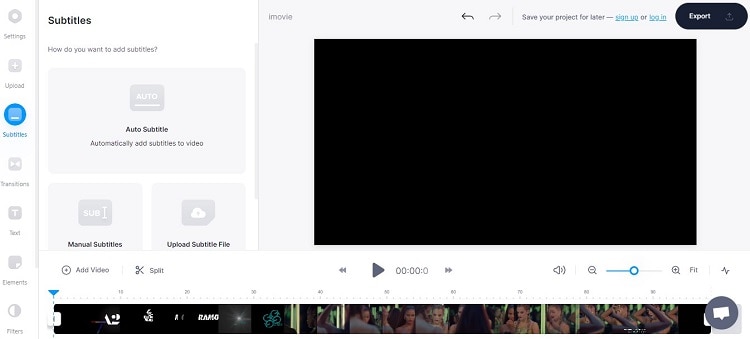
4. Veed.io
No matter you have a subtitle file in SRT, VTT, SSA, or TXT format, the Veed online editor will embed it to the video in no time. Additionally, it offers the Speech Recognition tool to generate subtitles automatically. You can also customize the font and position of the subs with Veed.io.
Supported Platform: Online
Pros
Advanced AI
A vast library of filers and effects
Cons
The embedded video is watermarked
Expensive
Only 10-minute video can be embedded for free
The steps to use Veed to embed text to video are mentioned here:
- Open Veed from any browser available on your device, and upload the video.
- Select Upload Subtitle File to import the SRT file.
- Finally, click Export to download the embedded video.
Part 3. FAQs about Embedding Subtitles to Video
1. How to embed subtitles into video permanently in Android?
You can download the “Video Subtitle Merger for Android” app, and quickly learn how to embed subtitles into video permanently on Android. Then, check out this article to know the detailed step-by-step guide.
2. How to embed subtitles into video online?
Tools such as Fastreel, Veed, and Clideo can enable you to embed subtitles into video instantly. You only have to access these tools from a web browser, import the video and subtitle files, and merge them. Though the services are convenient, you can only embed videos with subs within a specific limit. Also, the videos are watermarked, which could be tricky.
Summary
As you now know, there are many different ways to add subtitles to video; some are good, some are great, but none are perfect. The best way to add subtitles to your video is to use the UniConverter, a free online service that makes it easy to add subtitles to the video.

