How to record Discord with obs
Discord is a captivating platform. It is known for bringing lots of people to talk to each other. It also offers countless communication tools.
The only disadvantage is its inability to record content for future use. That's where the need for an OBS studio usually comes from. You can easily record Discord audio with OBS devices.
This software is so easy to operate and offers the best possible results for you. But some don't know how to record audio using OBS devices. But don't worry; in this article, we've created a guide about recording Discord audio using an OBS tool.
Let's get started.
What is OBS studio?
OBS is known as Open Broadcaster Software. It is an open-source live production tool supported by a massive community of developers worldwide.
This software can be used for live streaming, video production, and recording. It also helps many plugins; its functionality can extend to include various features such as Stream deck controls, NDI support, and VTS plugin.
How to Record Discord Audio with OBS on Mac
We'll give the complete guide to follow if you want to know how to record Discord with OBS on Mac. You only need to follow the instructions to get your job done.
Step 1: Install OBS studio
In the first place, you need to install OBS on your system. After installing it, the next step will be to sign up.
Step 2: Press the Plus icon.
Then, move towards the'' Sources section'' in OBS and hit the + icon at the bottom of the screen.
Step 3: Choose Audio Output Capture.
Now press '' Audio out Capture'' from the dropdown menu.
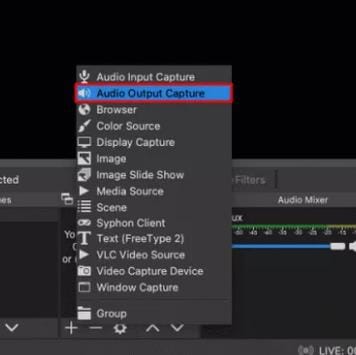
Step 4: Click OK
Then, you need to name your audio source and ensure the '' Make head visible'' option stays enabled. After all, hit the' OK' button.
Step 5: Select the Audio output device.
After that, you need to select an audio output device by expanding the dropdown menu, for example, speakers or headphones. Then, click '' OK.''
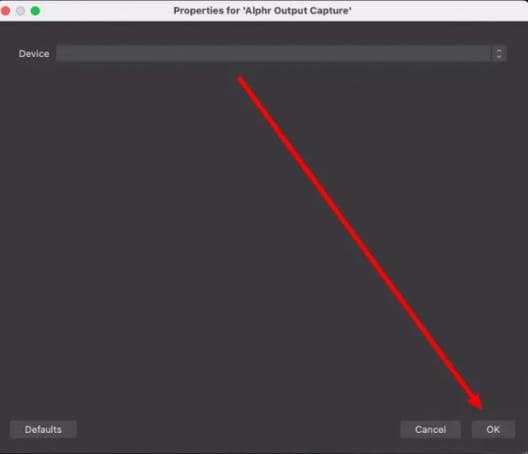
Step 6: Start Recording
Press the '' Start Recording icon''. You'll see that option in the 'Controls'' sections at the right corner of your screen.
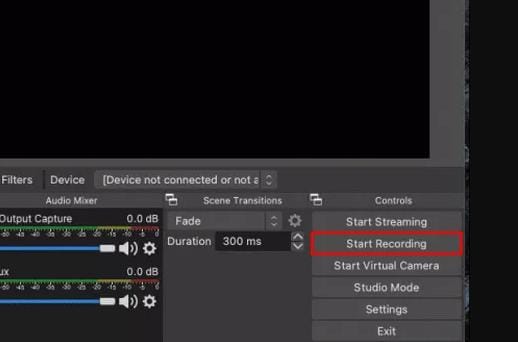
Step 7: Choose Format
Now, your audio will be recorded as a black video file; in MKV format. You can choose a different form by clicking output if you want to select another format. Now you can like your preferred design from the Recording format.
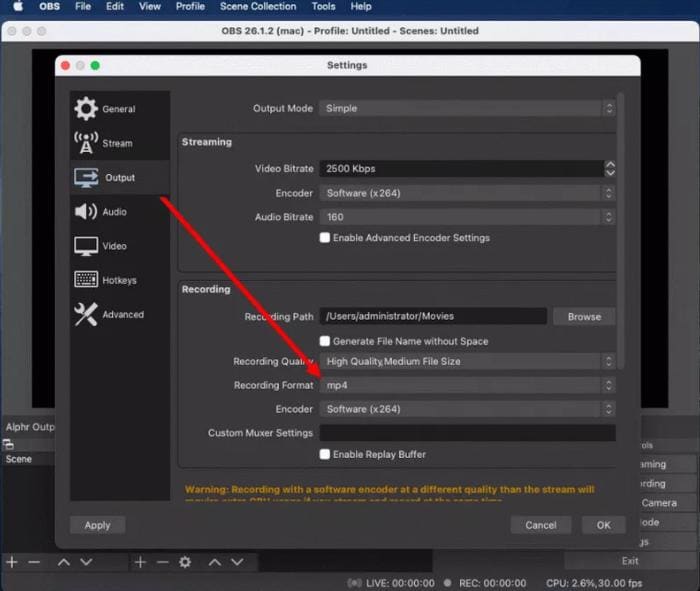
Step 8: Press the loudspeaker icon.
You must press the loudspeaker icon in the audio mixer section to enable or disable microphone recording.
Step 9: Shift the blue slider.
Then shift the blue slider to your loudspeaker icon to control your recording volume.
Step 10: Click on the File
If you want to watch your recordings, press the File and Show Recordings icon. Press the File and Show Recordings icon
How to Record Discord Audio with OBS on Window
Recording audio with OBS for Windows 10 is quite similar to Mac. For that. you must follow the steps mentioned below:
Step 1: Install OBS
First, install OBS, and sign up.
Step 2: Press the + icon.
Then go to the'' Sources section'' in OBS and hit the + icon at the bottom of the screen.
Click on the plus icon.
Step 3: Select Audio Output Capture
You must hit the'' Audio out Capture'' option from the dropdown menu.
Step 4: Click "OK"
You need to give your audio source a name and ensure the '' Make head visible'' option is enabled. After that, click the' OK' button.
Step 5: Choose an Audio output device
You can select an audio output device by expanding the dropdown menu and clicking'' OK.''
Select the audio output device
Step 6: Start Recording
You'll need to click on the '' Start Recording option''. You can see this option on the right side of the screen. in the 'Controls'' sections.
Step 7: Select a suitable Format.
In the end, your audio will be recorded in an MKV format. But if you want to choose a preferred configuration, you can select it by hitting the Output option.
Step 8: Choose the loudspeaker icon.
You can enable or disable the microphone recording by pressing the loudspeaker option in the audio mixer. Select the loudspeaker icon
Step 9: Shift the blue slider.
You can control your recording volume by shifting the blue slider to your loudspeaker icon.
Step 10: Click on Show Recordings.
If you want to view your recordings, you'll need to click on the "File" and then the "Show Recordings icon."
How to Record Discord Audio Separately with OBS
You should follow the simple steps to know how to record Discord audio separately with OBS.
Step 1: Check the output device.
You need to check your output device in your Discord settings. Then press the'' Voice&Video'' option on the bottom of your screen.
Step 2: Add a widget to the OBS scene.
Now, you'll need to add your device to OBS as a source to allow your OBS to access Discord audio. After going into the source pane, you'll need to press the'' +'' icon and add '' Audio Output.
A pop-up w.indow will appear. If you've added your audio device from Discord to your OBS, you can easily select it from the'' Add Existing'' icon. Or you need to create a brand new audio device. After doing it, click on OK.
Choose the existing add icon.
When you make a new audio device, you'll see a window asking you to choose an audio device. You'll need to ensure the device you're selecting must match the device used by your Discord for output.
Step 3: Test your added device.
You can also check the liability of an instrument you've added. You can make a call or chat with your friends having OBS open. If your bar is lighting up, your system is now ready.
Step 4: Add Discord device
Before going live, you'll need to ensure that you're adding your Discord device before changing any plans about chats. This entire process will protect you from being in an awkward situation like you're having an awful conversation with someone, but the discussion doesn't know what's happening.
Best OBS Alternative to Record Discord Audio
If you're looking for an OBS alternative to record Discord audio, there are 8 best OBS alternatives you can use and record your audio hassle-free.
1. Wondershare UniConverter
It is a powerful screen recording and editing software. Multiple valuable features are integrated into Wondershare UniConverter (originally Wondershare Video Converter Ultimate). It works as a video file converter, video editor, DVD burner, compressor, and more.
It is straightforward to use. It's a little expensive compared to other software, but if you want to work with videos daily, Wondershare UniConverter is best for you.
If you would like to convert or edit a few videos, you'll prefer to use a tool that provides a lower price. It can convert multiple videos to 1000 formats without quality loss.
It is dominant software that can support up to thirty times the speeds available on the conventional web and PC-based converters.
It is easy to download and operate as each step is clear to understand. There is no need to learn professional skills to manage this software.
Features
- Conversion Image/video
You can convert any image/video file into any format because it offers more than 1000 formats.
Video formats supported by this recording tool are MP4, AVI, WMV, MOV, MKV, and MPEG.
Image formats: JPG, PNG, BMP, and GIF
- Audio conversion
This software also offers multiple audio formats, such as MP3, M4A, AC3, AAC, etc.
- Screen Recording
You can capture your screen activities on the desktop whenever you want. It allows you to record your screen and create content such as promotional and instructional videos.
- Record with audio
You may be a gamer who wants to show your gaming skills to the world. Record your voice while playing the game and upload it to social media.
- Record with the camera
It lets you record demo videos with a camera. Record your screen with the Webcam and create your content in just a few clicks.
- CD Burning
It allows you to burn any music to a CD quickly.
- Subtitling
To better understand the audience, you can add subtitles to your content. It helps you to make your content appealing and interactive.
- Remove Background
It lets you remove the image's background with artificial intelligence.
- Audio/Video Editing
It also offers a variety of basic editing features such as trim, crop, merges, adds an effect, rotates, subtitles, audio, and watermark.
- GIF Maker
You can also make your content entertaining by making GIFs. For this, you can create your gifs from videos and pictures.
Pros
It is an easy-to-use tool.
It offers nearly 1000 formats.
It produces good quality videos.
Cons
It has a complex refund process.
Its free version provides you with limited features.
Wondershare UniConverter — All-in-one Video Toolbox for Windows and Mac.
Edit videos on Mac by trimming, cropping, adding effects, and subtitles.
Converter videos to any format at 90X faster speed.
Compress your video or audio files without quality loss.
Excellent smart trimmer for cutting and splitting videos automatically.
Nice AI-enabled subtitle editor for adding subtitles to your tutorial videos automatically.
Download any online video for teaching from more than 10,000 platforms and sites.
2. Craig chat bot
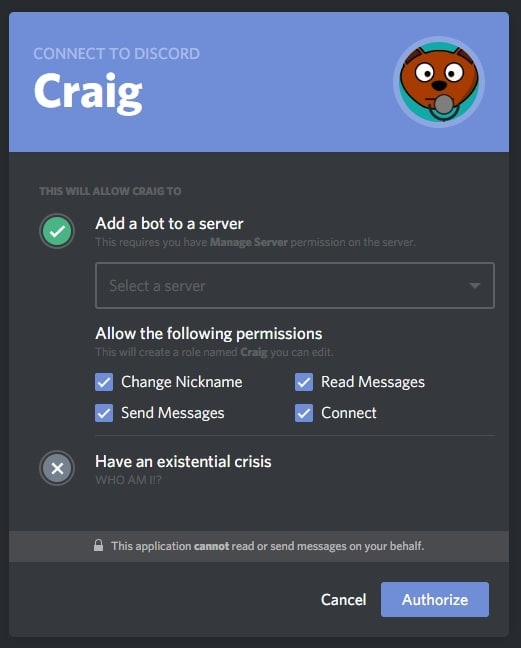
It is the voice channel recording for Discord with multi-track recording. When Craig records your Discord voice channel, you get a separate audio file for each speaker. It allows you to independently level, cut or otherwise edit each speaker, an invaluable ability for podcasts.
Every audio file delivered will perfectly sync with each other no matter how long your recording is or how many speakers are recorded. If speakers join late, you can use the web app to record higher quality than Discord.
Features:
- It's an open-source platform
- Your recordings can be exported in modern audio formats such as FLAC, MPEG AAC, and more.
- It records high-quality sound than Discord.
- Even if Craig is still recording, you can download your audio.
- You can record audio up to a reasonable limit; of 6 hours.
- It is a multi-track recording tool.
- It's free to use.
Pros
It is a fast software with zero lag
It provides good audio quality.
Cons
Doesn't support any phone OS.
3. LEAWO
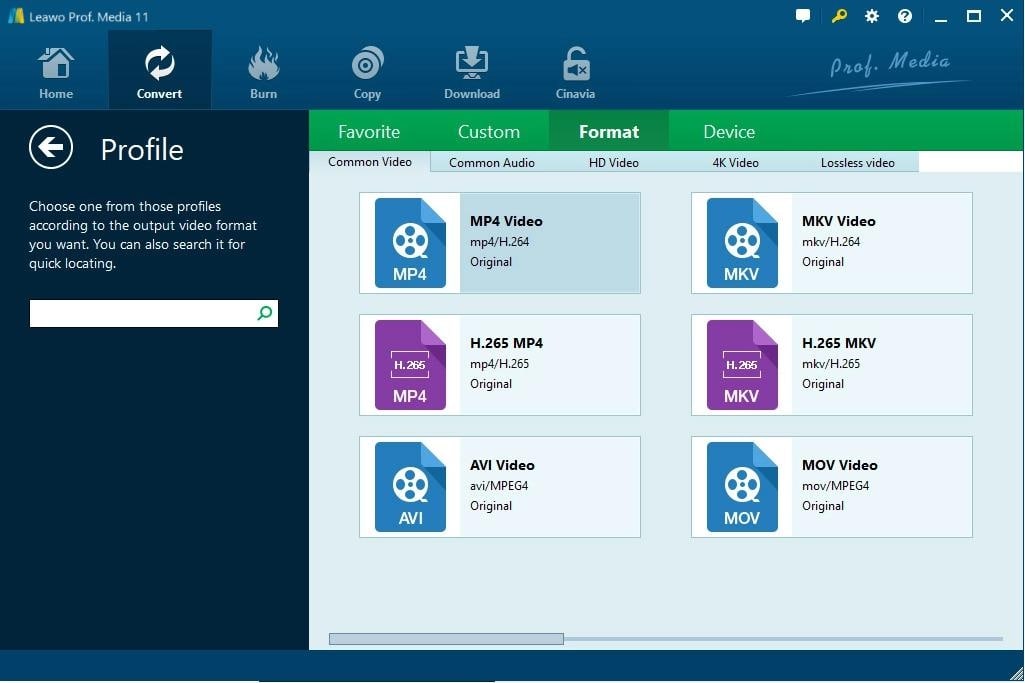
It is a superb music recorder but easy-to-use music recording software program that allows you to record free music from any built-in input audio, computer audio, and online music sources, like YouTube, Spotify, AOL Music, etc., and then save in MP3 or WAV format without losing quality. You can automatically add music tags when recording music or let you manually edit music tags via the music tag editor.
Features:
- It allows you to record audio
- You can schedule the recordings
- It lets you select the format.
- It canadd tags manually


