Screen Recorder
All Topic
- YouTube Tips
-
- AI Tools Tips
-
- AI Photo Enhancer Tips
- Voice Changer Tips
- AI Thumbnail Maker Tips
- AI Script Generator Tips
- Smart Summarizer
- AI Subtitle Generator Tips
- Watermark Remover
- Vocal Remover Tips
- Speech to Text Tips
- AI Video Tips
- AI Image Tips
- AI Subtitle Translator Tips
- Video Extractor Tips
- Text to Speech Tips
- AI Video Enhancer Tips
- DVD Users
- Social Media Users
- Camera Users
- Photography
- Creative Design
- Movie Users
- Travelling Fans
- Educational Users
- More Solutions
- Holidays and Commemoration
- Game Lovers
- Other Tips
How to Record Picture-in-Picture Video in 6 Effective Ways
by Kayla Morrison • 2026-01-21 19:00:53 • Proven solutions
Learning how to record picture in picture video is crucial, especially if you run an online class. Recoding a video overlay lets you demonstrate to your audience how a specific desktop app or settings works with precise gestures of yourself. But although that my sound easy, finding the perfect Picture in Picture (PIP) recorder can be a challenge. That's why this listicle will introduce you to six excellent apps to help you record a picture in picture video with high-quality.
- Part 1. Easiest Way to Record Picture-in-Picture Video on Windows and Mac
- Part 2. Other 5 Recommended Ways to Record Picture-in-Picture Video
Part 1. Easiest Way to Record Picture-in-Picture Video on Windows and Mac
Wondershare UniConverter is the best app for capturing a picture in picture video on Mac or Windows computer. It's simple to understand and use and offers multiple exciting features. Users can record videos, capture audio, convert media files, burn DVDs, etc. You can add a picture in picture effect during the video recording session using an inbuilt or connected webcam. Users can also apply voice narrations with the system microphone and capture system audio with the inbuilt speaker system. And most importantly, users can use annotations like texts, shapes, arrows, and drawings while recording a PIP video.
Wondershare UniConverter - Best Desktop Screen Recorder
-
Record a Picture-in-Picture video using the system webcam or a connected camera.
-
Edit videos with features of cropping, trimming, rotating, adding watermarks, applying effects, and others.
-
Edit, enhance & personalize your videos file.
-
Batch video/audio compression and conversion are allowed.
-
Toolbox with additional functions like Screen Recorder, VR Converter, GIF Maker, Fixing Media Metadata, and more.
-
Supported OS: Windows 10/8/7/XP/Vista, macOS 11 Big Sur, 10.15 (Catalina), 10.14, 10.13, 10.12, 10.11, 10.10, 10.9, 10.8, 10.7.
Below Are The Steps of How to Record Picture in Picture Video Using Wondershare UniConverter:
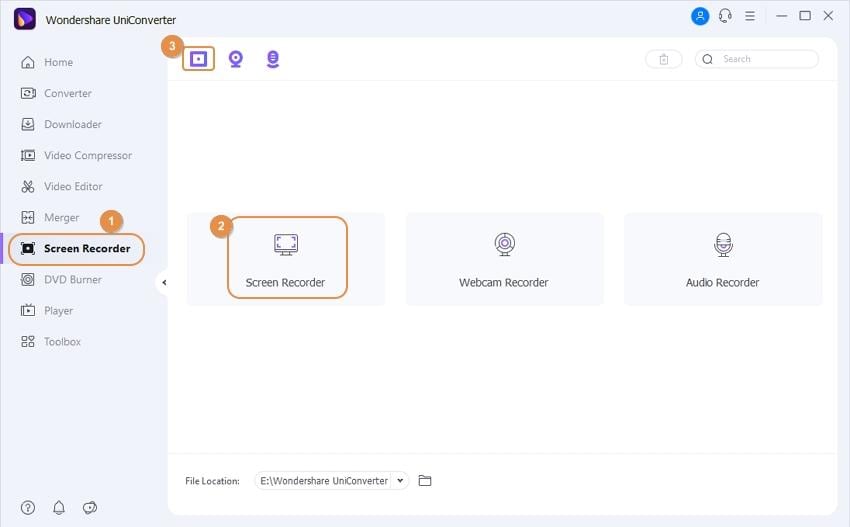
Step 1 Open the Screen Recorder tool.
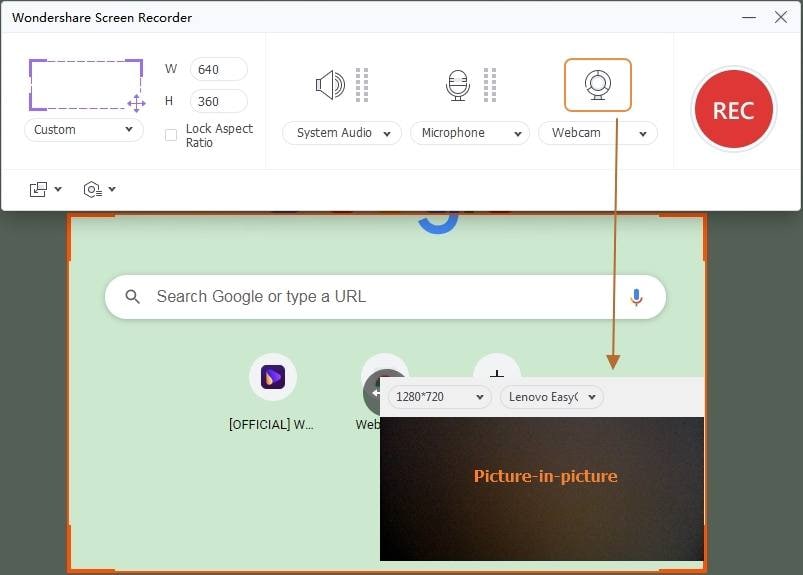
After installing Wondershare UniConverter successfully, click the Screen Recorder tab located on the left pane. Now proceed to press the Camcorder button at the center to launch Screen Recorder.
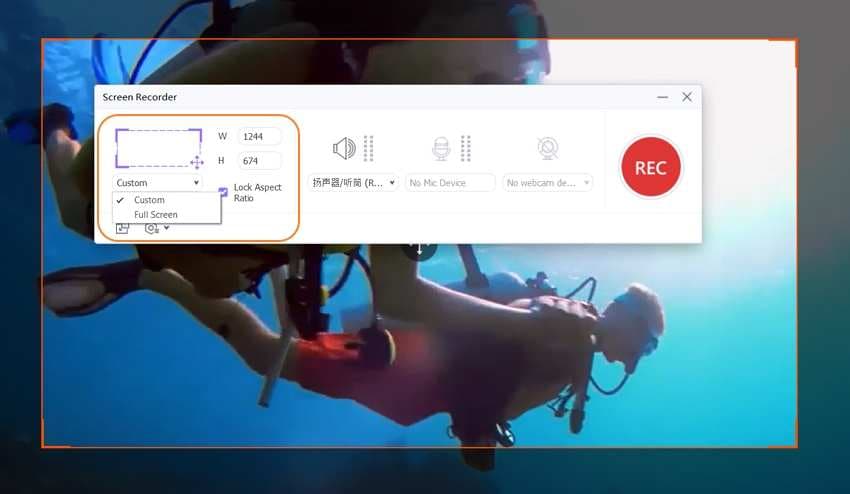
Step 2 Choose a recording area or region.
Do you want to capture the video in full-screen mode or just take a section of the screen? Use the cropper to adjust that by dragging it inwards or outwards. You can also set the custom recording dimension and lock the aspect ratio to look more professional.
Step 3 Select a webcam and a sound input microphone.
Enable the camera by clicking the Webcam button. Your system webcam should launch automatically. Now select an input mic under the Microphone drop-down list, then choose a speaker system that you'll use to record the system audio.

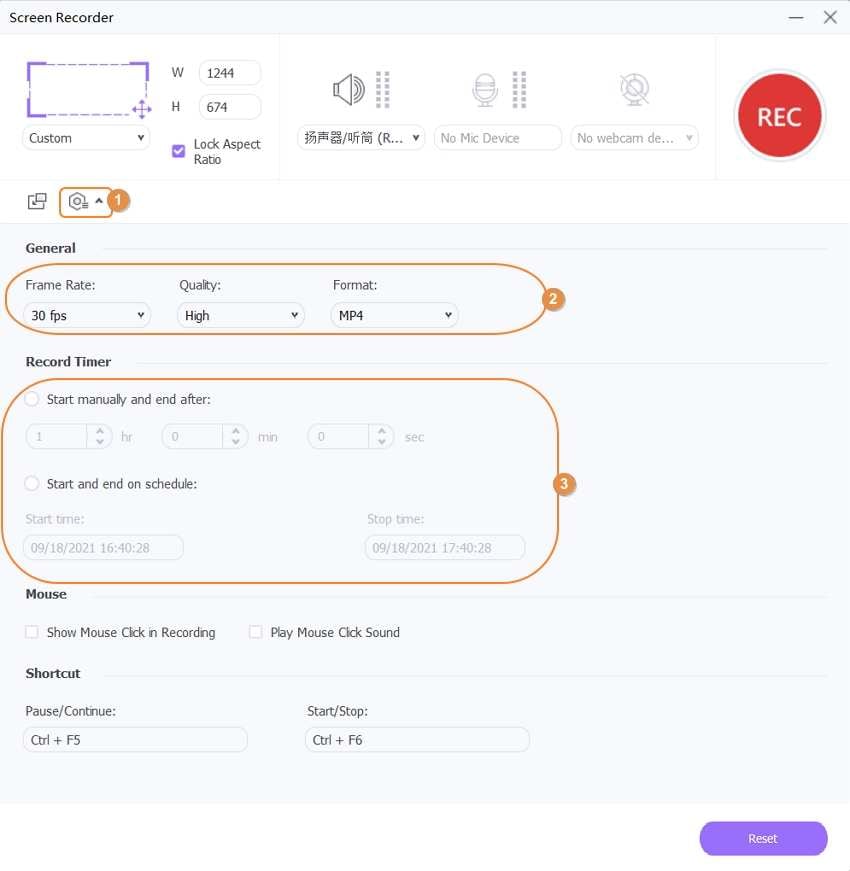
Step 4 Set output settings for your recorded video.
You're now ready to begin recording. But before that, click the Settings icon under the Record button to adjust a few things. Do the following:
- Open the Format drop-down list and set the target format as either MP4, AVI, or FLV.
- Navigate to the Frame Rate menu and set an output frame rate. You have an option to select between 15 and 60.
- Set the output quality or resolutions as high, medium, or low under the Quality menu. If your computer is out of storage, choose low or medium, although you'll have to sacrifice quality.
- Sometimes you may want to set a specific recording timer. In that case, manually enter the start and stop time.
- You can also set keyboard shortcuts to make your work a lot easier.
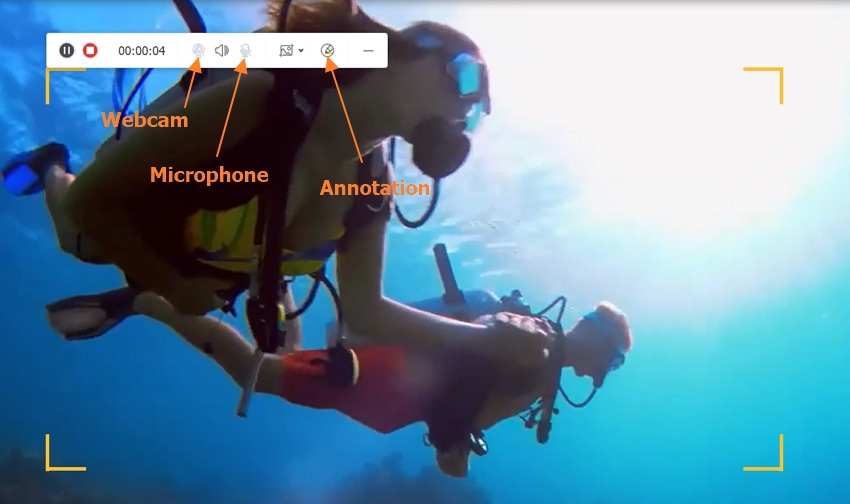
Step 5 Start recording with annotations.
Click the REC and wait for the three-second countdown to capture the desktop screen. Tap the arrow on your screen's right side to display the recording taskbar. Here, you can click the Annotation button to add unique features like texts, lines, shapes, and arrows as you record. Now click the Webcam button to open the video overlay screen. You can also enable or disable voice narrations. If satisfied, press the Stop button. It's that easy!


Part 2. Other 5 Recommended Ways to Record Picture-in-Picture Video
Apart from Wondershare UniConverter, you can also add these excellent apps to your video creation library:
1. Wondershare DemoCreator
Key features:
- 30-day money-back guarantee after a free trial.
- Compatible with all Mac and Windows OS.
- It lets users record in full-screen or custom mode.
- Add annotations such as texts, stickers, arrows, shapes, and more.
- Edits recorded videos by trimming, applying visual effects, cropping, etc.
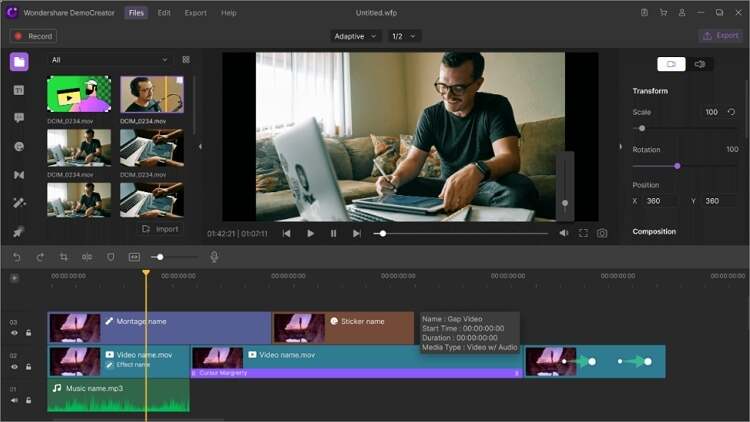
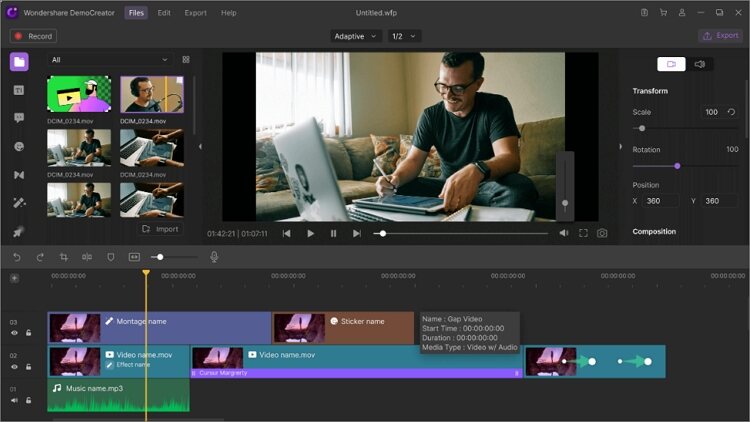
Wondershare DemoCreator is an excellent Wondershare product that makes your video recording and editing tasks effortless. With it, you can capture a PIP video with voice narrations and annotations on Mac or Windows. After recording, it lets you trim, add effects, crop, and do other video editing tasks.
2. OBS Studio
Key features:
- A free, open-source app.
- It works on Windows, Mac, and Linux computers.
- It supports an unlimited number of interchangeable scenes.
- Supports all desktop apps and external webcams.
- It offers an intuitive audio mixer.
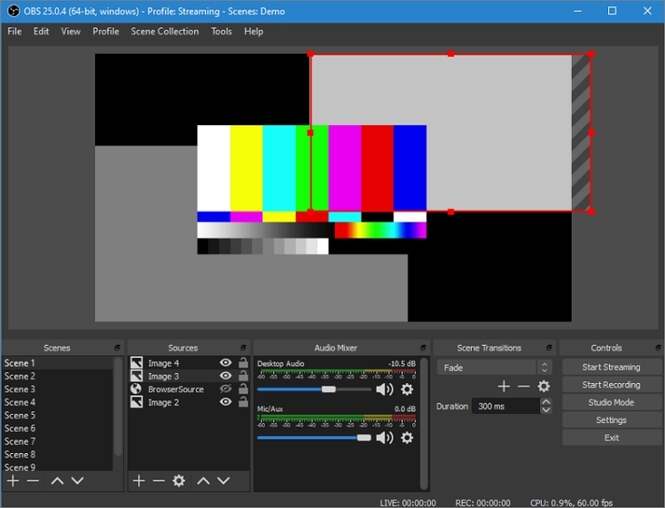
OBS Studio is something all freebie lovers should be looking at. Although the user interface can be a little intimidating initially, this app is simple to learn. With it, you can capture and mix videos, create multiple interchangeable scenes, stream videos, and so much more.
3. CloudApp
Key features:
- Compatible with Linux, Chrome, Windows, Mac, and iOS.
- Automatically save screen recording to the cloud or clipboard.
- Record high-quality live HD videos.
- Add annotations such as lines and emojis to images, GIFs, and videos.
- Customizable keyboard shortcuts.
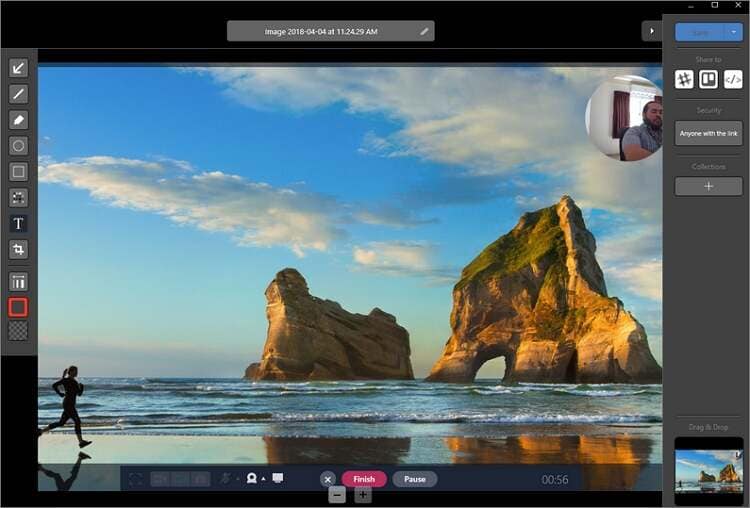
CloudApp is another beautiful screen capture tool for desktops. It can record a video in fullscreen or partial mode and automatically copy it to your clipboard or cloud storage. To make your clip more attractive, you can add stickers, shapes, texts, lines, etc.
4. Camtasia
Key features:
- Excellent video editing capabilities.
- Record full-screen or custom desktop screen with PIP effect and voice narrations.
- Attractive 30-day free trial period.
- Add texts, effects, transitions, and more to your video.
- Directly upload your recorded video to Vimeo, YouTube, Screencast, Dropbox, etc.
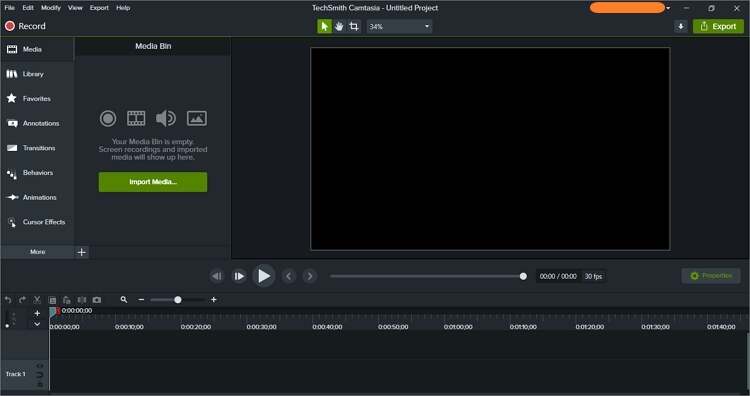
Honestly, few on this list can match Camtasia. Although the app has a significant file size, it compensates with multiple powerful packages. In addition to recording anything on your screen, it can also edit the eventual video by trimming, cropping, moving video sections, and more. You can also upload and edit local videos.
5. QuickTime Player
Key features:
- Easy to use interface.
- It is pre-installed on macOS.
- Works with iTunes files.
- Stream online videos via URL.
- It offers an intuitive picture viewer for BMP, JPG, and PNG.
QuickTime Players offers Mac users a free and straightforward way to open video and audio files. But did you know this app can also record videos? Well, now, you know! And, you can also make fast editing like splitting and cutting.
Conclusion
Choosing among the apps above can be a difficult test. So, to help you out, we recommend Wondershare UniConverter. That's because it features the most video recording features. Best of all, there are other tools like video editor and video converter to help you fine-tune your recorded video.
Your complete video toolbox
 Best screen recorder to record video with Picture-in-Picture effect.


Kayla Morrison
staff Editor