Live video streaming has become so trendy among most vloggers today. YouTube Live, for example, allows videographers to host online live classes, stream events, host workshops, and so on. But do you know the best methods to record YouTube live stream without breaking a sweat or compromising quality? This article has five simple solutions on how to record YouTube live stream on macOS or Windows computers. Let's start!
Part 1. Can I record a live stream?
It's rare for you to peruse through your social media handle these days without bumping into one or two live videos. Typically, people prefer live streaming videos to establish their brand and maximize their reach potential. Most viewers find live-streamed videos more engaging and realistic to watch.
Fortunately, YouTube allows you to live stream videos, with its live streaming platform boasting more than 1.9 billion users. But although the YouTube Creator Studio will enable you to create on-demand videos easily, this feature lacks essential tools for picture-in-picture (PIP) capturing, video editing, video recording, and more. So, if you're looking for a more engaging way to record and edit a YouTube live stream, keep reading.
Part 2. Top 5 options to record YouTube live stream (Windows & Mac)
1. Wondershare UniConverter 13(Windows/Mac)
If you want to record live stream YouTube without unwanted watermarks, get Wondershare UniConverter. This screen recorder is simple, elegant, and allows you to capture YouTube live videos in multiple positions. It allows users to manually set the capture area using the lasso tool or choose the preset full screen and custom modes. During the recording session, you can insert a video overlay (PIP), voice narration, and annotations like texts, shapes, lines, etc. And after recording, you can retouch the video to make it more engaging before sharing.
Wondershare UniConverter - Best YouTube live-recording software for macOS 10.9+ & Windows 10/8.1/7.
Intuitive screen recording function for capturing the entire screen or part of it.
Record YouTube live recording in up to 60 frames per second.
Export YouTube live recording in MP4, AVI, or FLV formats.
Insert PIP, voiceover, and annotations on the recorded videos.
Edit the YouTube live video by trimming, cropping, adding subtitles, and so on.
Below is how to record YouTube live with Wondershare UniConverter:
Step 1 Open and run the Screen Recorder tool.
Install and launch UniConverter on your computer and then tap Screen Recorder on the left menu bar. After that, click the Screen Recorder button to launch the function.
Step 2 Open the YouTube live video and choose a capture area.
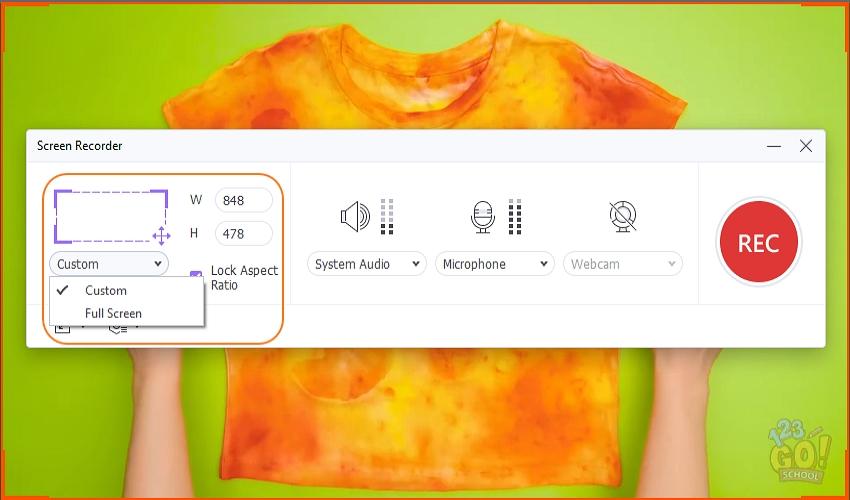
Once the screen capture tool launches successfully, open the video or computer activity you want to record and crop the video frame to fill a capture area. To record specific video frames, choose Custom on the recording mode section and enter your preferred height and width dimensions. Then, tap the Lock Aspect Ratio checkbox to ensure a more realistic output.
Step 3 Choose the recording devices and customize the settings.
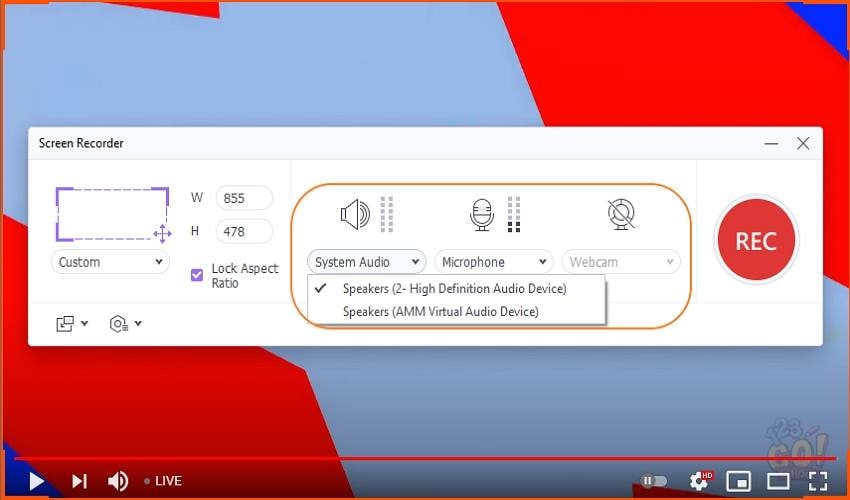
To record your YouTube live video with all sound outputs, choose a device on System Audio. Then, proceed to select a sound input device on the Microphone section before selecting a PiP device on Webcam.
Now it's time to configure the output format, frame rate, and quality. To do that, click the Settings button and then choose MP4, AVI, or FLV as the target format. For a smoother playback on any device or online platform, choose MP4. You can even set a recording timer to ensure you don't exceed the playback duration you want.
Step 4 Record the YouTube live video.
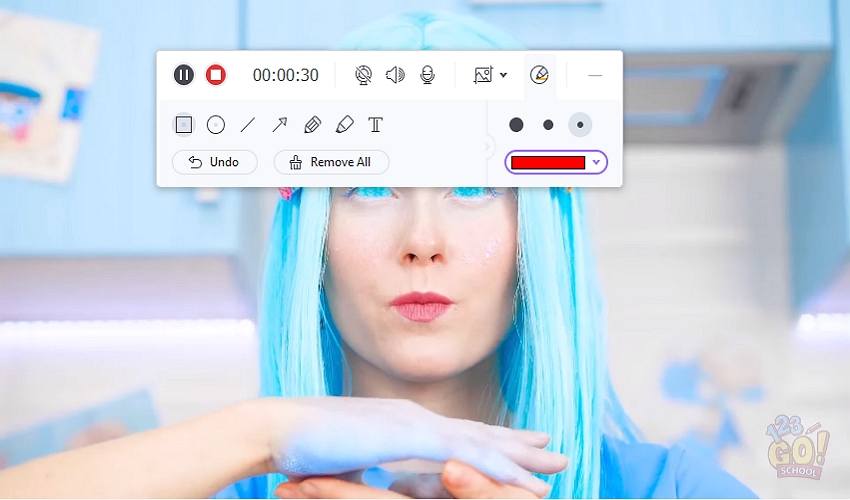
Last but not least, check the capture area once again if it fits your needs, and then click the REC button. When the recording session commences, launch the taskbar, where you'll see buttons for stopping/pausing the recording session, enabling/disabling devices, and capturing a screenshot. You'll also see a tool for adding annotations as you record. Finally, click Stop to finish recording and share your video.
Pro tip: You can edit your video further to make it stand out on the crowded YouTube platform. Just right-click the clip, choose Add, and then tap Video Editor. Now launch the Video Editor window and retouch the video professionally. You can even directly export it to YouTube format to avoid compatibility issues.
2. TechSmith's Snagit
Another excellent solution on how to record live streaming video on YouTube is Snagit. With this macOS and Windows app, you'll need little or no help to get started and capture top-quality videos. It allows users to capture the whole computer screen or a particular section before editing it by cutting and adding texts. Interestingly, Snagit also allows you to capture and export pictures in GIF and PNG formats.
Below is how to record YouTube live with Snagit:
Step 1. Install and run Snagit on your computer and then play the YouTube live video you want to capture.
Step 2. Click the Video tab on Snagit and then enable the recording settings and devices. For example, you can enable a webcam, video editor, system audio, and more.
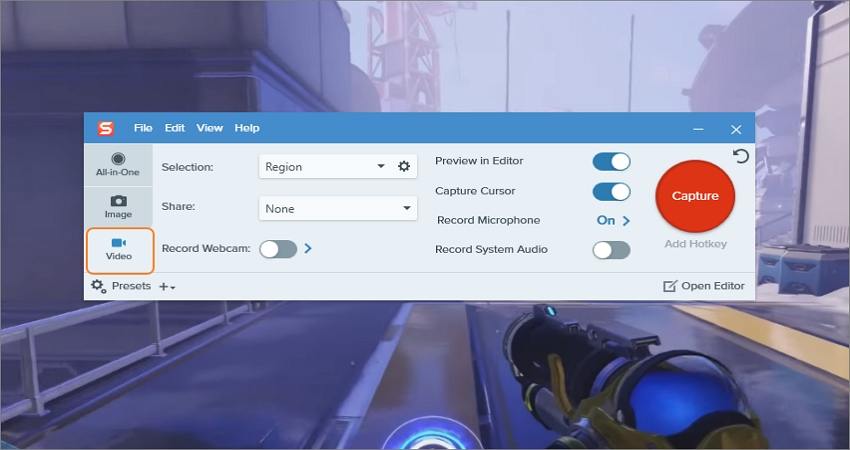
Step 3. Now click the Capture button and then crop the window to set a capture area. Like with UniConverter, you can even enter the optimized video frame dimensions.
Step 4. Tap Record to start capturing the live YouTube video. During the recording session, users can activate system sound, voice narration, and webcam overlay. Click Stop if satisfied.
Step 5. The Snagit Editor will lunch automatically with your captured video. Here, you can edit the video with arrows, shapes, stamps, texts, and so on. If satisfied, press the Share button and choose where to save the video. That's it!
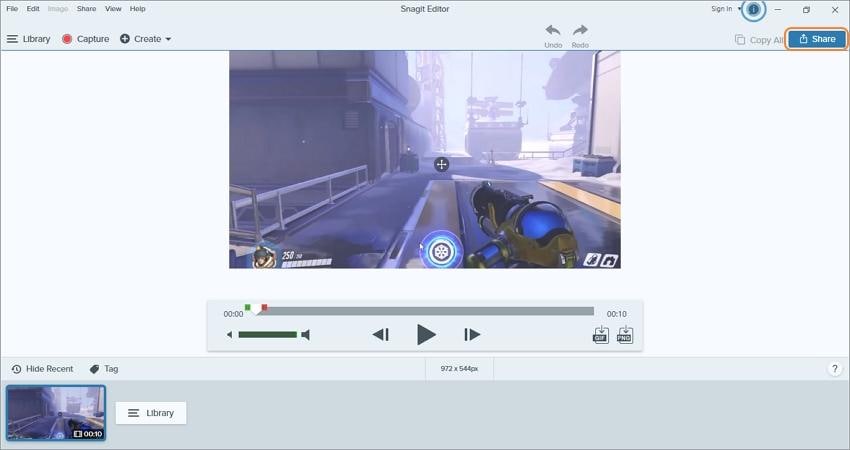
Note: Although the Snagit Editor is very helpful, the user interface can be overwhelming to beginners at first. Also, only paid users can edit recorded video clips on Snagit.
3. EaseUS RecExperts(Windows/Mac)
If Snagit doesn't cut it for you, EaseUS RecExperts should. Here, you'll enjoy free video recording sessions on Mac and Windows computers. This software lets you capture YouTube live videos alongside voice narrations and PIP effects. EaseUS RecExperts comes with four recording modes; Full Screen, Select Region, Lock Region, and Lock Window. After choosing a recording mode, you can even set a recording timer to ensure you never miss a YouTube live session.
Follow these steps to record YouTube live on EaseUS RecExperts:
Step 1. Install and run EaseUS RecExperts and then chose Record Screen. After that, launch the YouTube video you want to record.
Step 2. Now tap the crop icon and choose whether you want to record in Full screen, Select region, or Fixed region mode. In this case, choose Select region.
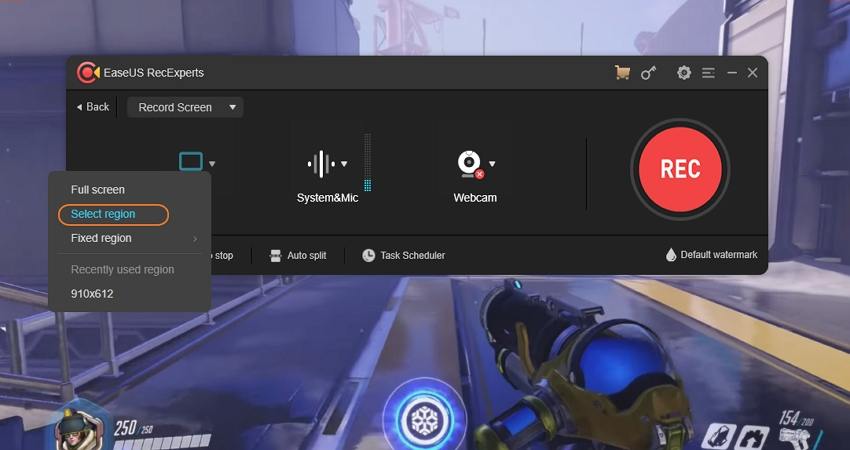
Step 3. Crop the area you want to record by long-pressing and dragging the mouse.
Step 4. Now go to the System & Mic option and then select the sound recording mode. For example, you can choose to record the microphone only or choose system sound and microphone. You can even record without any audio if you wish.

Step 5. Do you want to record the video with a PIP effect? If yes, click the Webcam icon and choose a facecam.
Step 6. Finally, click the Record button to capture your computer screen with EaseUS RecExperts. If satisfied, press Stop and then launch the editor by tapping the marker button. You can now dissect the video by dragging the handles before exporting.
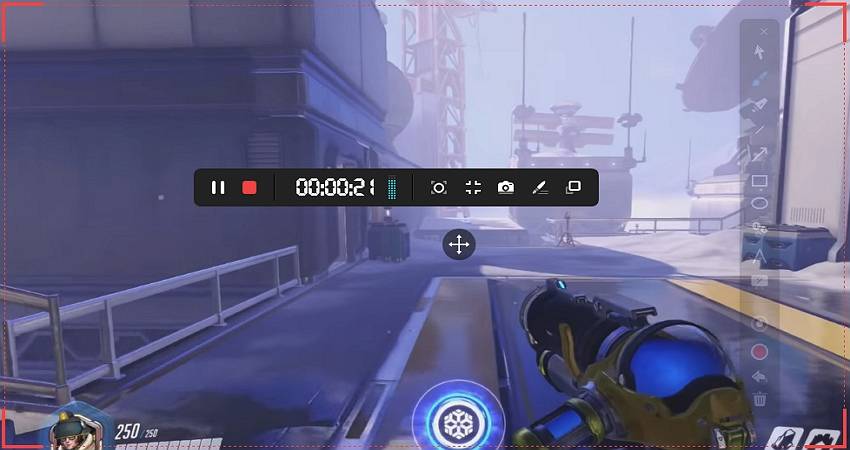
Note: As you can see, it might take you a while to master your way around this beautiful program. Even worse, users can only record MP4 videos, and the editor is pretty limited.
4. VLC(Windows/Mac)
Did you know that VLC is a multi-purpose software? Yes, you can use VLC to perform a host of functions apart from watching videos. For example, VLC can convert and record videos and audio with ease. Users can record local videos on apps like YouTube or livestream URL links as you record. In addition, VLC can export videos to MP4, WebM, AVI, or TS formats.
So without any further ado, apply these steps to record YouTube live stream on VLC:
Step 1. Install and run VLC on your computer. Remember, VLC is a free, open-source program.
Step 2. Next, open the YouTube live stream video and copy the URL. After that, click Media on VLC and then tap Open Network Stream. Then, proceed to paste the URL link in the space provided.
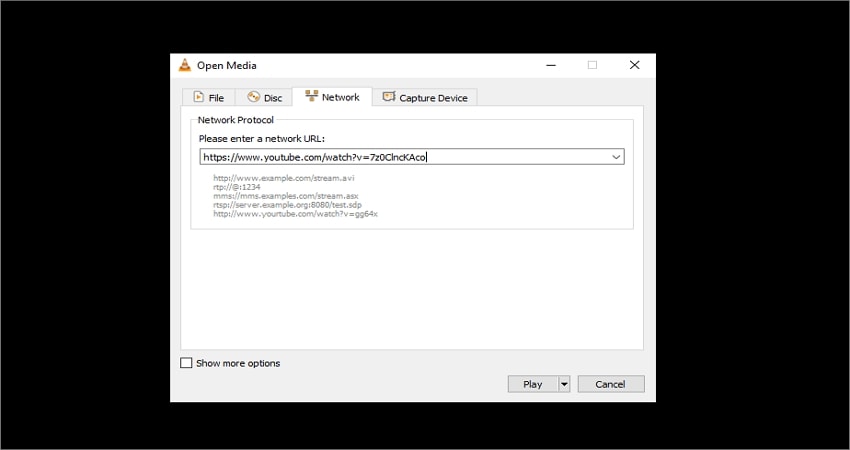
Step 3. Now click the Play button to begin capturing the YouTube video. After capturing enough content, press the Stop button.
Step 4. To view the imported YouTube video, tap Media, click Open Recent Media, and then tap your video to watch it.
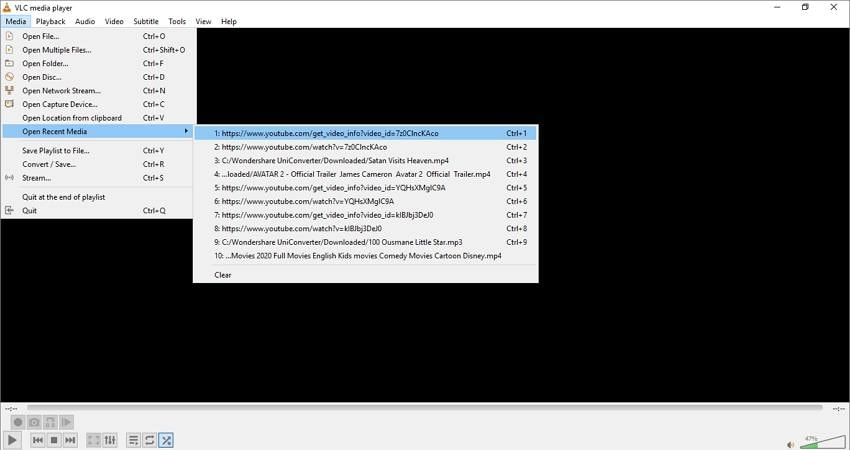
Note: Although a few programs can beat VLC when it comes to freebies, the output quality isn't up to scratch. Also, VLC doesn't offer video editing functions. So, use a utility app like UniConverter 13 to edit and convert your VLC-recorded video. Oh, lest I forget, you'll most likely get an error message when live streaming YouTube videos on VLC.
5. TechSmith's Camtasia(Windows/Mac)
Finally, use Camtasia from TechSmith to smoothly record YouTube live stream on macOS and Windows. This program boasts a clean and intuitive UI and can record pretty much anything on your computer. Users can capture videos alongside PiP effects, system sounds, microphone recordings, and annotations like texts and drawings. Also, Camtasia boasts an editing suite for trimming, moving, and adding video sections.
Below is how to record a live stream on YouTube with Camtasia:
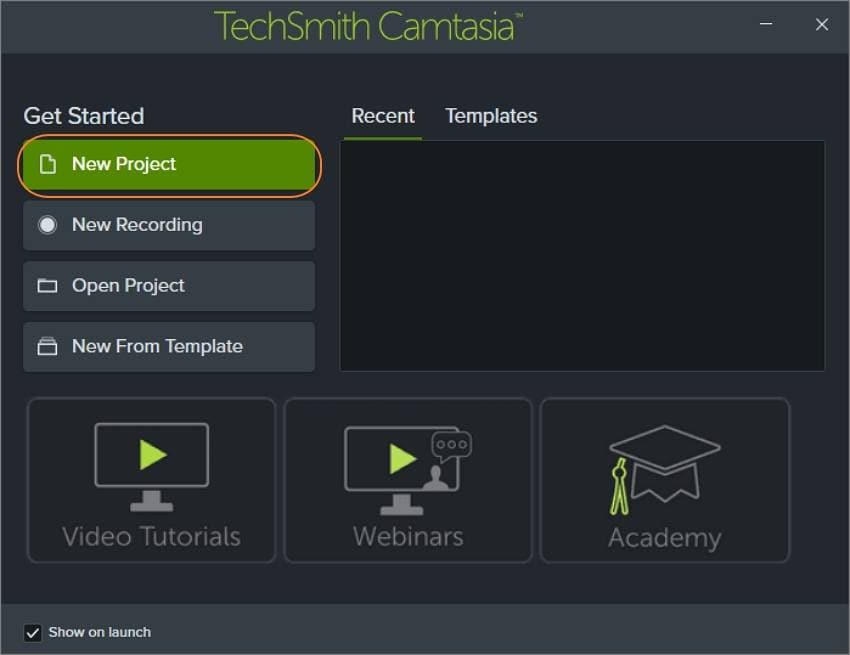
Step 1. Install and run Camtasia on your computer and then choose New Project. Then, tap the Record button to launch the Camtasia recorder.
Step 2. Now play the YouTube live video and choose the recording area as full screen or select area to record.
Step 3. Proceed to choose input devices for webcam, microphone, and system sound recording.
Step 4. Press the Start Recording button to begin recording the computer screen.
Step 5. Once you've recorded enough content, press Stop and then trim out unwanted sections using the Camtasia Editor. This tool also lets you add annotations, effects, titles, and more.
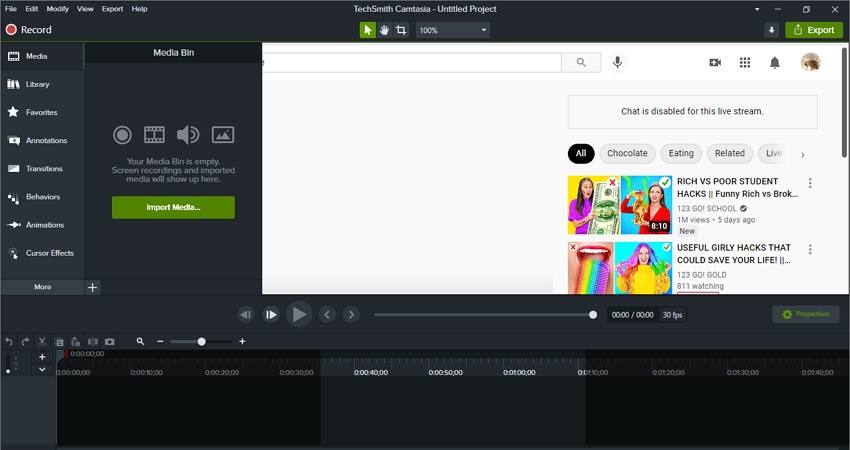
Step 6. Press Export to save your video as MP4 or GIF. You can even directly export the video to the cloud and social media platforms.
Part 3. Extra guide: How do I download a livestream from YouTube?
If you're skeptical about the quality of a recorded YouTube live video, then download it directly to your computer. Again, Wondershare UniConverter 13 will help you with that. But before extracting, this software allows you to save the video as MP4 with varying resolutions. You can also extract YouTube in MP3 or JPG formats.
Below are the easy steps:
Step 1. Launch the Downloader and import the URL link.
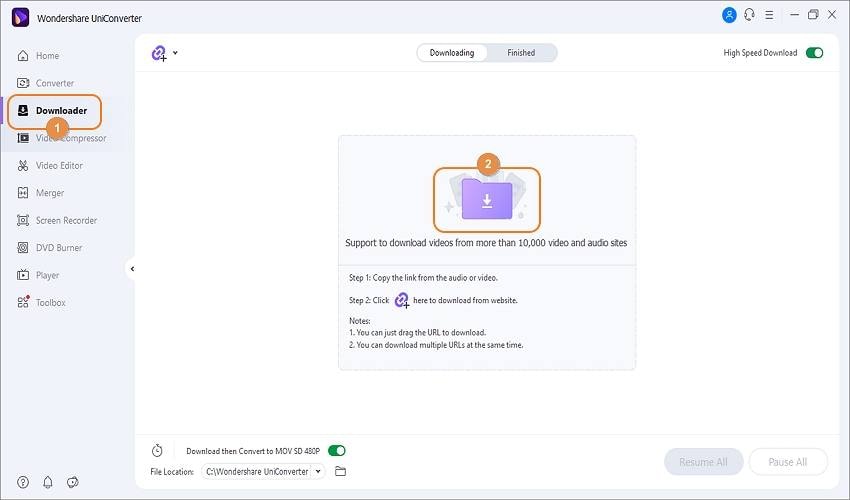
Start by copying the YouTube clip URL, and then on UniConverter, click the Downloader tab on the left pane. Now click the Download button, and the program will start analyzing your video.
Step 2. Choose MP4 as the target format.
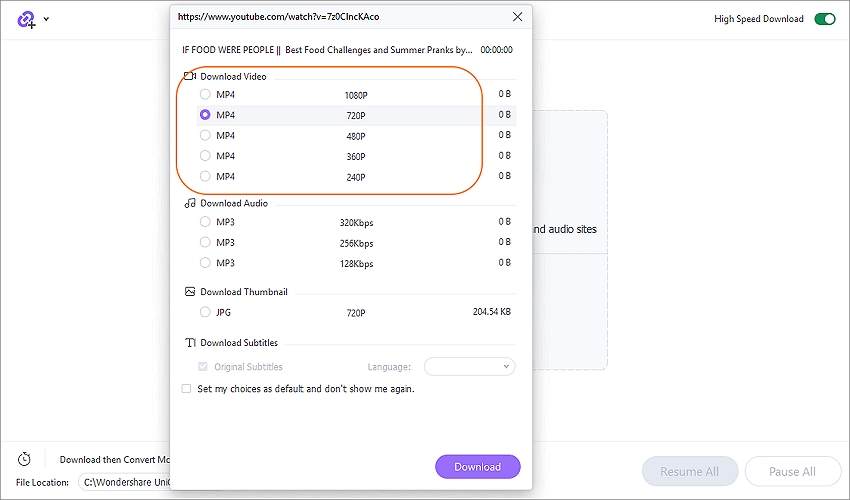
After the program has finished analyzing your video, select an MP4 resolution on the Download Video section. Remember, a higher-quality clip comes with a more significant file size.
Step 3. Save the video on your computer.
Click the Download button, then wait for UniConverter to finish extracting the YouTube video. For a quicker download process, tap the High-Speed Download toggle to enable it. Finally, click the Finished tab to view your extracted YouTube video. And there is that!
Conclusion
Now you know how to record live streaming video on YouTube easily. From the options above, it's evident that a free option like VLC is irresistible. However, the UI is a bit challenging to navigate, and it doesn't offer any video editing tools. On the other hand, options like Camtasia and Snagit are challenging to use and expensive. And that's not to mention EaseUS RecExperts, which has limited video editing capabilities. So, use UniConverter 13 for the best YouTube live video recording and editing experience.

