Want to record your games efficiently on your Windows computer? Microsoft has provided a useful built-in tool for Windows 10 and 11 in the form of the Xbox game bar that allows users to record audio or video during gameplays, take screenshots, and much more. Using the simple keyboard shortcut "Win + G," you can access the Xbox recorder on your Windows.
Keep reading to learn more about what you can do with the Xbox screen recorder and how to record your gameplays using the tool. Also, discover a powerful alternative that can make screen recording much easier - Wondershare UniConverter.
Part 1: How to record with the Xbox game bar
Before using the Xbox game bar screen recording a game, there are a few requirements you need to keep in mind. You can do so without special video card requirements if you only want to take screenshots of games. However, for recording games using the Game Bar, the video card on your computer needs to support either the AMD VCE, NVIDIA NVENC, or the Intel Quick Sync or later-generation encoders.
You must also ensure you have enabled the Xbox Game Bar record screen in your PC's settings. Remember that you can only screen record one window open on your PC at a time, and the Game Bar does not record the computer's desktop, File Explorer, or other screens. Minimizing all open tabs or switching to a desktop interrupts the recording process. Keeping all that in mind, here is how to screen record with Xbox game bar on Windows 10:
Step 1
As the Xbox Game Bar only records the screen currently open, launch the app or game you wish to record.
Step 2
You can use the keyboard shortcut "Win + G" or the Xbox button on your PC to open the Game Bar. Check the box next to the "Yes, this is a game" option in the proceeding pop-up.

Step 3
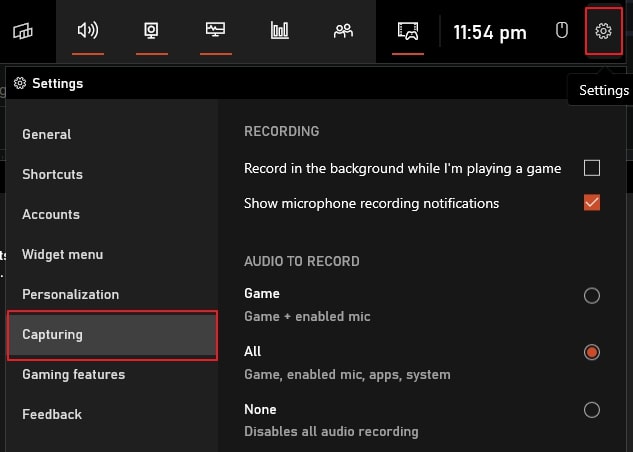
Before starting the recording, ensure your options are set in the right place, and your Game Bar is recording audio. You can do so by navigating to the "Settings" and choosing "Capturing" from the left panel.
Step 4
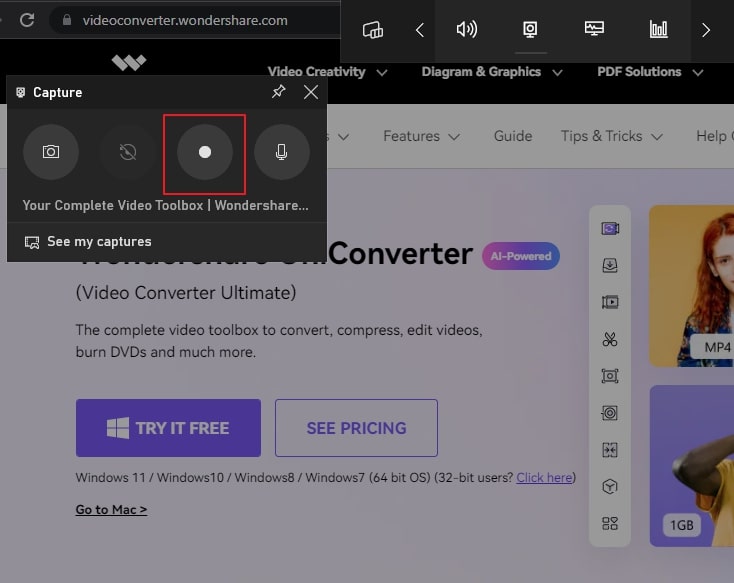
Now tap the "Start Recording" button or use the keyboard shortcut "Win + Alt + R" to start recording. You need then use the "Escape" button or the "Win + G" keys to exit Game Bar and start your screen recording.
Step 5
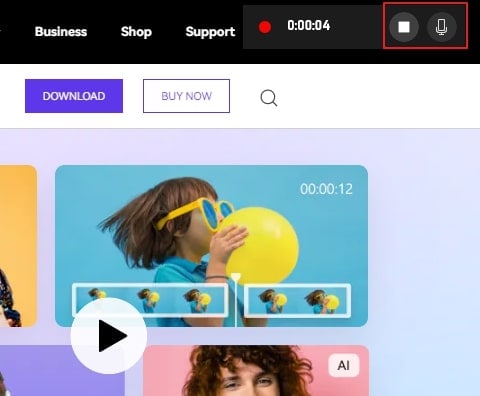
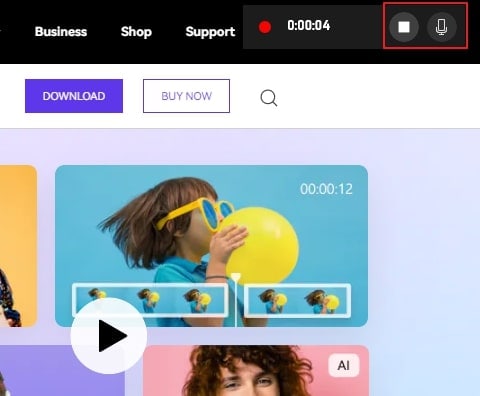
At the screen's top-right corner, you will see an indicator with the recording timer and an option to mute or unmute the microphone. To terminate the recording process, tap the "Stop" button or press the "Win + Alt + R" keys. Go to the "Show All Captures" option in the Game Bar to view your recordings.
Part 2: How to record audio with the Xbox game bar
Before using the Xbox game bar recording, remember that the audio recording feature follows the same requirements as the video recording feature. Once everything is according to the plan, you can follow the steps given below for Xbox recording in Windows 10:
Step 1
Launch the app or game you wish to record because the Xbox Game Bar can only record the audio of one application at a time.
Step 2
The keyboard shortcut "Win + G" or the Xbox button can be used to open the Game Bar. Following this, enable the "Yes, this is a game" option in the window that pops up next.

Step 3
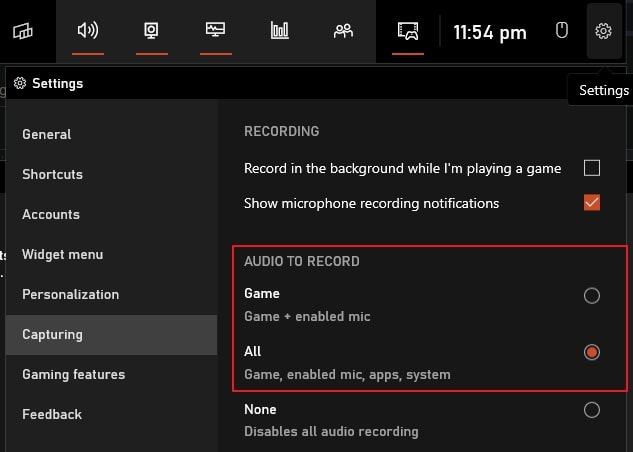
Next, access the settings and choose "Capturing" from the left panel to adjust the audio recording settings. Ensure audio from all sources, including microphone, game, and system apps, are recorded using the tool.
Step 4
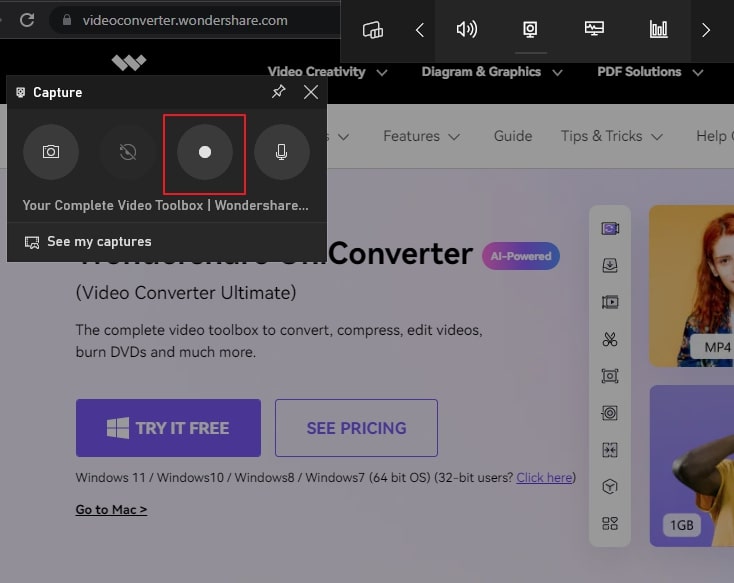
Hit the "Start Recording" button from the "Capture" window or use the keyboard shortcut "Win + Alt + R" to initiate audio recording. Next, use the "Escape" button or the "Win + G" keys to exit the Game Bar and proceed with the audio recording process.
Step 5
You will see an indicator bar with the recording timer and an option to mute or unmute the microphone on the right side of your screen. You can complete the audio recording process by tapping the "Stop" button or using the "Win + Alt + R" keys. Now, access the "Show All Captures" option to view your recorded audios.
Part 3: How to fix common breakdowns of Xbox game bar
Are you having trouble accessing the functions of the Xbox game bar? Here are some issues users commonly encounter when using the Xbox game bar and how one should fix them without much hassle.
1. Why doesn't the keyboard shortcut for the Xbox game bar work?
It might be possible that the game you are trying to record has blocked keyboard shortcuts. If that is the case, your custom shortcuts will not work. You can try updating the app on your device and getting the latest version of the Xbox game bar to get rid of the issue.
2. Why can't I take a screenshot on the Xbox game bar?
If you cannot take a screenshot of a game using the Xbox game bar, ensure that the option is enabled in the widget and that the game allows recording. Sometimes, some protected content, such as DRM encryptions, hinder the recording process and cause your screenshots to turn blank. Close such tabs on your device or use a third-party tool and see if the issue persists.
3. Why are my game clips blank?
If you have enabled the recording options on the Xbox game bar and are running the latest version, there are high chances your game does not allow recording. In such a case, your recorded clips will turn out to be blank, and it isn't much you can do about it.
4. Why can't I record audio using my device?
Make sure that your audio device is compatible with your computer. After connecting the device, ensure that the Xbox game bar recognizes it. Open Game Bar and go to "Party Chat" from its "Settings," then search for your device in the "Input" or "Output" sections.
Part 4: A powerful alternative - editor's recommendation
If you cannot record your gameplay using the Xbox game bar and are looking for a third-party tool to get the job done, the answer lies in Wondershare UniConverter.
UniConverter is primarily a media toolbox containing many powerful tools for audio, video, and image files. From converting file formats to optimizing the size or trimming files, UniConverter can do a lot for you. The program's user-friendly interface makes the editing process light as a breeze, even for first-time users.
The screen recorder feature of UniConverter offers top-quality recording of screen and audio. Using the tool, you can choose to record full or custom screens, webcam, picture-in-picture, microphone, and more. Here are some perks of using UniConverter as your go-to screen recording tool:
- Before starting the process, you can customize the settings, such as the frame rate, quality, and file format of the recorded audio or video.
- The output files feature impeccable quality, with crisp audio and video without lag.
- After recording, you can also easily edit your video to add text annotations or other features using UniConverter.
How to record game or audio in Windows using UniConverter
The process of recording a game or audio using UniConverter is remarkably easy. The tool does most of the job for you, leaving you with smooth and high-quality output. Here is a step-by-step guide on how to screen record a game on Windows using Wondershare UniConverter:
Wondershare UniConverter — All-in-one Video Toolbox for Windows and Mac.
Edit videos on Mac by trimming, cropping, adding effects, and subtitles.
Converter videos to any format at 90X faster speed.
Compress your video or audio files without quality loss.
Excellent smart trimmer for cutting and splitting videos automatically.
Nice AI-enabled subtitle editor for adding subtitles to your tutorial videos automatically.
Download any online video for teaching from more than 10,000 platforms and sites.
Step 1 Open application recorder
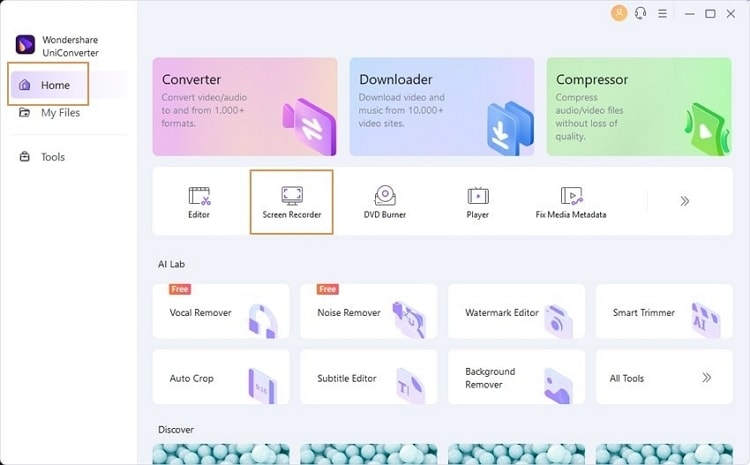
To get things started, download and launch UniConverter on your computer. Go to the "Home" tab from the left panel and select the "Screen Recorder" option. As you lead into the next screen, select "Application Recorder" to proceed.
Step 2 Set recording preferences
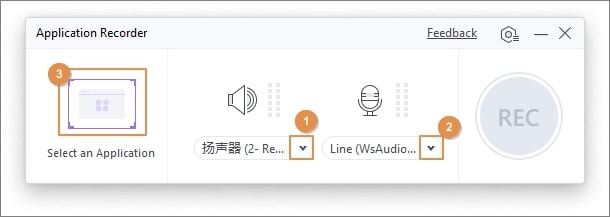
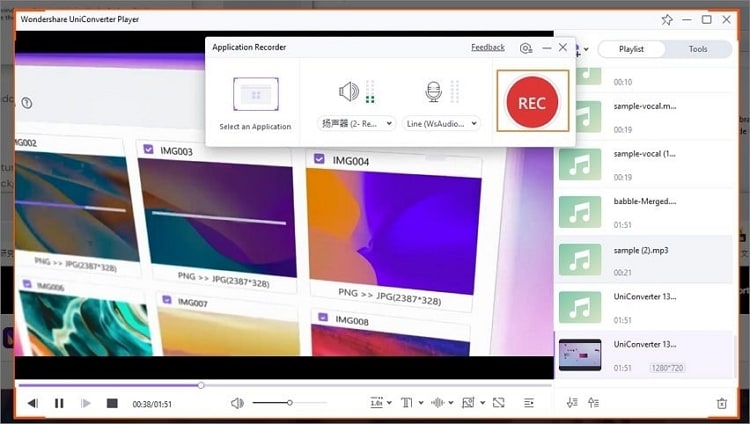
Now select your speaker and microphone from the next pop-up window. Hit "Select an Application," follow the instructions on the screen and select the gaming window you wish to record. Keep in mind that minimizing the locked window after starting the recording will interrupt the process.
Step 3 Record and save your gameplay
Next, click on the "REC" button present on the screen to start recording. You can click the "Stop" button to terminate the recording process. After that, UniConverter will automatically save the recorded video to your computer.
Conclusion
The screen recorder Xbox is a useful gaming overlay that can help you record your gameplays easily. Although the feature is quite convenient, the recording process can often slow down the device's performance. With Wondershare UniConverter, you can record longer gameplays in high quality on your Windows computer.
FAQs
- Does Xbox game bar affect PC performance?
The Xbox game recorder has been seen to significantly affect the performance of Windows computers. If you are using the feature, there are high chances your computer can experience low FPS and slow down your PC. Disabling the feature is the only way to get rid of the issue.
- How long can I record with the Xbox game bar?
The maximum recording length that the background recording feature of the Xbox game bar record desktop allows is up to 30 minutes. After 30 minutes, the recording is automatically turned off. You can also set the maximum length of the recorded clips from the Game Bar settings up to 30 minutes, 1 hour, or 2 hours.
- How to disable the Xbox game bar on Windows?
To disable Xbox Game Bar on your Windows 10 computer, open the Settings app on your Windows 10 and select "Gaming" from the range of available options. Go to the "Xbox Game Bar" panel from the left and turn the toggle switch off under the option "Enable Xbox Game Bar."
- Some of the above codec formats may need to be supported by system.

