
Mastering green screen removal in Premiere Pro opens up a range of creative possibilities for your videos. Your ideal shooting location might be too busy, expensive, or inaccessible. Understanding how to remove a green screen will help you set a scene in extreme parts of the world or even on the moon. Adobe Premiere Pro is one of the most flexible and well-known software options available, helping you remove a green screen efficiently. Although it’s popular for its editing features, it can remove and replace backgrounds from videos.
This comprehensive article gives you detailed steps to remove green screen in Premiere Pro. You can follow them to add a background of your choice and create a stunning video.
In this article
- What Is Green Screen Editing in Adobe Premiere Pro?
- What Do You Need to Remove Green Screen in Premiere Pro?
- How to Remove Green Screen in Premiere Pro
- AI-Powered Way to Remove Green Screen
- Premiere Pro vs Wondershare UniConverter: Which Is Easier for Background Removal?
- FAQs about Premiere Green Screen Removal
Part 1. What Is Green Screen Editing in Adobe Premiere Pro?
Green screen editing, also known as chroma keying, is a process that removes a solid color (typically green or blue) from a video clip and makes it transparent. Then, you can add your chosen background or visual effect to create the illusion that the subject is in a completely different environment. You can also experiment with various virtual backgrounds and create videos to match the set requirements.
Part 2. What Do You Need to Remove Green Screen in Premiere Pro?

Adobe Premiere Pro is a professional editing program that requires intermediate to advanced editing skills to operate, which can be tricky to acquire through YouTube videos or online articles. To add to that, a basic system won’t be efficient enough to handle the software. Adobe has specified a set of minimum system requirements for running the software. You will learn these and the added requirements for green screen removal on Premiere Pro:
File Formats
Premiere Pro supports many commonly used video formats, including MOV, MP4, WMV, and MPEG. However, it doesn’t support OPUS, MKV, and FLAC video file formats. The first prerequisite for removing the green screen in the software is to ensure the video is in the correct format. If not, you’ll see error messages like “cannot import MKV to Adobe Premiere Pro” or “Premiere Pro no audio/video.”
System Memory
Removing a green screen or performing basic video edits in Premiere Pro requires sufficient RAM space. You need a minimum of 16GB to perform basic edits. However, if you’re running Adobe After Effects or Photoshop simultaneously with Premiere Pro, the memory requirements can go as high as 32GB.
System Requirements
Here are the recommended system requirements your computer must meet to optimally run Adobe Premiere Pro, according to its official website:
- Processor: Intel 11th Gen/AMD Ryzen 3000/Threadripper 3000 series/Apple MacBook M2
- Operating System: Windows 10 or higher/ macOS version 12 or later
- GPU: 8GB of GPU memory/Apple silicon: 16GB of unified memory
- Storage: 8GB of available free space for installation, and needs additional storage during installation.
- Sound Card: ASIO compatible or Microsoft Windows Driver Model
- Network Storage: 1 Gigabit Ethernet
Display
The display of your computer is also crucial, and its requirement depends on the type of videos you edit. For example, if you primarily work with 4K videos, you will need a 4K monitor. Alternatively, connect your system directly to your 4K TV monitor. Without the proper display, you won’t be able to play the video with the best visuals.
Knowledge
Premiere Pro, with its available tools, can help create professional-looking videos. If the motive is simply to remove the green screen, YouTube and other online tutorials may be helpful.
However, to use the software to its full potential, you must have an intermediate proficiency in graphics design. You should understand the differences between various video formats and codecs to select the most suitable one for your project. Next, and probably the most important, are editing skills. You must be able to cut, copy, and paste clips, add effects, and create transitions between clips. Additionally, the ability to work with audio is equally important.
Part 3. How to Remove Green Screen in Premiere Pro
Learning how to remove green screen in Premiere Pro enables you to create stunning, professional videos more quickly than before. Here’s a step-by-step guide you must follow:
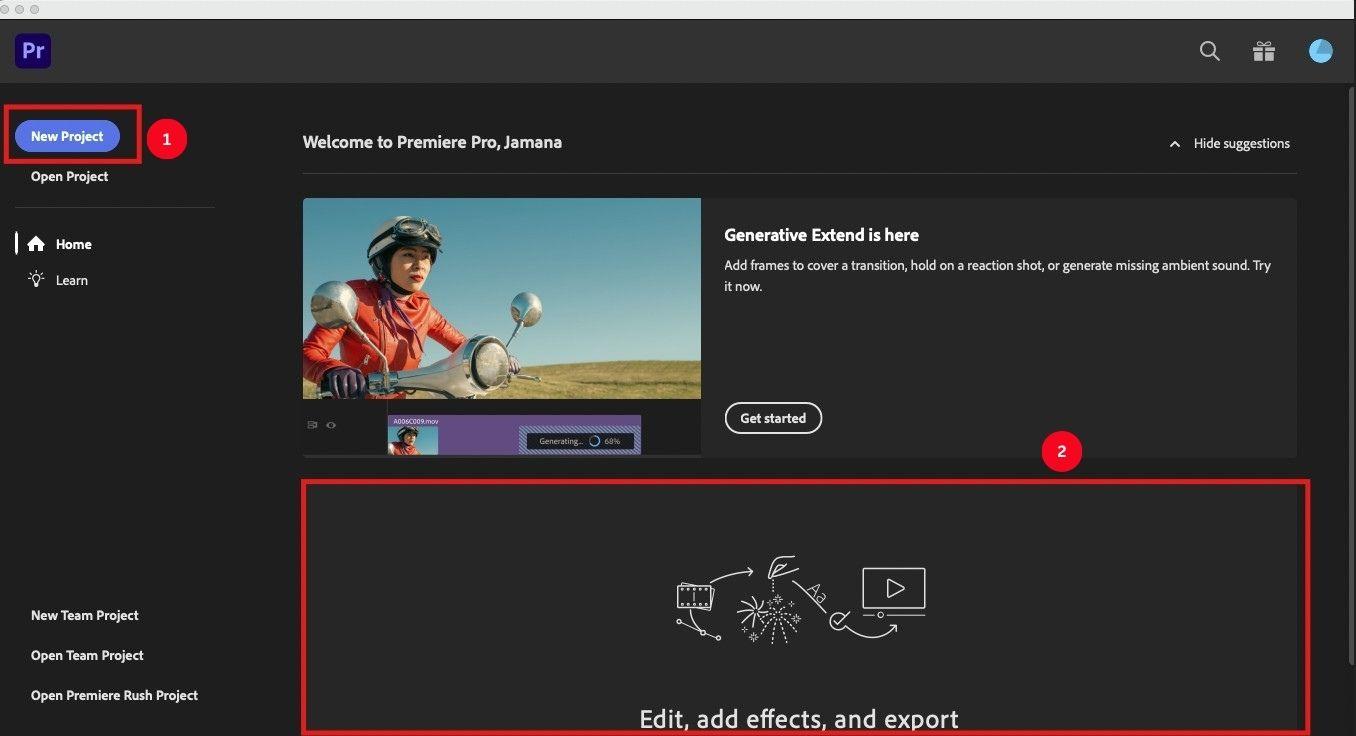
Step 1: First, open the tool on your computer. On its home dashboard, click “New Project” and drag and drop your green screen video into Premiere Pro.
Step 2: At the top of the screen, you’ll see the video preview. To begin with background removal, click “Window > Effects.”
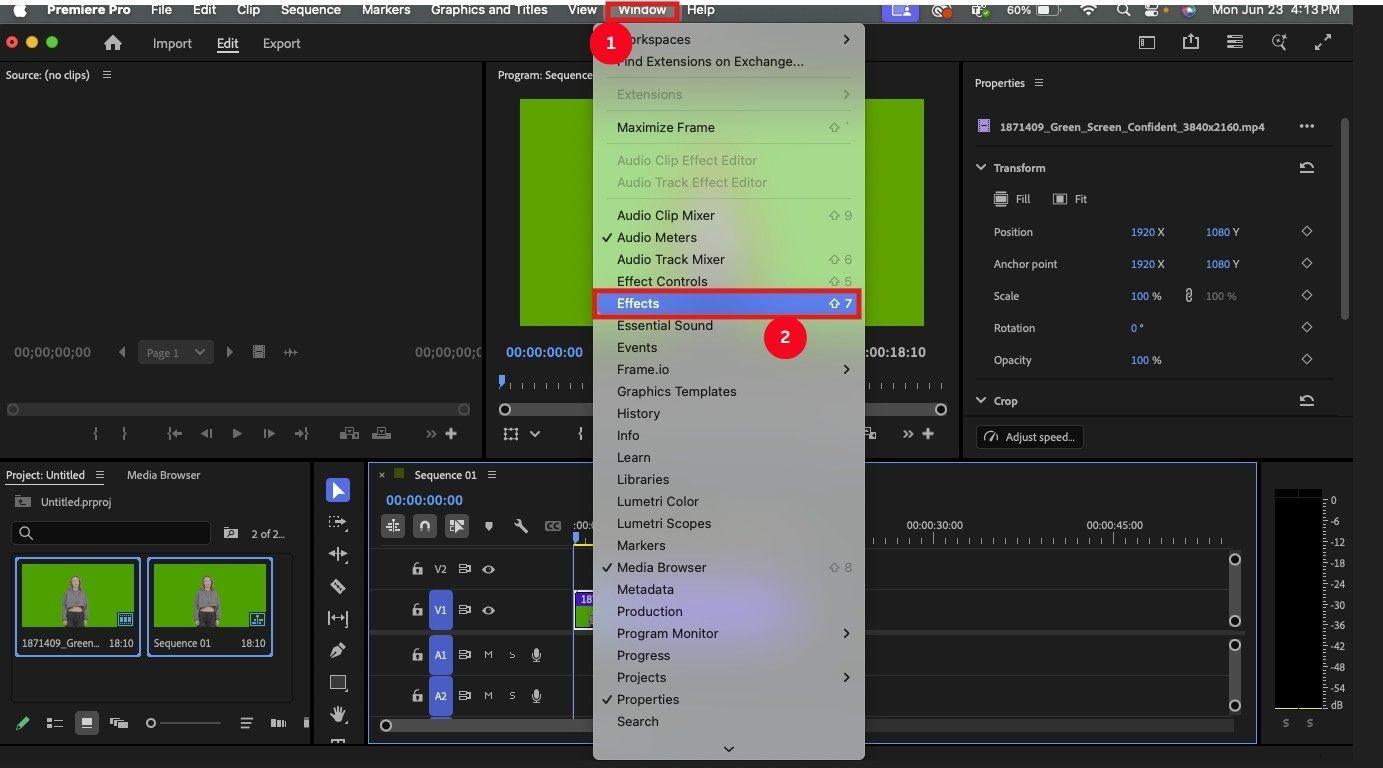
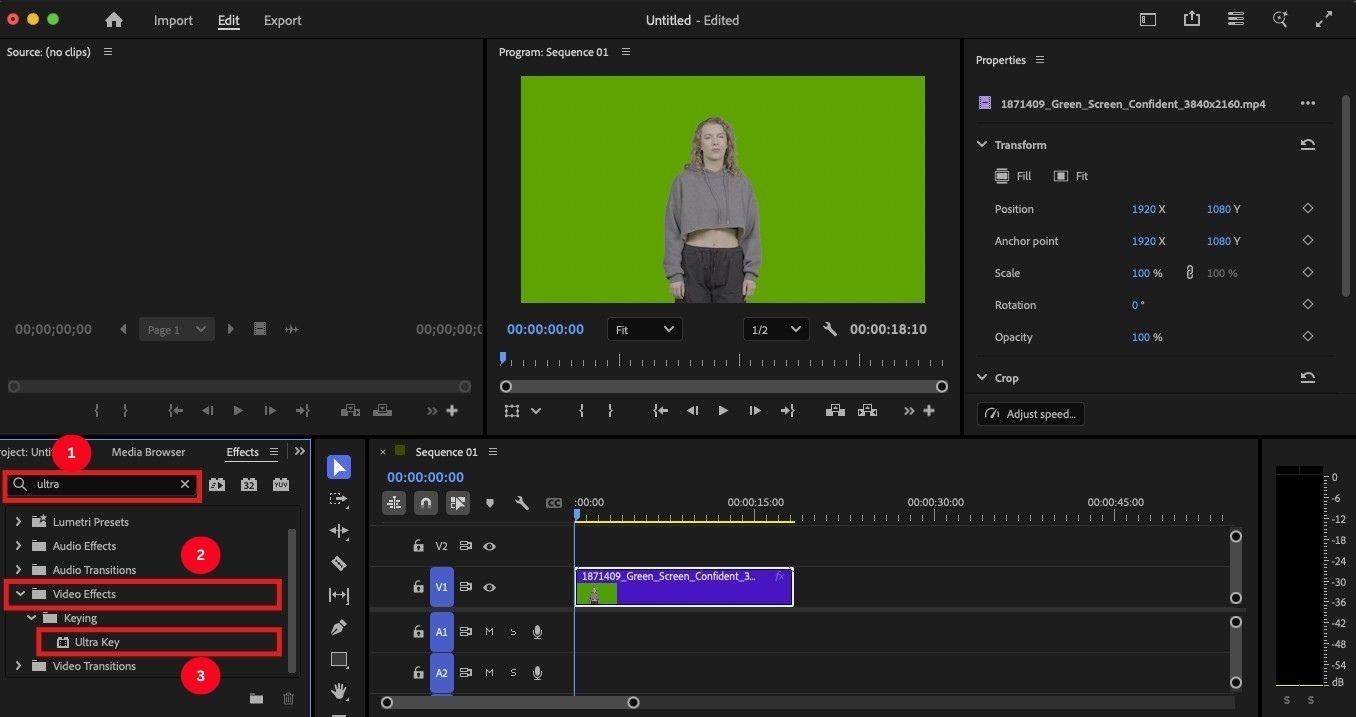
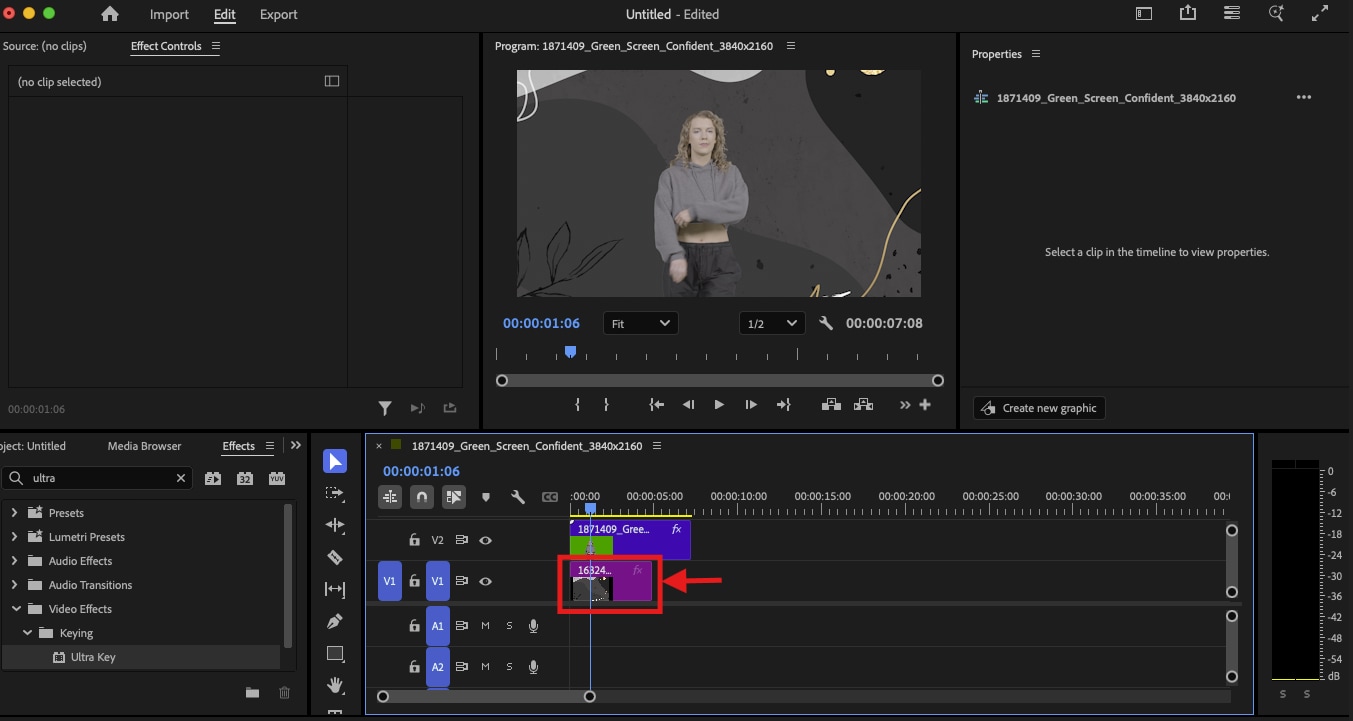
Step 3: In the “Effects” panel of Premiere Pro, located at the bottom left corner, typing “ultra” will give you an “Ultra Key” option. Click “Video Effects > Ultra Key,” and drag it over the video clip in your timeline to apply the effect. You won’t see the output immediately, so proceed to the next step.
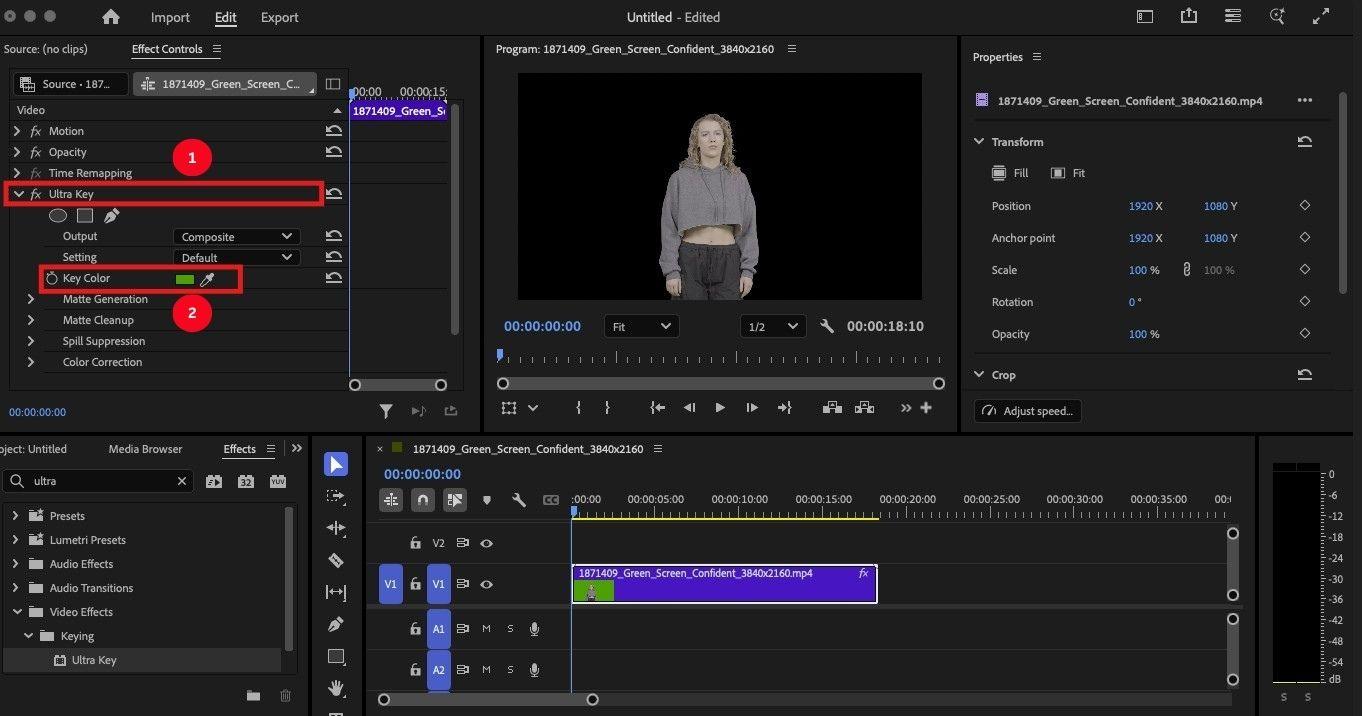
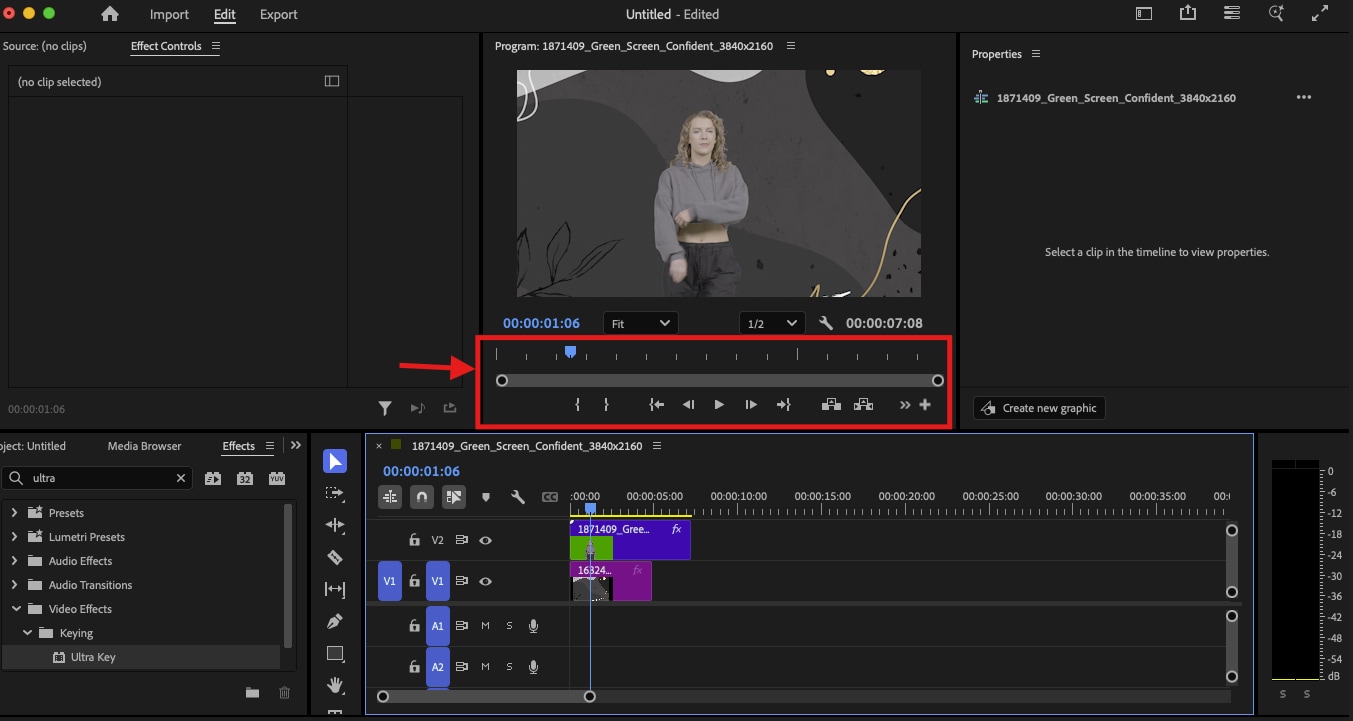
Step 4: In the “Effects Control” section at the top-left corner, locate the “Ultra Key” dropdown and from the listed options, notice the small eyedropper icon. This is the “Key Color” chooser and lets you remove any color hue from the video. Here, it will be the green screen.
Click the “Key Color” icon and move the cursor over the green screen preview. Then, click once in the middle of the field, and the green screen will vanish!
Step 5: To add a custom backdrop, place a video or still image beneath this video clip on the timeline. The new background will fill the space, and the subject will stay in its place.
Step 6: Preview the finished video by simply dragging the “Playhead” in the timeline at the beginning of the clip and pressing “Space.” You can now experiment with different videos and images to create a stunning output.
Part 4. AI-Powered Way to Remove Green Screen
While Premiere Pro is a great way to remove green screens from videos and generate professional results, it’s a resource-intensive tool that can slow down your system. Besides, learning the video editing process is somewhat tricky. In that case, consider an alternative that is simple to use and offers a set of editing features.
Wondershare UniConverter
Wondershare UniConverter’s Video Background Changer features a more straightforward interface, making the process easier and quicker, especially for beginners. You just need to upload the image, and with a few clicks, the tool removes the green screen. What makes it unique is its batch processing capability, which can save you time and effort.
Key Features
- Its free video editor feature lets you trim and crop videos, add a watermark, subtitles, and effects.
- There’s an ultimate video converter feature that can batch convert video, audio, and image files.
- You can utilize its AI video enhancer to enhance video resolution to 4K and 8K without compromising quality.
- It can also generate subtitles or captions online for free.

Best Video Green Screen Remover
How to Remove Green Screen from Video Using Wondershare UniConverter
Removing a green screen from a video using UniConverter is straightforward, so here are the steps:
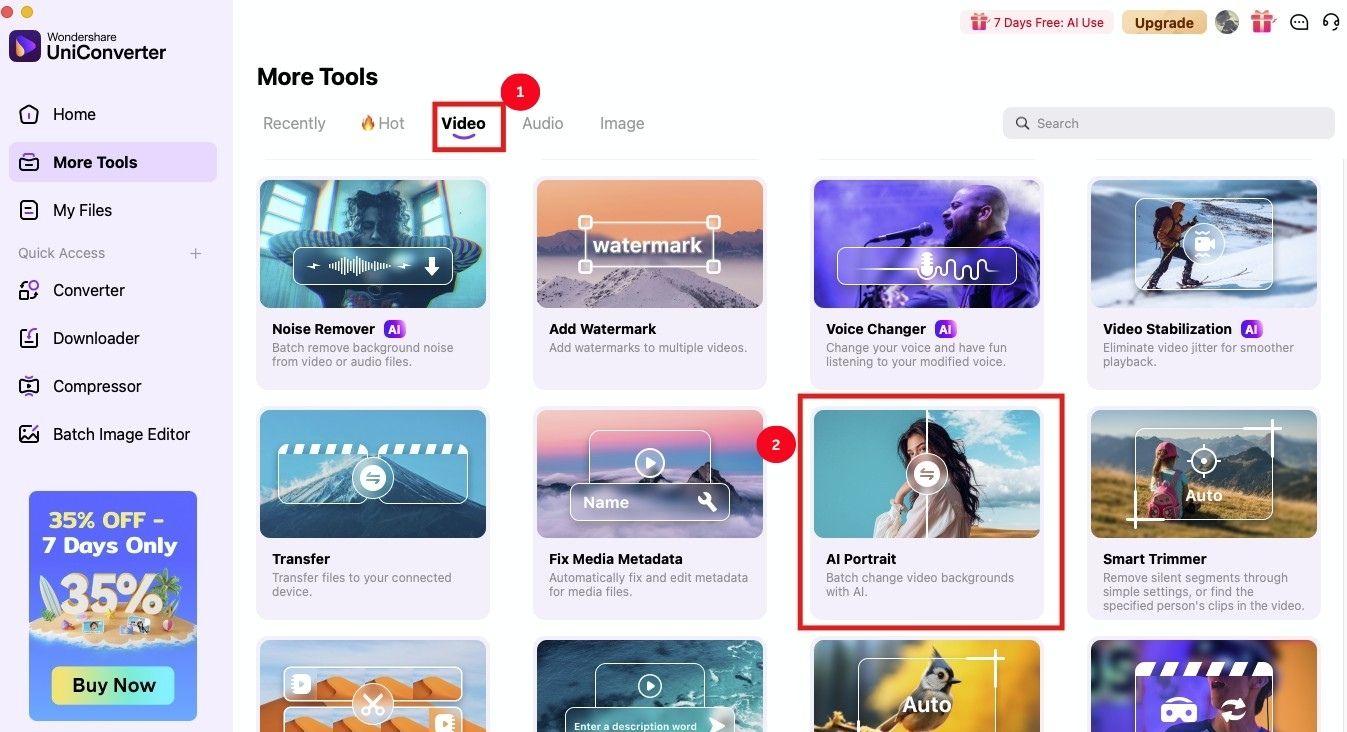
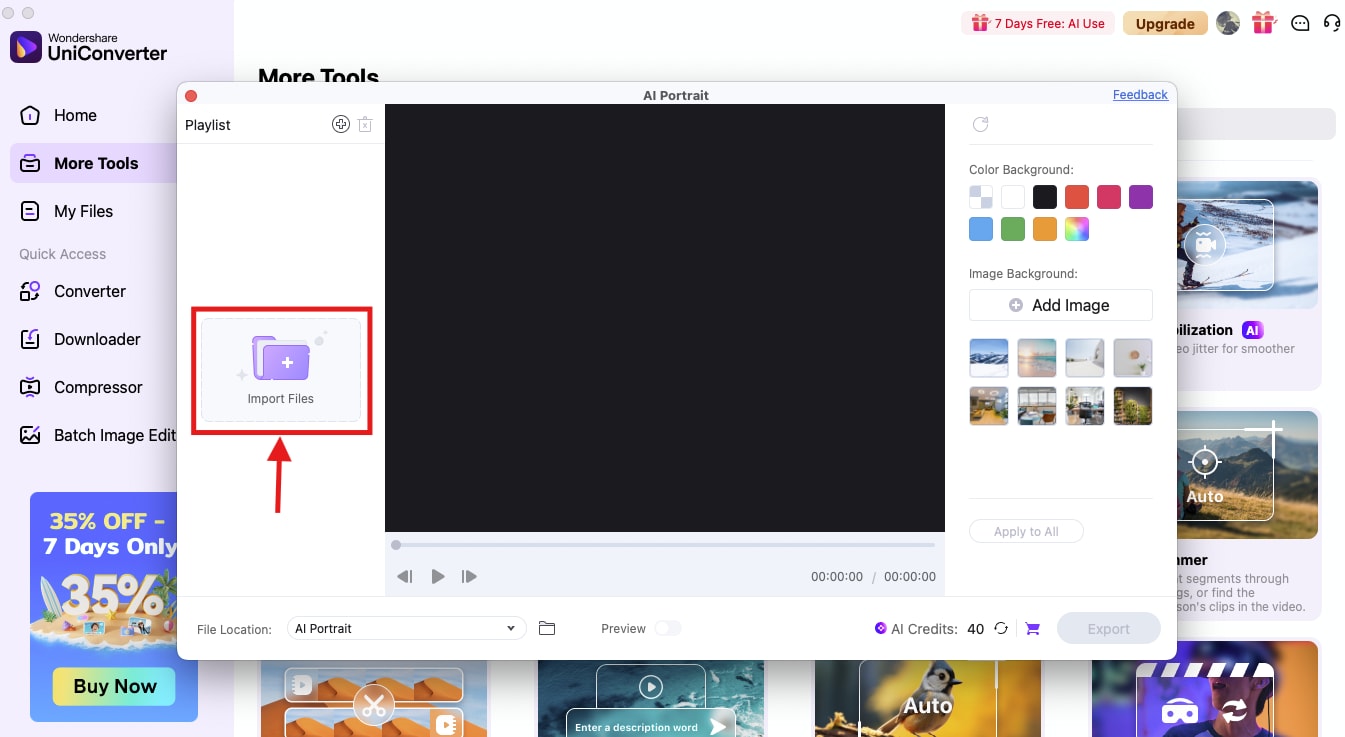
Step 1: Open UniConverter on your computer, and click the “Video” tab on its main dashboard. Then, from the available options, click “AI Portrait” (Mac), "Video BG Remover" (Windows) to remove the green screen.
Step 2: Click on “Import Files” to import the green screen video. The upload process takes a few seconds to complete.
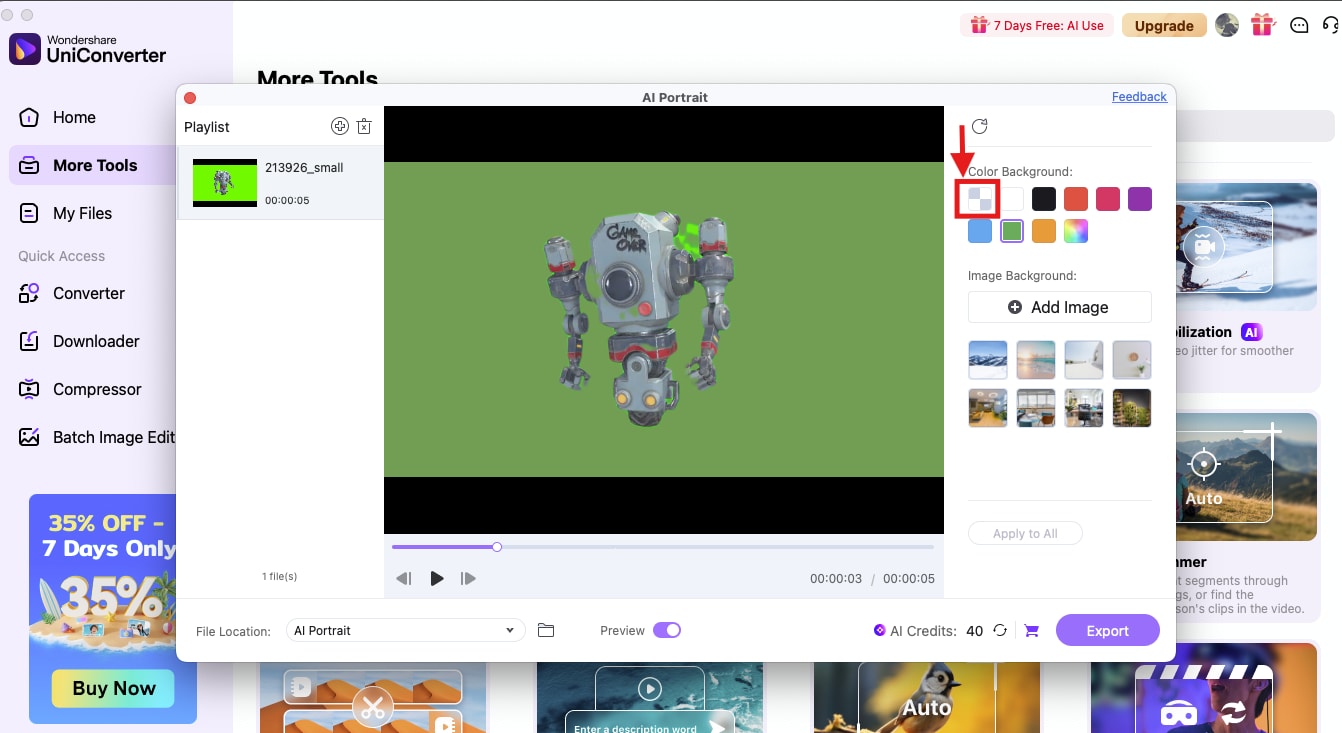
Step 3: Locate the “Color Background” option on the right side of the video. Click the first option with gray and white checks to remove the green screen from your video and make the background transparent.
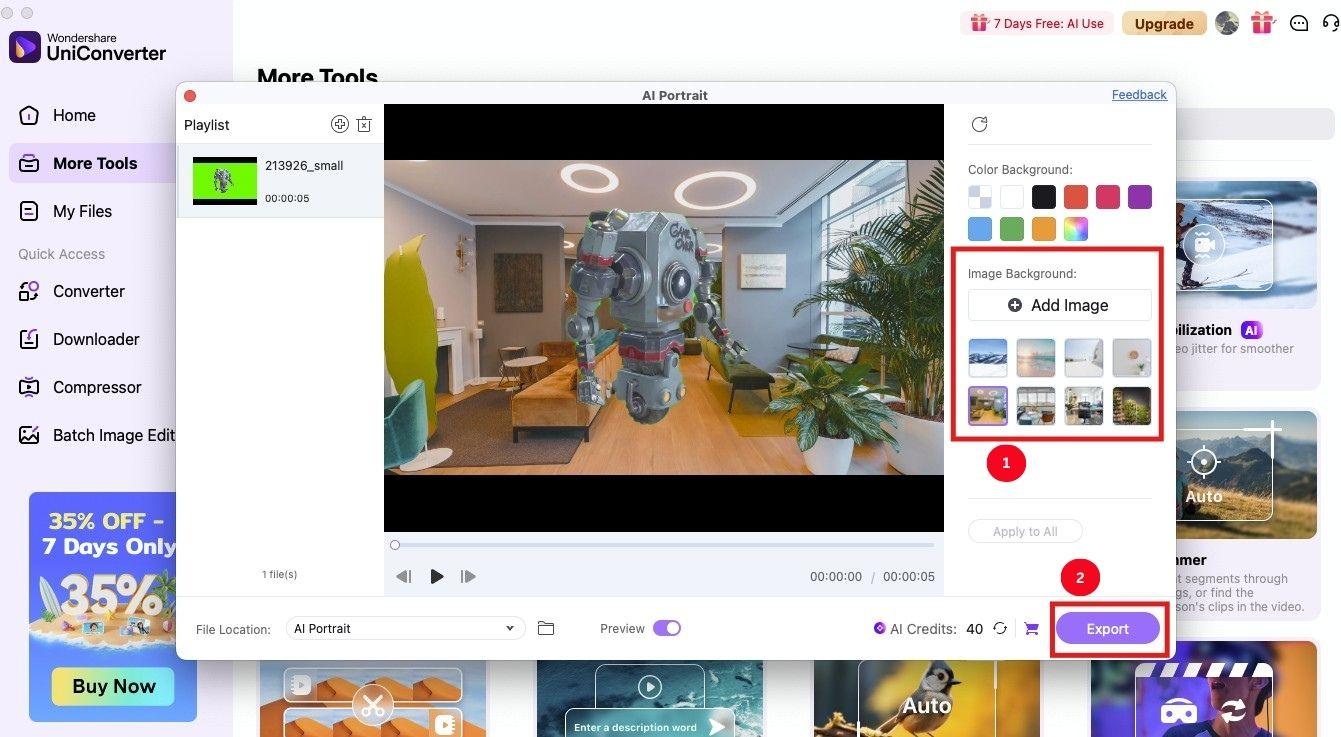
Step 4: Next, click “Add Image” to add images to the background, or select from the available templates. Preview the final output, and click “Export” to save the video in your local storage.
Part 5. Premiere Pro vs Wondershare UniConverter: Which Is Easier for Background Removal?
The following quick comparison table highlights the major features of Premiere Pro and Wondershare UniConverter, showing how UniConverter is an ideal tool for students and beginners who are not tech-savvy.
| Feature | Premiere Pro | Wondershare UniConverter |
| Ease of Use | Moderate to difficult- requires editing skills | Easy and beginner-friendly |
| Background Removal | Yes, via Ultra Key | Yes, via the AI Portrait tool |
| Accuracy | High (requires proper tuning) | High (no tuning required) |
| File Format | Supports most file formats, except OPUS, MKV, and FLAC | Supports typical video and image formats |
| Speed of Processing | Slow | Fast |
| Best for | Professionals | Content creators and professionals |
Conclusion
Learning how to remove green screen in Premiere Pro opens up a new creative world for video editors and content creators. While its Ultra Key can efficiently remove the background and let you add a new one, the method is rather complex. If you’re using a straightforward tool, Wondershare UniConverter is a good choice. It not only changes the background but also offers features to edit, sharpen, and compress the video. Keep trying and exploring new ideas, and you’ll be able to make impressive videos with Wondershare UniConverter.

