TV Recording Tips
- TRY FREE TRY FREE
- 1. DVR for TV Recording+
-
- 1.1 How to Choose the Best Digital Video Recorders for TV in 2026
- 1.2 4 Ways You Shoud Know for TV Recording in 2026
- 1.3 Top 6 DVR Recorders for TV in 2026
- 1.4 5 Methods to Record TV Shows without DVR in 2026
- 1.5 Top 5 PVR Recorder for Live TV Shows in 2026
- 1.6 All Ways to Record TV Shows on Fire TV Stick in 2026
- 1.7 All Things to Know About TV Shows Recording on Philo TV in 2026
- 1.8 Easy Ways to Record Programs on Roku in 2026
- 1.9 Best TV Recording Box: the 9 Best Ways to Enjoy TV Shows
- 1.10 What are the Best TV Recording Devices in 2026
- 1.11 The Most Efficient Steps to Record TV Videos in 2026
- 1.12 How to Record TV Programs On An External Hard Drive in 2026
- 1.13 How to Record TV Shows on DVD Recorder Easily in 2026
- 1.14 How to Record Shows from Samsung Smart TV via USB by Simple Steps in 2026
- 1.15 Deserved to Have Top 12 Freeview TV Recorders in 2026
- 1.16 How to Use Tablo TV Kill Time During Self-Quarantine Period in 2026
- 1.17 How to Edit TV Shows Recorded from Xfinity in 2026
- 2. Record Cable TV+
- 3. Record Live TV+
-
- 3.1 6 Popular HD TV Recorders in 2026
- 3.2 Top 5 Live TV Recorders on PC in 2026
- 3.3 How to Record Online TV Shows Easily for 2026
- 3.4 Easy Steps to Record Live TV Shows in 2026
- 3.5 How to Record Shows from Streaming Services in 2026
- 3.6 Simple Methods to Record TV Shows on OTA Streaming Devices in 2026
- 4. Record Screen+
- 5. Other Tips for TV Recording+
How to Edit TV Shows Recorded from Xfinity in 2026
by Christine Smith • 2026-01-21 18:55:42 • Proven solutions
If you have installed an Xfinity X1 TV box at your home, you may already know about Xfinity recording is one of the most useful features of an Xfinity X1 TV box. Thanks to Xfinity recordings, you have the power to record your favorite TV shows/movies and watch them anytime you want.
Now, while the Xfinity recordings feature is extremely useful, there are situations when you might want to edit the footage before watching. For instance, if you want to share a 2-3 minutes snippet from a long news reporting clip, you must know how to trim that recording first.
To help you along the way, we have compiled a step-by-step guide to edit TV shows recorded from your Xfinity X1 TV box.
- Part 1.How to Record a Program on Xfinity
- Part 2.Easy Steps to Edit Videos Recorded from Xfinity
- Part 3.How to Record TV Shows with Wondershare UniConverter
Part 1: How to Record a Program on Xfinity
Recording a program on Xfinity is a fairly straightforward process. Before we dive into the editing process, let’s first take a look at how to setup Xfinity recordings to record your favorite TV shows and movies.
Follow these steps to record and schedule TV shows with an Xfinity X1 TV box.
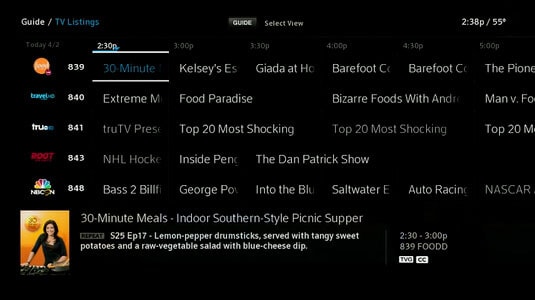
Step 1: Press the Guide button on your Xfinity remote control and select the program you want to record.

Step 2: Press the Record button on your remote control. It will prompt you to the program’s info panel. Tap the “Record” option on the info panel to initiate recording.
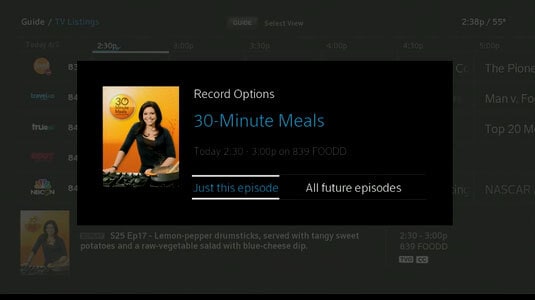
Step 3: Tap the Just This Episode to record the current episode only. You can also select All Future Episodes if you want to record every episode from now onwards.

That’s it; the recording process will initiate, and you’ll be able to watch the episode anytime in the future.
Part 2: Easy Steps to Edit Videos Recorded from Xfinity
Now that you have recorded a TV show, you can move towards the editing process. To edit Xfinity recordings, you’ll need third-party editing software. While there are too many options to choose from, we recommend using Wondershare UniConverter (originally Wondershare Video Converter Ultimate).
Wondershare UniConverter is feature-rich and fully-packed video editing software that will allow you to edit your Xfinity recordings within minutes. Whether you want to trim different videos to compile a short-movie or apply special effects to a recording, Wondershare UniConverter will help.
Unlike other editing tools, UniConverter has a user-friendly interface and an array of features that’ll make the entire editing process a cakewalk. It means that even if you have little editing knowledge, you’ll be able to edit the recordings in Wondershare UniConverter without any hassle.
 Wondershare UniConverter- Multifunctional Video Converter

- Screen recording for all desktop activities with voice
- Convert video to optimized preset for almost all of the devices.
- 90X faster conversion speed.
- Edit, enhance, personalize your videos by trimming, cropping, adding subtitles, and more.
- Burn video to playable DVD or Blu-ray disc with an attractive free DVD template.
- Download or record videos from YouTube and other 10,000 video sharing sites.
- Versatile toolbox includes fixing video metadata, GIF maker, video compressor, and screen recorder.
- Supported OS: Windows 10/8/7/XP/Vista, macOS 11 Big Sur, 10.15 (Catalina), 10.14, 10.13, 10.12, 10.11, 10.10, 10.9, 10.8, 10.7, 10.6.
Let’s Learn how to use Wonshare UniConverter to edit your favorite TV shows from Xfinity.
Step 1. Launch Wondershare UniConverter and add the file.
Launch UniConverter on your desktop and add the TV recording that you want to edit. To do so, tap the  button and choose the video files from your local directory.
![]()
Step 2. Trim the video.
Once the video file is added, tap the Trim button to launch the trimming process. You’ll be prompted to the trimming window. Now, drag the slider across the video file to set a start-point of the unwanted part. Tap the Cut button to create a cut here. Now, move the other end of the slide to choose the end-point and again tap cut. Once the unwanted clip is cut completely, tap the Delete button to delete it from the rest of the footage.
![]()
That’s how you can delete unwanted segments from the footage using WonderShare UniConverter. Tap the Save button to save the final edit of your Xfinity Recordings.
Step 3. Select the Crop button.
To crop a video, tap the Crop button after adding the video file that you want to edit. A new window will appear on your computer screen. Here you can also rotate the video frame clockwise as well as anti-clockwise before beginning with the cropping process.
![]()
Step 4. Crop and save the video.
You can either drag the corners of the video frame or enter specific height and width in the right toolbar to crop the video. You’ll be able to see the preview of the changes you make simultaneously.
![]()
Step 5. Save changes.
Once you have cropped the video, tap OK to implement the changes.
Step 6. Add video file and open effects window.
You can also use Wondershare Uniconverter to apply special effects to your Xfinity recordings to enhance their video quality.
Add the video file that you want to edit. Tap the Effects button to launch the Special Effects Window.
![]()
Step 7. Apply effects and filters.
Once you’re in the Effects window, you can adjust the brightness, contrast, saturation, etc. to enhance the video quality. You can also pick any of the available filters to add a new look to the video.
![]()
Once you have applied the effects, tap the OK button to save your changes.
Part 3: How to Record TV Shows with Wondershare UniConverter
In addition to editing Xfinity recordings professionally, Wondershare UniConverter also lets you record TV shows effortlessly. You can stream and record movies on platforms like Netflix, YouTube, Sony Crackle, and so on. When recording the video, users can add annotations, PIP effect, voice narrations, etc. Moreover, users can customize the frame rate, output quality, and format. The supported output formats are MP4, AVI, and FLV.
Below are the steps to record TV shows using Wondershare UniConverter:
Step 1Launch Wondershare Screen Recorder.
Run Wondershare UniConverter, then click Screen Recorder on the left pane. After that, press the Camcorder icon to launch the Screen Recorder tool.
![]()
Step 2Set a capture area.
Launch your favorite TV show, then choose whether you want to record the whole screen or a specific region. To do that, click the drop-down arrow below the “Select a recording mode” function, then choose Full Screen or Custom mode. When recording in Custom mode, enter the frame dimensions, then lock the aspect ratio.
![]()
Step 3Customize recording preferences.
To capture the system sound, click the System Audio menu, then select an output device. You can also press the Microphone icon to choose a device for adding voice narrations to your recording. Last but not least, choose a camera under the Webcam drop-down menu for adding a PIP effect.
![]()
Next, press the Settings button below the REC button to choose a frame rate, quality, and format. You can also set the recording duration and customize the keyboard shortcuts to make your work easier.
![]()
Step 4Start recording TV shows on a desktop.
Click the REC button to start capturing the TV show professionally. Launch the recording taskbar and choose whether to mute or unmute voice narration, webcam, and system sound. Also, press the Annotation button to include texts, shapes, arrows, and other characters in your recording session. Click Stop to finish capturing the desktop screen and preview your video.
![]()
Conclusion
Since we are living in a fast-paced world, we often miss out on watching the live telecast of the favorite TV shows. However, thanks to tools like Wondershare UniConverter and Xfinity recordings, you have the power to schedule the recordings for all the TV shows. Once the shows are recorded successfully, you can binge-watch them anytime you want.


Christine Smith
chief Editor