TV Recording Tips
- TRY FREE TRY FREE
- 1. DVR for TV Recording+
-
- 1.1 How to Choose the Best Digital Video Recorders for TV in 2026
- 1.2 4 Ways You Shoud Know for TV Recording in 2026
- 1.3 Top 6 DVR Recorders for TV in 2026
- 1.4 5 Methods to Record TV Shows without DVR in 2026
- 1.5 Top 5 PVR Recorder for Live TV Shows in 2026
- 1.6 All Ways to Record TV Shows on Fire TV Stick in 2026
- 1.7 All Things to Know About TV Shows Recording on Philo TV in 2026
- 1.8 Easy Ways to Record Programs on Roku in 2026
- 1.9 Best TV Recording Box: the 9 Best Ways to Enjoy TV Shows
- 1.10 What are the Best TV Recording Devices in 2026
- 1.11 The Most Efficient Steps to Record TV Videos in 2026
- 1.12 How to Record TV Programs On An External Hard Drive in 2026
- 1.13 How to Record TV Shows on DVD Recorder Easily in 2026
- 1.14 How to Record Shows from Samsung Smart TV via USB by Simple Steps in 2026
- 1.15 Deserved to Have Top 12 Freeview TV Recorders in 2026
- 1.16 How to Use Tablo TV Kill Time During Self-Quarantine Period in 2026
- 1.17 How to Edit TV Shows Recorded from Xfinity in 2026
- 2. Record Cable TV+
- 3. Record Live TV+
- 4. Record Screen+
- 5. Other Tips for TV Recording+
How to Record TV Programs on An External Hard Drive in 2026
by Christine Smith • 2026-06-23 14:39:23 • Proven solutions
You can use an external HDD as a TV hard drive recorder as long as you can access a smart TV with a USB port to connect the devices. Even though USB flash drives of 8GB to 264GB can also be used for the purpose, their limited storage space might be a hassle sometimes. Apart from this, in some cases, the television may refuse to recognize the connected flash drive due to compatibility issues. Therefore, you are encouraged to use a USB hard drive for TV recording for the flawless capturing experience.
- Part 1. What Is Necessary
- Part 2. How to Record on External Hard Drive
- Part 3. How to Record TV Programs on PC
Part 1: What Is Necessary
As mentioned earlier, if you have a television with a USB port and have access to an external hard drive for recording smart TV, you are all set to go. However, to capture the movies or TV shows without any trouble, there are few things you must consider while you are on a hunt to grab all the required ingredients. Points that you should keep in mind include:
● Hard Disk Type
Although you can use any external HDD as long as it can be connected to a USB port, using the 2.5” variant is highly encouraged as it is considered the best hard drive for recording TV. This is because it doesn’t require any additional power supply. This is not the case when you use a 3.5” HDD.
● Data Security
As you begin recording TV shows or movies on an external hard drive, the existing data may erase. This is not always the case, but some television models prompt you to format the disk before proceeding.
● Unrecognized USB Drive
As discussed above, some TV models fail to recognize some USB flash drives. If you have any such drive that the television has already refused to accept, you might consider using an HDD instead.
● Additional Power Source
If you are using a 3.5” hard disk drive, make sure that you have an additional power outlet somewhere near the TV to connect the HDD. In the case of 2.5” HDD, sometime it may require an additional power source too. In such a scenario, you might need an additional USB port for more power, as inducing AC to this small drive could permanently damage its hardware.
Part 2: How to Record on External Hard Drive
Once you have gathered all the essential ingredients listed above, you can go through the following method to use an external hard drive for TV recording:
Step 1: Connect the Hardware
Ensure that your television is connected to the cable or set-top box to receive OTA programs, and connect the external hard drive for recording on a smart TV.
Step 2: Prepare for Recording
Scan the TV for available channels, save the ones you found, and tune in to that you want to record the show or movie.
Step 3: Record the TV
Press the Rec (or Record) button on the television’s remote control, select Proceed when the TV prompts to scan the connected drive for compatibility and performance and wait while the scanning completes the process and begins to record TV shows the hard drive.
Part 3: How to Record TV Programs on PC
If your computer has a TV tuner card, you can record all smart TV programs using Wondershare UniConverter. With this app, users can capture high-quality desktop screens and save them on an external hard disk, local storage, USB stick, and so on. Before recording your live TV channel, you can preset the frame rate, quality, format, destination path, and more. After that, you can start recording TV show with voice narration, Picture in Picture (PIP) effect, system sound, and annotations like shapes, texts, arrows, lines, and more. And lest I forget, users can edit the recorded video using the Video Editor function.
Wondershare UniConverter – Best Live TV Recorder for PC
 Wondershare UniConverter - Best Screen Recorder for Mac/Windows

- Record all computer activities in full-screen or customized mode.
- Customize the input microphone, webcam, and output speaker before you start recording.
- Preset the frame rate, quality, and format (MP4, AVI, and FLV) before recording.
- Capture desktop screen with special annotations like shapes, texts, lines, and more.
- Edit the recorded clip by trimming, cropping, rotating, adding subtitles, etc.
- Convert between 1000+ file formats, including MP3, M4A, MP4, MOV, MTS, and more.
- Best TV hard drive recorder for Mac OS X 10.9+ (Catalina included) & Windows 7/8/10.
Below are the steps to capture a live TV program on Mac/Win using Wondershare UniConverter:
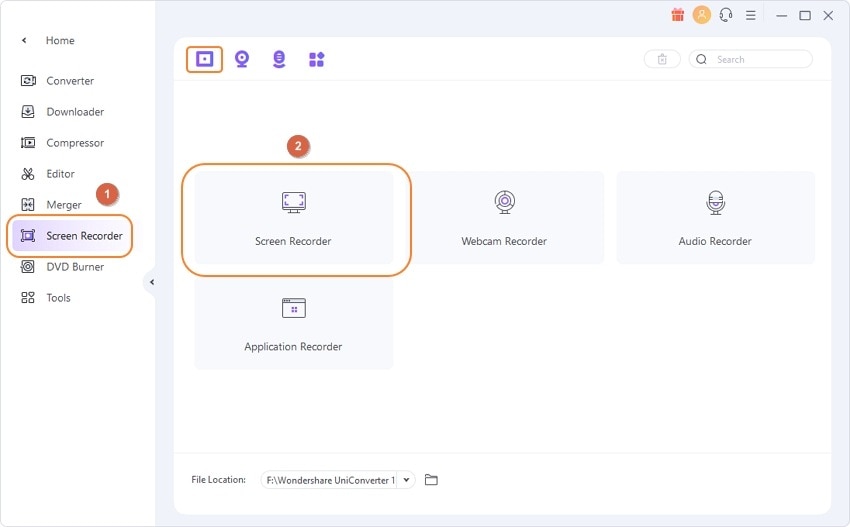
Step 1 Open the screen recording tool.
Install and run the program on your computer, then press the Screen Recorder tool. After that, tap the Screen Recorder icon to launch the screen capturing function.
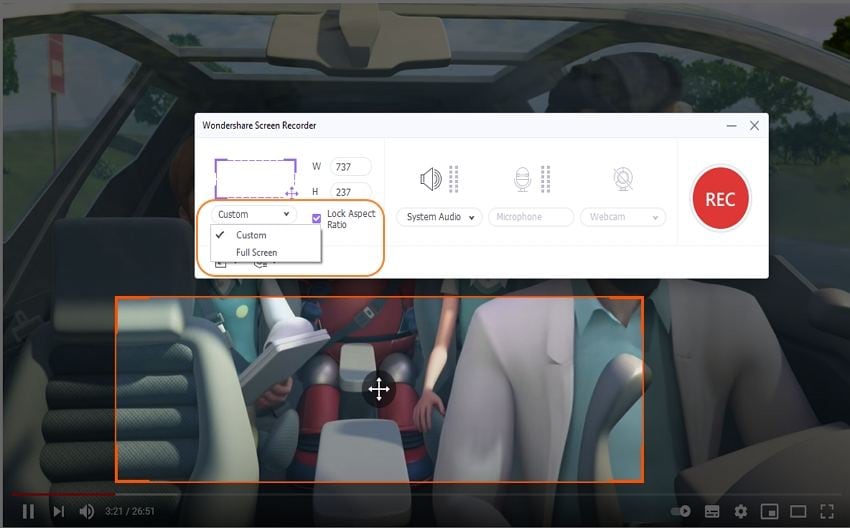
Step 2 Select a specific capture area.
Open the TV channel, then drag the recording cropper at the edges of your desktop screen to select a capture area. You can also open the Recording Mode menu and set the capture area as Full Screen or Custom. With the custom mode, enter the frame dimensions before tapping the Lock Aspect Ration checkbox.
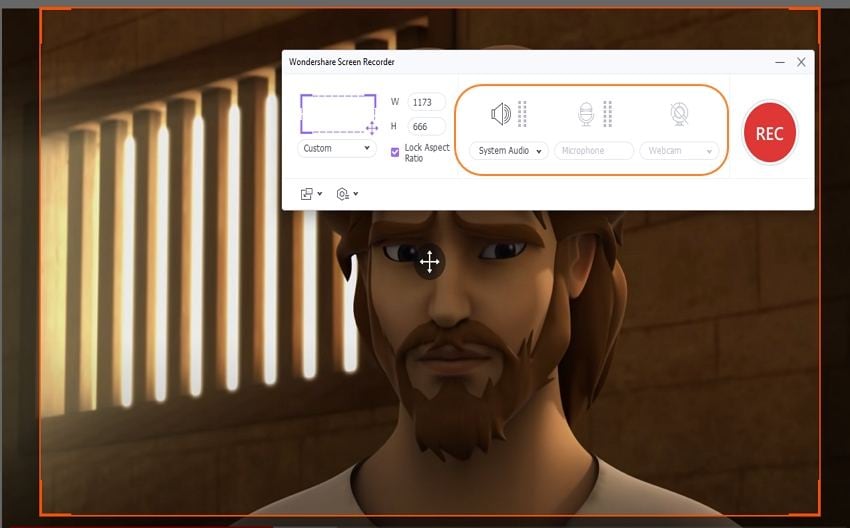
Step 3 Configure your recording preferences.
First of all, ensure that you’ve selected an audio device under the System Audio section. After that, choose a mic and a Facecam under the Microphone and Webcam drop-down lists. This way, you can record your live TV with your own voice narrations and PIP effect.
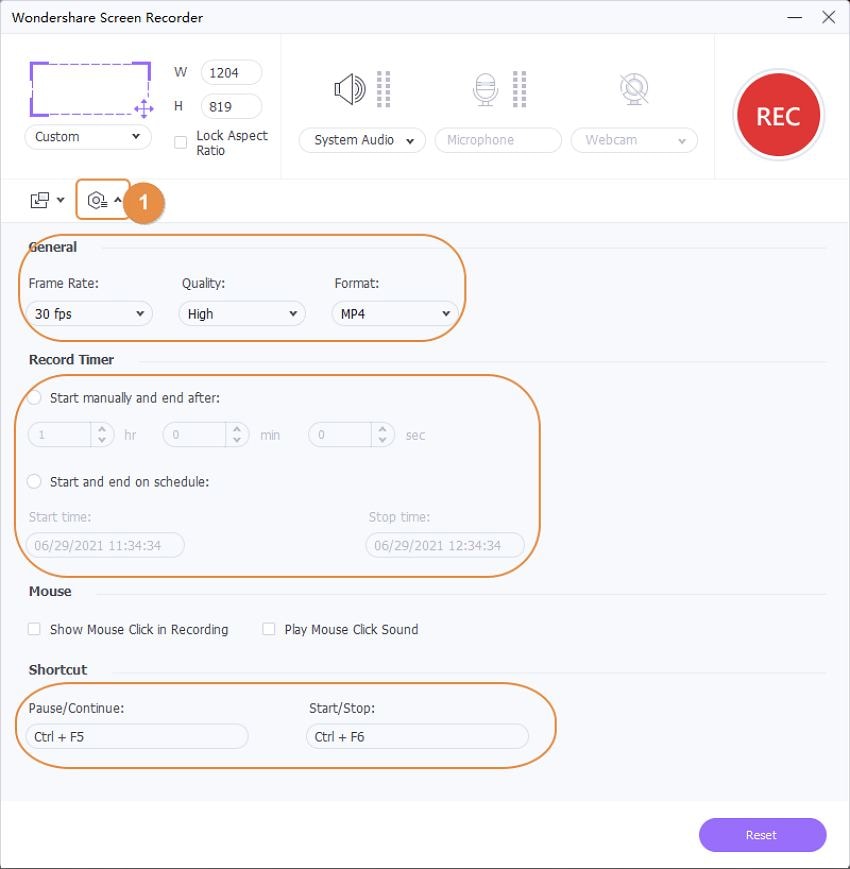
Next, click the Settings icon to set the output format as either MP4, AVI, or FLV. You can also choose an output frame rate, quality, and recording timer. And yes, you can select a folder path under the Save As section. Here, you can set the connected external hard drive as the folder path.
Step 4 Start capturing a live TV on PC.
Finally, press the REC button to start capturing the desktop screen losslessly. If you want to add special characters like lines, shapes, texts, arrows, and more, open the taskbar, then click the Annotation button. You can also take screenshots, mute system audio and voiceovers, and disable or enable the webcam. Once satisfied, press Stop to preview and edit your live TV recording. It’s that straightforward!

Conclusion
Although using a TV hard drive recorder by connecting it directly to the television might sound a quick and straightforward solution to capture shows and movies, the restrictions this approach comes with won’t give you enough room for video editing and manipulations. On the other hand, a program like Wondershare UniConverter gives you full control over recording and amending the clips to best suit your needs.
- How to Record Videos on Mac with Helpful Ways
- How to Record Online TV Shows Easily for 2026
- Best TV Recording Box: The 9 Best Ways to Enjoy TV Shows in 2026
- All Ways to Record TV Shows on Fire TV Stick in 2026
- How to Record Shows from Samsung Smart TV via USB by Simple Steps in 2026
- Easy Ways to Record TV Shows to a Computer in 2026
- How to Record TV Shows with USB Stick in 2026


Christine Smith
chief Editor