TV Recording Tips
- TRY FREE TRY FREE
- 1. DVR for TV Recording+
-
- 1.1 How to Choose the Best Digital Video Recorders for TV in 2026
- 1.2 4 Ways You Shoud Know for TV Recording in 2026
- 1.3 Top 6 DVR Recorders for TV in 2026
- 1.4 5 Methods to Record TV Shows without DVR in 2026
- 1.5 Top 5 PVR Recorder for Live TV Shows in 2026
- 1.6 All Ways to Record TV Shows on Fire TV Stick in 2026
- 1.7 All Things to Know About TV Shows Recording on Philo TV in 2026
- 1.8 Easy Ways to Record Programs on Roku in 2026
- 1.9 Best TV Recording Box: the 9 Best Ways to Enjoy TV Shows
- 1.10 What are the Best TV Recording Devices in 2026
- 1.11 The Most Efficient Steps to Record TV Videos in 2026
- 1.12 How to Record TV Programs On An External Hard Drive in 2026
- 1.13 How to Record TV Shows on DVD Recorder Easily in 2026
- 1.14 How to Record Shows from Samsung Smart TV via USB by Simple Steps in 2026
- 1.15 Deserved to Have Top 12 Freeview TV Recorders in 2026
- 1.16 How to Use Tablo TV Kill Time During Self-Quarantine Period in 2026
- 1.17 How to Edit TV Shows Recorded from Xfinity in 2026
- 2. Record Cable TV+
- 3. Record Live TV+
-
- 3.1 6 Popular HD TV Recorders in 2026
- 3.2 Top 5 Live TV Recorders on PC in 2026
- 3.3 How to Record Online TV Shows Easily for 2026
- 3.4 Easy Steps to Record Live TV Shows in 2026
- 3.5 How to Record Shows from Streaming Services in 2026
- 3.6 Simple Methods to Record TV Shows on OTA Streaming Devices in 2026
- 4. Record Screen+
- 5. Other Tips for TV Recording+
Easy Steps to Record Live TV Shows in 2026
by Christine Smith • 2026-01-21 18:55:40 • Proven solutions
Amidst your busy work schedule, it is a tough task to watch your favorite live TV shows regularly. You have to sort out all your works before the TV or Computer screens to view the live streaming programs. What do you think about a concept on how to record Live TV shows effortlessly? It sounds incredible that there is no need to miss your favorite live programs anymore due to the advent of the recording feature. You must identify an effective strategy to record the shows without any data loss, and at the same time, the quality factor plays a significant role. Do not worry. This article guides you through figuring out the best TV show recorder, which satisfies your expectations. It is the perfect time for you to get ready and explore the dazzling product, which soon knocks on your door from the digital market.
- Part 1. How to record Live TV shows on Mac/Windows easily
- Part 2. How to export recorded live TV shows
- Part 3. Other alternatives to record live TV shows
Part 1: How to record Live TV shows on Mac/Windows easily
Do you have any idea about recording live TV shows on desktop systems? Here comes a great product.
Wondershare UniConverter (originally Wondershare Video Converter Ultimate). This tool comprises of outstanding functionalities and discovers more by surfing through the below listings:
 Wondershare UniConverter for Mac/Windows (Catalina Included)

- Quick, reliable, and extraordinary video converter.
- 90X faster conversion speed than other universal converters.
- Handles more than 1000 file formats.
- Download and play live streaming of multimedia content precisely.
- Burn videos to DVD fast by all-in-one DVD toolkit.
- Separate versions available to support Mac and Windows platform.
- It has a compact Toolbox that carries out various activities like file compression, screen recording, CD burner, DVD converter, fixing video metadata, etc.
Steps to record TV live shows by Wondershare UniConverter. Here you will be learning about the live TV show recording feature on the Windows platform.
Step 1 Quick Download
Visit the official website of Wondershare UniConverter and download the Windows version, and then you must follow the wizard for a successful installation. Finally, launch the tool by tapping the icon. In the Menu screen, choose Screen Recorder from the displayed list below.

Step 2 Explore Recording Functionalities
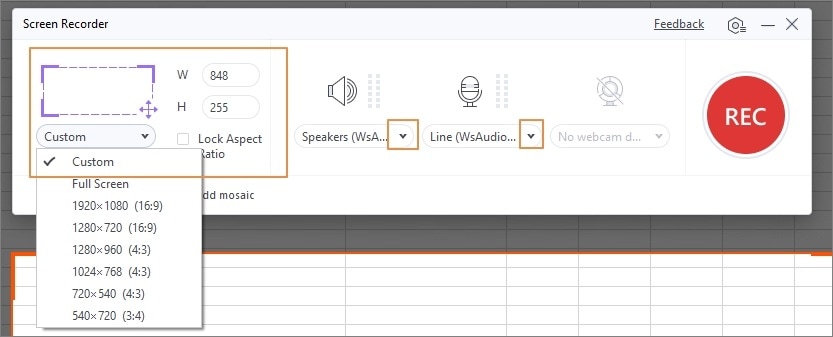
Allow the live show to stream into your system by visiting its respective web address and then adjust the capture screen by tapping the Capture Area option with the help of UniConverter. You can either choose full screen or custom areas using the drop-down icon near the Capture Area icon. For customization, you can make use of the cross symbol, which appears in the middle of the window.
Step 3 Additional settings in recording
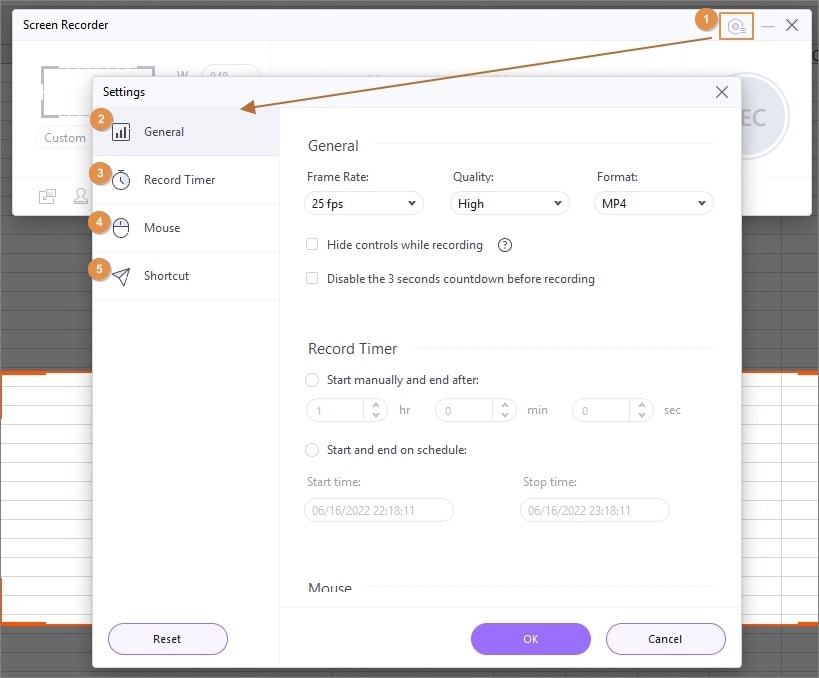
Click the drop-down icon at the top right side of the screen as from the expanded list and modify the settings as your needs. You can change the storage location of the live video using the dotted line near the Save As option beneath the General menu. You can set record timing manually via Record Timer too.
Step 4 Trigger the live show recording.
Now, you have sorted out all the settings related to the live show recording in Wondershare UniConverter, and it is the perfect time to hit Rec, a circular orange button that is highly visible on the top menu. A countdown begins soon after the button tapped, and the live show commences to be recorded at the desired storage location.

Step 5 Stop the screen recorder.
When the live show ends, then immediately press the Stop button or use the shortcut Crtl+F6. You can also use the Esc option to stop the recording.
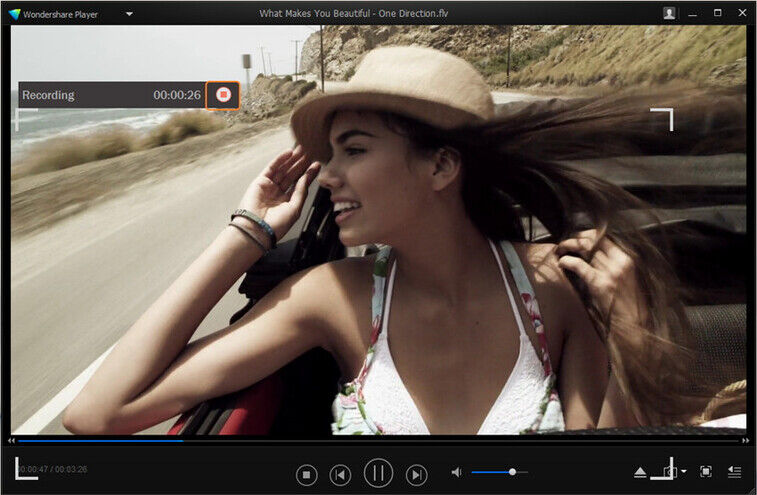
You had a better understanding of how to record Live TV shows by Wondershare UniConverter. If you want to view the live show recording in your favorite gadgets, then how to transfer this recorded video to other external devices, this inquisitiveness leads you to the next part of the discussion.

Tips
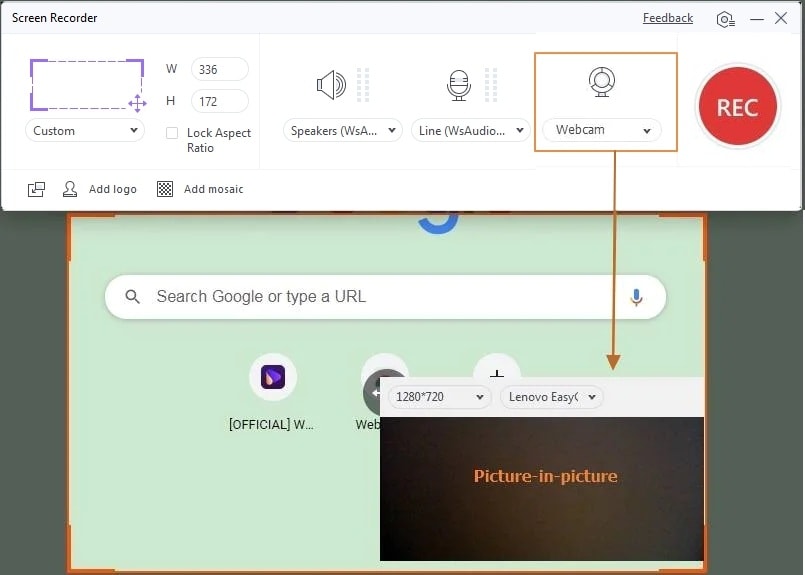
Wondershare UniConverter supports Picture-in-Picture (PiP) as well, just move to How to record yourself and your desktop screen at the same time >> to learn more details.
Part 2: How to export recorded live TV shows
In this illustration, connect an Android device with your Windows system using an active USB cable and then follow the below guidelines.
Step 1 Open Wondershare UniConverter
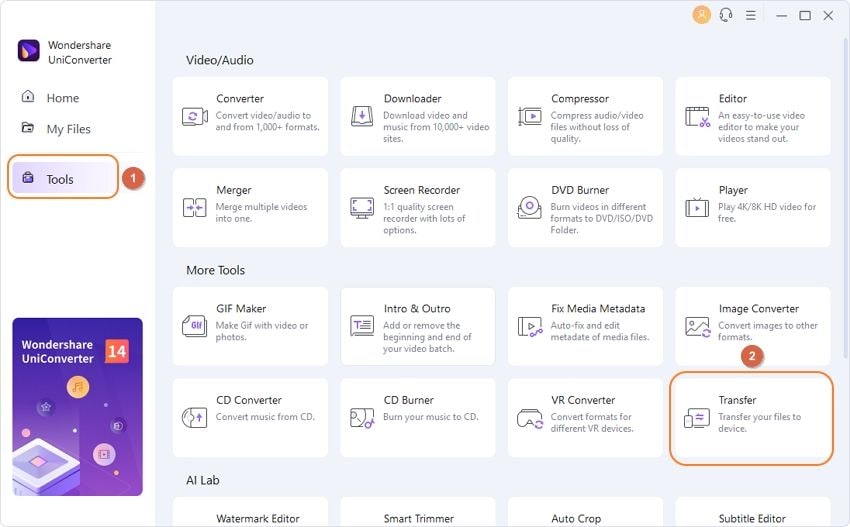
You have to download and install the program. Then select the Transfer option from Toolbox. This process requests for the USB debugging with your connected device. The procedure varies with your device model. You must tap About phone - Software info- Developer option for USB debugging to prepare your device for the transfer process.
Step 2 Include the recorded live TV show.
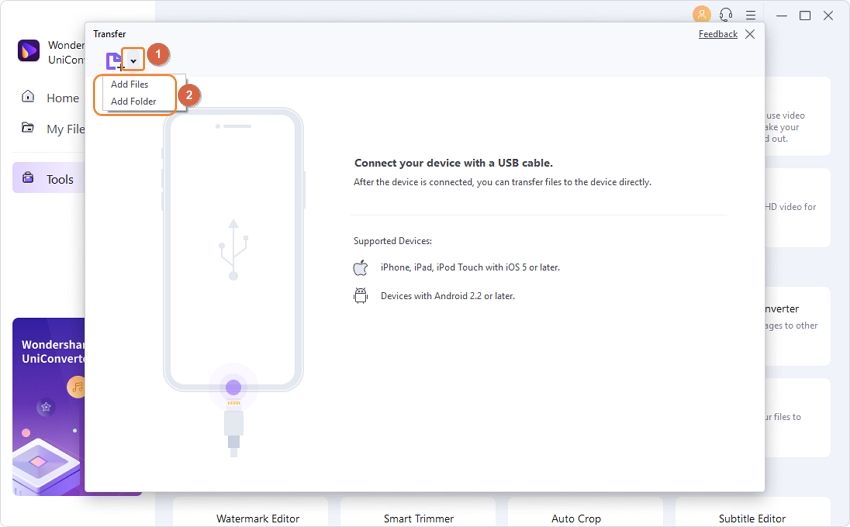
At the top left side of the window hit the Add Files option to navigate through the folders for an easy reach of the desired video file. The added files appear on the Wondershare UniConverter screen in a well-organized way. You can add many video files based on your needs by following similar steps and finally tap Add to Transfer button at the top right of the screen.
Step 3 Time to Transfer
Now, knock down the Transfer button to trigger the transfer procedure on the respective video or press Transfer all button at the bottom right to stimulate the transfer for all the videos listed out in the program's screen.
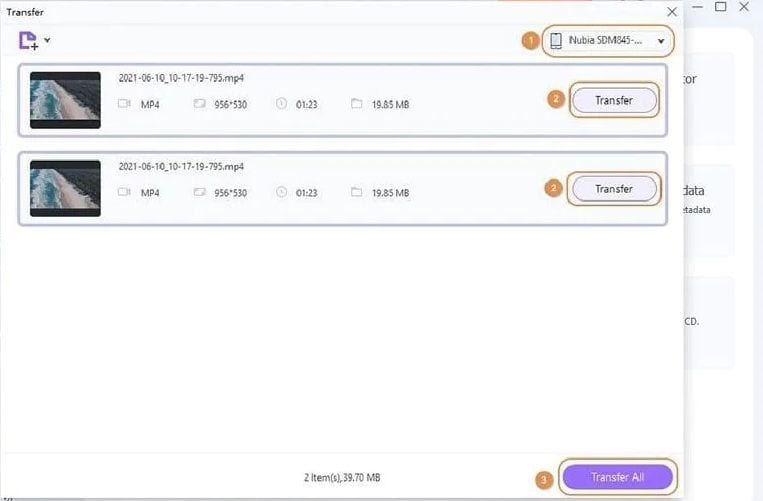
After the transfer process, disconnect your Android phone from your system safely and reach out for the transferred video files in the device to play your favorite TV live show.
You had a clear vision of the recorded video export from your PC to the Android gadgets successfully.
Part 3: Other alternatives to record live TV shows
Apart from the above methods to record live TV shows, there are other 3 alternatives for your reference.
Ezvid
It is a reliable screen capture software that records live TV shows without any breaks. You can record the desktop activities precisely and save it in your desired storage location.
Pros
●It is a free app, and you do not have to pay for it
●This screen recording tool has an incredible built-in video editors
Cons
●This app requires 10GB free memory space for effective performance. Only the latest version system can support this software
●Works on Windows only
●The maximum allowed recording time is 45 Min.
Apowersoft
Apowersoft is web-based software and available for free download at its official website. Three steps are sufficient to complete the recordings live, and you can upload the recorded video files at YouTube, RecCloud, etc.
Pros
●Customize the recordings by adding colors, notes, etc.
●You can convert the recorded file to different formats depending on your requirements.
Cons
●The trial version allows only 3 mins of recording on your phone.
●It will attach watermarks while recording the video.
Loom
This app record TV shows quickly, and there are more than 1.5 million users worldwide. Loom works well on Windows, Mac, Chrome, and even iOS systems. You can install this program easily.
Pros
●You can record the videos up to the resolution of 1080p.
●Add notations while recording live video sessions.
Cons
●Video editing can be a bit tricky with the cursors, and not very accurate on the timeline.
●It is difficult to edit the recorded video because there are no controls for post-editing in this software.
Conclusion
Finally, you are now at the end of the discussion where Wondershare UniConverter plays a vital role in recording TV live shows and exporting it to your desired platform effortlessly. It is the best source to work on multimedia files to acquire flawless outcomes. Convert, record, transfer any files as per your requirement quickly. The Wondershare UniConverter is a reliable tool that assures quality results without any data loss during the conversion or transfer procedure. It is a highly recommended program which serves as a boon for the beginners and challenging source for the experts. This tool satisfies both the extremes without any compromises.


Christine Smith
chief Editor