TV Recording Tips
- TRY FREE TRY FREE
- 1. DVR for TV Recording+
-
- 1.1 How to Choose the Best Digital Video Recorders for TV in 2026
- 1.2 4 Ways You Shoud Know for TV Recording in 2026
- 1.3 Top 6 DVR Recorders for TV in 2026
- 1.4 5 Methods to Record TV Shows without DVR in 2026
- 1.5 Top 5 PVR Recorder for Live TV Shows in 2026
- 1.6 All Ways to Record TV Shows on Fire TV Stick in 2026
- 1.7 All Things to Know About TV Shows Recording on Philo TV in 2026
- 1.8 Easy Ways to Record Programs on Roku in 2026
- 1.9 Best TV Recording Box: the 9 Best Ways to Enjoy TV Shows
- 1.10 What are the Best TV Recording Devices in 2026
- 1.11 The Most Efficient Steps to Record TV Videos in 2026
- 1.12 How to Record TV Programs On An External Hard Drive in 2026
- 1.13 How to Record TV Shows on DVD Recorder Easily in 2026
- 1.14 How to Record Shows from Samsung Smart TV via USB by Simple Steps in 2026
- 1.15 Deserved to Have Top 12 Freeview TV Recorders in 2026
- 1.16 How to Use Tablo TV Kill Time During Self-Quarantine Period in 2026
- 1.17 How to Edit TV Shows Recorded from Xfinity in 2026
- 2. Record Cable TV+
- 3. Record Live TV+
-
- 3.1 6 Popular HD TV Recorders in 2026
- 3.2 Top 5 Live TV Recorders on PC in 2026
- 3.3 How to Record Online TV Shows Easily for 2026
- 3.4 Easy Steps to Record Live TV Shows in 2026
- 3.5 How to Record Shows from Streaming Services in 2026
- 3.6 Simple Methods to Record TV Shows on OTA Streaming Devices in 2026
- 4. Record Screen+
- 5. Other Tips for TV Recording+
4 Ways You Should Know for TV Recording in 2026
by Christine Smith • 2026-01-21 18:55:52 • Proven solutions
There are various technologies today. And the world is growing exponentially in the direction of advancement. We get to see a lot of technological equipment around us every day. Among all these useful technologies, one is TV Recording. Anyone who has a television can record their favorite shows or movies using a simple device. This device can be of various types. Numerous tools are available in the market to record videos from your TV into any hardware device of your choice. You can use a DVR recorder for TV to record the movies shown on your television, or you can record digital TV on a VCR. It is very simple and easy to use. The next method is to record digital TV on a set-top box. Also, you can use digital recorders to get your digital TV recorded. All these four methods can be used in digital television to record it. In this article, we are going to give you all the necessary details for your reference. Go through them to have a decent idea about recording TV using these four different technologies.
- Part 1. Record Digital TV on DVR
- Part 2. Record Digital TV on VCR
- Part 3. Record Digital TV on Set Top Box
- Part 4. The Easiest Alternative to Digital Recorders to Record TV Shows on PC
Part 1. Record Digital TV on DVR
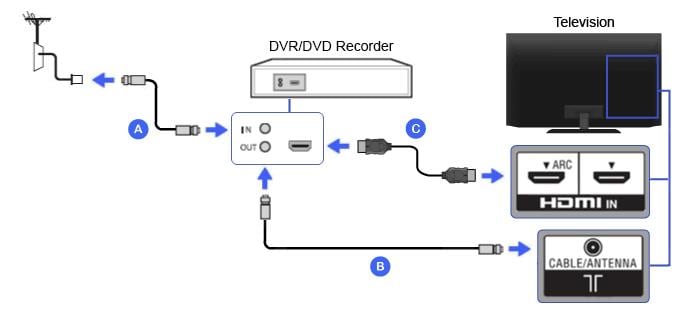
To record shows on your TV, you can use a DVR. There are numerous DVR recorders available to record your digital TV. A DVR is basically like a computer responsible for recording, saving, and playing videos with audio. It is a simple device to record your shows. It is a device that can help you record your videos in digital format to any hardware device like an SD memory card, disk drive, SSD, USB drive, or some other connectable device. They are used to record videos and shows from your television onto any hardware device. The DVRs used for personal help are PVRs (Personal video recorders). This device is helpful in TV Recording. These can be used with antenna TV as well. DVR recorder for antenna TV recording has also turned out to be of great use to consumers. People prefer other ways of recording audio and videos. Following are the simple steps to record digital TV on DVR recorders:
Firstly, ensure that your DVR is already connected to your digital TV set. To connect your DVR to your digital TV, you will be required to use a radio frequency modulator, otherwise known as an RF modulator. You must also turn off all electrical appliances connected to your digital TV. It is to ensure that there are no interruptions. After you have turned off your electrical appliances involved in this process, make sure that the cables you would be using are long enough to get to the television from any location you will be setting up your DVR.
Secondly, you will be connecting your DVR to the RF modulator. One end of an RCA video cable, which is a yellow cable should be connected to the video out jack which is also yellow on your DVR. Also, connect the RCA cable to the video in port on the RF modulator.
Thirdly, connect the RF modulator to your digital TV. A coaxial cable should be connected to the RF out port on the RF modulator and the RF in port at the back of your digital TV. After this, ensure your digital TV and your RF modulator are set to the same channel.
Connect your digital TV power to your DVR by plugging the TV power cord into the back of the DVR, which is located at the back of your DVR at the far right end, then plug your DVR power cord into the wall source.
After powering your TV, the next step in recording your digital TV on your DVR is to hit Record on your remote. If you started watching the program before you have begun recording, don't worry, the total time allocated for the program will be stored on your DVR.

Follow these simplified steps and record your favorite shows. No more missing out on any series; you can adjust your recording options as you desire.
Part 2. Record Digital TV on VCR
If you do not wish to use a DVR or you do not have one, then you can go for recording your TV shows on a VCR. It was used earlier to record analog audio and videos only, but now it is also available for digital formats. These are very old devices with their launch around the 1980s. In simpler terms, it is a digital TV recording device known as a video cassette recorder.
They have various unique features they are multi-standard, which means that they can transfer videos from one device to another very quickly. Also, the quality of the audio recorded in VCRs is outstanding. The sound is clear and high-quality. The videos are also recorded in good condition. Apart from this, they offer copy protection and have flying-erase heads. Recording digital TV on VCR can easily help you to record analog and digital audio and videos from your television. They can also help in the playback of recorded tapes and audio. These are associated with a TV and a clock to set the recording timer. If you have not used it or do not know how to use it for recording, then you can refer to the steps mentioned below for recording broadcast digital TV.
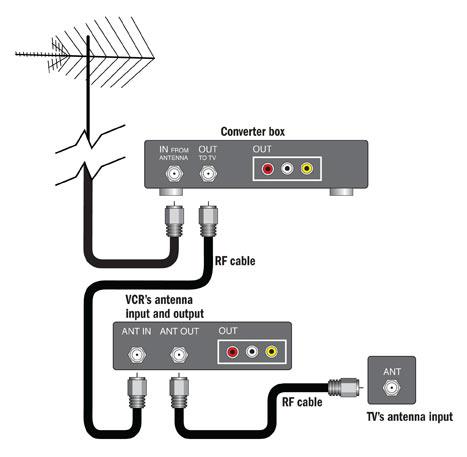
To begin the process of recording your digital TV on a VCR, you will need some essential supplies:
● An antenna.
● A DTV converter box.
● Two-way splitter.
● Lengths of coaxial cable.
● RCA video and audio cables (Yellow, white and red cables).
After getting all that is listed above, follow these simple steps:
Step 1: The coaxial cable connects the antenna output to the two-way splitter input.
Step 2: Connect another two coaxial cables to the output on the two-way splitter.
Step 3: one of the coaxial cables should be connected from the two-way splitter to the coaxial input on the DTV converter box. Once finished, connect the other coaxial cable from the two-way splitter to the antenna input on your digital TV.
Step 4: Grab your RCA cables. Connect one end of the video and audio cable to the outputs that have similar colors on the back of your DTV converter box. After you have done this, connect the other end of the same RCA audio and video cable to the inputs on the back of your VCR. Do not forget you also need to connect them to the inputs with colors that match the cables.
Step 5: You are not yet done with the RCA audio and video cable. Get the other RCA audio and video cables and ensure they are connected to the VCR output with matching colors. Once you are done with this process, connect the other end of the same RCA cable to the same inputs of similar colors, which are situated at the back of your digital TV.
Step 6: When this process is done, power on your TV. Use your remote to search for VCR or antenna on your digital TV.
Step 7: Hit the record button on your remote when you want to record any show of your choice.

Part 3. Record Digital TV on Set Top Box
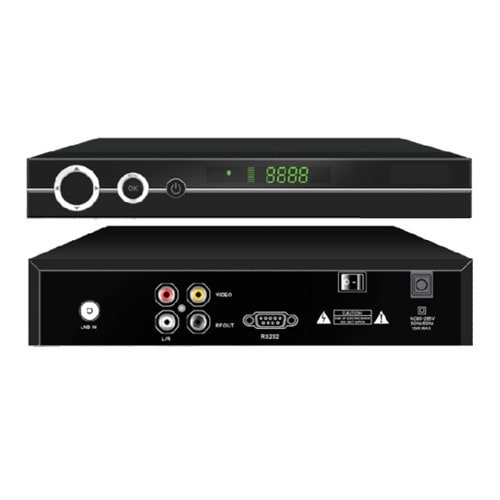
A set-top box can also be known as a cable box. It is an electrical appliance that generally contains a TV-tuner input and displays output to a television set and an external source of the signal, turning the signal source into content in a form that can then be displayed on the TV. Follow these simple steps to record your digital TV on a set-top box:
● Get a digital storage device. This can be gotten from a store that sells electrical appliances.
● After this, connect the storage device to your set-top box.
● When it has been connected successfully, a pop-up will appear on the screen of your digital TV.
● Go through the information displayed on your digital TV, select set up a smart TV, and click on YES.
● You can record shows on your set-top box by either selecting guide on your digital TV remote or pressing the smart TV button on your remote control. After that, click on OK. You can decide how you want to record by timing or show titles.

Part 4. The Easiest Alternative to Digital Recorders to Record TV Shows on PC
If these options are a little hard to comprehend, use Wondershare UniConverter to record high-quality TV shows on Mac/Win. This all-in-one tool allows you to record videos easily and convert them into any format. While recording TV shows, this app lets you add voice narrations using a microphone, Picture in Picture (PIP) effects using a webcam, and annotations like shapes, texts, lines, arrows, and so on. Best of all, you can edit the captured TV show by converting, cutting, cropping, adding watermarks, and more.
Wondershare UniConverter – Best DVR Recorder Alternative
 Wondershare UniConverter - Best Video Converter for Mac/Windows

- It lets users record any desktop activity, including TV shows, video games, browser tabs, making VoIP calls, and so on.
- It can capture high-quality videos on full-screen or choose a specific capture area.
- Record TV shows with annotations (texts, shapes, lines, drawings, etc.), voice narrations, and PIP effects.
- It allows you to retouch the recorded clip by trimming, cropping, applying effects, adding subtitles, and more.
- Convert the recorded clip to MP2, MP3, MP4, MTS, MOV, M4A, and other media formats.
- Best screen capture app for Mac OS X 10.9 (Mojave and Catalina included) & Windows 10/8/7.
The step-by-step process to record a TV show easily on Mac/Win using Wondershare UniConverter:
Step 1Launch the Screen Recorder.
Run the app, then click the Screen Recorder button. After that, hit the Screen Recorder button to launch the video recorder tool.
![]()
Step 2Select a capture section.
Do you want to record the entire screen or a particular section of the screen? In that case, open the TV show, then tap the recording mode menu to choose Full Screen or Custom. Remember to enter the frame dimensions and click Lock Aspect Ratio if you select Custom mode.
![]()
Step 3Adjust the recording settings.
Choose a device under the System Audio section if you want to capture the TV show with all computer sounds. You can also add a voice narration and PIP effect by selecting a mic and a Facecam under the Microphone and Webcam menus.
![]()
Now click the Settings menu to set a target format, frame rate, and output quality. You can also change the keyboard shortcuts and the destination folder.
![]()
Step 4Start recording the TV show.
Configure the capture area once more, then tap REC to begin the video recording process. After that, launch the video recording taskbar, then click Annotations to add texts, shapes, lines, drawings, and more. If you’re satisfied, hit the Stop button. I guess that was easy!
![]()
Conclusion:
With the above various ways and steps outlined in this article, recording shows will no longer be a strenuous task for you. You can record shows and watch them in your leisure or free time, even while watching a completely different program. Any of these methods can help you with TV recording. The best alternative way of a digital video recorder for TV is UniConverter. So start using it now to get your favorite shows recorded on time.

Christine Smith
chief Editor