TV Recording Tips
- TRY FREE TRY FREE
- 1. DVR for TV Recording+
-
- 1.1 Best Ways to Record OTA TV Shows with Digital DVR Recorder in 2020
- 1.2 How to Choose the Best Digital Video Recorders for TV in 2020
- 1.3 4 Ways You Shoud Know for TV Recording in 2020
- 1.4 Top 6 DVR Recorders for TV in 2020
- 1.5 5 Methods to Record TV Shows without DVR in 2020
- 1.6 The Alternative to HD TV Recorder for TV Shows Recording in 2020
- 1.7 Top 5 PVR Recorder for Live TV Shows in 2020
- 1.8 All Ways to Record TV Shows on Fire TV Stick in 2020
- 1.9 All Things to Know About TV Shows Recording on Philo TV in 2020
- 1.10 Easy Ways to Record Programs on Roku in 2020
- 1.11 Best TV Recording Box: the 9 Best Ways to Enjoy TV Shows
- 1.12 What are the Best TV Recording Devices in 2020
- 1.13 The Most Efficient Steps to Record TV Videos in 2020
- 1.14 How to Record TV Programs On An External Hard Drive in 2020
- 1.15 How to Record TV Shows on DVD Recorder Easily in 2020
- 1.17 How to Record Shows from Samsung Smart TV via USB by Simple Steps in 2020
- 1.18 Deserved to Have Top 12 Freeview TV Recorders in 2020
- 1.19 How to Use Tablo TV Kill Time During Self-Quarantine Period in 2020
- 1.20 How to Edit TV Shows Recorded from Xfinity in 2020
- 2. Record Cable TV+
- 3. Record Live TV+
-
- 3.1 6 Popular HD TV Recorders in 2020
- 3.2 Top 5 Live TV Recorders on PC in 2020
- 3.3 How to Record OTA TV Shows in 2020
- 3.4 How to Record Online TV Shows Easily for 2020
- 3.5 How to Record A Show on 3 Main Live TV Streaming Services in 2020
- 3.6 Easy Steps to Record Live TV Shows in 2020
- 3.7 How to Record Shows from Streaming Services in 2020
- 3.8 Simple Methods to Record TV Shows on OTA Streaming Devices in 2020
- 4. Record Screen+
- 5. Other Tips for TV Recording+
Best Ways to Record OTA TV Shows with Digital DVR Recorder in 2025
by Christine Smith • 2025-11-14 10:38:07 • Proven solutions
Time is running ahead of us, and we are all busy with our work and life, but there are still many people who like to watch their favorite TV shows. Even if we grow older, some of the TV shows are worth watching because it is entertainment after a hectic day.

When we miss our favorite show and the episode, we wish if that could be broadcasted again, but that is never done eventually. In this case, we are only left with some other options to record the TV shows and watch them later. To record your preferred TV shows, you would need a digital video recorder at your home.
These Digital TV Recorders make your life more comfortable than ever because now you have the option to capture those favorite episodes and watch them any day. It doesn’t matter if you have an antenna TV or some other dish services, but you still can record it and play later.
- Part 1. What is OTA TV?
- Part 2. Easy Steps to Record OTA TV Shows with Digital DVR Recorder
- Part 3. Best Alternative to DVR to Record OTA TV Shows on PC
Part 1. What is OTA TV?
OTA TV refers to Over-the-air television, where you can watch high definition television channels that are broadcasted in your town. These channels are majorly related to those stations which you sometimes watch on satellites and cable networks for news and other shows. Getting these OTA stations to your TV is very easy than you think. You just need an antenna and an HD television to receive the signals. If you don’t have the HD television, then you can simply get the signals with the help of an HD converter box.
Pros:
● There are no monthly charges on OTA TV services.
● You can access the local news and sports channel for free.
● You don’t need to put heavy equipment.
Cons:
● The channel list is very small.
● There would be no technical support to call if you lost your connection during your enjoyable showtime.
● You must be living around the broadcasting station to get a proper connection.
● The channel guide will cost you some extra bucks if you need them.
Part 2. Easy Steps to Record OTA TV Shows with Digital DVR Recorder
Now is the time to free your television and watch your favorite shows whenever you want. The digital video recorders for TV would make it possible to record a TV show with a button on your remote control. Apart from recording, you can pause and play the show anytime and rewind it to watch the missing portion. The digital TV recorder box can also be utilized to control the live broadcasting of channels. When you turn on the TV, the DVR starts a temporary recording that makes it probable to rewind or pause the live show in case you have to go to get a beer or the phone is ringing. Your DVR can record up to 2 hours of live video depending upon the configuration you have purchased.
This user guide will take you through the step by step guide to the most common features of a DVR to record OTA TV shows.
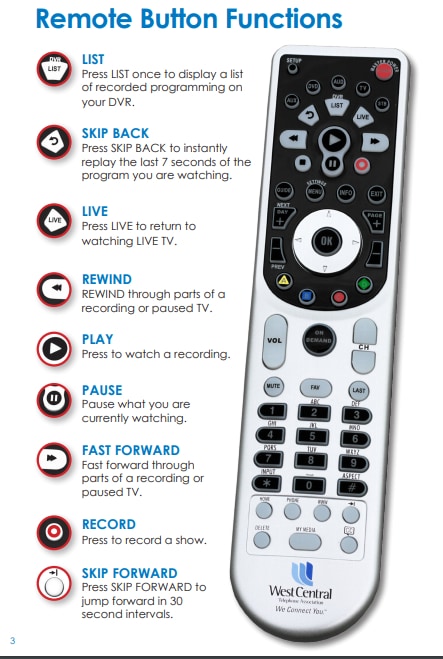
Step 1. While watching your favorite show, tap on the Record button on the remote. You can either make it a one-time recording or do it for a series recording by customizing start and stop at times.
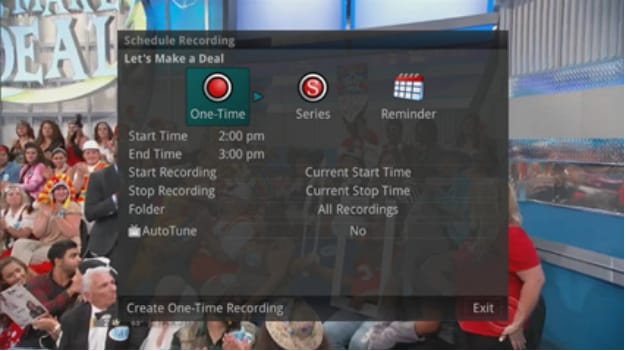
You can select the reminder option if you would like to set a note for your chosen show before 15 minutes, or it will be auto-tuned.
Step 2. Now when you have started the recording of your preferred shows, a red circle on display would brief you that the record has begun successfully.

Step 3. The recording shows a one-time record from the guide.
You can select a show from the guide and record it with the digital TV recorder box though the process of recording is also the same.
Select and highlight the program from the guide that you want to record and press the Record button. Once the recording options are displayed, select the correct option as given above, and your recording will automatically start.
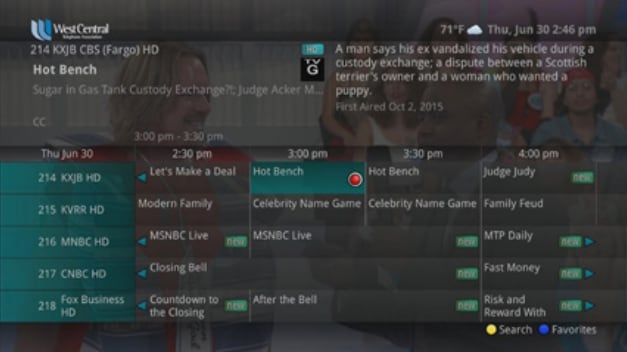
Step 4. Record a series from the guide with the digital video recorder.
You now learned to record your favorite shows, but there is still one thing that you might be crazy about, and that is to record an entire series that you want to watch on the weekend or after the work.
Though the process is still the same, there are some minor settings that you will learn in the next steps.
● When you have selected the program you want to record in the guide, press the record button, and some recording options will open up on your TV screen.
● Now with the help of remote control, select the series you want to capture and press the OK button on the remote.
● You now have all the recording options for your series on the TV display.
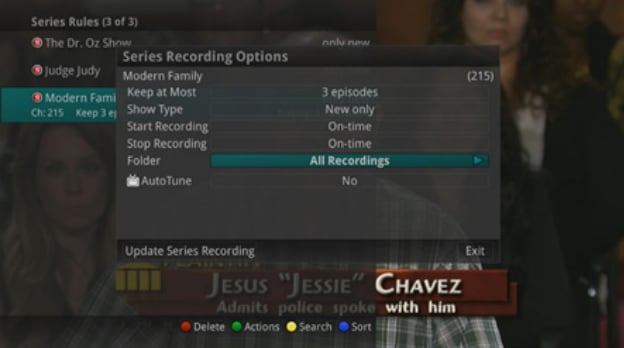
Now, you have the option to choose the episodes you want to record. You can use the Right/Left arrow buttons on the remote to select the number of episodes.
● Whether it’s a new episode or all the programs at once, it depends on you what you are going to record.
● You can select the time of recording whether you want to record it on time or 1 to 60 minutes before the show.
● Now, the last option you have is to stop the recording. You can stop recording at the scheduled time or use the Left/Right button on the remote to select any time between 1 to 60 minutes.
● So, you are done with selecting all the shows you want to record. It’s time to choose a folder where you want to save the recording, there is a default folder named All recordings, but you can choose another folder or create a new one.
● If you have more than one DVR at your home, you also have the option to choose the room where you would like to record the whole series. Please make sure the DVR is inside your homegroup. Now, select the AutoTune feature with a Yes or No.
● All the settings are correctly done, and now you have to arrow down on creating a series recording and then press OK on your remote to save the changes. You also can cancel the changes you made by tapping on the EXIT button or select CANCEL and then OK on the remote.
● Now when you have done everything, a Red circle will appear on display with an “S” that indicates the series you selected is getting recorded.
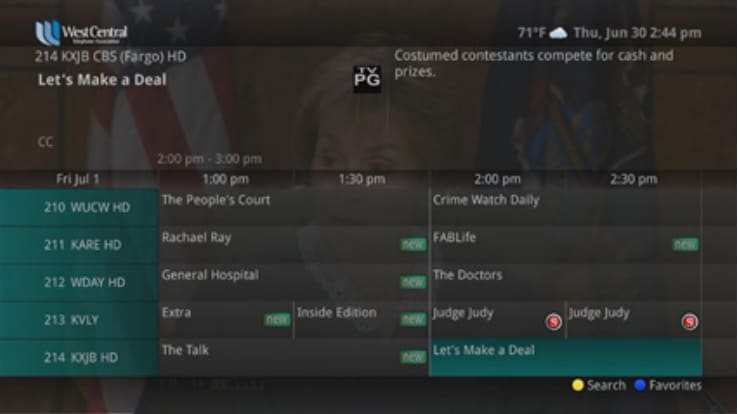
If you ever wish to see the series that you have scheduled to record, you can check them in the Series rules list or the future recording list.
Part 3. Best Alternative to DVR to Record OTA TV Shows on PC
Recording OTA TV shows or any other live show on a computer is a cakewalk, thanks to Wondershare UniConverter. Just connect your TV to your computer using a USB/HDMI cable to start streaming OTA TV shows on your computer. After that, use Wondershare Screen Recorder to capture top-quality videos of your favorite TV shows. With this feature, users can set the output format, frame rate, and format. You can export OTA TV shows to MP4, FLV, and AVI. Interestingly, users can record desktop screens with picture-in-picture effects and annotations like texts, shapes, drawings, lines, etc.
 Wondershare UniConverter for Mac/Windows (Catalina Included)

- Record all desktop screen activities in either full-screen or customized mode.
- Support over 1000 video output formats with zero quality loss.
- 90X faster conversion speed than any conventional converters.
- Edit video files with trimming, cropping, cutting, merging, adding subtitles, etc.
- Convert videos to any format in batch with less quality loss.
- Allow saving 4K/HD videos from 10,000 video streaming sites.
- Burn videos to DVD with customized free DVD menu templates.
Below is how to record OTA TV shows on PC using Wondershare UniConverter:
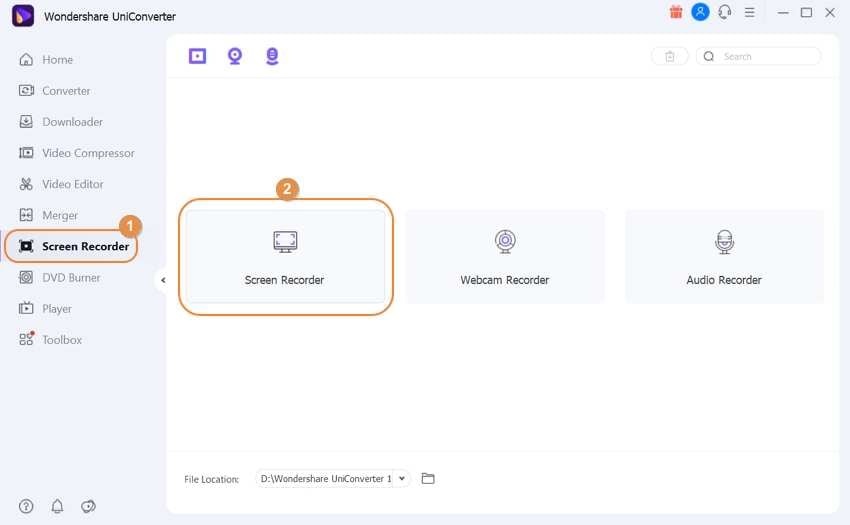
Step 1 Install and launch Wondershare Screen Recorder.
Install and run Wondershare UniConverter on your computer, then press the Screen Recorder function. Now click the Camcorder button to launch the recording tool.
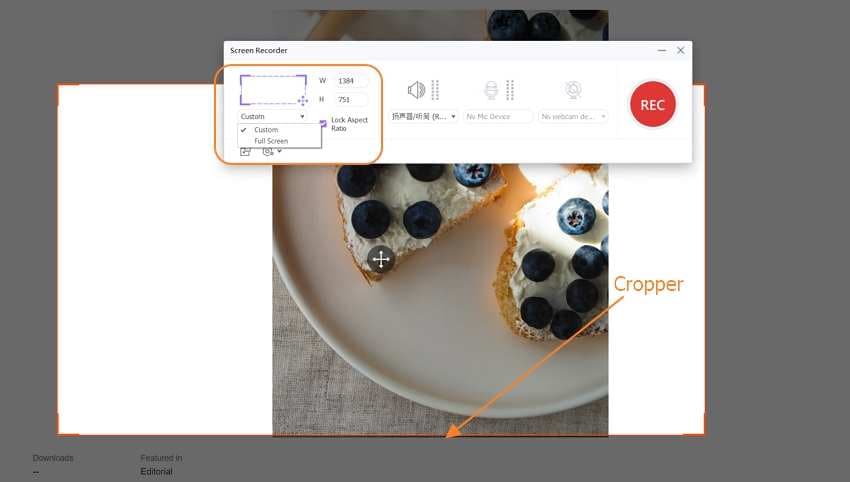
Step 2 Select a recording area on your screen.
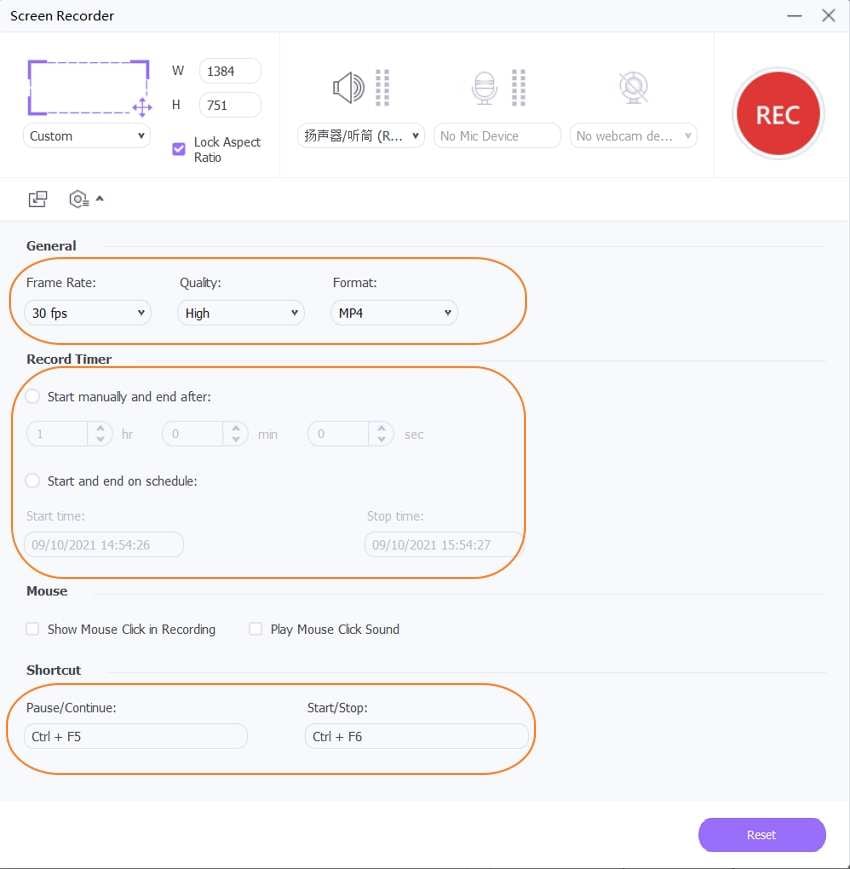
Do you want to record your desktop screen in Full Screen or Custom mode? In that case, click the drop-down button below the recording mode function, then choose a preset. When recording in Custom mode, set the height and width before tapping the Lock Aspect Ratio checkbox to make the outcome look more professional. An easier way is to drag the cropper inwards or outwards to fit the selected recording region.
Step 3 Fix other recording settings before you start recording.
If you want to add your voiceovers to the recorded video, open the Microphone menu list and select an input mic. You can also mute or unmute system sound under the Speaker section and add a Picture in Picture effect by choosing a camera under the Webcam icon.
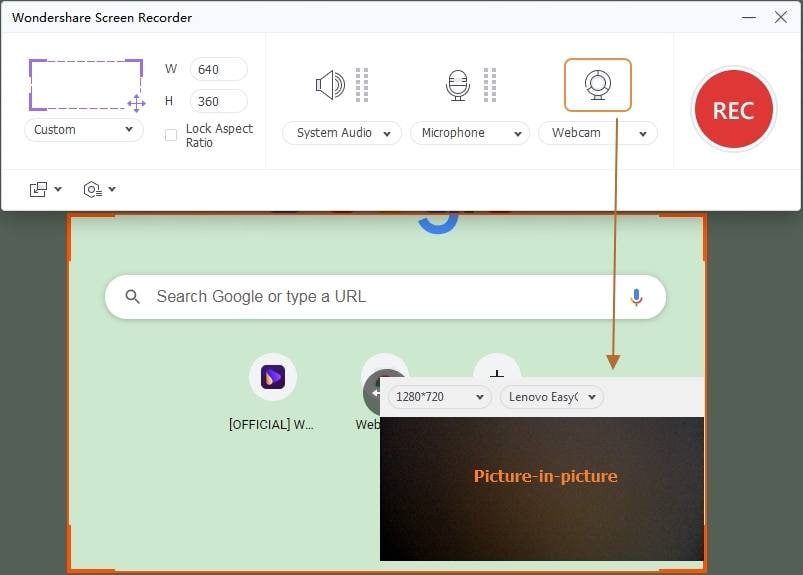
Now click the Settings menu to apply additional changes. Here, you can set the output format to MP4, AVI, or FLV. Users can also set the frame rate and the output quality as low, medium, or high. Plus, you can choose a target folder and customize the keyboard shortcuts.
Step 4 Start Recording OTA TV Show with unique annotations.
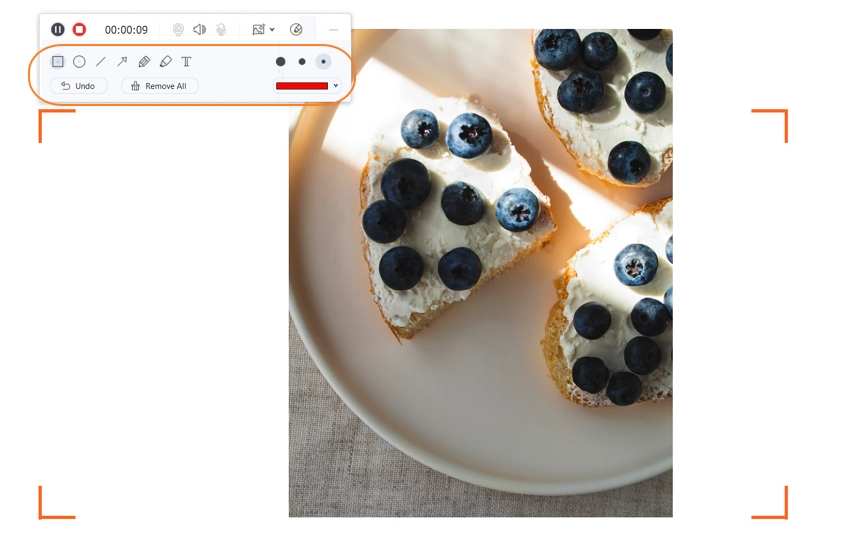
If everything looks clean and polished, launch the TV show, then press the REC button. Now open the recording taskbar, press the Annotation button, and start adding shapes, colorful texts, lines, drawings, etc. You can even capture a screenshot of a specific moment and use it as your smartphone wallpaper, social media profile picture, YouTube thumbnail, and more. Click the Stop button to finish capturing the desktop screen.
You can also stop the recording with a shortcut by pressing Ctrl+F6, and this can be set as a recording preference in Step 2.
Now, your recording is done, and popup named UniConverter Downloaded will appear on the screen for the video you just captured.
Note: You can use the Video Editor tool on Wondershare UniConverter to professionally edit your recorded TV show. You can crop, compress, cut, rotate, convert, and more.
Conclusion:
The digital world has taken over traditional ways of watching TV, playing games, and the way we find love too. Everything is evolving with technology, and we are coping with it at a faster pace. There was a time when there was no source of watching our OTA TV Shows because you were at work, and you missed it every time. Later, things changed, and you were able to record your preferred shows with the help of a DVR. Like time changed earlier, this time has also changed, and a transition in technology has taken the place of how you watch TV. If you are missing any of your favorite shows due to work or some other responsibility, Wondershare UniConverter is your best friend who will record your show in your absence. Everything could be done on your computer, and there is no need to monitor it for a longer duration. People love it, and not only you could record TV shows on a computer, but also there are other tasks that this tool can do for you like video editing, video conversion, etc.


Christine Smith
chief Editor