TV Recording Tips
- TRY FREE TRY FREE
- 1. DVR for TV Recording+
-
- 1.1 Best Ways to Record OTA TV Shows with Digital DVR Recorder in 2020
- 1.2 How to Choose the Best Digital Video Recorders for TV in 2020
- 1.3 4 Ways You Shoud Know for TV Recording in 2020
- 1.4 Top 6 DVR Recorders for TV in 2020
- 1.5 5 Methods to Record TV Shows without DVR in 2020
- 1.6 The Alternative to HD TV Recorder for TV Shows Recording in 2020
- 1.7 Top 5 PVR Recorder for Live TV Shows in 2020
- 1.8 All Ways to Record TV Shows on Fire TV Stick in 2020
- 1.9 All Things to Know About TV Shows Recording on Philo TV in 2020
- 1.10 Easy Ways to Record Programs on Roku in 2020
- 1.11 Best TV Recording Box: the 9 Best Ways to Enjoy TV Shows
- 1.12 What are the Best TV Recording Devices in 2020
- 1.13 The Most Efficient Steps to Record TV Videos in 2020
- 1.14 How to Record TV Programs On An External Hard Drive in 2020
- 1.15 How to Record TV Shows on DVD Recorder Easily in 2020
- 1.17 How to Record Shows from Samsung Smart TV via USB by Simple Steps in 2020
- 1.18 Deserved to Have Top 12 Freeview TV Recorders in 2020
- 1.19 How to Use Tablo TV Kill Time During Self-Quarantine Period in 2020
- 1.20 How to Edit TV Shows Recorded from Xfinity in 2020
- 2. Record Cable TV+
- 3. Record Live TV+
-
- 3.1 6 Popular HD TV Recorders in 2020
- 3.2 Top 5 Live TV Recorders on PC in 2020
- 3.3 How to Record OTA TV Shows in 2020
- 3.4 How to Record Online TV Shows Easily for 2020
- 3.5 How to Record A Show on 3 Main Live TV Streaming Services in 2020
- 3.6 Easy Steps to Record Live TV Shows in 2020
- 3.7 How to Record Shows from Streaming Services in 2020
- 3.8 Simple Methods to Record TV Shows on OTA Streaming Devices in 2020
- 4. Record Screen+
- 5. Other Tips for TV Recording+
How to Record A Show on 3 Main Live TV Streaming Services in 2025
by Christine Smith • 2025-11-14 10:38:15 • Proven solutions
A trending question about cord cutting is if you can record streaming video to watch later. It looks like a simple question but is a little bit complicated. In this context, it is essential to understand that there are specific streaming services that have the DVR facility. However, there are restrictions too, when it comes to a cable TV. On the other hand, services such as Netflix, do not offer any DVR facilities in any case. However, you can find shows on-demand on services like this. Also, there are workarounds for those services that come with no DVR facilities too. In this post, you will learn how to record a show on three of the leading live TV streaming services like YouTube TV Record this year.
- Part 1. How to Record TV shows on Sling TV
- Part 2. How to Record TV Shows on YouTube TV
- Part 3. How to Record TV Shows on Hulu Plus Live TV
- Part 4. How to Record Screen on PC
Part 1. How to Record TV shows on Sling TV
Suppose you have taken a new Sling TV subscription, but you still feel that you are missing out on certain features that you got while using simple cable TV. For example, a proper DVR option. Well, you don’t need to be sad, but just learn how to record on Sling TV. Irrespective of the Sling service that you have subscribed for, you will be given 10 hours of Sling TV record, especially if you are using free Cloud DVR. Moreover, with an extra amount of just $5/month, you can get 50 hours of Sling TV record shows.
Check out the steps of how to do it:
Step 1: The option of Sling Cloud DVR is available on any device that supports the service. So, you must reboot your service in your device for the next steps before anything else. Open Sling.
Step 2: You will find a GUIDE option on the top panel. Click on that.
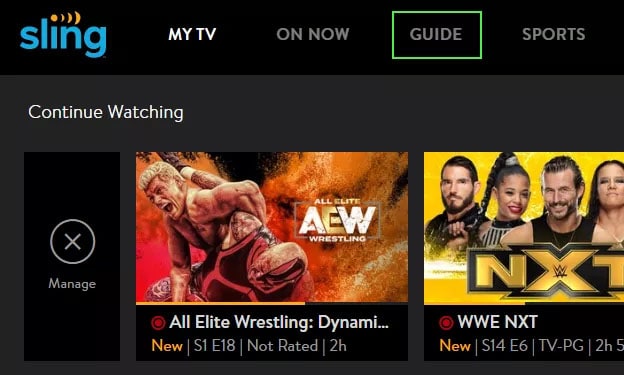
Step 3: Choose whatever show you want to watch or record.
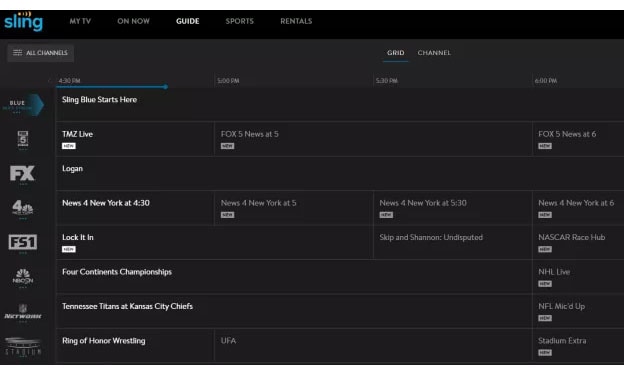
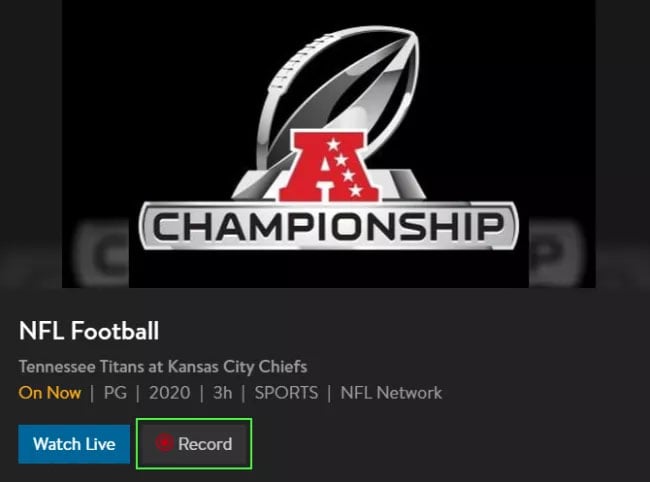
Step 4: You will find a Record option just when you click on the show. You can record any live episode or schedule for a future recording too.
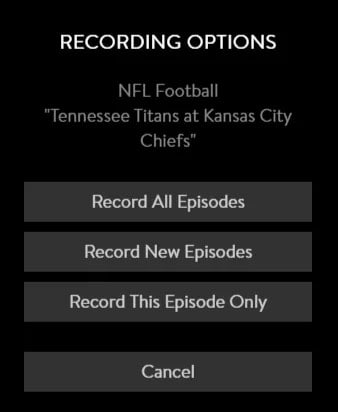
Step 5: When you click on Record, you will find other options such as Record all episodes, Record New Episodes, and Record This Episode Only. So, you can choose whichever option you prefer.
Pros:
● Channel selection is commendable.
● The subscription options are flexible.
● Streaming reliability.
● Good movie rentals are available.
Cons:
● There are only limited regional and local channels.
● The extra add-ons are very confusing.
● Apps and interfaces lag in comparison with other competitors.
Part 2. How to Record TV Shows on YouTube TV
Out of all other good features, one of the highlights, one of the best is the DVR allowance with which you can record YouTube TV. There is endless space for you to store the downloaded content. So, take a look at the below tutorial to learn recording shows on YouTube TV.
Check out the steps:
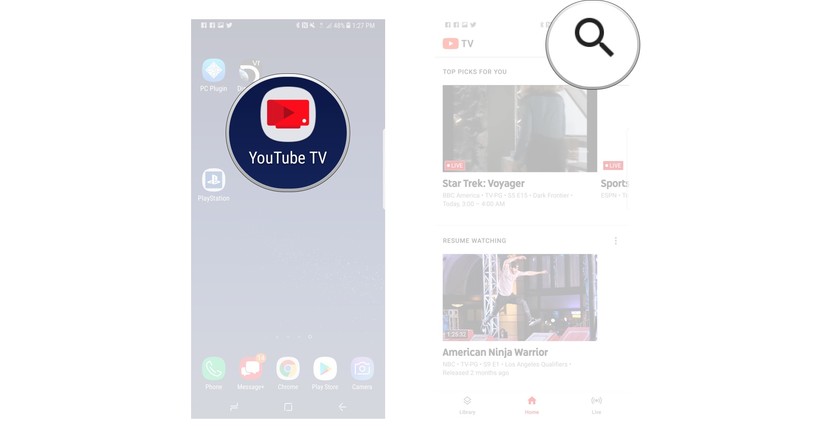
Step 1: Create a YouTube TV account if you do not have one yet.
Step 2: Launch it and log in to the account on your device.
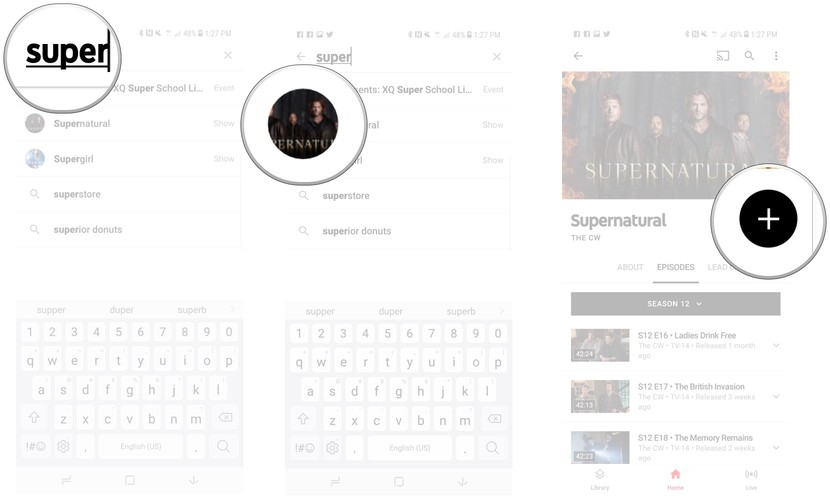
Step 3: Find and select the program that you want to record. You can use the search icon for this.
Step 4: Simply type the name of the show.
Step 5: Look for the “+” icon and click on that. It will save the selected show to the library, and it will get automatically recorded.
Pros:
● Endless option for cloud DVR.
● Channel navigation made faster.
● Live previews.
Cons:
● You will not find all cable channels on YouTube TV.
● Availability only in 4-5 markets.
● It does not have Amazon Fire TV, Roku Apps, and Apple TV.
● It becomes more expensive if you are trying to sign up using an iOS device.
Part 3. How to Record TV Shows on Hulu Plus Live TV
Now that you are learning how to record a show, watching those at your flexible time is becoming easier. It is the same with the record Hulu live TV option where you make use of Cloud DVR services. Besides, Hulu TV has a wide array of options including several cable and broadcast networks. So, you can now choose your favorite shows and schedule them for recording so that you can watch them later.
Check out the steps below:
Step 1: Click on the icon for Hulu for Live TV on iPad, iPhone, or any other Apple device to open it.
Step 2: Select any show that you see is available through Live, and not on-demand.
Step 3: Find the description tab for the movie or show.
Step 4: Click on My stuff or My episodes.
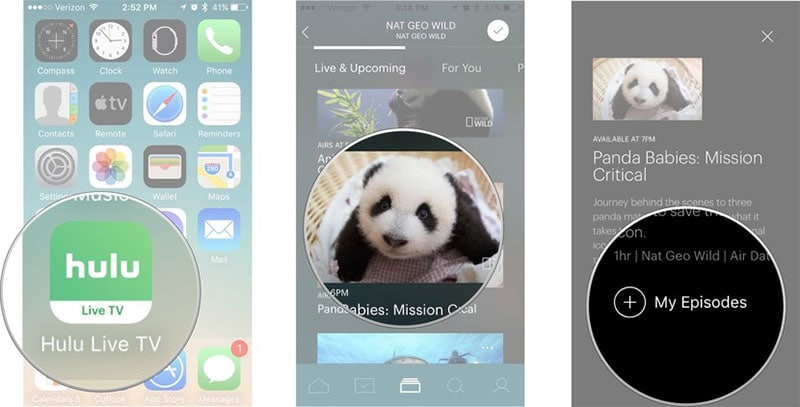
Step 5: The recording will happen on its own now.
Pros:
● Value for money.
● You can combine several popular channels along with the existing on-demand options.
● The DVR storage space is customizable and you can expand it.
Cons:
● Ad-skipping not possible unless you pay the extra charge to expand storage.
● You do not get an out-of-home viewing option on devices such as Fire TV players and Roku.
Part 4. How to Record Live TV Streaming Services on PC [Recommended]
If you want to record live TV streaming services on Mac/Win with high-quality, install Wondershare UniConverter. With this app, users can record live TV shows in either custom or full-screen mode. When using the Custom mode, users can enter the video frame dimensions and lock the aspect ratio to make the video more attractive to watch. You can also add voiceovers, video overlays or Picture in Picture effects, and annotations like texts, shapes, drawings, lines, and more. And most importantly, users can edit their captured TV shows by trimming, cropping adding watermarks, etc.
Wondershare UniConverter – Best Desktop Screen Recorder
 Wondershare UniConverter - Best Video Converter for Mac/Windows

- Record all desktop activities by choosing a specific capture area or record the entire screen.
- It lets users add annotations, PIP effects, and voice narrations to their recorded video.
- It allows users to preset the output frame rate, format, and quality.
- Record desktop screen activities like browser tabs, video games, media players, and more.
- Edit the recorded video file by trimming, cropping, compressing, applying video effects, and more.
- Convert the recorded video file to VOB, MTS, 3GP, MOV, MP4, FLV, and more.
- Best live TV recorder for OS X 10.9+ & Win 10/8/7.
Step-by-step process to record a live TV streaming service on Mac/Win with Wondershare UniConverter:
Step 1Run the Screen Recorder.
Install and run Wondershare UniConverter on your PC, then click Screen Recorder. After that, tap the Camcorder button to load the Screen Recorder tool.
![]()
Step 2Select a capture rea.
Now click the Recording Mode function then use your mouse to set a capture area. Another way is to open the Recording Mode menu, then set the capture region as either Full Screen or Custom. With the former, you can enter your frame dimensions, then tap Lock Aspect Ratio.
![]()
Step 3Configure your recording settings.
For starters, choose a sound output device under the System Audio section. Next, select a microphone for adding voice narrations under the Microphone drop-down list. Last but not least, open the Webcam menu and choose a camera for adding a video overlay.
![]()
Now proceed to open the Settings menu to set the target frame rate, quality, and format. You can also customize the folder path, recording timer, and keyboard shortcuts.
![]()
Step 4Start recording your desktop screen.
Launch the live TV show on your PC, then customize the capture region if needed. After that, press, REC to begin capturing the video. You can launch the recording taskbar, then click Annotations to add texts, shapes, drawings, arrows, and lines. Click Stop to finish capturing the Live TV and edit it appropriately using the Video Editor tool.
![]()
Conclusion
Streaming services are taking over the world with a storm now mainly due to its flexibility and customer-friendly features. So, from the above information, you can now stream your favorite shows, record them, and watch them when you are free. Moreover, you can record your desktop anytime you want via Wondershare UniConverter.


Christine Smith
chief Editor