TV Recording Tips
- TRY FREE TRY FREE
- 1. DVR for TV Recording+
-
- 1.1 How to Choose the Best Digital Video Recorders for TV in 2026
- 1.2 4 Ways You Shoud Know for TV Recording in 2026
- 1.3 Top 6 DVR Recorders for TV in 2026
- 1.4 5 Methods to Record TV Shows without DVR in 2026
- 1.5 Top 5 PVR Recorder for Live TV Shows in 2026
- 1.6 All Ways to Record TV Shows on Fire TV Stick in 2026
- 1.7 All Things to Know About TV Shows Recording on Philo TV in 2026
- 1.8 Easy Ways to Record Programs on Roku in 2026
- 1.9 Best TV Recording Box: the 9 Best Ways to Enjoy TV Shows
- 1.10 What are the Best TV Recording Devices in 2026
- 1.11 The Most Efficient Steps to Record TV Videos in 2026
- 1.12 How to Record TV Programs On An External Hard Drive in 2026
- 1.13 How to Record TV Shows on DVD Recorder Easily in 2026
- 1.14 How to Record Shows from Samsung Smart TV via USB by Simple Steps in 2026
- 1.15 Deserved to Have Top 12 Freeview TV Recorders in 2026
- 1.16 How to Use Tablo TV Kill Time During Self-Quarantine Period in 2026
- 1.17 How to Edit TV Shows Recorded from Xfinity in 2026
- 2. Record Cable TV+
- 3. Record Live TV+
- 4. Record Screen+
- 5. Other Tips for TV Recording+
Simple Steps to Capture Video on Win/Mac in 2026
by Christine Smith • 2026-06-23 14:39:21 • Proven solutions
Today, we are living in a world where everyone is sprinting towards their goals to survive in the cut-throat competition. While this hectic schedule has too many rewards at the end, it also comes with a couple of pay-offs. For instance, today, people don’t have enough time to sit and watch the live broadcast of their favorite TV shows.
However, there’s a solution to avoid this from happening in the future. If you often miss out on your favorite TV shows or movies, it is always a good strategy to learn how to capture video from TV to laptop via video capture USB 2.0. Gone are the days when you could record a TV show by throwing a VHS tape into the VCR.
Since VCR rarely exists these days, the process of recording a video from TV has changed as well. To make it easier for you to understand, we have compiled a detailed guide on how to capture video from TV to a laptop or a computer.
- Part 1. USB 2.0 Video Capture for Mac/Win
- Part 2. Capture Video with Wondershare UniConverter on Win/Mac
Part 1: USB 2.0 Video Capture for Mac / Win
One of the easiest ways to capture TV shows on your computer is to use a dedicated USB 2.0 device. The device is simultaneously connected to the computer and your TV. It converts the video signals, coming from the TV, into a digital video file that you can watch on your computer.
There is a wide variety of USB 2.0 video capture devices available in the market. While some are specifically designed for a dedicated operating system, others work on both Windows as well as Mac.
Using a video capture USB 2.0 stick is extremely easy. All you need is the video capture stick and recording software to set timers for all the recordings.
Step 1: First of all, install the drivers using the Driver CD that comes with the video capture stick. Once the drivers are installed, plug the USB stick into your computer and connect the female cables on the stick to the RCA cables on your TV.
Step 2: Once the connection is established, launch the recording software, and you’ll be able to record any video, TV show, or movie that’s playing on your TV.
Step 3: The video capture USB 2.0 stick will also help you convert data from your old VHS tapes to compatible video files that you can watch on your laptop. So, in case you’ve been wondering how to recover the footage of all those Star Trek shows you recorded as a kid, video capture USB 2.0 is your answer.
Part 2: Capture Video with Wondershare UniConverter on Win / Mac
If you find the method above too complicated to comprehend, use Wondershare UniConverter to record a computer screen in a heartbeat. This powerful program is simple to use, making it best for both experienced and novice video editors. That said, the screen recorder function lets users capture videos in either customized or full-screen mode. After selecting a recording region, you can choose to add a voiceover using an internal/external mic and a picture in picture effect (PIP) using a webcam. Plus, users can customize the output format, frame rate, quality, and keyboard shortcuts.
Wondershare UniConverter – Best Screen Recorder for Mac/Windows
 Wondershare UniConverter - Best Video Converter for Mac/Windows

- Record lossless desktop activities in full-screen or customized mode.
- Capture desktop screen with a voiceover, PIP effect, and unique annotations.
- Customize the output frame rate, quality, format, and timing before recording.
- Edit the captured video by cropping, trimming, rotating, applying watermarks, adding video effects, and more.
- Convert between thousands of file formats, including WebM, MP4, MOV, MP3, M4A, OGG, and more.
- It is the best video capture USB 2.0 alternative for Mac OS X 10.9+ or Windows 10/8/7.
Follow these detailed steps to record a video on Mac/Windows using Wondershare UniConverter:
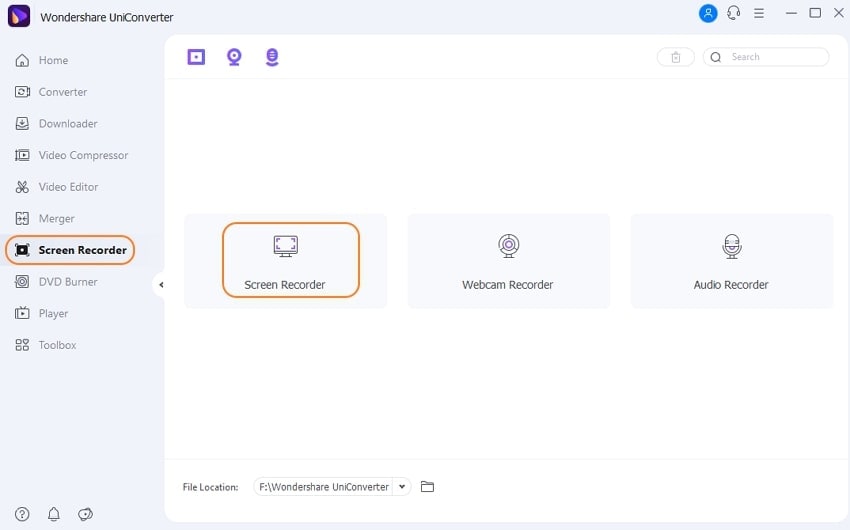
Step 1Launch Wondershare Screen Recorder function.
Run Wondershare UniConverter on your PC, then click the Screen Recorder tab. After that, tap the Camcorder icon to launch the Screen Recorder tool.
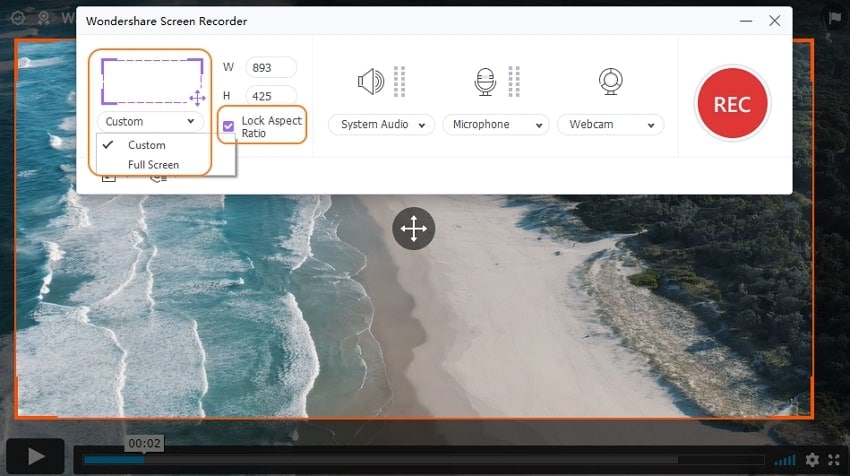
Step 2Select an area to capture.
Launch the video you intend to capture, then drag the cropping tool to fit an area of the screen you want to record. Alternatively, click the drop-down list below the cropper and set the recording mode as Custom or Full Screen.
Step 3Customize the recording settings.
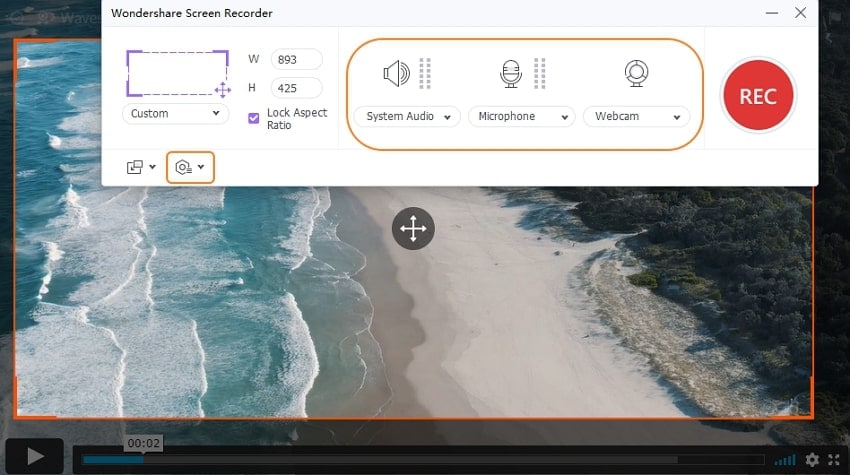
Open the System Audio menu to select a sound output device. If you want to include a voiceover, click the Microphone button and choose a device. You can even add a PIP effect using the system camera or select a new one under the Webcam drop-down list.
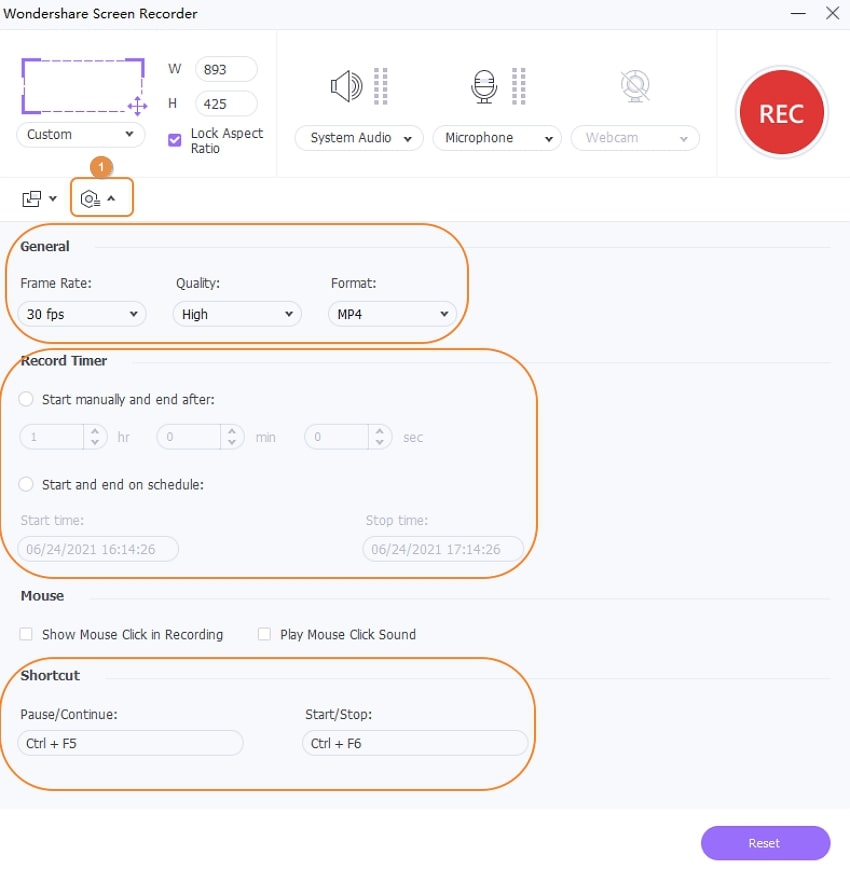
Next, click Settings to choose MP4, FLV, or AVI as the target format. You can also set the frame rate, quality, destination path, and customize the keyboard shortcuts. Moreover, users can enter the recording start and stop time.
Step 4Start recording a video on a desktop.
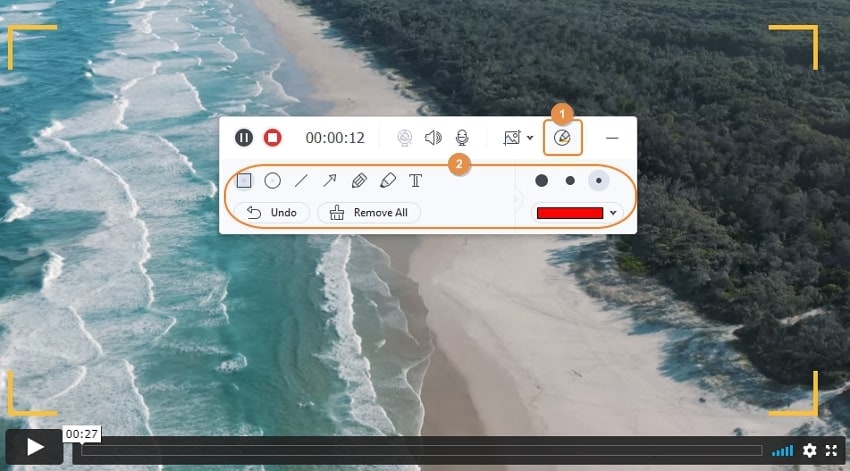
If everything looks great, click the REC button to start capturing a video. Now launch the recording taskbar, then click the Annotation button to add shapes, lines, texts, and drawings as you record the video. Finally, press Stop to finish capturing the video with lossless quality.
Conclusion
Wondershare UniConverter is one of the most useful tools to manage and convert media files and watch them across different devices. Whether you want to capture video from TV to laptop or cast a video from your computer to the TV screen, Wondershare UniConverter will help.
- How to Record Videos on Mac with Helpful Ways
- MP4 Song Download: Save Music Videos as MP4 Safely
- How to Record Cable TV in 2026
- Simple Ways to Record TV Shows in 2026
- Best TV Recording Box: The 9 Best Ways to Enjoy TV Shows in 2026
- All Ways to Record TV Shows on Fire TV Stick in 2026
- Deserved to Have Top 12 Freeview TV Recorders in 2026


Christine Smith
chief Editor