
Nothing’s more frustrating than waiting to watch your favorite video, only to encounter a YouTube video download audio problem. The frustration adds up when the audio plays perfectly online. Possible reasons are missing audio codecs or a failed download. Either way, you need a reliable YouTube video converter and downloader.
This guide walks you through the reasons behind YouTube video download audio problems in detail and the step-by-step fixes using a powerful converter and downloader. The best part is that you don’t need any technical skills for the fixes, so let’s start downloading.
In this Article
Part 1. Why Downloaded YouTube Videos Have No Sound?
If your downloaded YouTube video has no audio, the downloader is mostly at fault. They may fail to download the separate audio stream, include the required codecs, or complete the download. Here are the details:
★YouTube Uses Separate Audio and Video Streams
YouTube uses the DASH (Dynamic Adaptive Streaming over HTTP) technology for its videos. DASH is an adaptive streaming technology that breaks a multimedia file into small, sequential segments, and multiple versions of each segment are created at various bitrates and resolutions (from 144p to 4K). During playback, based on your internet speed and CPU usage, the client-side switches among quality segments to ensure the smoothest possible streaming experience.
Not only that, the video and audio components are stored and transmitted in separate streams. Basic video downloaders often fail to download the corresponding audio segment of the video or to merge the two components, leaving only the visuals.
★Wrong Audio Codec or Format
If the required audio codec isn’t available or isn’t functioning properly, the media player won’t play the audio correctly. Its results range from video distortions to audio abnormalities and muted audio. The issue is typical with the WEBM format, which uses the Opus audio codec and isn’t natively supported by traditional media players.
★Incomplete or Failed Download
Many videos you download from YouTube may look complete, but when you play them, there’s no sound. This can also result from a corrupted video file. Faulty software, incomplete downloads, or unexpected shutdowns during file transfer are often the underlying issues.
When a YouTube video file is corrupted, important data may be lost or misplaced, including the audio. As a result, the downloaded video will play without audio.
Part 2. Common Reasons Why YouTube Video Download Audio Problem Appears
Before you proceed to fix the no-sound issue, understand why it occurs. These factors are outlined below:
Using Free Online Tools: YouTube separates audio and video components in a multimedia file for high-quality streams. Online downloaders often capture only the video component, so you end up downloading a YouTube video without audio.
Downloading High-Quality (1080p/4K) Videos: YouTube uses DASH technology for 1080p+ videos and splits the multimedia file into separate audio and video streams. Some downloaders only capture the video stream, so your download YouTube video has no sound.
Downloading with Outdated Software: Outdated software on Windows and macOS may fail to manage network connections or perform file integrity checks, resulting in a corrupted download. This often misses the required audio components and results in total silence in your downloaded videos.
Outdated Media Player or Device: Modern video and audio files use a range of compressed formats known as codecs. An older media player might not have the latest codecs to decode and play a newer file. This often results in a silent playback, even though the audio component is present in the multimedia file.
Part 3. How to Fix a Downloaded YouTube Video With No Sound
There are simple fixes for the YouTube video download audio problem, including converting the video to a supported format, re-downloading it, and checking the audio track in the media player. The solutions are detailed as follows:
Method 1 – Convert the Video to a Compatible Format (Recommended)
If your media player doesn’t support the audio codec or format, you can re-encode the video with a proper audio track and ensure audio is included during conversion. Many online video converters can do the job, but most offer limited control over audio codecs. Moreover, the risks of slower processing and failed conversions remain.
It’s thereby recommended to use simple yet powerful tools like UniConverter. It converts the media into your desired format and re-encodes the video with a proper audio track. Just upload the video and add the audio track of your choice. Moreover, UniConverter allows you to check whether audio is included during conversion. Here are the steps to convert the downloaded youtube video using UniConverter:

All-in-One Multimedia Processing Tool

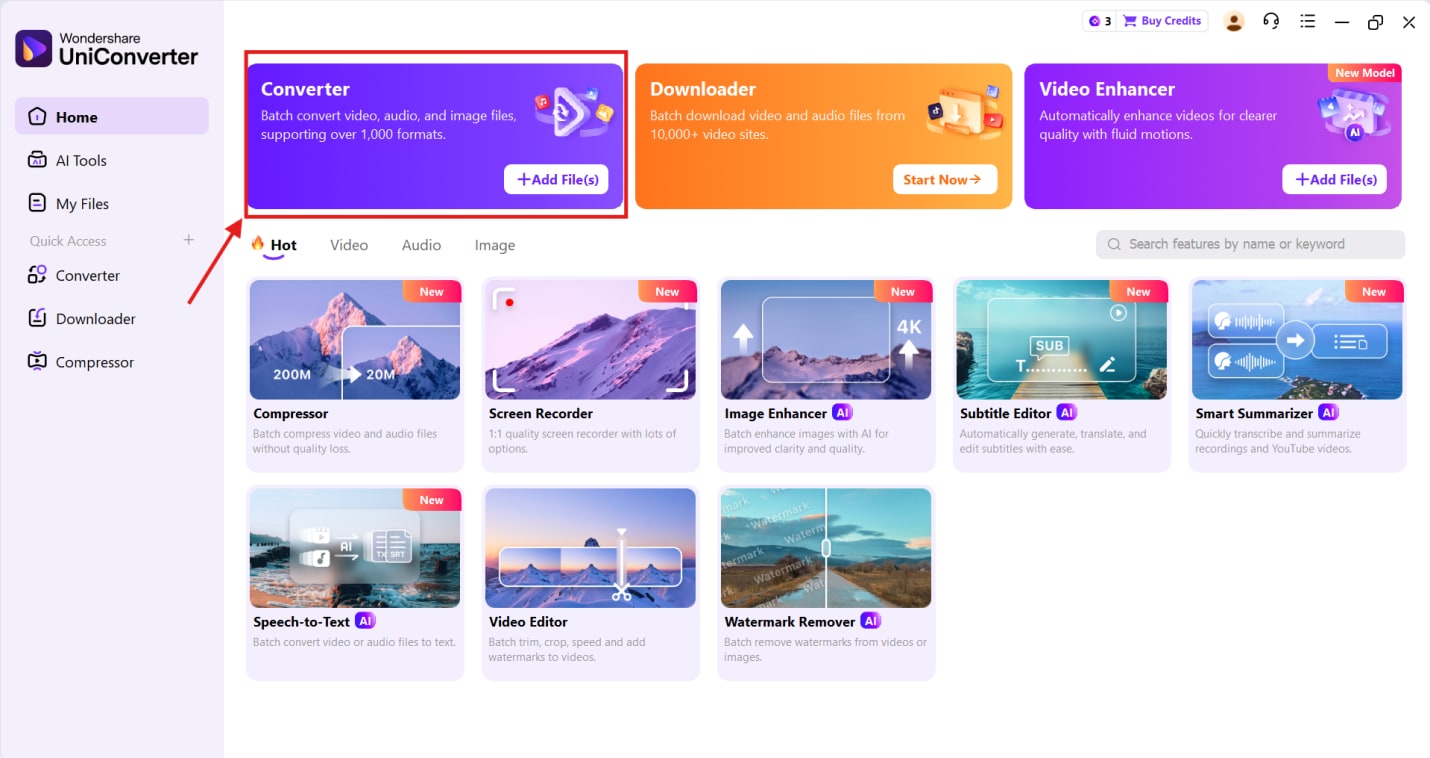
Step 1: Launch UniConverter on your device and head to the Converter feature at the top.
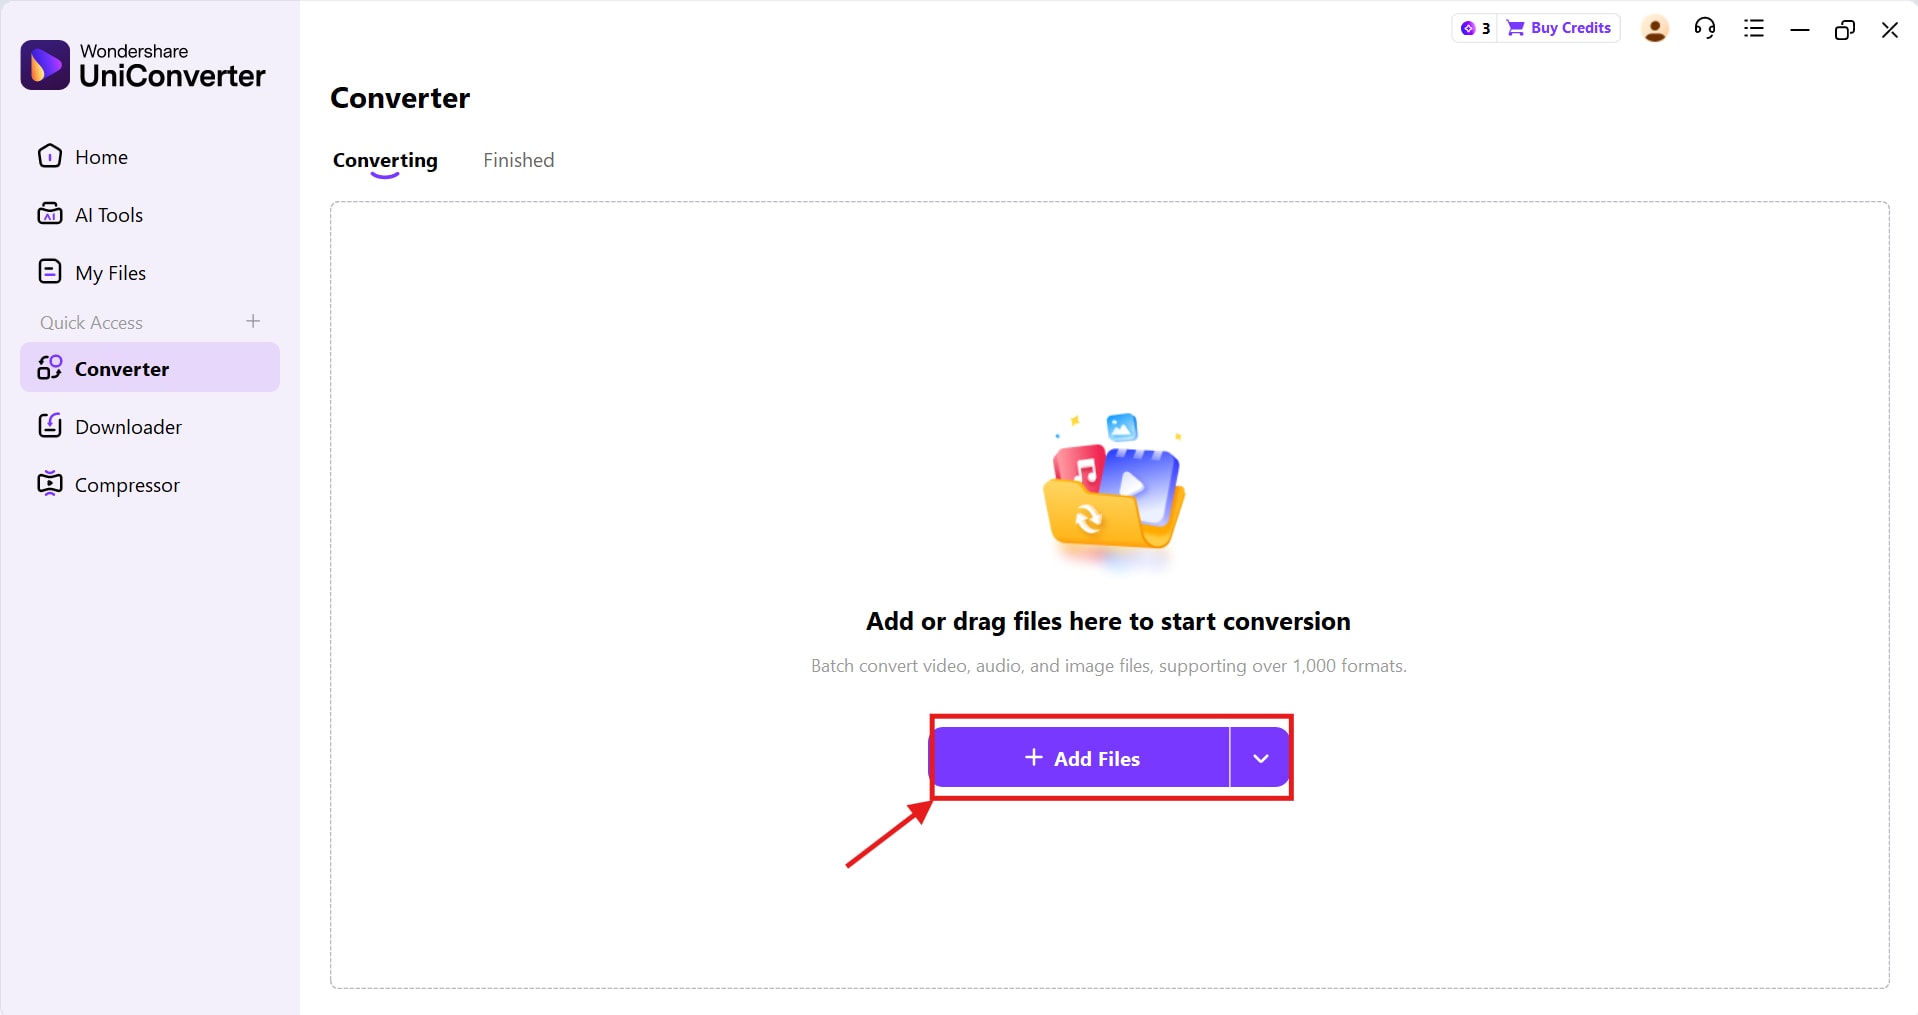
Step 2: Click Add Files to upload your no-audio video file. UniConverter supports batch conversion, allowing you to upload multiple files at once.
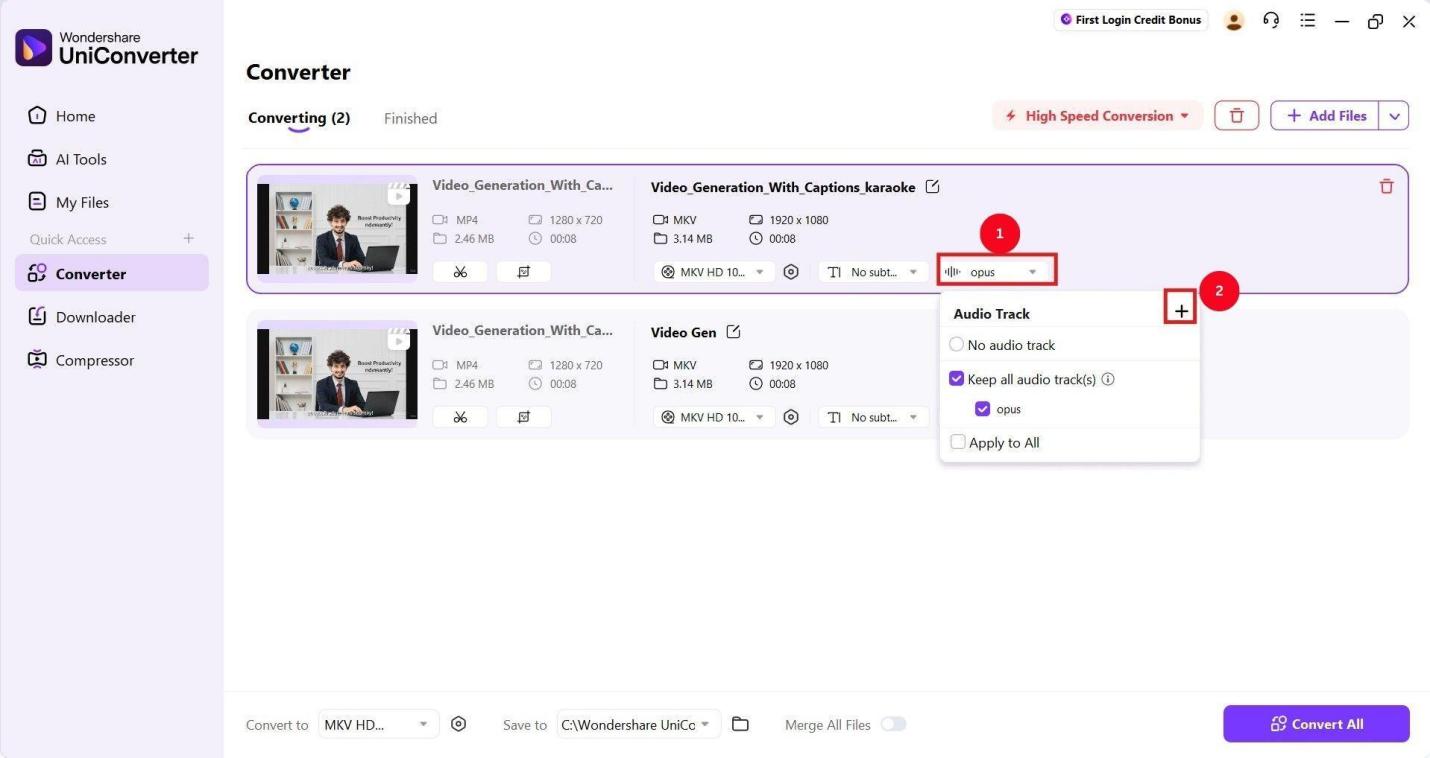
Step 3: Once the video upload is complete, click the audio dropdown, then select the + icon to add the audio track you want.
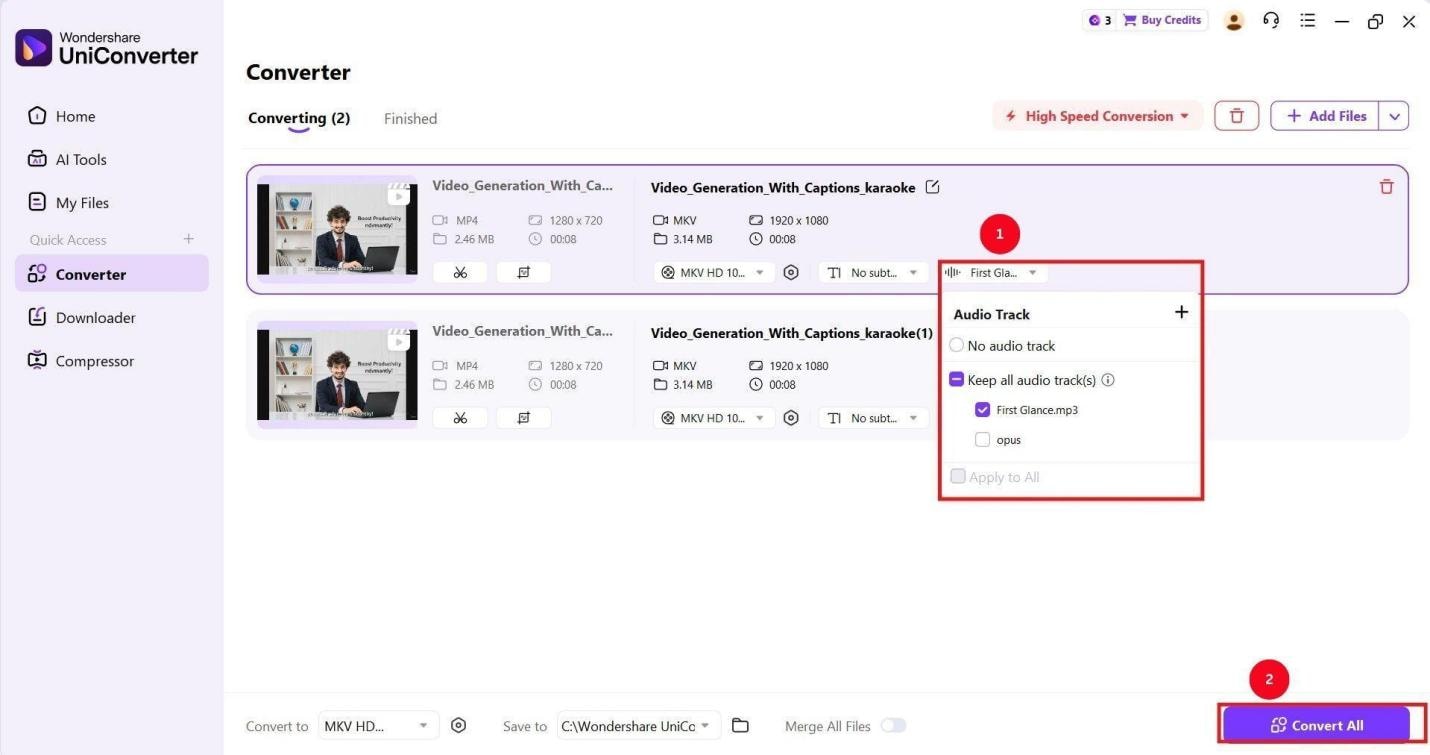
Step 4: Re-click the dropdown menu to verify that the audio has been added to your downloaded clip. Then, click Convert All.
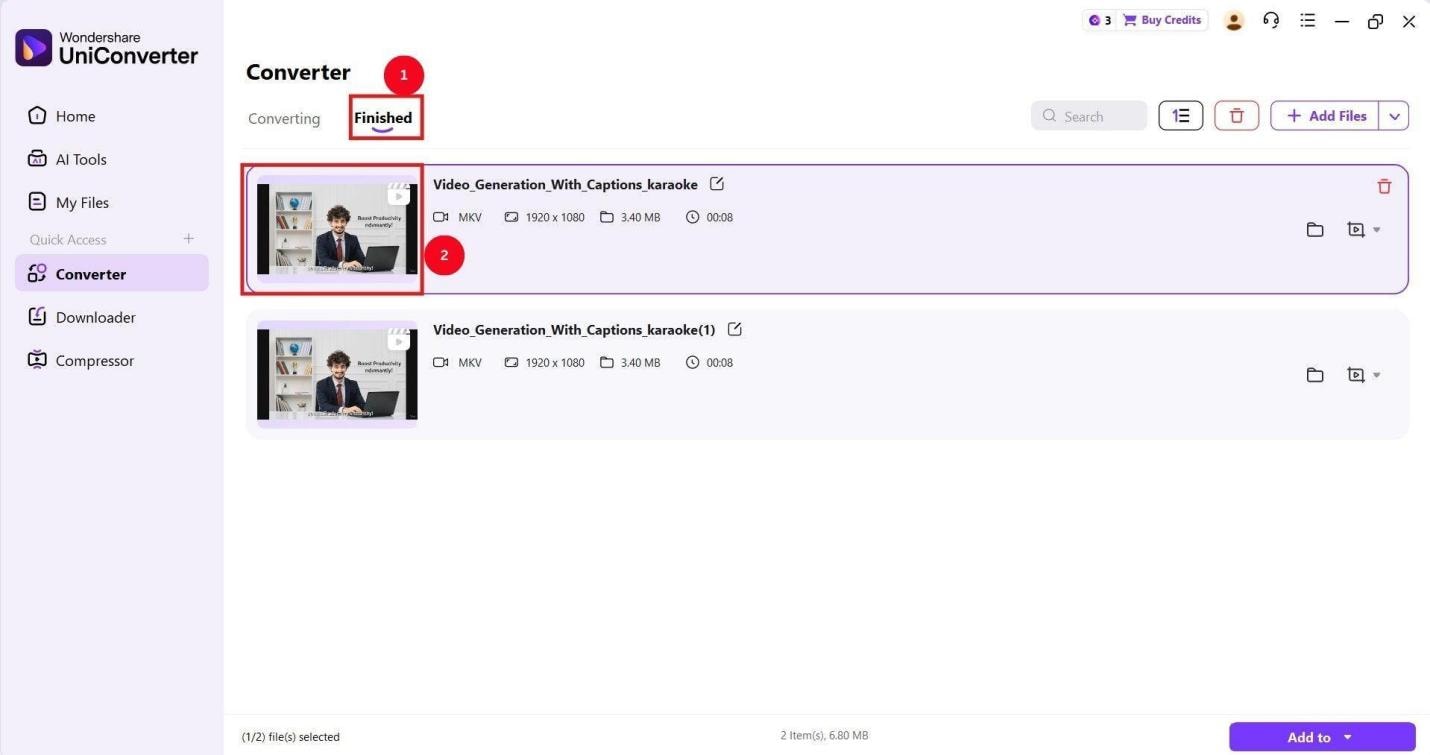
Step 5: It takes a few seconds for the UniConverter to re-encode the video. Once done, it moves the videos to the Finished tab, where you can preview them.
Method 2 – Re-download the Video With Audio Enabled
If you don’t have the separate audio file to encode into the video, it’s best to re-download the video. Online downloaders can be an option, but opt for tools that support merging audio and video. However, desktop tools like UniConverter are a safer option to download your YouTube videos. It allows you to paste your YouTube video link, merge video and audio, or obtain an audio-only output. UniConverter also uses high-speed technology to safely download videos without any ads.
Method 3 – Check Audio Track in Media Player
If you still don't hear audio after re-encoding the video or re-downloading it with audio enabled, the audio may be disabled in the media player. If you’re playing videos on VLC, the steps to check and enable the audio track are simple, and here are the steps:
Step 1: Launch the VLC Media Player and play the video.
Step 2: Head over to the “Audio” option on the top menu bar and click “Audio Track” from the dropdown menu.
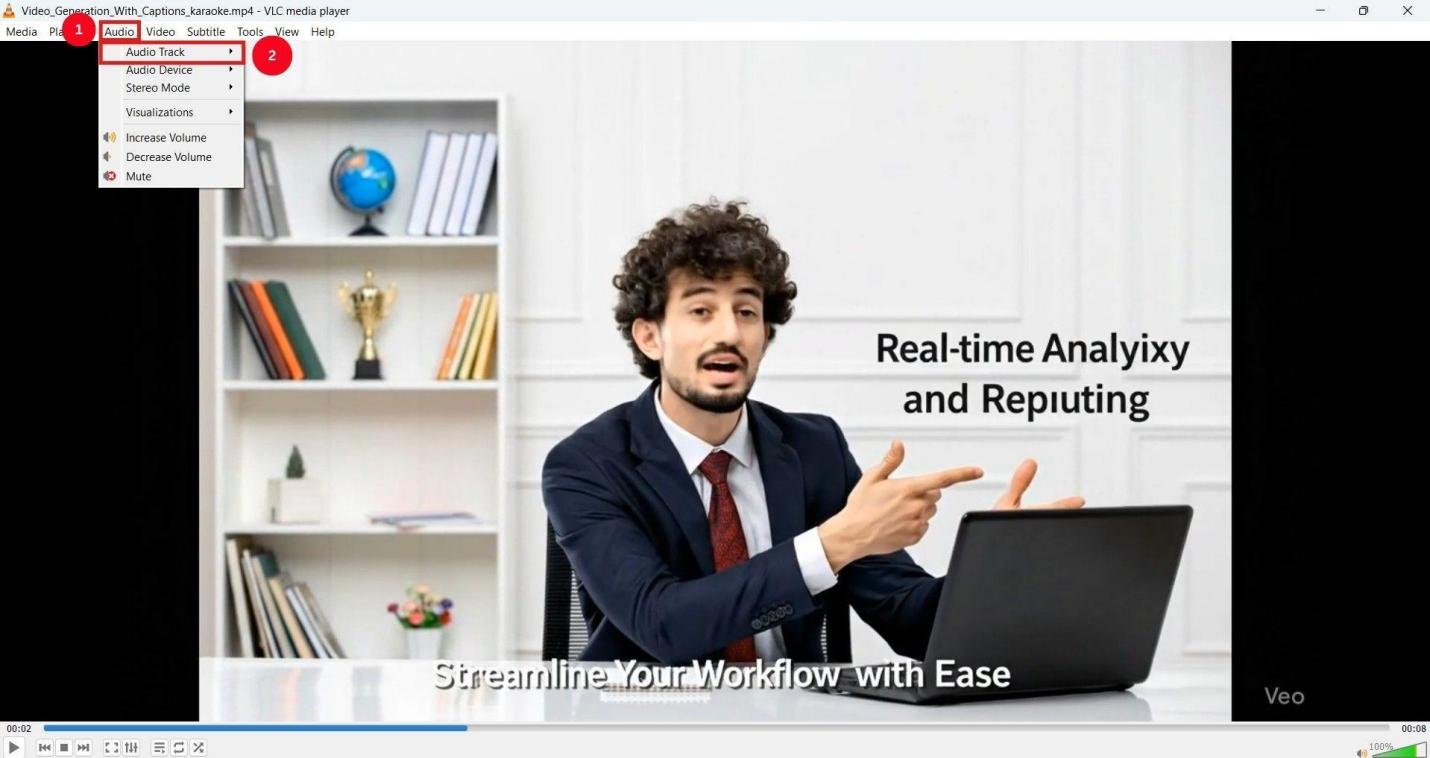
Step 3: If the audio is set to “Disable,” change it to the available track. Now, play the video, and the audio should play normally.

If the audio still won't play, try a different media player, such as QuickTime, RealPlayer, or KMPlayer. For players such as QuickTime, you need a reliable converter like UniConverter to convert MP4 to a supported format.
Part 4. Fix YouTube Download Audio Problems with UniConverter
Wondershare UniConverter is a comprehensive downloading and conversion tool for Windows and macOS with robust encoding capabilities. It merges audio and video during download and lets you preview the media file before saving it to your local storage. This way, you can re-download the file if the audio or video is off and avoid a muted YouTube video.
UniConverter supports most video formats, such as MP4, HEVC MP4, MKV, M4A, AVI, and more, with supported audio codecs. You can use it as a powerful encoder to convert videos to your preferred formats and ensure stress-free streaming on any media player.
If you want to try these before committing, UniConverter offers a free trial that lets you download, convert, and edit videos. This is suitable for testing compatibility, quick format checks, or handling occasional conversions.
Part 5. How to Download YouTube Videos With Sound (Step-by-Step)
UniConverter merges audio and video when downloading YouTube videos to provide a seamless streaming experience. Besides, the process is simple, so here are the steps to follow:
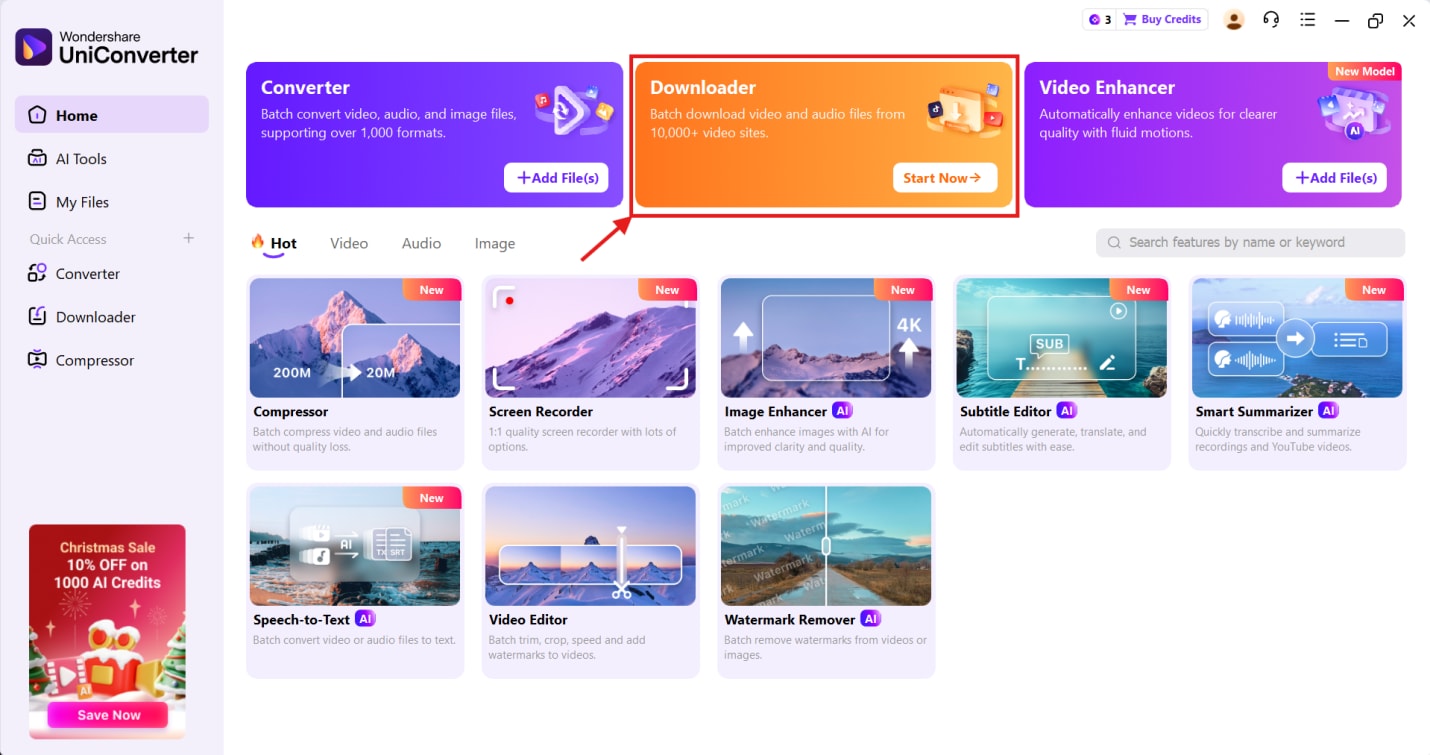
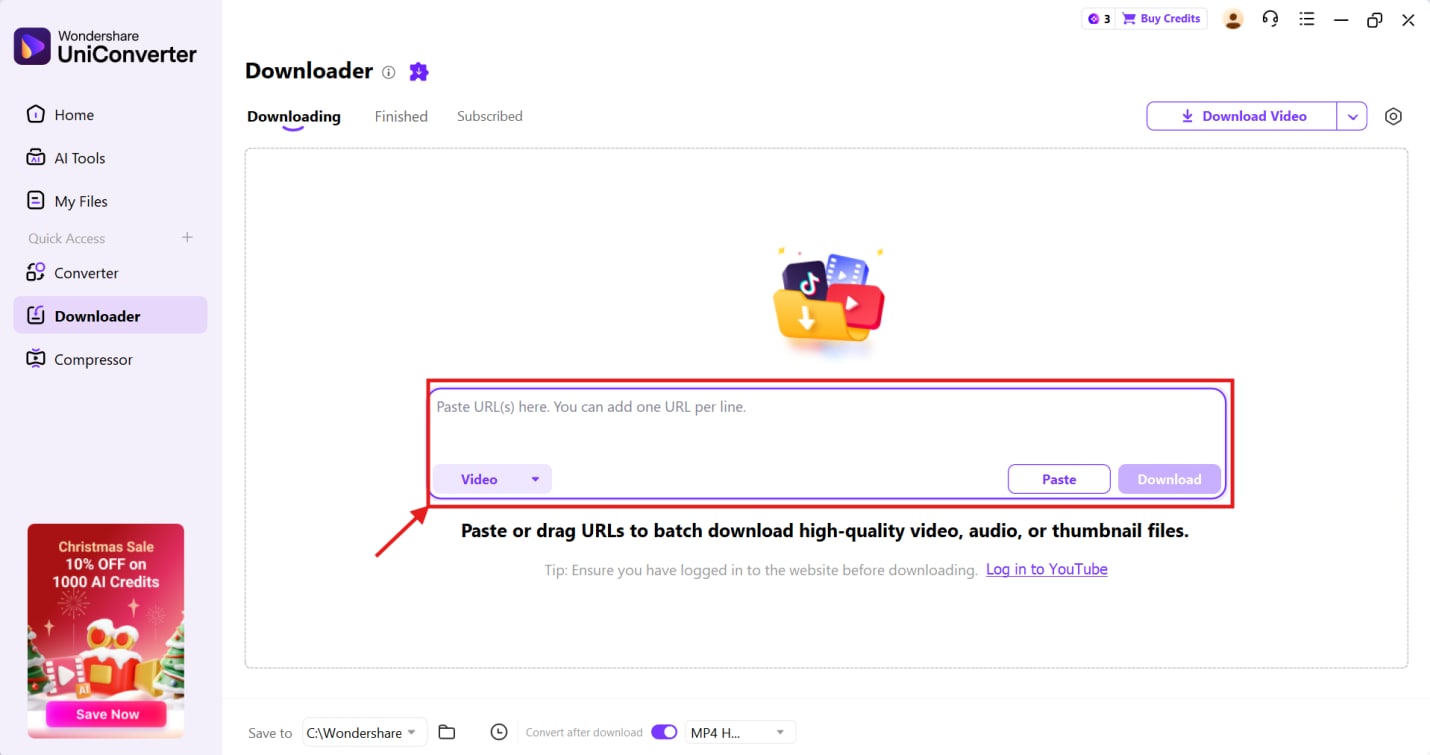
Step 1: Launch UniConverter on your device and head over to the “Downloader” option at the top.
Step 2: Paste the URLs in the input space and select Video or Audio from the dropdown menu. UniConverter supports batch downloads, so paste multiple YouTube links here if needed.
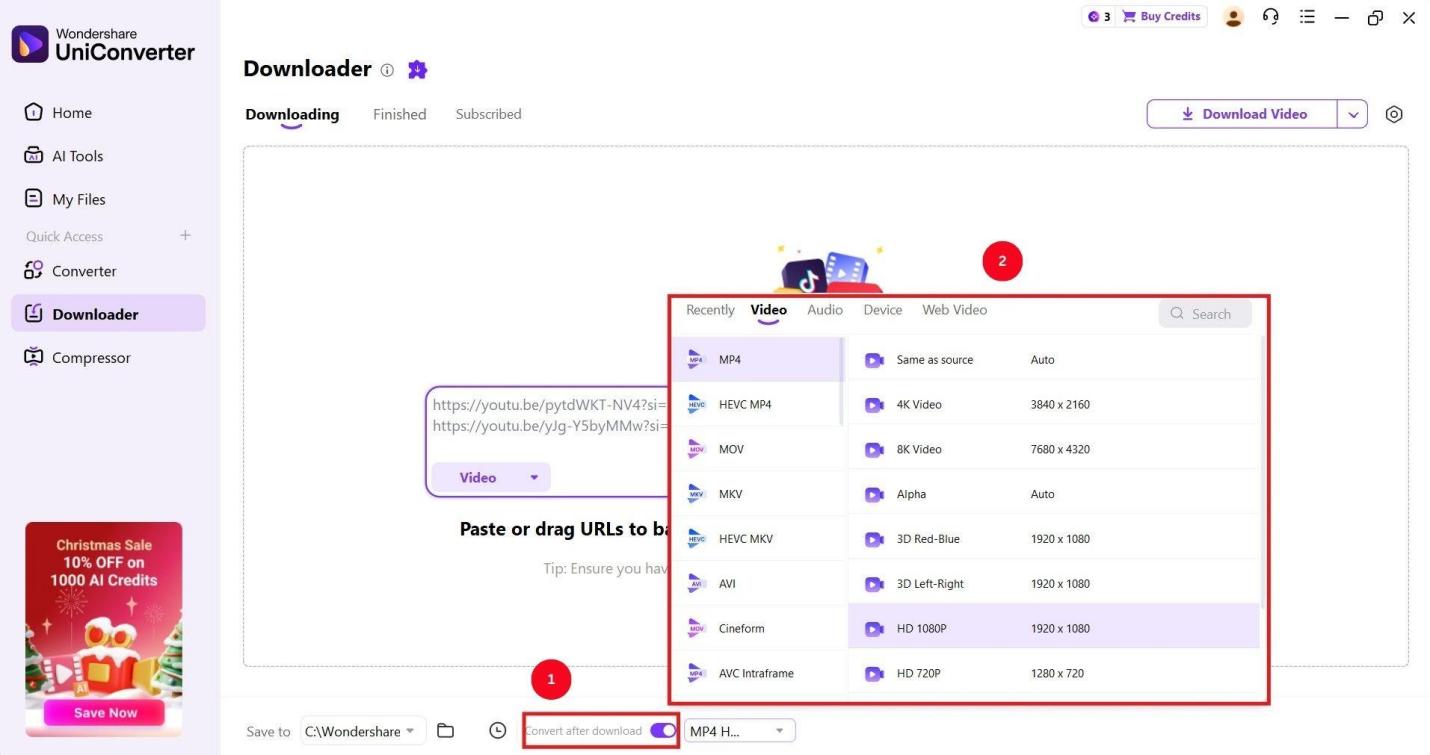
Step 3: Toggle the Convert after download option, then click the dropdown menu next to it and select the video and audio formats.
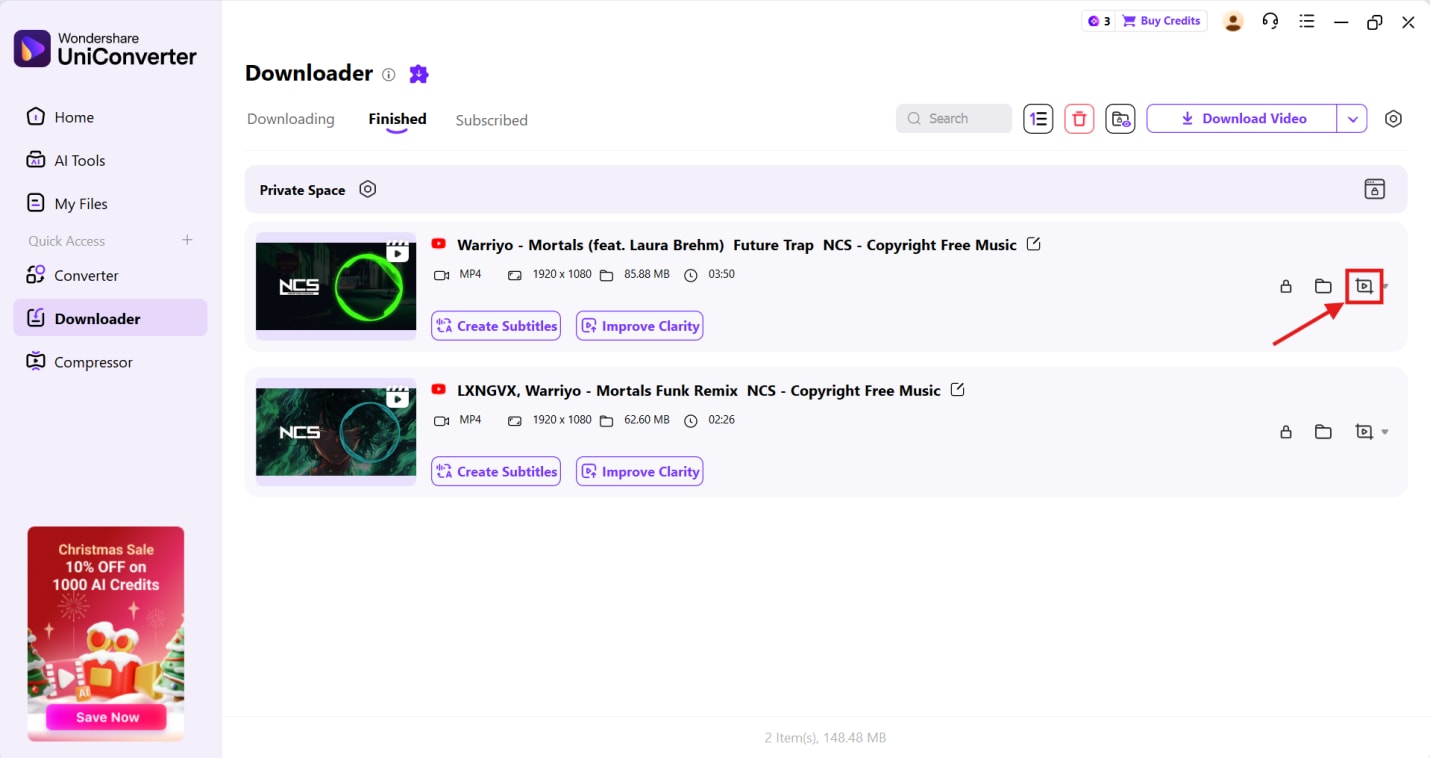
Step 4: Click Download, and you’ll be directed to the Finished tab. Here, click the cut icon to convert, compress, cut, or merge the media file.
Conclusion
YouTube video download audio problem is more common than you think, and is easily fixable. Re-converting the downloaded file to the correct audio codecs, re-downloading the video, or enabling audio in the media player are several ways to restore audio.
Although the fixes are simple, using a reliable tool is important. The best option is to use a desktop tool like Wondershare UniConverter to merge the audio and video streams. This way, you always have a high-quality video to stream. UniConverter isn’t just a reliable downloader; it's also a converter with tools to meet most of your media-editing needs. Download UniConverter today to avoid media-related issues in the future!

