Digital communication has transformed into shape with tools like Snapchat and Microsoft Teams. Both tools have very different functions and utilities. They can still be used collectively for inducing entertainment with professional work. Snapchat is an entertainment platform that takes images and videos of users with different filters and enhancements. Microsoft Teams, on the other hand, is recognized as an online meeting platform connecting people worldwide.
What if you are in a meeting and want to stay in a good mood with something entertaining? We will look into the guide on how to use Snap Camera on Teams for including add-ons to make the meetings a good memoir.
Part 1: What is a Snapchat filter?
Snapchat is a platform that takes quick pictures to share with other users in seconds. While it allowed users to send images and illustrative content, it also provided them with enhancement tools to edit them. One element was Snapchat filters. This was quite helpful in making Snapchat a popular application among users of all ages.
Snapchat filter is recognized as an overlay layer for photographs to enhance the outlook of the image. While the filter contains a proper message or element representing something specific, it can also be graphical, improving the image's outlook. By sharing the date or time of taking the picture, you can overlay different colors to make it look different from the original. This is what a Snapchat filter represents and is known for.
Two prominent types of Snapchat filters exist in the application. This clearly sets a line between all types of filters present in the application. Let's look and understand more about these diversifying types:
1. Geofilter
Filters tied to a specific geofence defined by the person are known as geofilters. These types include multiple details, such as the location of the particular place the snap is being taken. Along with that, the filters contain something specific related to the place, which makes the snap meaningful for the other user viewing it.
2. Moment filter
Moment filters differ from the premier type, where they relate to the moment that expresses the snap better. It can represent a particular moment that is prominent in the current day. It can also be an illustrative filter enhancing the snap itself. From fundamental color grading changes to exact moments, Moment filters contain everything important that can be used to make a snap great.
Part 2: How to set up Snap Camera for Teams
Snapchat is not the only application available for changing a visual appearance on devices. While Snapchat is commonly used on mobile devices, you can consider using Snap Camera. It is a great alternative for attractive filters to use in meetings and video call-related work. This platform can be used with tools like Skype, Microsoft Teams, and Google Meet.
We will be checking out how to use Snap Camera on Teams with the help of a compelling overview of the tool and its function. Let's check out how Snap Camera can be used by setting it up for Teams on PC:
Step 1
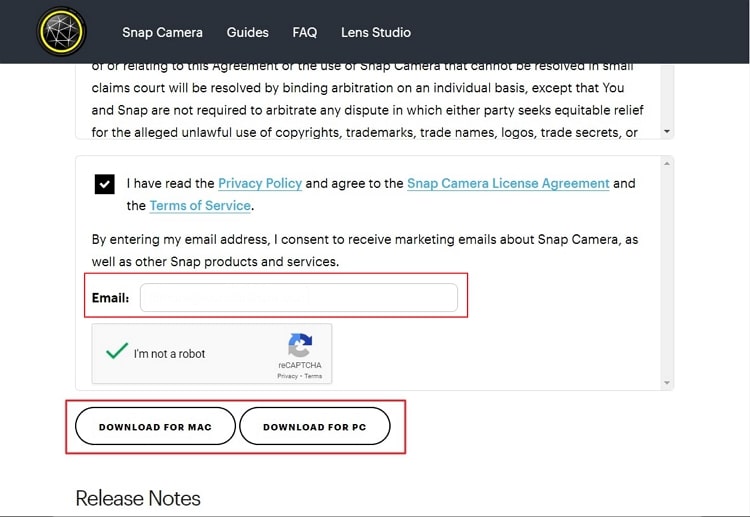
Open the official website of Snap Camera and select the "Download" button to open a new page on the screen. You must fulfill some essential provisions before downloading the tool on the PC.

Step 2
Select the "I agree" button and ensure that the "I'm not a robot" option is marked. Enter your email address in the provided space and select the option of "Download For PC" or "Download For Mac" to proceed. The installer file downloads, which needs to be opened for installing Snap Camera on your computer.
Step 3
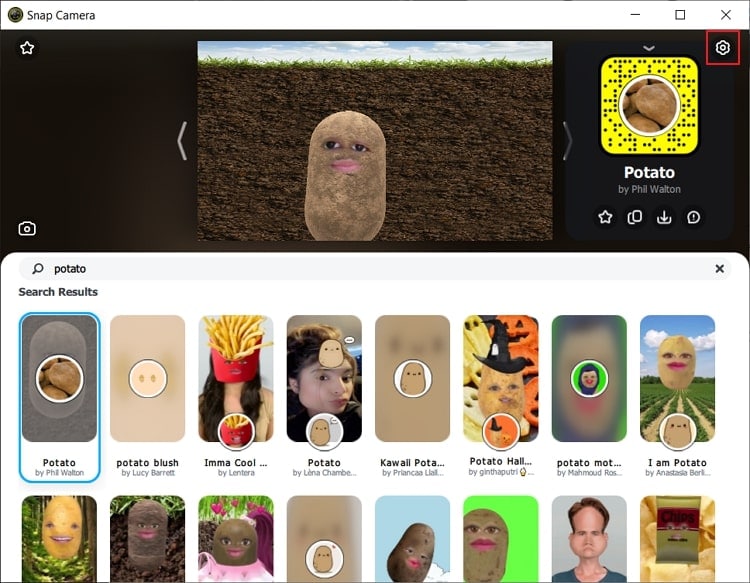
As you launch the tool, you will find a black screen on your front that needs some settings changes. Select the "Gear" icon to access the Settings of the tool. As you have to set up Snap Camera for Teams, you have to ensure that the computer's web camera is connected to the settings.
Step 4
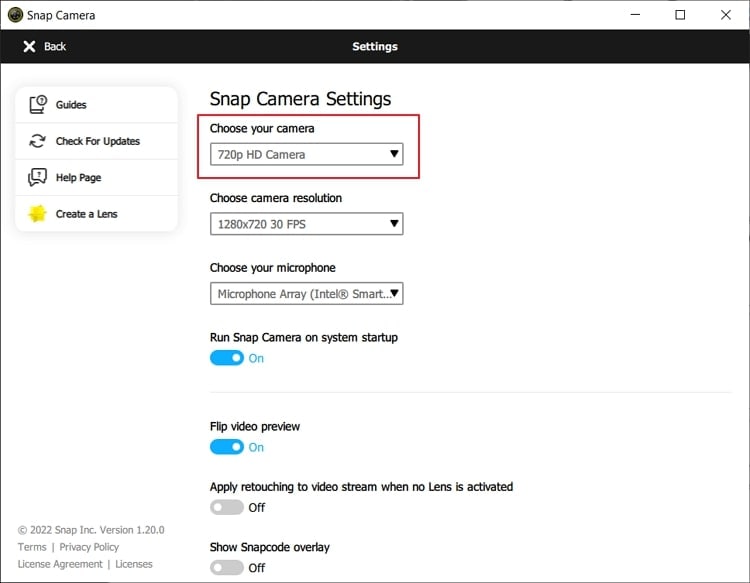
Look for the "Choose your camera" option in the "Snap Camera Settings." Select your PC webcam and redirect to select an appropriate filter you want to use in the meeting.
Part 3: How to turn Snap Camera filters during Microsoft Teams video call
How to apply the perfect snap filter for Teams video call on your computer? With Snap Camera, it is undoubtedly possible and executable. Let's look into how you can turn Snap Camera filters within Teams as follows:
Step 1
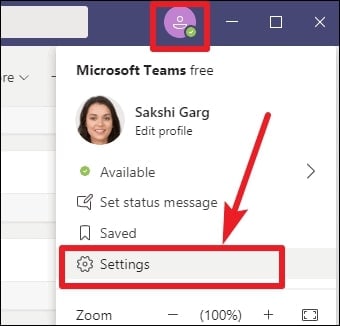
Launch Microsoft Teams and select the "Profile" icon on the top-right. Proceed into the "Settings" from the drop-down menu and select "Devices" in the left panel that opens after accessing the settings.
Step 2
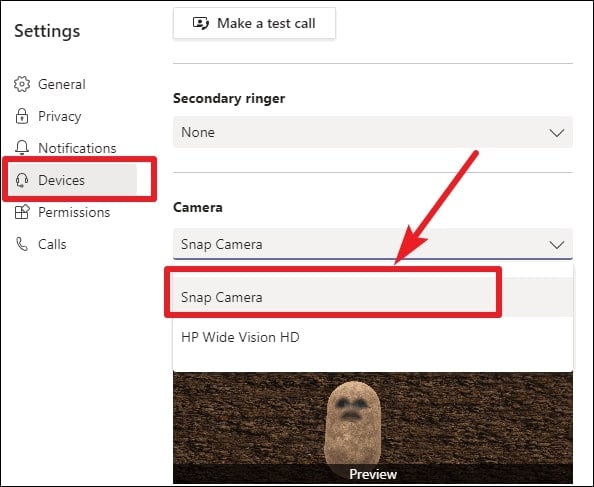
Look for the "Camera" section in the settings and change it to "Snap Camera" with the available list. Your Microsoft Teams will now easily use the filters available on Snap Camera during a video call.
Bonus Part: How to record a meeting in Microsoft Teams if you are not the host?
As communications have digitally transitioned, you will look into some techniques to record a meeting on Microsoft Teams. You can only record the session in Teams if you are the meeting host, which restricts your functionality by loads. Wondershare UniConverter provides a dedicated system for recording a meeting in Microsoft Teams without being a host. Its intuitive functionality and interface make it a great tool to operate. Let's see how you can record a meeting in Microsoft Teams using UniConverter:
Wondershare UniConverter — All-in-one Video Toolbox for Windows and Mac.
Edit videos on Mac by trimming, cropping, adding effects, and subtitles.
Converter videos to any format at 130X faster speed.
Compress your video or audio files without quality loss.
Excellent smart trimmer for cutting and splitting videos automatically.
Nice AI-enabled subtitle editor for adding subtitles to your tutorial videos automatically.
Step 1 Open Screen Recorder on UniConverter
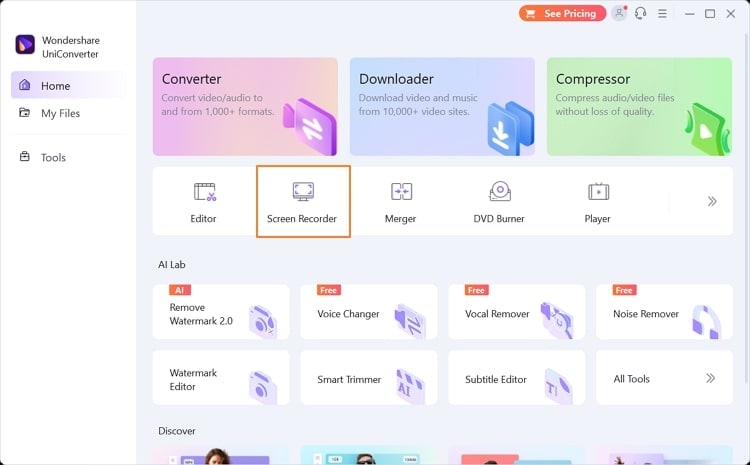
You must launch Wondershare UniConverter on your computer and proceed to select the "Screen Recorder" option from the homepage.
Step 2 Initialize screen recording
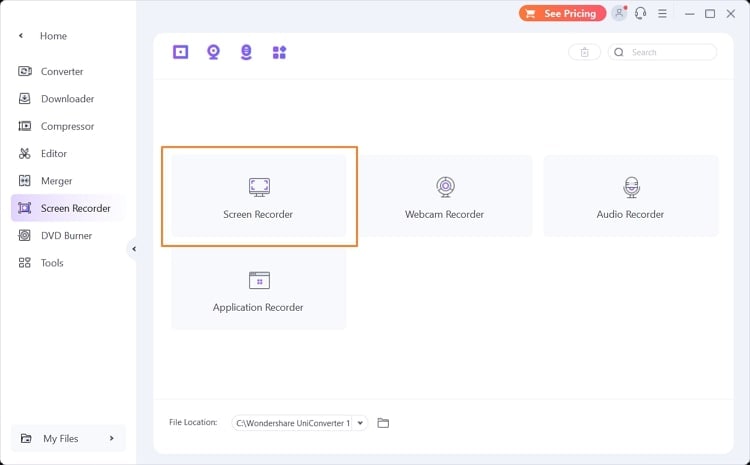
As the tool redirects to a new window, select the option of "Screen Recorder" from the available options on the screen. This will lead you to the initialization screen for recording the screen of your Microsoft Teams.
Step 3 Set up a recording of the Microsoft Teams
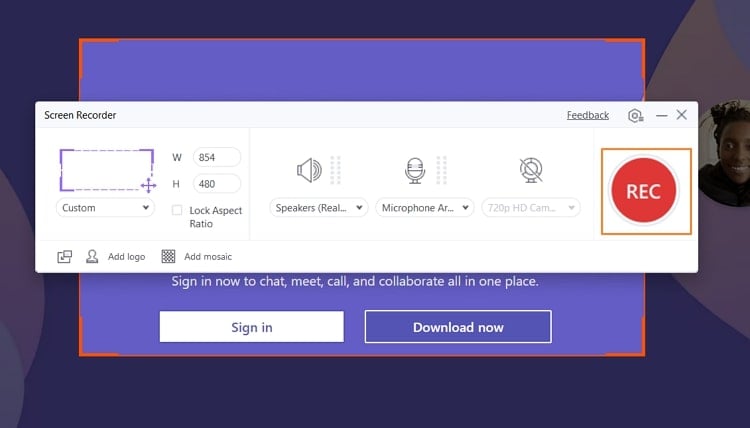
Define the screen size that you want to record in the process. As you proceed with the aspect ratio of the recording, you should also define the "Speaker," "Microphone," and "Webcam" settings of the recording. Add a logo or mosaic to your recording if required. Once done, click the "REC" button to start recording your screen.
Step 4 Conclude recording of Teams
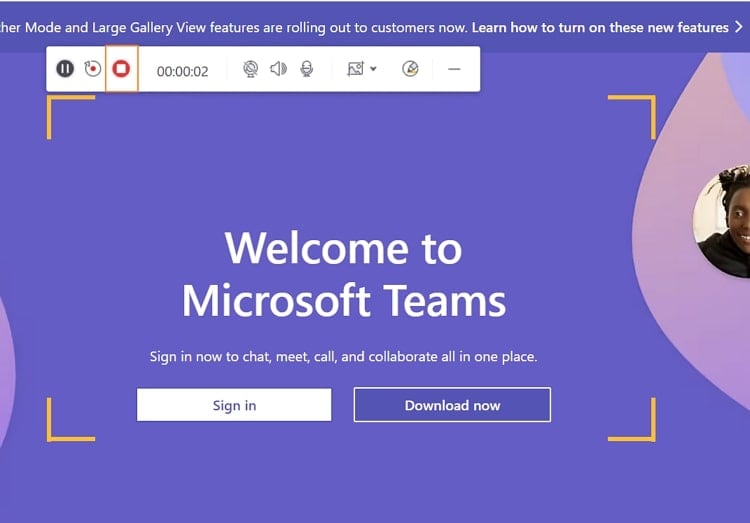
Once you are done recording the screen, you can click on the "Stop" button on the top of the screen recording screen to conclude. The recording opens on the platform, which can be edited or saved per your requirements.
Ending words
This article has been immensely helpful in defining the parameters that are important to set up Snap Camera for Teams on your PC. With an overview of what Snapchat filters are, it has been of potential focus on how you can enhance your Teams video call with filters. For recording the Teams video call, we have also provided an overview of how to use Wondershare UniConverter for this purpose.
