Are you a frequent user of Snapchat? Snapchat filters can instantly bring excitement to your captured photos or videos with a single click. It also helps in enhancing the visual appearance of your taken snaps. However, it may be possible that your captured snap with a Snapchat filter has a large file size. Due to the Snapchat filter size, you may encounter uploading errors.
To deal with the Snapchat photo size issue, this article can help you. By exploring this article, you can learn about reliable tools through which you can reduce the Snapchat filter size.

Part 1: What is Snapchat filter size?
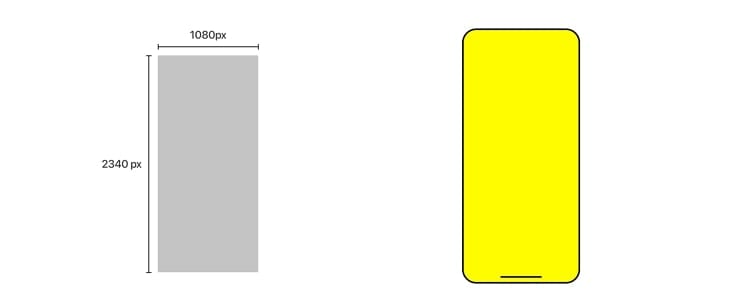
Snapchat filters came in 2015 that proved to be a huge game changer in increasing the visual appeal of photos and videos. These filters overlay your photos and videos instantly. However, there are certain requirements for the Snapchat filter size. The filter should not exceed the limit of 300KB and have a resolution of 1080 x 2340 pixels. Moreover, it should have a transparent background, and the suitable image format is PNG.
There are two types of filters that you can use: Custom filters and Community filters. Community filters are free to use and are available for the whole community. On the other hand, custom filters are only for commercial or individual use. Also, you need to pay to use custom filters.
Part 2: How to compress Snapchat video size?
By using a Snapchat filter while recording videos, the overall file size may get increase. Due to Snapchat filter size, you can encounter errors such as storage and memory issues in your device. Moreover, the Snapchat video would take extensive time while upload on different platforms. To resolve this issue, you can try Wondershare UniConverter to compress your Snapchat video files.
Wondershare UniConverter — All-in-one Video Toolbox for Windows and Mac.
Edit videos on Mac by trimming, cropping, adding effects, and subtitles.
Converter videos to any format at 130X faster speed.
Compress your video or audio files without quality loss.
Excellent smart trimmer for cutting and splitting videos automatically.
Nice AI-enabled subtitle editor for adding subtitles to your tutorial videos automatically.
UniConverter supports more than 1000 file formats. It means you can easily upload any popular format on this platform without any restrictions. You can use this platform for multiple purposes, such as compressing social media sharing, email sharing, and getting rid of storage issues. To learn more about video compression on UniConverter, continue reading.
Key features
- This tool supports batch processing through which you can compress your multiple videos at the same time.
- It offers lossless compression that maintains the original quality of your video file.
- There are three compression modes in UniConverter that you can utilize. The options are High-Quality mode, Standard mode, and Low-quality mode. You can select any of the compression modes according to the given situation.
- This tool offers multiple customizable options. You can select a custom video size, bitrate, resolution, and output format according to your choice.
Steps to compress Snapchat video on UniConverter
Follow the steps described below to compress the Snapchat video using UniConverter robust video compressor:
Step 1 Select the video compressor
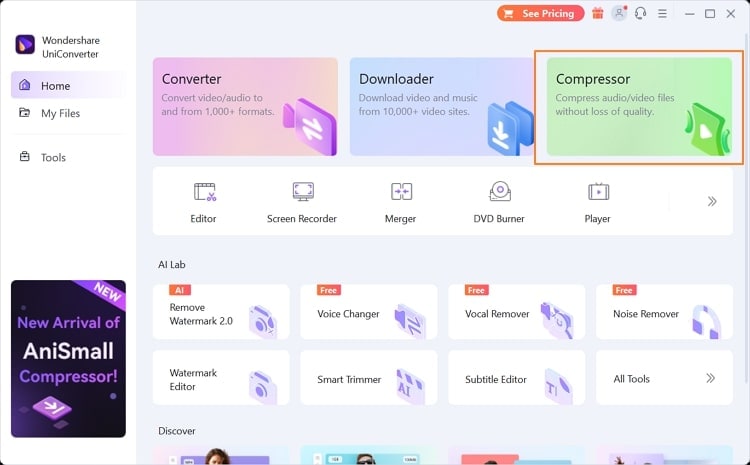
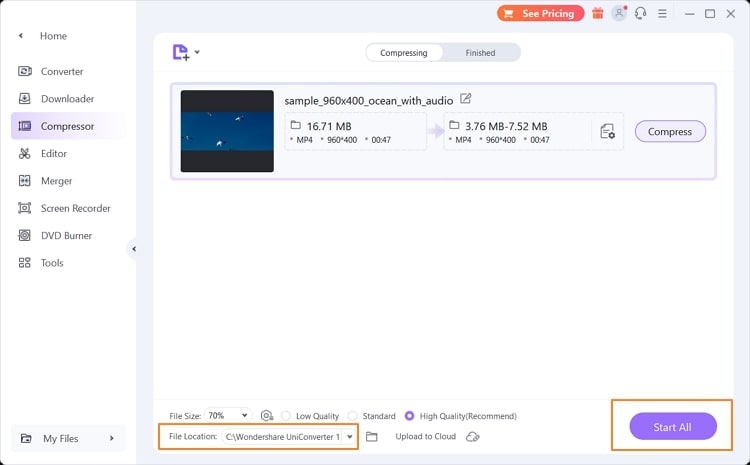
Download and install Wondershare UniConverter on your PC or MacBook. Open its main interface and click on "Compressor," displayed at the top.
Step 2 Import the Snapchat video
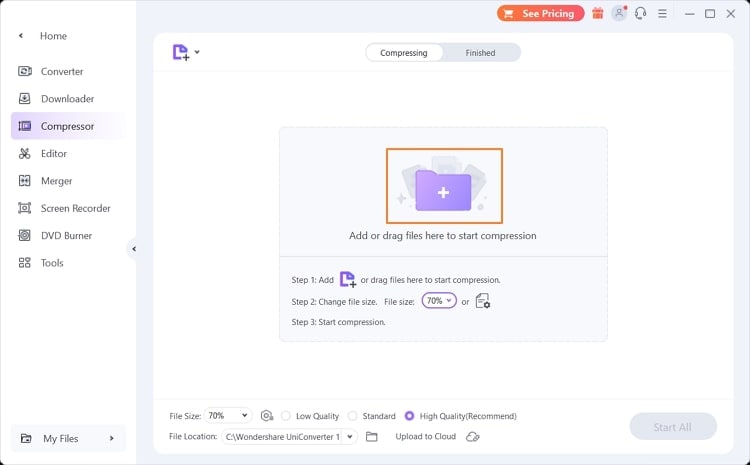
The window of the Compressor tool will open on your screen. Click on the "Add File" button to upload the Snapchat video file which you want to compress. You can also drag and drop the video file on this platform.
Step 3 Select the Snapchat video size
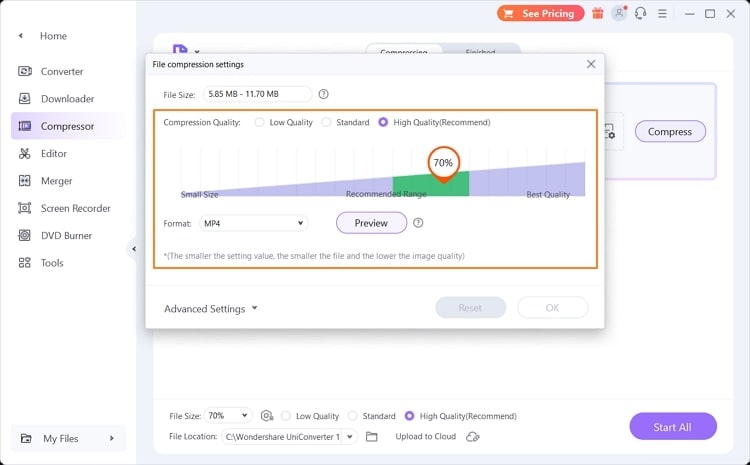
Once you have uploaded the Snapchat video file, you can select the compression percentage by navigating to the "File Gear" button. You can also select the compression mode from the given options.
Step 4 Start compressing Snapchat video
You can also choose the file location according to your choice. Once done with the compression settings, click on the "Start All" button. After the compression process ends, you can preview the results from the "Finished" tab. If you are satisfied, you can save the compressed Snapchat video file.
Part 3: How to reduce Snapchat picture size?
If you are dealing with issues with Snapchat photo size, a reliable compression tool can help you. By decreasing the Snapchat picture size, you can instantly upload it without hassle. For this purpose, the best online tool is Compressor.io. It's a well-trusted online platform that can be easily accessed through any web browser. It supports various popular image formats such as JPEG, PNG, SVG, GIF, and WEBP.
Moreover, it also provides other options through which you can resize your images easily. Hence, it's a perfect tool through which you can reduce the Snapchat post size proficiently. To get aware of more distinct features of this online tool, keep reading this section.
Key features
- This tool offers two options for compression: Lossy and Lossless. Through lossy compression, you can instantly reduce the file size up to 95% with minor changes. On the other hand, with lossless compression, you can maintain the original quality of the file while reducing the size by up to 20%.
- In the pro version, you can compress unlimited files through this tool. You can upload up to 20MB file size in the paid version of this online platform.
- It contains advanced options like Image Resizing and Auto-rename files. Using these options, you can add modifications to your uploaded photos easily.
Steps to reduce Snapchat picture size using Compressor.io
Want to know how to reduce the Snapchat photo size without losing the quality? Read the step-by-step guide provided below:
Step 1
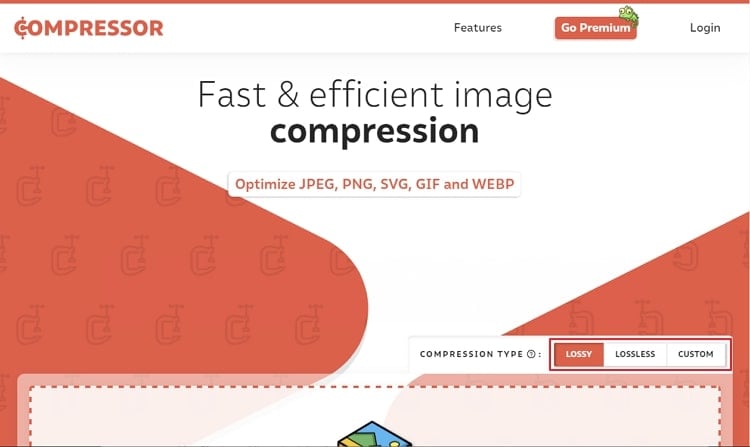
Navigate to the official website of Compressor.io through your web browser. Once done, choose the compression type from the given options. You can select Lossy, Lossless, and Custom, according to your preference.
Step 2
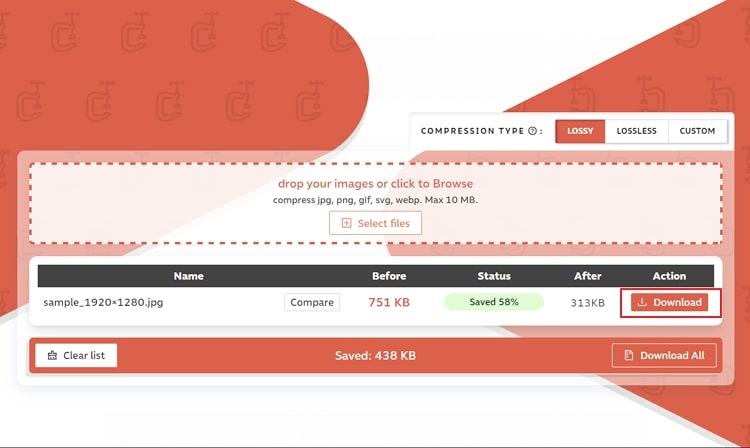
Once you have selected the compression type, click on the "Select File" button. Browse the image from your computer and click the "Open" button to upload it on this tool. Once your file gets uploaded, the tool will begin the compression. You can also compare the original and compressed sizes. Afterward, you can save the results by clicking on the "Download" button.
Bottom line
Snapchat filters can bring new life to your ordinary photos. However, it may increase the actual file size of your pictures and videos. To deal with Snapchat filter size, this article has provided you with all the details. We have recommended an offline and online tool through which you can quickly decrease the image and video file sizes while maintaining their quality.
People also ask
- Does it cost money to make a Snapchat filter?
Community filters can be created free of cost that can be used by anyone. However, if you are trying to create a custom filter, such as a geofence filter, it will cost you $5 to $20 per day to run this filter.
- Who created Snapchat filters?
The technology used behind the AR Snapchat filters was first developed by a Ukrainian company. In 2015, Snapchat introduced its AR filters which gained immense popularity. After two years, Snapchat Introduced its Lens Studio, through which people were able to create custom filters and lenses. Currently, Snapchat filters are now available in a huge variety that you can easily explore.
