
You’ve just recorded an important event, but when you play back the footage, the details look soft and unclear. Video sharpness determines how crisp and detailed every frame appears, directly affecting the clarity and overall quality of your content. Blurry or soft videos often result from shaky cameras, low resolution, poor lighting, or compression.
Fortunately, a variety of options exist to restore and enhance clarity. From online tools for quick fixes, AI-powered video sharpener solutions that intelligently reconstruct details, to professional software offering advanced control, there’s a method to suit every need and skill level.
In this article
Part 1. What Is Video Sharpening & How It Works
Video sharpening is the process of enhancing the clarity and detail of your footage, making edges crisper and textures more defined. It improves the visual quality of videos that appear soft, blurry, or slightly out of focus.
Traditional Sharpening Filters vs AI‑based Enhancement
Traditional sharpening relies on simple filters that increase contrast along edges to make objects appear clearer. While these filters offer quick improvements, they often introduce noise or unnatural outlines.
In contrast, AI video sharpening analyzes the entire frame, intelligently reconstructing lost details and textures. This advanced method produces sharper, more natural-looking videos without the harsh artifacts common in standard filters. This makes it ideal for restoring soft or blurry footage while preserving a realistic appearance.
How AI Detects and Restores Lost Detail Frame by Frame
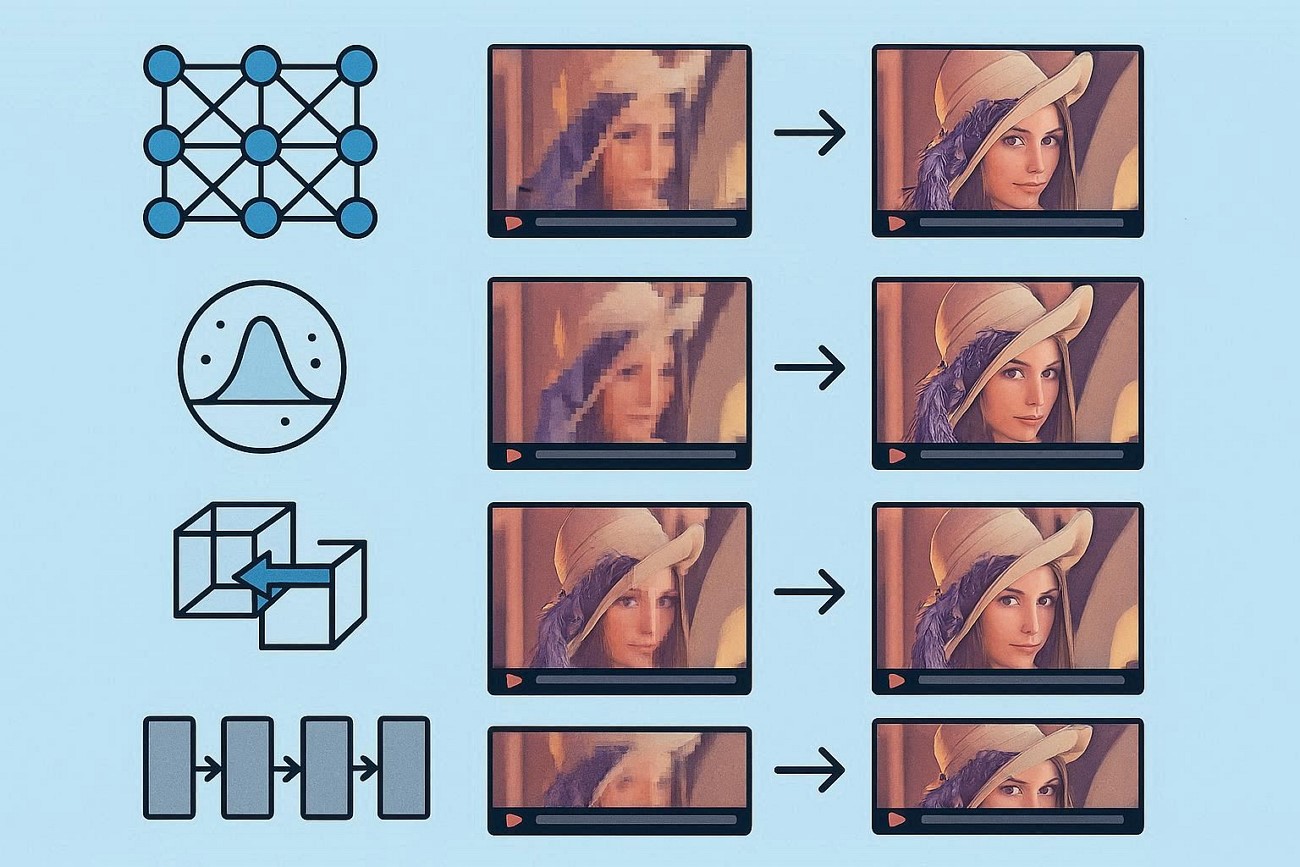
Before diving into specific AI methods, it’s important to understand that modern AI doesn’t just apply simple edge filters. It analyzes patterns across time and space to intelligently improve clarity. Here is how AI-sharpened video tools detect and restore details frame by frame:
Generative Adversarial Networks (GANs): AI generators learn to produce realistic, high‑detail frames while discriminators critique them to reduce artifacts and improve clarity. This push‑and‑pull setup lets the system infer missing pixels and textures beyond simple interpolation.
Diffusion Models: These models refine noisy or low‑quality frames by progressively removing noise and predicting high‑resolution details, often yielding rich texture reconstruction.
Optical Flow‑Guided Refinement: AI uses motion tracking between frames to align and smoothly enhance details across sequences, reducing flicker and maintaining temporal coherence.
3D Convolutional Neural Networks: Rather than processing frames independently, these networks consider both spatial and temporal features, enhancing consistency and detail across neighboring frames.
Transformer Networks for Temporal Coherence: Advanced sequence models help understand motion patterns and global context, improving how sharpening is applied over time rather than frame by frame in isolation.
When Sharpening Helps and Its Limits
Before applying any enhancement, it’s important to know when it makes sense to sharpen video quality and when limitations may prevent significant improvement. Understanding these boundaries ensures your efforts deliver the best results:
Low‑Resolution Footage Enhancement: Sharpening can clarify soft edges and improve perceived detail, but it cannot create true resolution beyond the original capture.
Slightly Blurry or Soft Videos: AI and software sharpening excel at enhancing minor focus issues without major artifacts.
Compression Artifacts: Sharpening may highlight blocky or noisy areas in heavily compressed videos, limiting quality gains.
Extreme Motion Blur: Videos with fast camera movement or subject motion often cannot be fully corrected, as lost detail is unrecoverable.
High Definition Footage: Sharpening has minimal effect on crisp, well-captured HD or 4K videos and may introduce unnecessary edge halos.
Part 2. How To Choose a Good Video Sharpener?
When looking to sharpen blurry video, selecting the right tool is crucial to balance quality and ease of use. Here are the key factors to consider when looking for a solution to sharpen videos:
AI‑Powered Enhancement: Look for tools that use AI algorithms to intelligently reconstruct lost details rather than just applying basic edge filters.
Ease of Use / User Interface: A clean, intuitive interface helps speed up editing, especially for beginners or non-technical users.
Format Support: Ensure the sharpener supports your video’s resolution and file type, including HD, 4K, and compressed formats.
Processing Speed: Faster rendering is essential for long videos or batch processing without sacrificing quality.
Noise Reduction Integration: Tools that combine sharpening with noise reduction help maintain natural-looking results.
Part 3. Top AI Sharpening Software for Deeper Quality Improvement
Whether you’re restoring old footage or enhancing slightly blurry recordings, using a reliable video sharpener free ensures incredible quality enhancements. The following are a few top AI tools that get the task done with efficiency:
1. Wondershare UniConverter
Best For: Batch video enhancement and convertsion
One of the top tools that uses advanced AI models to intelligently improve video quality in one click is UniConverter. It can unblur footage, sharpen edges, upscale video to 4K clarity, and reconstruct fine details using cutting‑edge generative enhancement algorithms. The tool also includes automatic video noise reduction, preserving natural texture while removing distracting grain.
Besides basic quality enhancement, the tool offers various enhancement models for you to choose from. With easy export functions, this AI sharpen video tool combines powerful AI quality improvements with an intuitive workflow for creators of all levels. The intuitive interface of the tool lets you preview your applied enhancements within the tool for further modification if required.
Step-by-Step Guide on How to Use the UniConverter Video Enhancer
As discussed, UniConverter allows users to effortlessly enhance videos by offering different AI models. Provided below is the step-by-step guide on how to use this incredible tool:
Step 1. Begin by Accessing the Feature
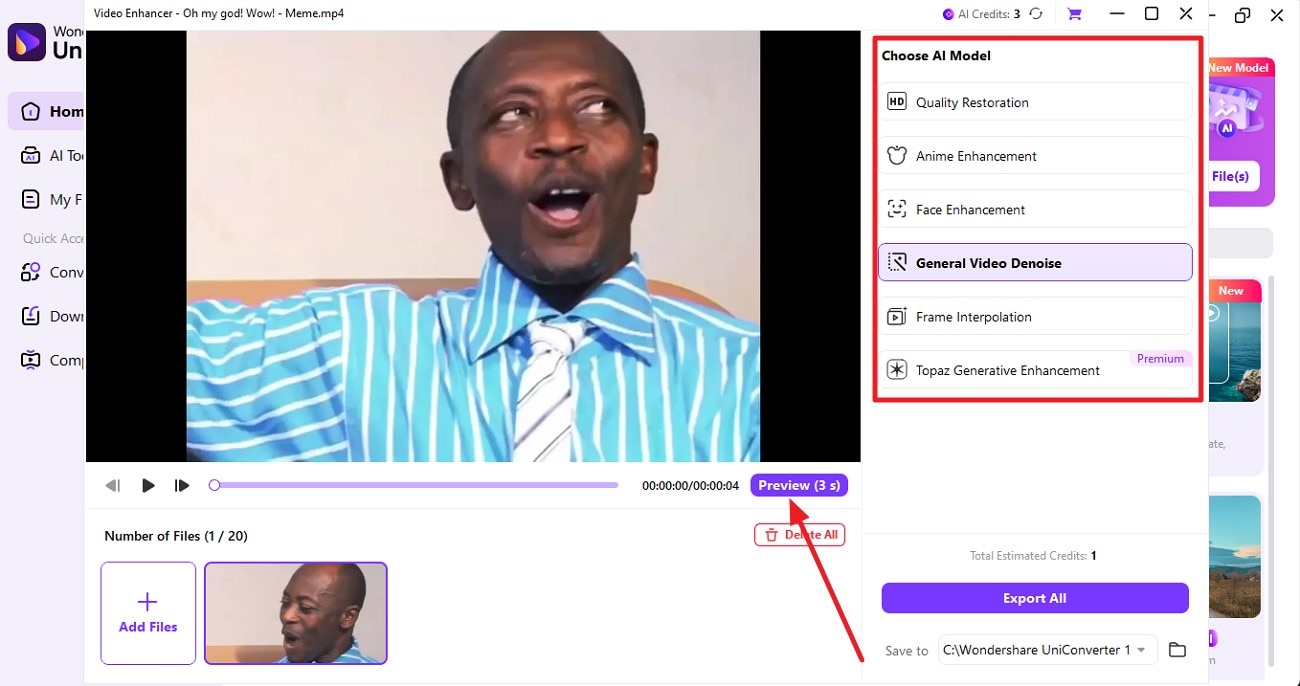
To start the process, launch UniConverter on your device, select the “Video Enhancer” tab and click on it.
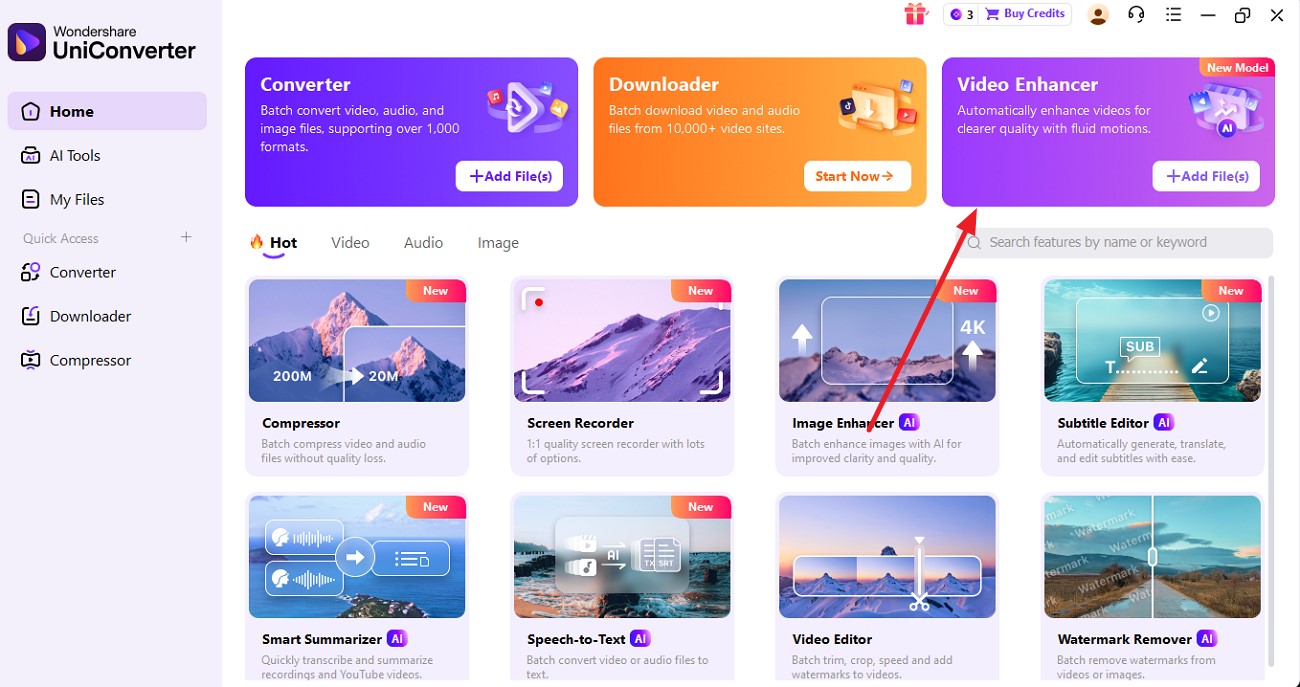
Step 2. Import Video and Select Enhancement Model
Next, import your video with artifacts and select the enhancement model from the options provided on the right. Once selected, press the “Preview” button to execute the enhancement process.
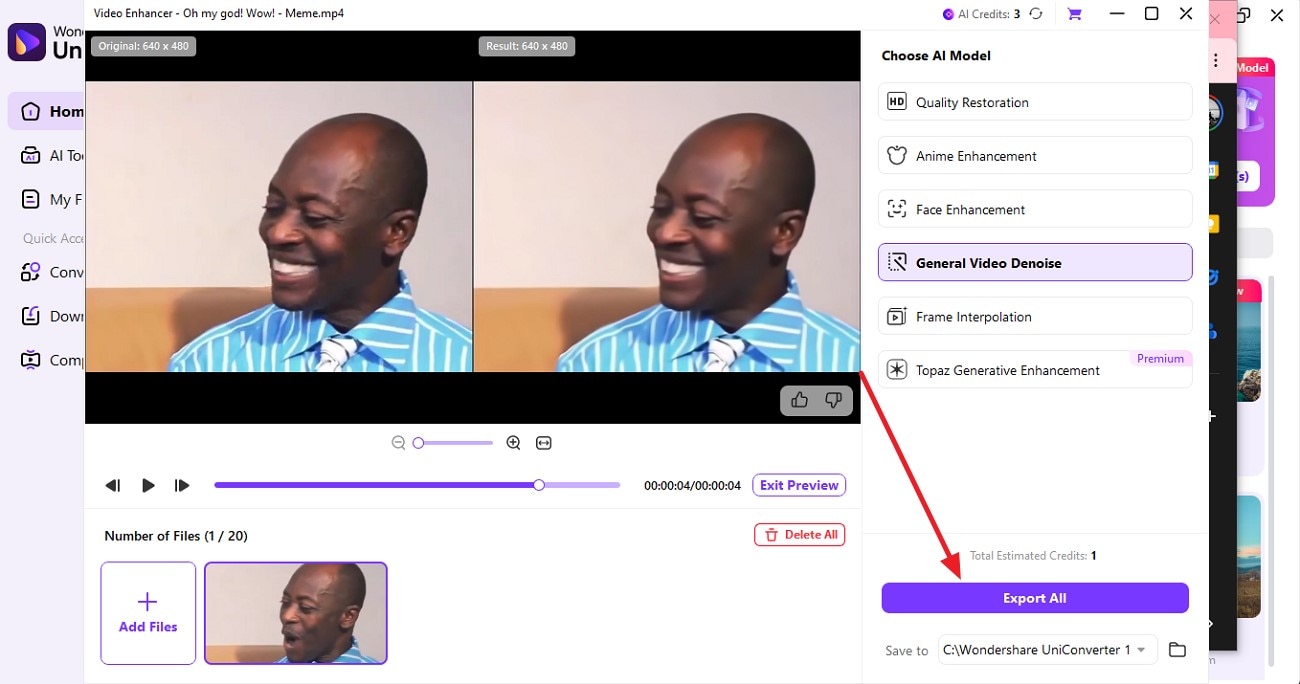
Step 3. Compare Results and Export
After the process is completed, a side-by-side comparison of the video will be available. Once you have previewed, press the “Export All” button to save the enhanced video to your device.

AI Video Sharpener for Clearer Footage
2. Adobe Premiere
Best For: Professional editing and filmmaking
Adobe Premiere Pro is one of the most reliable tools that offers professional-grade video editing. Users can personalize text, add smooth transitions, and export videos in multiple aspect ratios for different platforms. Moreover, the built-in audio ducking enhances sound clarity automatically. Follow the steps mentioned below to learn how to use the Premiere Pro sharpen video utility:
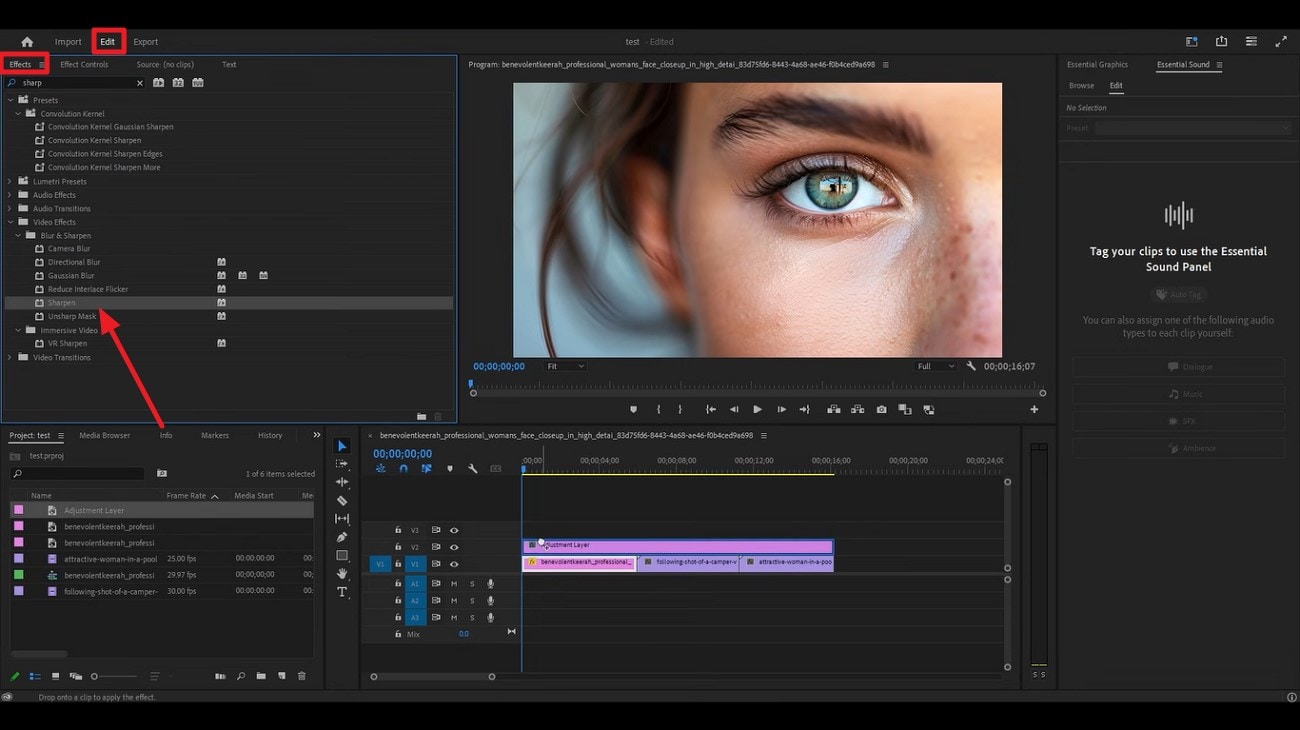
Step 1. After importing the video within the tool, enable the “Edit” option and select “Effects.” Under the effects section, locate the “Sharpen” option and apply it to the video layer by dragging it to the timeline.
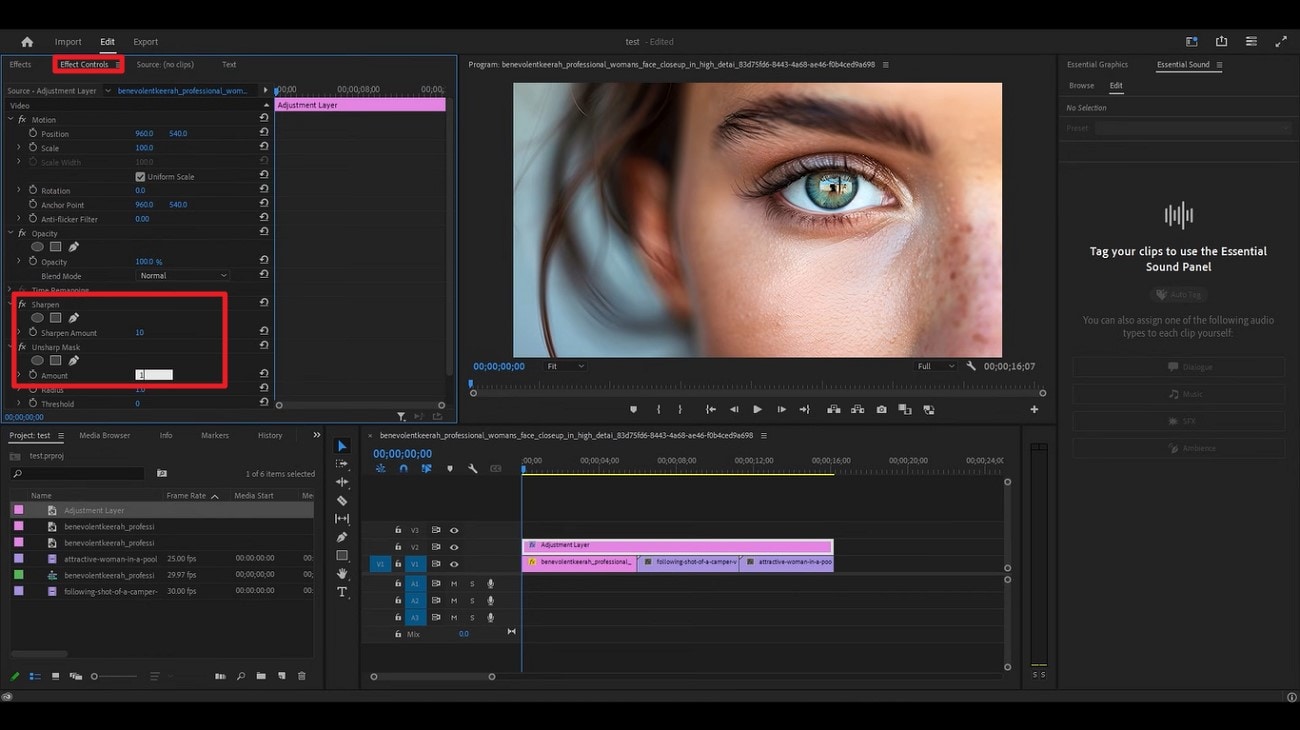
Step 2. Now, enable the “Effects Control” section and adjust the “Sharpen” and “Unsharp Mask” values according to your preferences. Once the desired results are achieved, save the video to your device using the designated option.
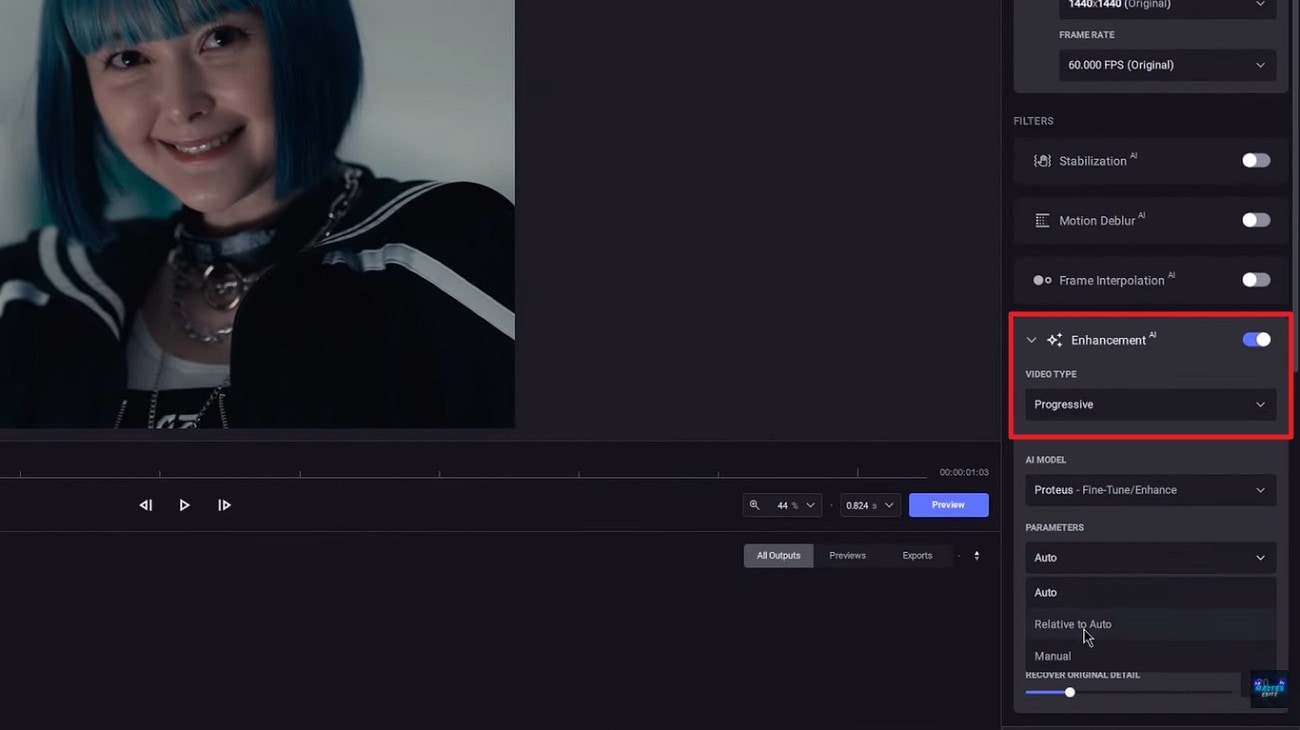
3. TopazLabs
Best For: High resolution upscaling
Powered by advanced artificial intelligence, Topaz Video Enhancer AI enables creators to produce high-quality visual content with minimal effort. Its clean, intuitive interface makes it a preferred option among professional editors looking for precision and efficiency. Additionally, this Topaz sharpen AI crack allows users to upscale videos to an impressive 16K resolution, preserving fine details. To learn how to use this tool for video enhancement, read the steps provided next:
Step 1. To begin, launch the tool and import the video to the tool’s interface. Next, head to the section on the right and turn the toggle on for “Enhancement.” Now choose the video type by expanding the drop-down menu.
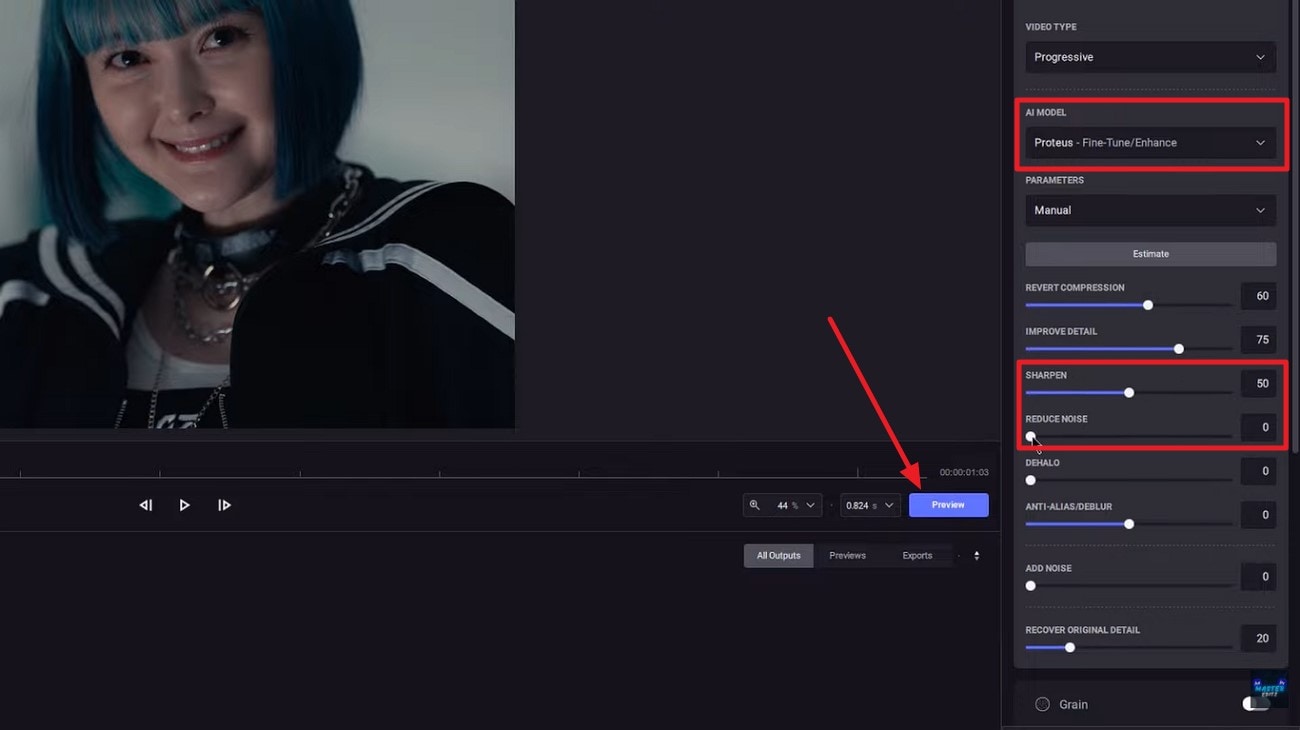
Step 2. Next, select the AI model and adjust the “Sharpen” and “Noise” by using the respective sliders. Once done, press the “Preview” button to execute the process.
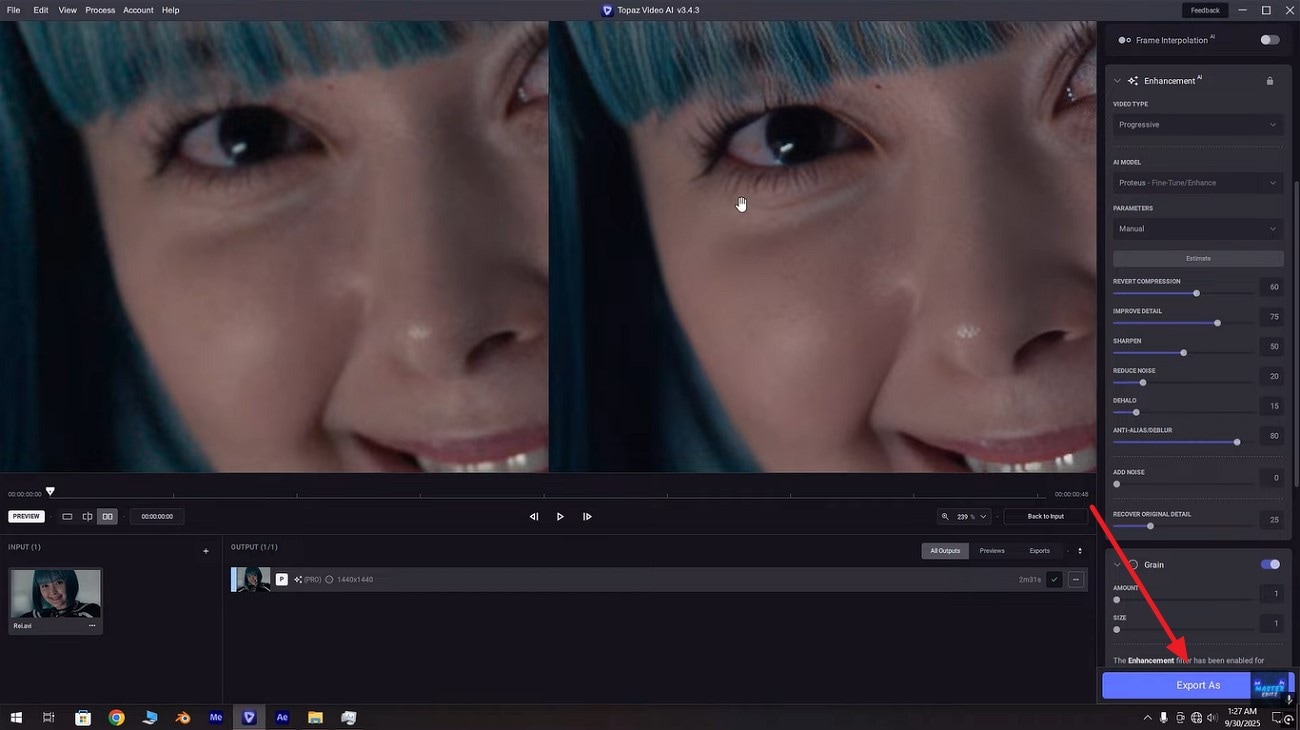
Step 3. Once the enhancement is done, compare the results and save the video using the “Export” option.
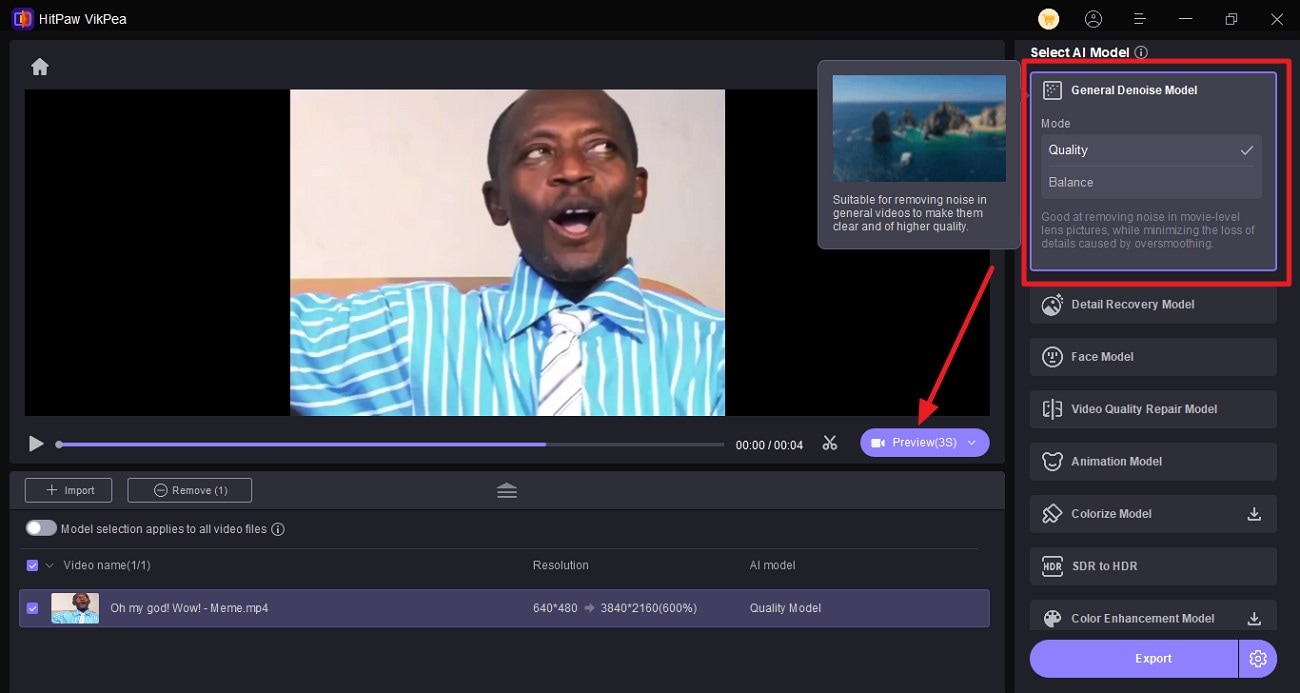
4. Vikpea Video Enhancer
Best For: GPU-accelerated AI enhancement
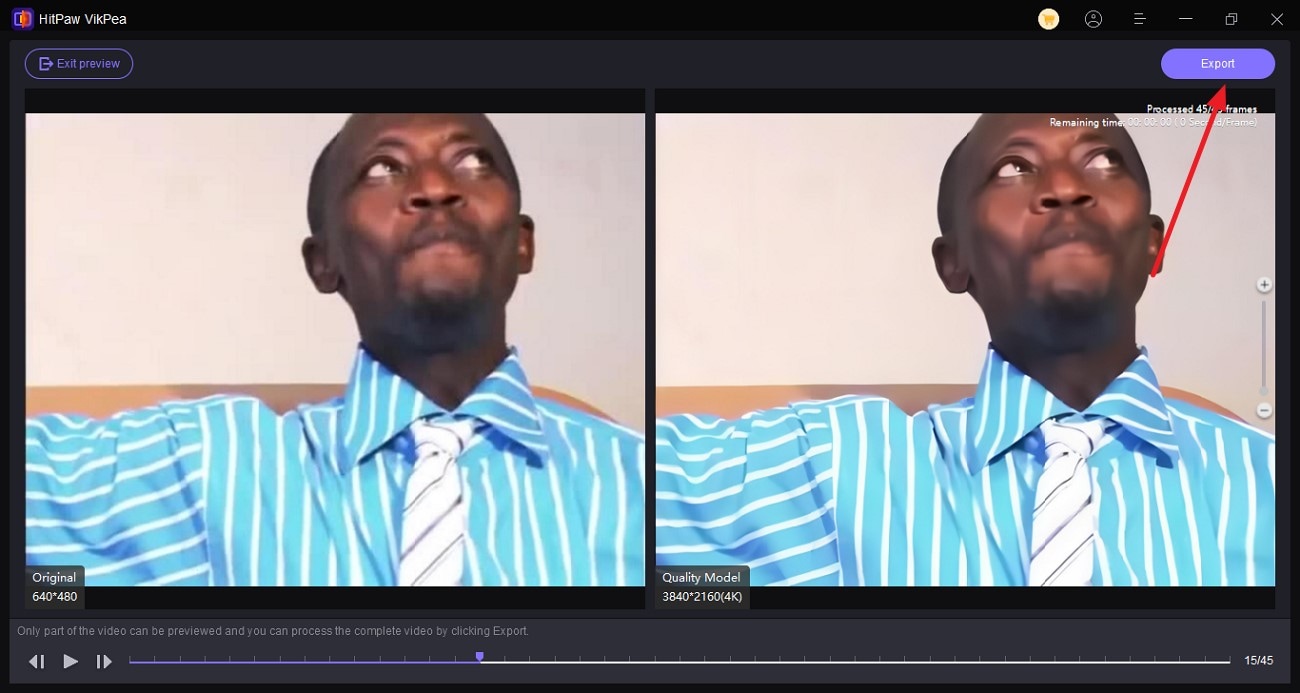
Leveraging GPU-accelerated technology, HitPaw Video Enhancer allows creators to sharpen video quality with remarkable accuracy. It effectively reduces grain and blur, delivering clearer and more professional-looking footage. The software uses AI to automatically detect faces in your video and enhance facial features for more natural and polished results. If you do not know how to use this tool for video enhancement, read the steps provided next:
Step 1. After accessing the AI Enhancer feature from the homepage and importing the video to the tool’s interface, select the AI enhancement model from the right. When selected, press the “Preview” button to execute the process.
Step 2. Once the process is completed, compare the results side-by-side and press the “Export” button to save the video.
Part 4. Sharpen Video Online Free: Best Web Tools
If you don’t want to install software, there are plenty of web-based solutions that let you sharpen video online for free. Some of the few online options are provided below:
1. Flixier
Best For: Quick, cloud-based video editing
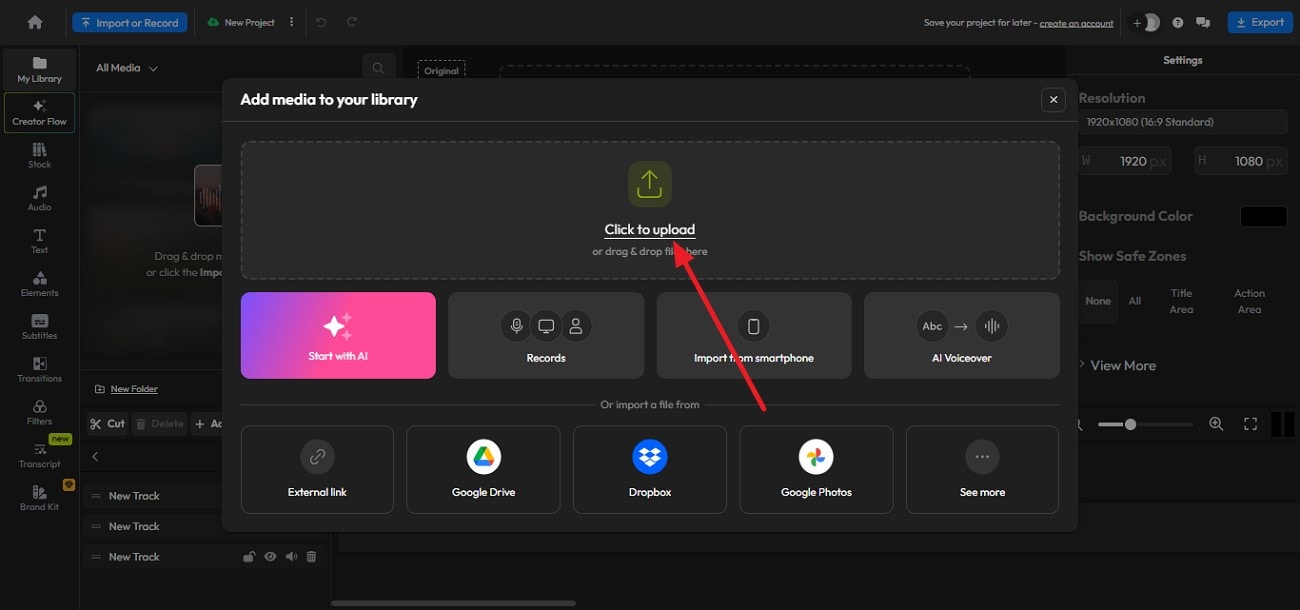
Flixier is a cloud‑based online video editor that lets you sharpen video online for free with a simple Sharpen filter directly in your browser. Without downloads or installs, you can upload clips, apply filters like Sharpen, and export crisp, enhanced videos quickly. To learn how to use this tool, follow the steps provided next:
Step 1. Once you have acquired the tool on your browser, press the “Click to Upload” option to upload your low-quality video.
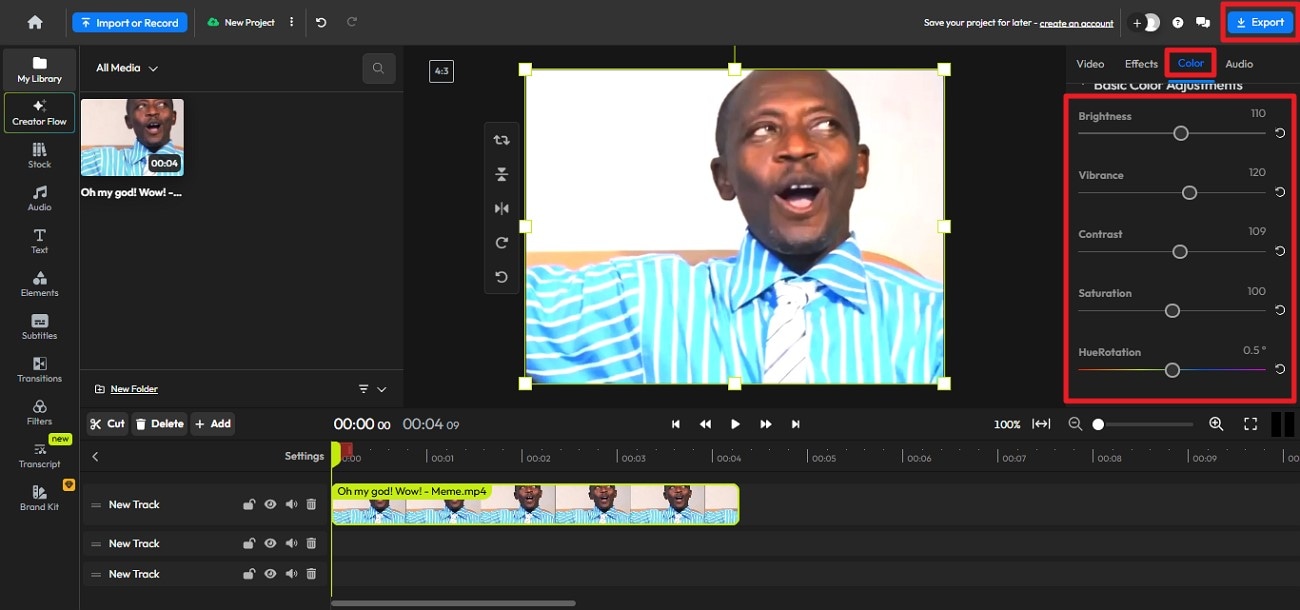
Step 2. In the editing interface of the tool, enable the “Color” section and adjust “Brightness,” “Vibrance,” and other elements by dragging the respective sliders. Press “Export” to save the video once the manual adjustments are done.
2. Veed.io
Best For: Social media content editing
It is a browser‑based tool that helps you quickly enhance videos by adjusting brightness, contrast, saturation, exposure, and more. You can sharpen videos, improve lighting, and export directly from your browser. This makes it ideal for quick edits and social media clips to sharpen videos online for free. Read the steps provided next to learn how to use this tool for video enhancement:
Step 1. Press the “Upload Files” button to successfully upload your blurred video to the tool’s interface.

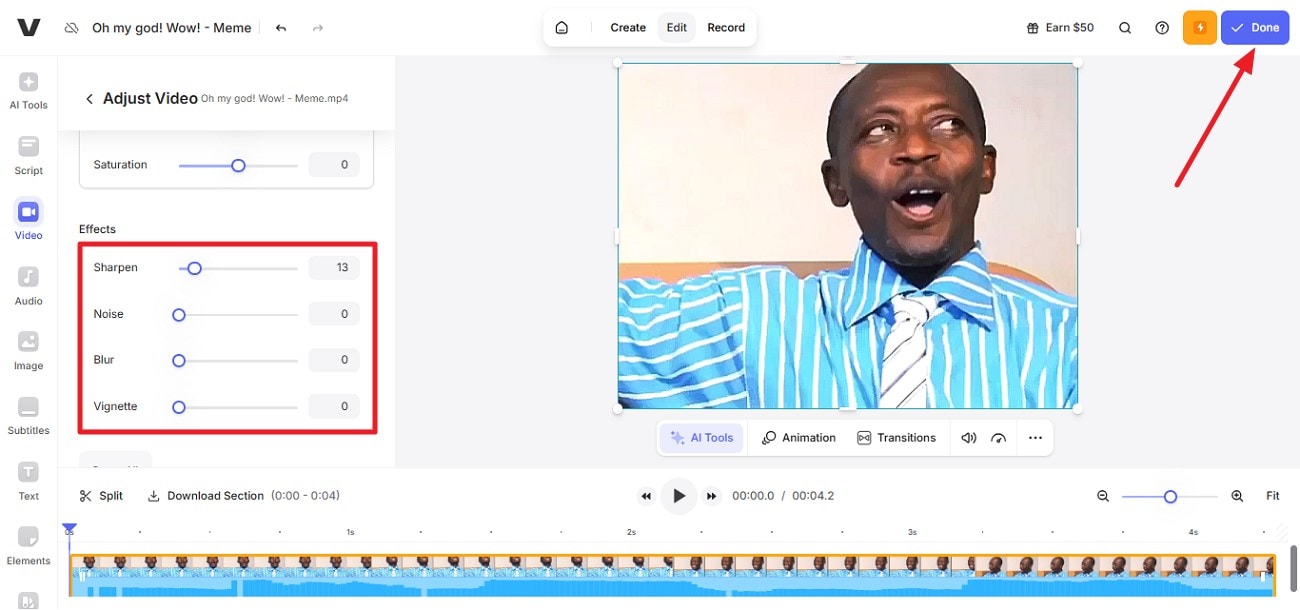
Step 2. Now, access the “Effects” section and adjust the “Sharpen,” “Noise,” and “Blur” to enhance the visuals. Once done, press the “Done” button to save the results.
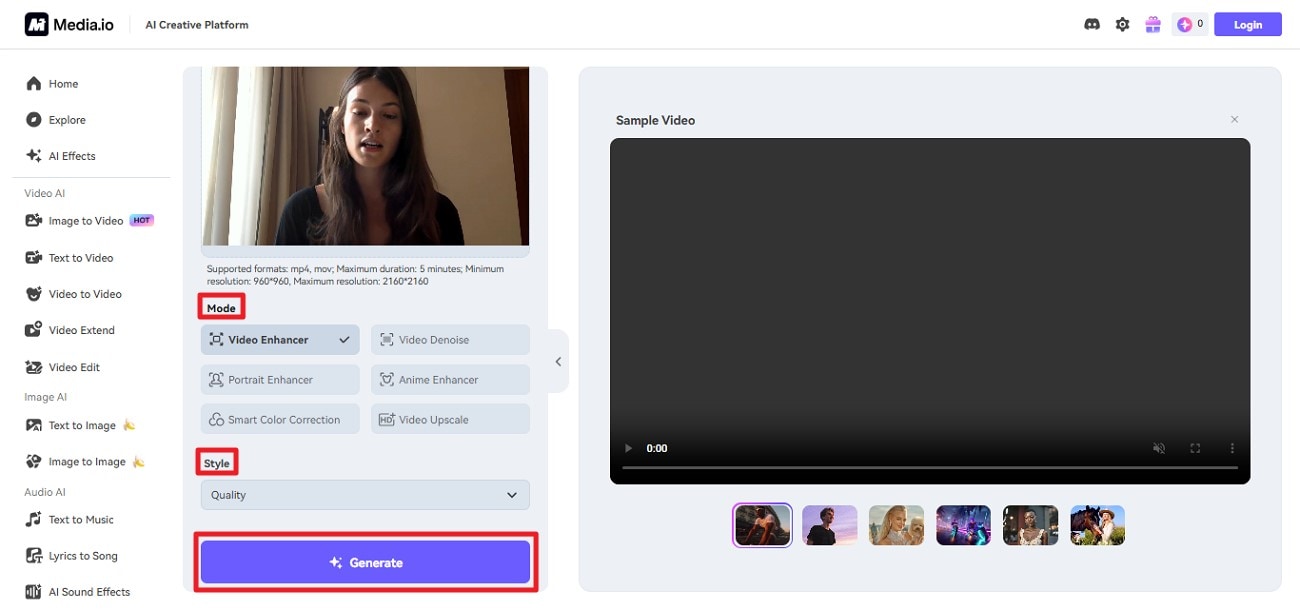
3. Media.io
Best For: Straightforward online AI upscaling
Designed for quick quality improvements, Media.io Video Enhancer is an online AI-powered tool. It helps users sharpen blurry videos, reduce noise, and upscale videos up to 4K directly in the browser. With support for popular formats like MP4 and MOV, it offers a simple upload-enhance-download workflow without requiring any software installation. To learn how to use this tool, read the instructions provided below:
Instructions: Once you have uploaded the video to the tool’s interface, enable the “Video Enhancer” mode and select the quality. Press the “Generate” button to sharpen your video automatically.
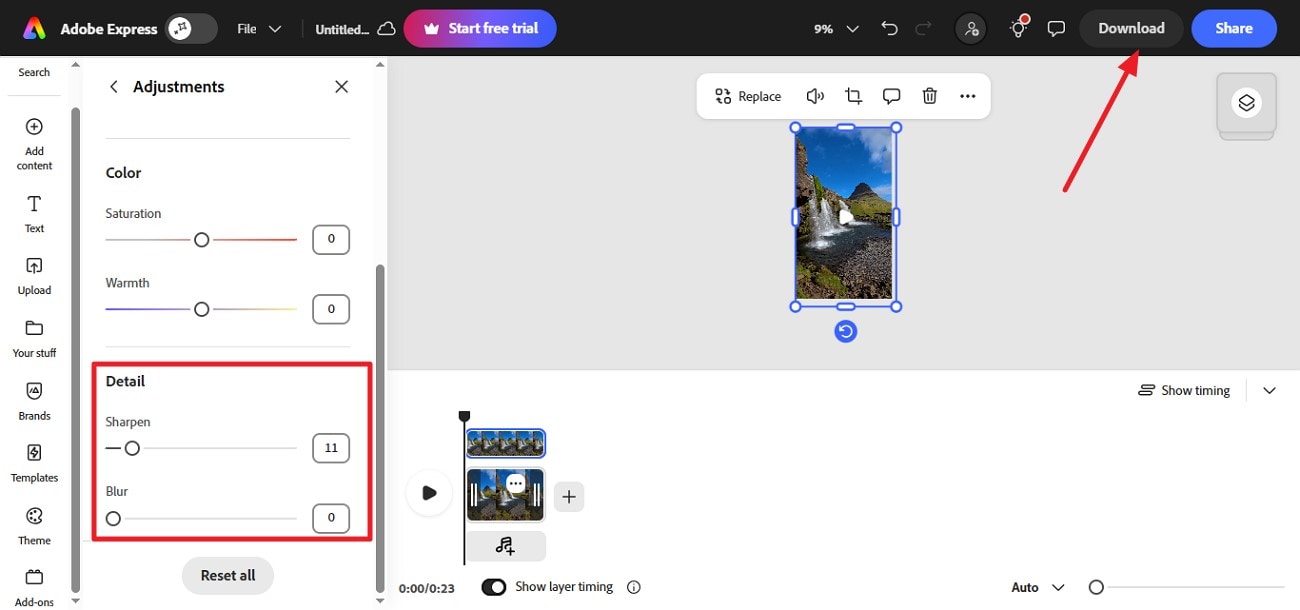
4. Adobe Express
Best For: Simple video adjustments
Another video editor that provides a web-based solution for improving video appearance without technical complexity is Adobe Express. Users can fine-tune brightness, contrast, and visual filters to enhance clarity and reduce softness. Although this video sharpener lacks dedicated AI sharpening tools, it works well for quick refinements and social-ready video enhancements. To learn how to use this tool for sharpening video, read the instructions provided next:
Instructions: After you have uploaded the video, access the “Detail” section and adjust the “Sharpen” slider to improve clarity. Once done, press the “Download” button to save the results to your device.
Part 5. Sharpen Video for Social Media vs. Professional Output
With AI video sharpening, the level of enhancement, tool choice, and export settings should vary. This depends on whether the goal is quick social engagement or long-term professional quality. The following are some of the sharpening techniques you can use for your needs:
Instagram Reels & TikTok: Light AI sharpening works best for vertical videos, enhancing clarity without overprocessing, as aggressive sharpening can look harsh on small mobile screens.
YouTube Videos: Moderate AI sharpening helps maintain detail on larger displays, especially for HD and 4K playback, while preserving natural textures during compression.
Facebook Videos: Balanced sharpening improves visibility after platform compression, ensuring videos remain clear without introducing noise.
Professional Archives & Client Deliverables: Advanced AI sharpening or professional software is ideal, focusing on detail preservation, color accuracy, and long-term quality retention.
Settings Tips for HD vs. 4K Export Formats
Before you export, remember that the settings you choose after you sharpen blurry video can make or break the final clarity. Mentioned below are some of the tips that you can follow to get the best results:
Resolution & Frame Size: Always export at the original editing resolution; 1080p for HD and 2160p for 4K. This helps retain sharp edges and prevents unnecessary quality loss.
Bitrate Selection: Use higher bitrates to protect fine details. For HD, a medium-to-high bitrate works well, while 4K exports benefit from significantly higher bitrates to avoid softness.
Codec Choice: We recommend H.264 for compatibility and HEVC (H.265) for 4K exports where smaller file size and better compression efficiency are priorities.
Match Source Settings: Keeping frame rate and aspect ratio consistent with the source footage ensures smoother playback and preserves sharpness.
Maximum Render Quality: Enable maximum render or scaling quality options whenever available, especially if resizing footage, to maintain crisp visual output.
Conclusion
To wrap it up, this article provided a complete guide on how to use video sharpeners effortlessly. The article provided a list of top online and offline tools that help you get the task done. However, one of the tools that provides high-quality video enhancement, along with features like batch processing, is Wondershare UniConverter. The tool offers various AI-powered enhancement models to improve the quality of your videos.
FAQs
-
1. What is the best way to sharpen a blurry video?
The most effective method is using AI-powered video sharpening tools. These tools intelligently analyze each frame to restore perceived detail without introducing excessive noise. Solutions like Wondershare UniConverter offer one-click AI enhancement for fast and reliable results. -
2. Can video sharpening really improve low-quality footage?
Video sharpening can improve perceived clarity and edge definition, especially for slightly blurry, soft, or compressed footage. However, it cannot fully recover details that were never captured in the original recording. -
3. Is there a free video sharpener option available?
Yes. Some online tools provide free video sharpening with limited features or watermarks. For deeper quality improvement, batch processing, and higher consistency, desktop tools like Wondershare UniConverter offer more advanced AI-based sharpening options. -
4. Does AI video sharpening work better than traditional filters?
Yes. AI video sharpening works better than traditional filters because it analyzes motion, textures, and context within each frame. Traditional sharpening filters mainly boost edge contrast, while AI-based tools can reconstruct details more naturally and avoid harsh artifacts.

