Quick List: How to Upscale Video in Premiere Pro and Use AI Enhancement
Source Resolution vs. Sequence Resolution vs. Export Resolution
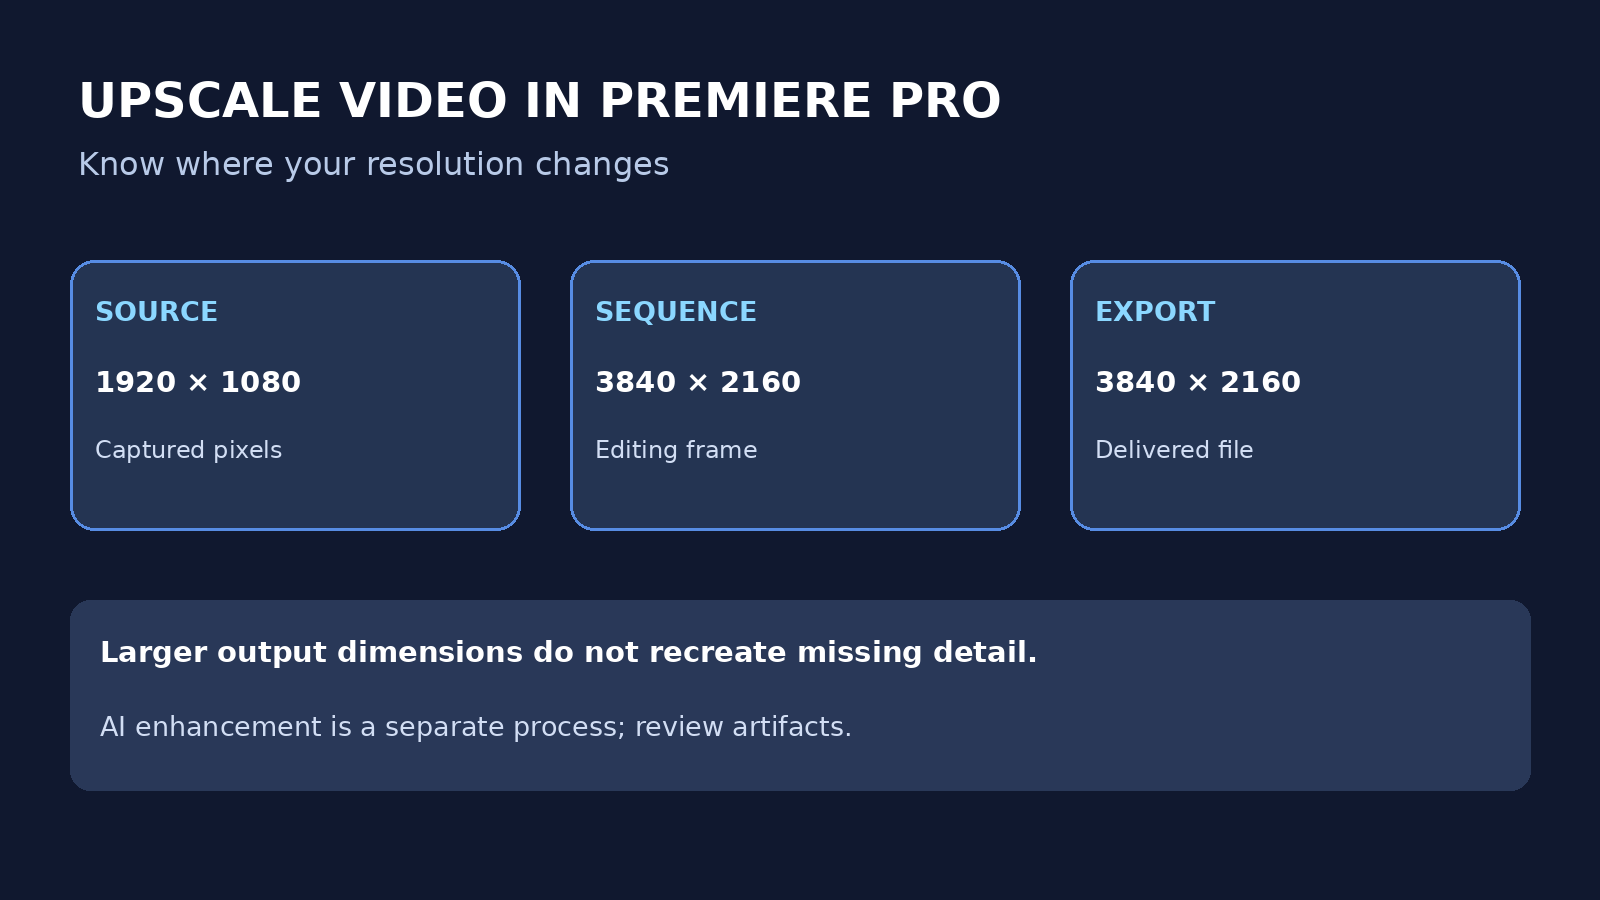
Resolution describes frame dimensions, but a Premiere project has more than one set of dimensions. Identify each before changing settings.
| Stage | What it means | Example |
|---|---|---|
| Source | Pixels in the original recorded file. | 1920 × 1080. |
| Sequence | The frame used for editing and composing clips. | 3840 × 2160 for 4K UHD. |
| Export | The dimensions written to the delivered file. | 3840 × 2160 when selected in export settings. |
A 1080p source enlarged to a 4K UHD frame doubles both width and height. The file contains more pixels, but enlarging existing pixels does not mean it contains footage originally captured in 4K.
Before You Upscale: Choose the Right Workflow
| Goal | Workflow | Key condition |
|---|---|---|
| Deliver an existing edit at a larger frame size | Premiere sequence scaling and export | Standard resizing is different from AI reconstruction. |
| Use Adobe’s AI video upscaler | Adobe Firefly Upscale video | Separate Firefly workspace; review current upload and account conditions. |
| Use an AI integration from Premiere | Topaz Labs for Premiere panel | Third-party panel sends media to Topaz Cloud; its own service terms apply. |
| Compare a dedicated desktop enhancement preview | UniConverter Video Enhancer | Choose a model and inspect the preview before export. |
For existing Premiere projects, duplicate the sequence before a major resolution change. Recheck titles, graphics, masks, crops, and framing: changing the canvas can alter their appearance.
How to Upscale Video in Premiere Pro to 4K
Follow these steps for a 16:9 project targeting 4K UHD. For vertical video, match your intended aspect ratio and destination rather than copying landscape dimensions.
- Step 1: Check the source. Import your video into Premiere Pro and inspect its frame dimensions in the Project panel or file properties. Confirm the source size and aspect ratio before selecting an output.
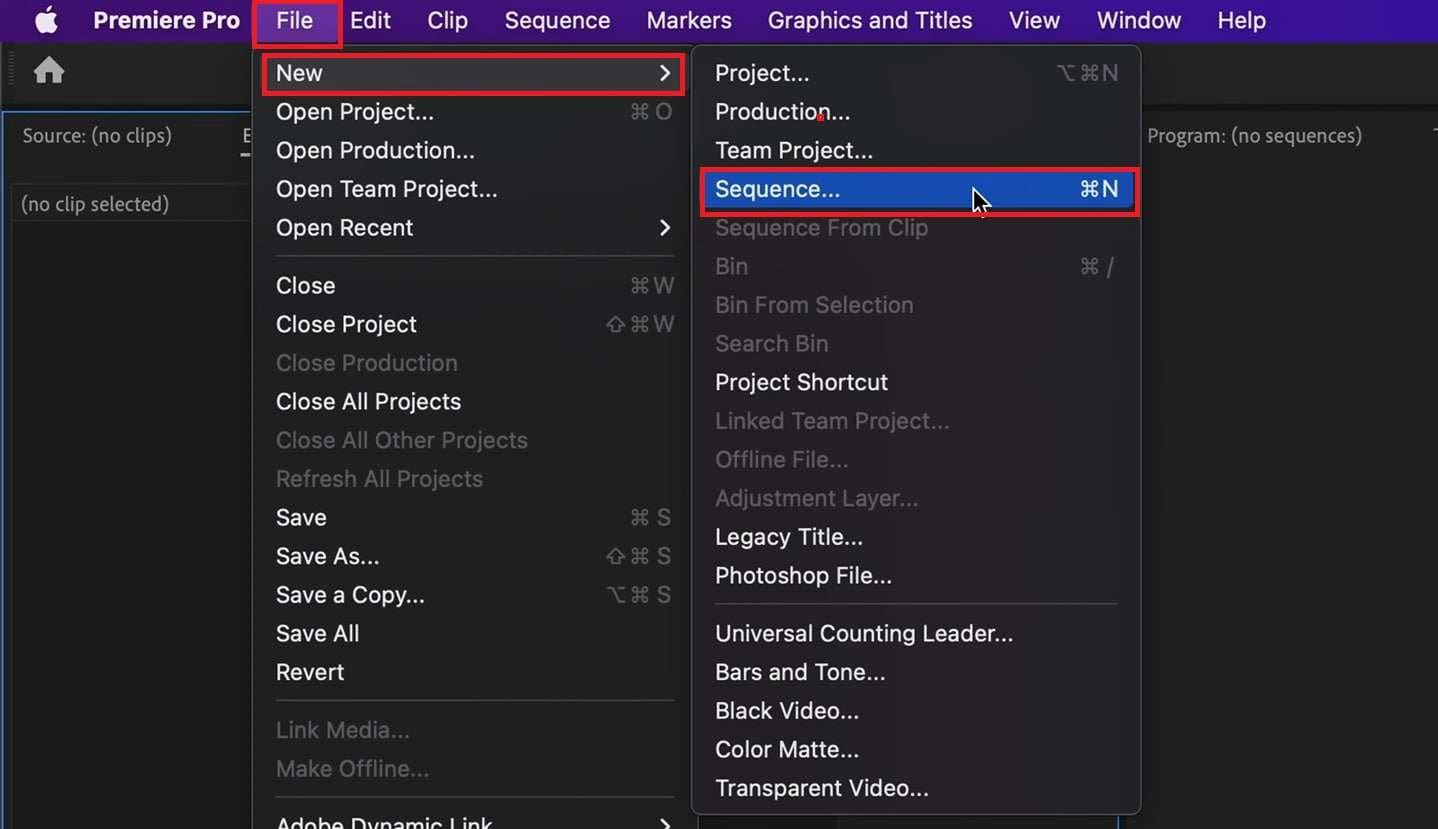
Create or open the sequence you intend to edit. This example shows the New Sequence menu. - Step 2: Set the sequence frame size. Open Sequence > Sequence Settings. For a 16:9 4K UHD sequence, set Frame Size to 3840 horizontal by 2160 vertical, then confirm the setting. Duplicate an existing sequence first if you need a safe comparison.
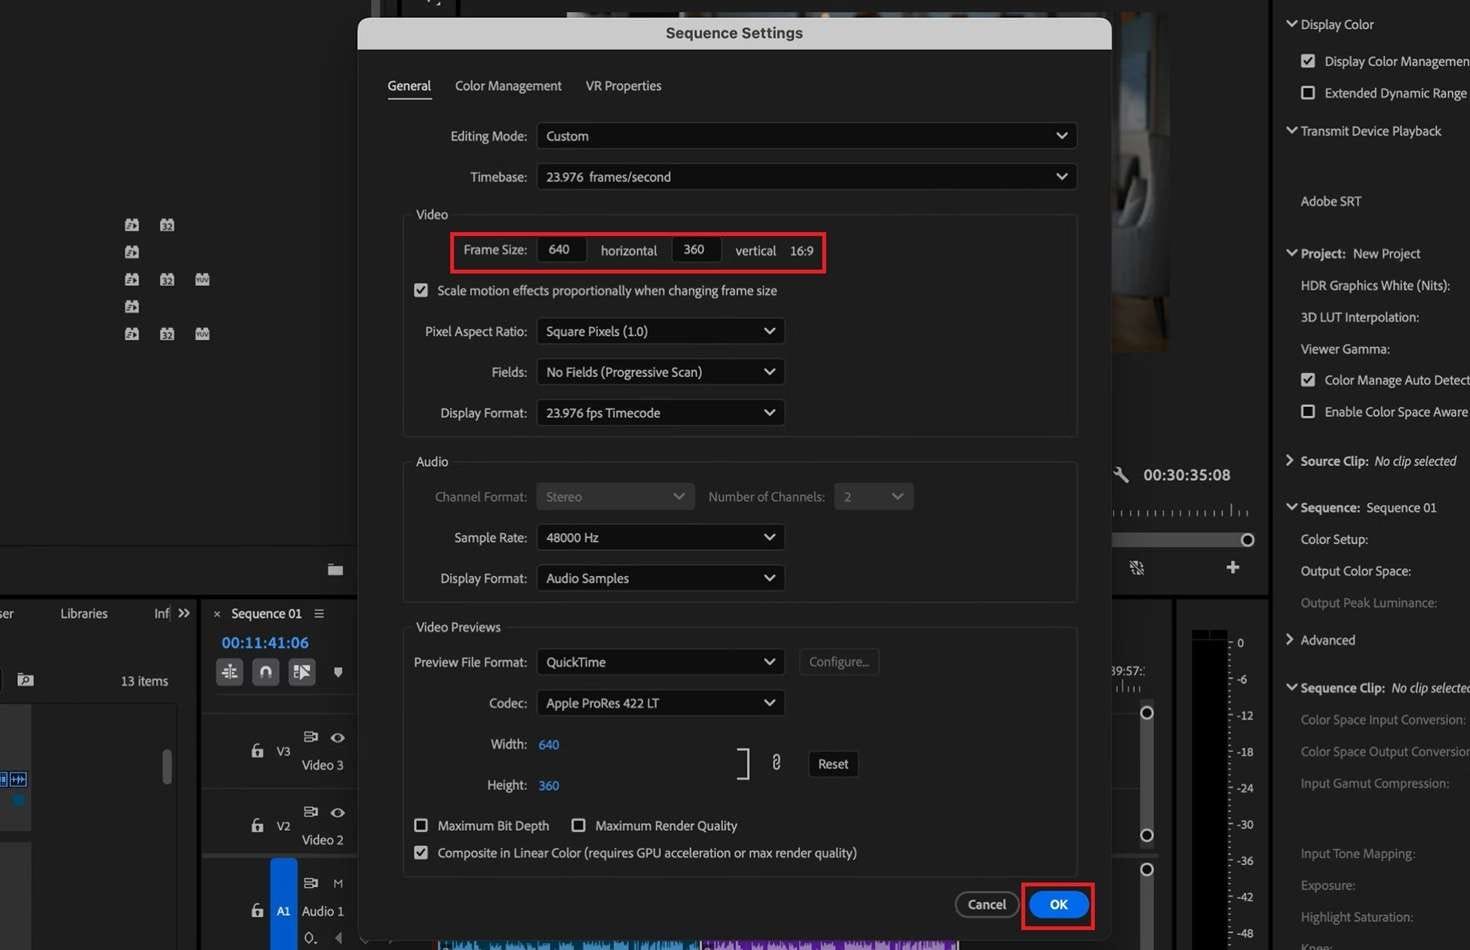
Find Frame Size in Sequence Settings and enter the dimensions for your project. - Step 3: Fit the clip to the sequence. Place the clip in the timeline, right-click it, and choose Set to Frame Size. Check the Program Monitor for cropped edges or bars; different aspect ratios may need reframing.
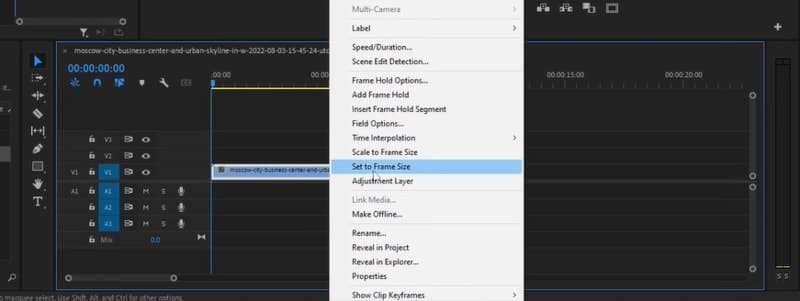
Select the clip and use Set to Frame Size; inspect the result for cropping or bars. - Step 4: Review the result. Play representative motion and inspect important details. If needed, adjust Motion > Scale and Position in Effect Controls; keep proportions natural and check for artifacts.
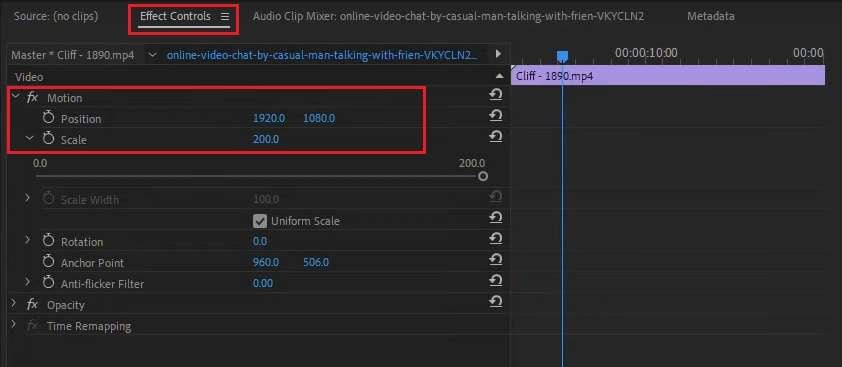
Fine-tune framing with Motion controls when the automatic fit needs adjustment. - Step 5: Export at the target dimensions. Open the export workspace, choose the appropriate format and output settings, and verify that the export width and height are 3840 × 2160 for a 4K UHD file. Export, then inspect the finished file’s properties and playback.
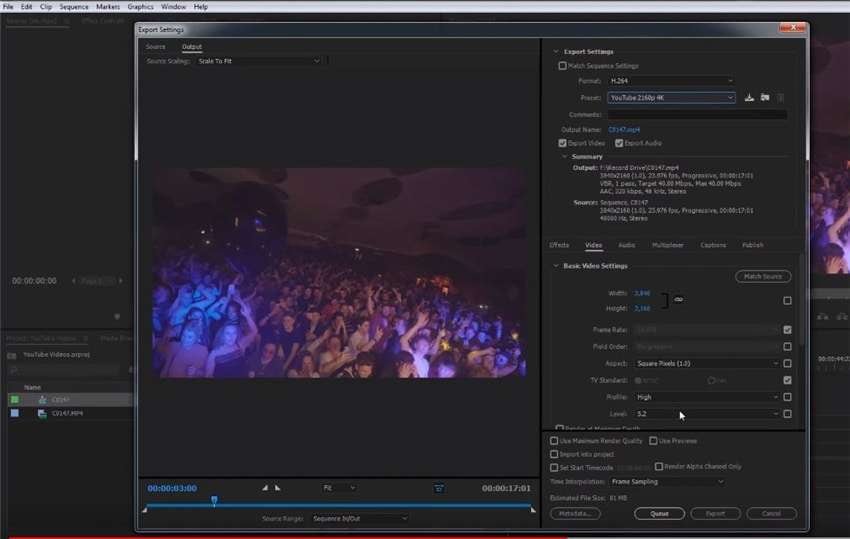
Check the export settings and final frame dimensions before saving the output.
Adobe’s Sequence Settings guide explains how to change the editing frame. For an exported 4K file, check the output settings too; a 4K sequence alone does not force every export preset to use 4K.
If your upscaled footage still looks slightly soft, you can use Premiere Pro’s sharpening tools to improve the appearance of existing edges. For step-by-step instructions and tips on avoiding halos, see how to sharpen video in Premiere Pro. Keep in mind that sharpening cannot reliably recover details missing from the original footage.
How to Use Adobe Firefly AI Video Upscaler
Adobe Firefly offers an AI video upscaler in its web workspace. It is separate from the basic resizing controls in Premiere Pro. Adobe also provides Topaz Astra as a partner model in Firefly; the available entry point and options should be checked in the current interface.
- Open Adobe Firefly and choose Video → Upscale video, then add a video from your device or Adobe cloud storage.
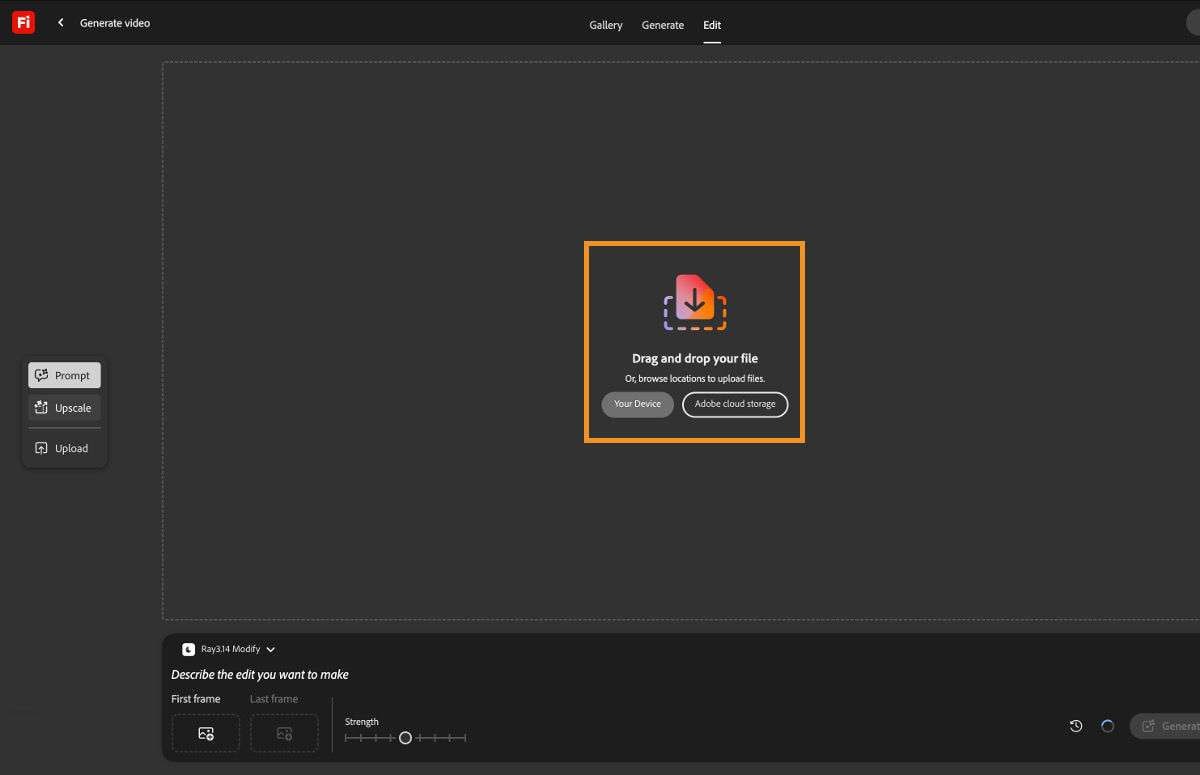
Choose your video in Firefly using Your Device or Adobe cloud storage. Source: Adobe Firefly Help. - Open Upscale and select an enhancement mode. Adobe describes Precise as a more restrained adjustment and Creative as a more stylized one.
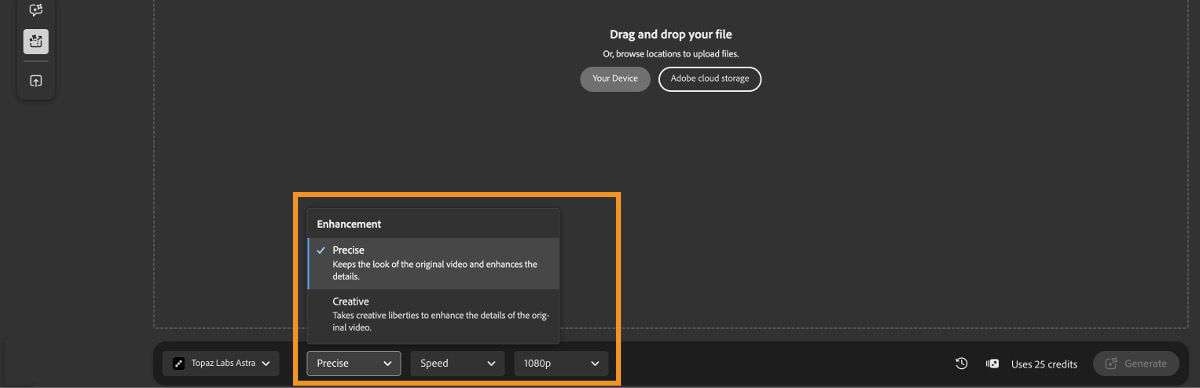
Open Upscale and choose the enhancement mode and resolution. Source: Adobe Firefly Help. - Choose the available detail and resolution options, generate the result, and compare it with the source.
- Download the result and, if needed, import it into your Premiere project. Check the final video for changes to faces, text and motion.
Adobe’s Firefly upscaling guide describes the current settings. Adobe’s product page shows an upload box with MP4, less than 200 MB and 5–20 seconds; treat those as conditions for that specific entry point, not a universal limit across every Firefly workflow.
Inside Premiere: Topaz Labs also offers a third-party Premiere panel that submits media to Topaz Cloud. It is an integration with separate service conditions, not Premiere’s standard scaling control. See the Topaz Labs panel page for its current workflow.
How to Enhance Video with UniConverter
When a larger frame still looks soft, UniConverter Video Enhancer offers a separate desktop workflow for comparing an AI-enhanced preview. It can improve the appearance of some low-resolution footage; generated detail is an interpretation, so it should not be treated as proof of what was originally recorded.
- Step 1. Open UniConverter 18 on Windows and choose Enhance & Clean Up → Video Enhancer from Home.
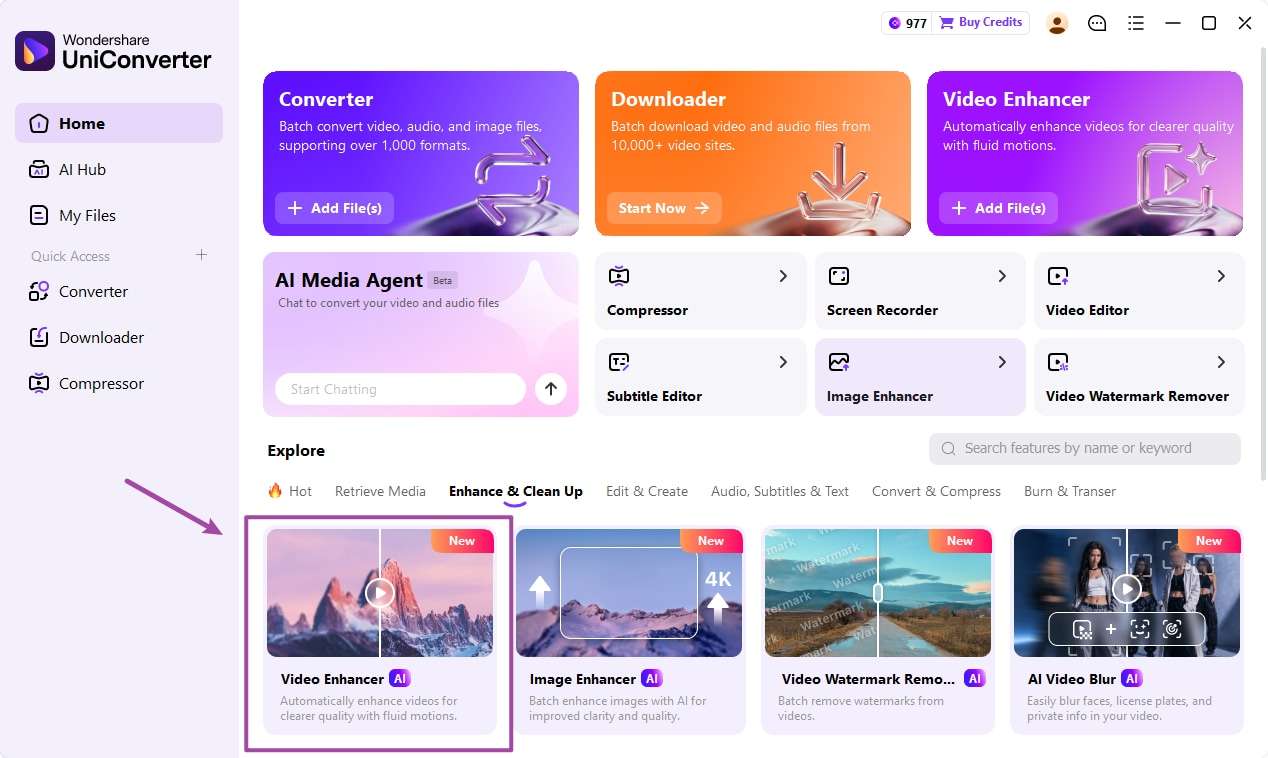
Open Video Enhancer on the UniConverter home screen. - Step 2. Select Quality Enhancement → Ultra (Gen AI), then click Add Video.
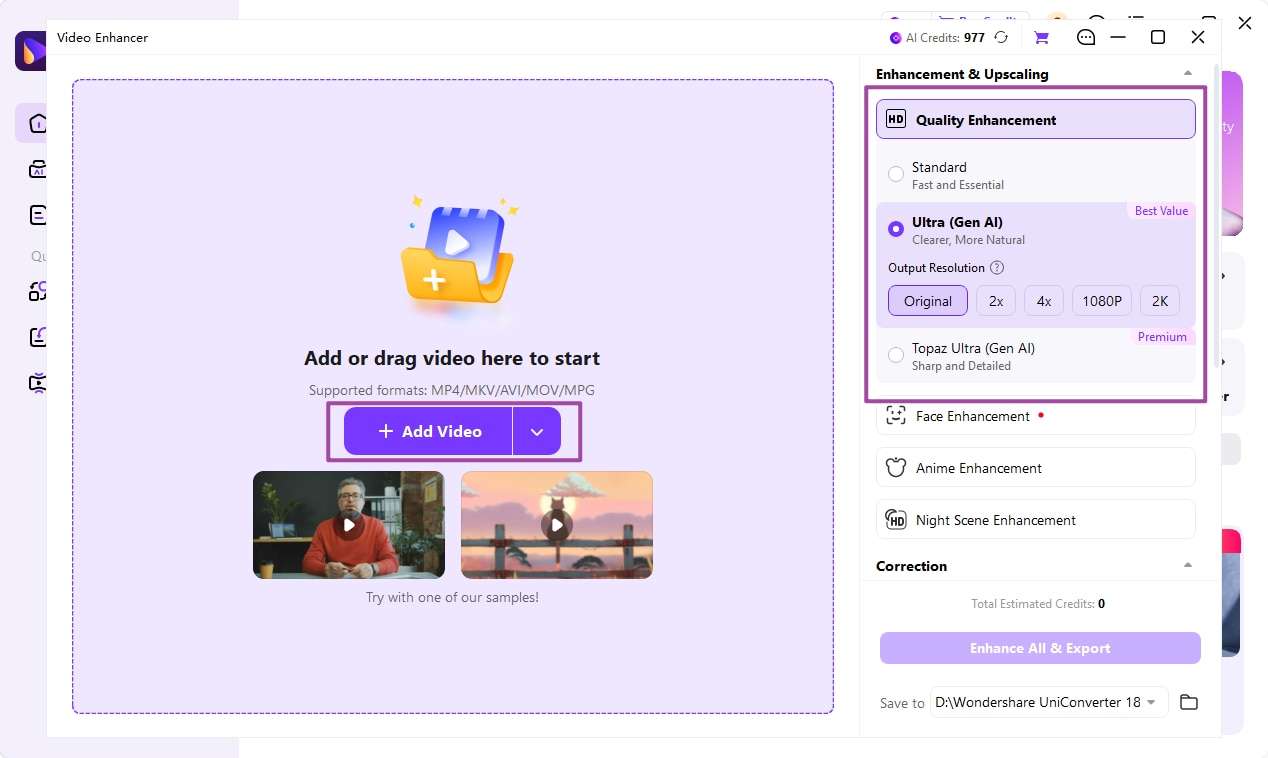
Choose Quality Enhancement and Ultra Gen AI. - Step 3. Choose an Output Resolution and click Preview (3 s). The official guide lists Original, 2×, 4×, 1080P, and 2K for Ultra (Gen AI); 2× and 4× depend on the source dimensions. For a 4K target, the official product page lists Topaz Ultra (Gen AI) → 4K for supported videos; select that model if available and inspect its own settings.
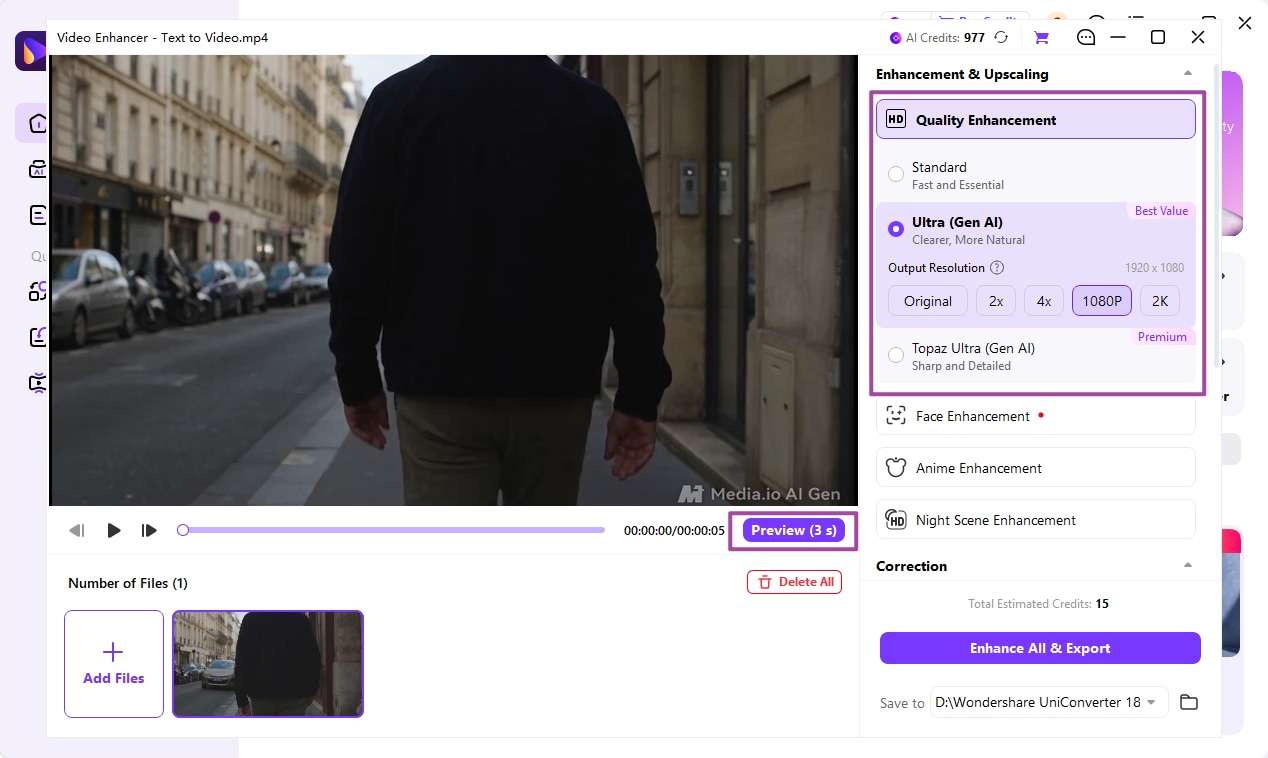
Choose output resolution and Preview 3 s. - Step 4. Compare Original and Result for faces, text, edges and motion. If the preview looks artificial, reconsider the settings.
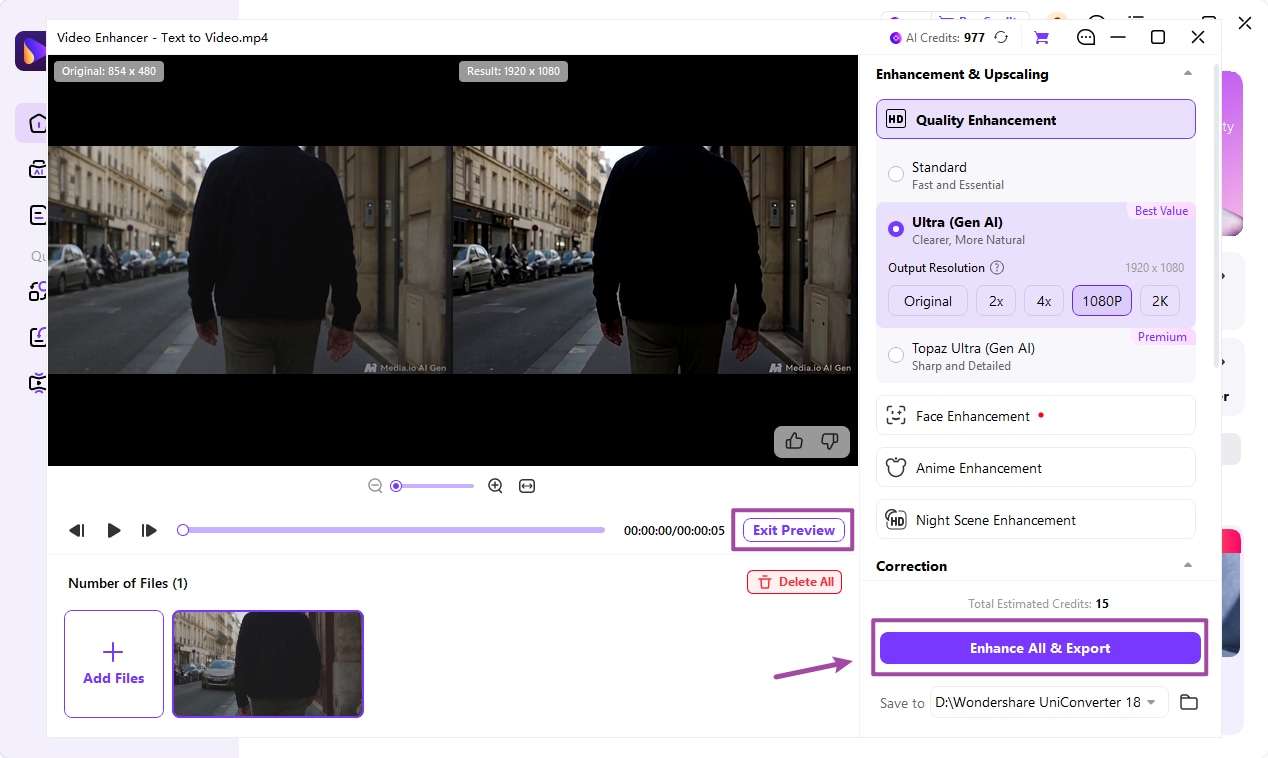
Compare the original and enhanced video preview. - Step 5. Choose Save to, click Enhance All & Export, and confirm the task. Play the finished video and verify its properties.
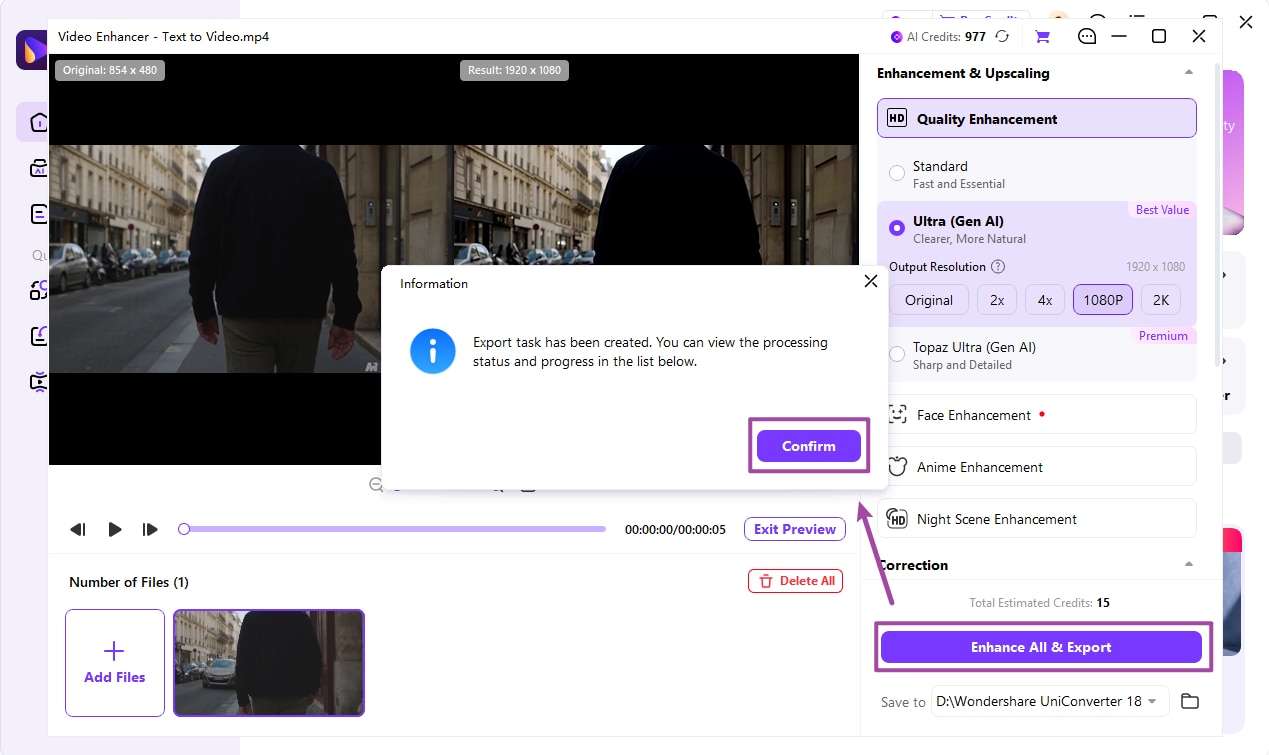
Confirm an enhancement export task.
For the exact Windows interface, see the official Video Enhancer guide. Model access and full exports can require a license or AI credits; review the current terms and estimated use in the product.
Related guides: how to upscale video to 4K, how to unblur a video, and our Adobe Premiere Pro review.
Troubleshooting Premiere Pro Upscaling Problems
| Symptom | How to check | Next action |
|---|---|---|
| Clip does not fill the frame | Compare source and sequence aspect ratios. | Use Set to Frame Size, then reframe if needed; cropping or bars may be necessary. |
| Output is 1080p instead of 4K | Inspect the sequence and exported file dimensions separately. | Set the intended export width and height and export again. |
| 4K file still looks soft | Compare the source with the output at the same display size. | Use a better source or test enhancement; do not assume the export size restored detail. |
| Noise or halos become stronger | Review motion, edges and dark areas at full size. | Reduce sharpening or select a different enhancement workflow. |
| AI changes text or faces | Compare representative frames with the original. | Choose a more restrained mode or retain the source when fidelity matters. |
When UniConverter is not the right fit: If standard resizing already meets the delivery requirement, keep the workflow in Premiere. For evidence-sensitive footage or missing facial details, use the original or another recording rather than rely on generative reconstruction.
FAQ
-
How do I upscale a video in Premiere Pro?
Check the source, set your sequence to the desired frame size, fit the clip, and export at the target dimensions. Inspect the result; enlarging the output alone does not guarantee additional real detail.
-
How can I upscale video quality using Adobe AI video upscaler?
Adobe Firefly offers Video > Upscale video for uploaded or generated clips. Select an enhancement mode and output resolution, generate a result, and review it before downloading. This is a Firefly workflow separate from Premiere’s standard sequence scaling.
-
Is Adobe Firefly Video Upscaler part of Premiere Pro?
Firefly’s Upscale video is an Adobe Firefly workflow. Premiere’s ordinary sequence scaling is a separate operation. Third-party tools such as the Topaz Labs Premiere panel provide another integration and have their own service conditions.
-
Can I upscale 1080p to 4K in Premiere Pro?
Yes. Set a 3840 × 2160 sequence, fit a 1920 × 1080 clip, and export at the target size. Both dimensions are doubled, but the larger output does not guarantee the original 4K detail.
-
Why does my 4K export still look blurry?
The source may already be soft, compressed, out of focus, or smaller than the export. Compare the source and export at the same display size, confirm the sequence and output dimensions, and use a better original when available.
-
Does AI video upscaling restore the exact original details?
No. An AI model estimates or generates visual detail and can introduce artifacts. Compare moving frames, faces and text with the source; do not treat invented detail as evidence of the original scene.
-
Can UniConverter upscale a video to 4K?
UniConverter offers different enhancement models and output choices. The official Windows guide lists Original, 2×, 4×, 1080P, and 2K for Ultra (Gen AI). UniConverter also lists 4K output for its Topaz Ultra (Gen AI) model on supported videos; choose the appropriate model and check its settings.