UniConverter User Guide
-
Get Started
-
Video Converter
- Convert DVD to Any Format | Wondershare UniConverter for Windows
- Add Media Files | Wondershare UniConverter for Windows
- Convert Video from Camcorder | Wondershare UniConverter for Windows
- Convert Videos for iPhone/iPad/Android Devices | Wondershare UniConverter for Windows
- Convert Videos for Social Network | Wondershare UniConverter for Windows
- Convert Videos from iOS & Android Devices | Wondershare UniConverter for Windows
- Convert Videos to Any Format | Wondershare UniConverter for Windows
- Convert Video to Audio | Wondershare UniConverter for Windows
- Mute Video | Wondershare UniConverter for Windows
- Add Audio to Video | Wondershare UniConverter for Windows
- Convert Multiple Video In Batches | Wondershare UniConverter for Windows
- Easily Convert 4K and 8K Videos | Wondershare UniConverter for Windows
- Convert Video to MP3 | Wondershare UniConverter for Windows
- Convert Video to GIF | Wondershare UniConverter for Windows
- Convert SDR Video to HDR | Wondershare UniConverter for Windows
- Convert Video to Image Sequence | Wondershare UniConverter for Windows
-
Audio Converter
-
Video Compressor
-
Downloader
-
Screen Recorder
-
Merger
-
DVD Burner
-
Media Player
-
Video Editor
- Trim Video | Wondershare UniConverter for Windows
- Add Watermark | Wondershare UniConverter for Windows
- Crop Video | Wondershare UniConverter for Windows
- Apply Effect | Wondershare UniConverter for Windows
- Add Subtitle | Wondershare UniConverter for Windows
- Audio Track Volume | Wondershare UniConverter for Windows
- Auto Video Cutter | Wondershare UniConverter for Windows
-
Tools
- Image Converter | Wondershare UniConverter for Windows
- GIF Maker | Wondershare UniConverter for Windows
- Fix Video Metadata | Wondershare UniConverter for Windows
- CD Burner | Wondershare UniConverter for Windows
- Convert CD to MP3 | Wondershare UniConverter for Windows
- Convert Video to VR | Wondershare UniConverter for Windows
- Transfer Video/Audio Files to iOS Device | Wondershare UniConverter for Windows
- Transfer Video/Audio to Android Device | Wondershare UniConverter for Windows
- Subtitle Editor | Wondershare UniConverter for Windows
- Watermark Editor | Wondershare UniConverter for Windows
- Smart Trimmer | Wondershare UniConverter for Windows
- Background Remover | Wondershare UniConverter for Windows
- Auto Crop Video | Wondershare UniConverter
- AI Portrait | Wondershare UniConverter
- Intro & Outro | Wondershare UniConverter
- Vocal Remover | Wondershare UniConverter for Windows
- Noise Remover | Wondershare UniConverter for Windows
- Video Stabilization | Wondershare UniConverter for Windows
- AI Video Enhancer | Wondershare UniConverter for Windows
- AI Image Enhancer | Wondershare UniConverter for Windows
- AI Script Generator | Wondershare UniConverter for Windows
- Text To Speech | Wondershare UniConverter for Windows
- AI Subtitle Translator | Wondershare UniConverter for Windows
- AI Thumbnail Maker | Wondershare UniConverter for Windows
- Auto Highlight | Wondershare UniConverter for Windows
- Scene Detection | Wondershare UniConverter for Windows
- Remove Watermark | Wondershare UniConverter for Windows
- Voice Changer | Wondershare UniConverter for Windows
- AI Video Enhancer | Use AI Batch Image Enhancement
- Crop Image | Wondershare UniConverter for Windows
- Rotate Image | Wondershare UniConverter for Windows
- Resize Image | Wondershare UniConverter for Windows
- Image Edit | Wondershare UniConverter for Windows
- Anime Enhancement | Wondershare UniConverter for Windows
- Face Enhancement | Wondershare UniConverter for Windows
- Adjust Speed of TTS Audio | Wondershare UniConverter for Windows
- Voice Clone | Wondershare UniConverter for Windows
- Enable NVIDIA Acceleration | NVIDIA Graphics Driver Installation Tutorial on Win
- Smart Summarizer | Wondershare UniConverter for Windows
FAQs
Video/Audio Solutions
AI Video Enhancer
Part 1: Introduction
Enhancing videos via AI means using artificial intelligence to make your videos look better. But, if you want a more detailed explanation, it’s using AI to improve video resolution and enhance the quality of low-resolution footage. Plus, it can increase the framerate of your video to reduce jitter and ensure a smoother viewing experience. Take the simple steps below to enhance your video!
Part 2: Guides
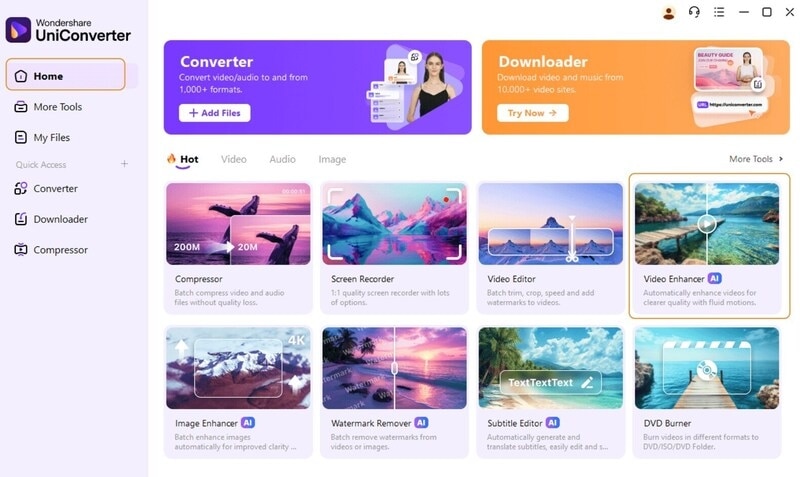
Step 1 Start Wondershare UniConverter and select AI Video Enhancer
Once you download and install UniConverter, click on it and launch the robust tool. You’ll see several Hot features in the homepage. Click “AI Video Enhancer” under the “Hot” section of the software’s interface.
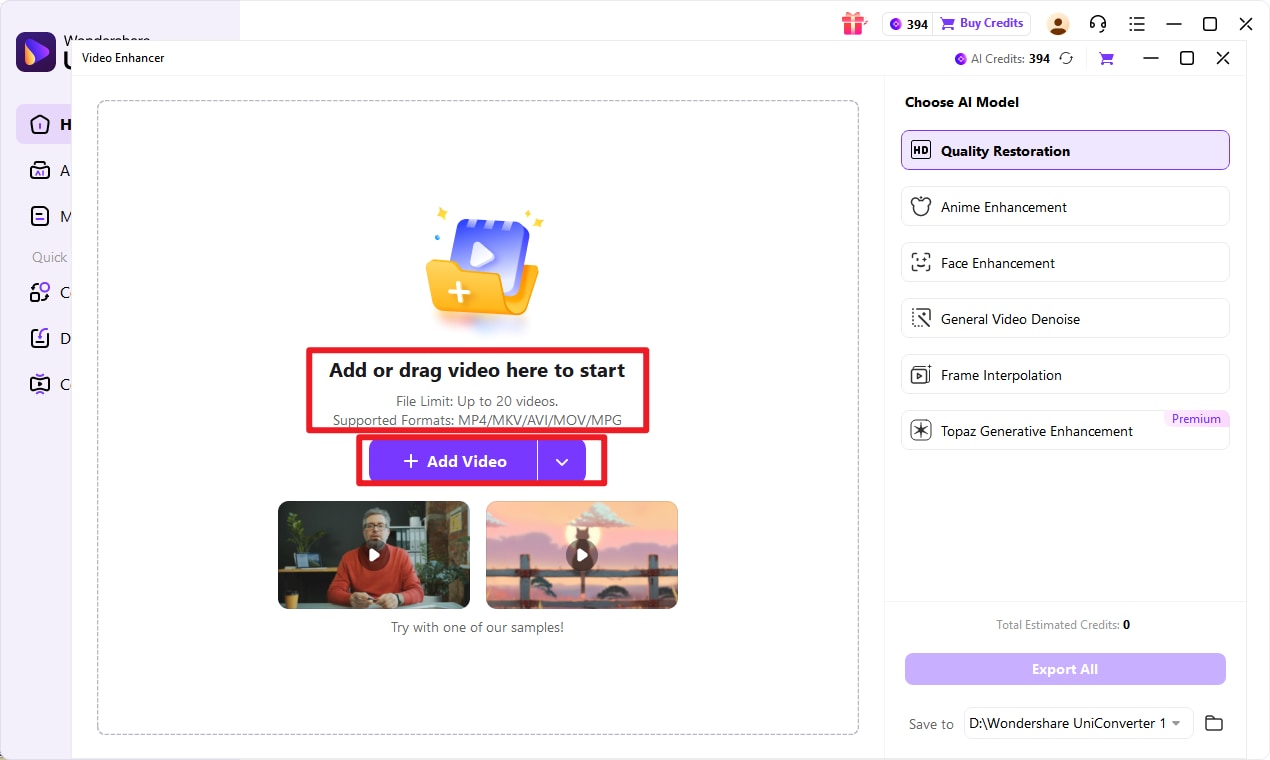
Step 2 Add Files to AI Video Enhancer
You add the video files you want to enhance using AI for this step. You can drag and drop the files on the software or click the “+” you see in the middle to open a File Explorer window, locate the files, and select them.
Step 3 Select AI Model
This AI Video Enhancer currently supports four AI models for video quality enhancement: Video Enhancement, General Denoiser, Frame Interpolation, and Video Upscaler. What do each of them do?
Video Enhancement helps enhance your video quality in just one click.
Anime Enhancement bring more vivid color and sharper lines in old anime clips.
Face Enhancement helps smooth wrinkles and scratches on skin and make face looks brighter.
With General Video Denoise, the AI reduces visual noise (grainy appearance in the video), so it’s perfect for videos captured in low light.
Frame Interpolation increases the video frame rate to make motions in the video smoother.
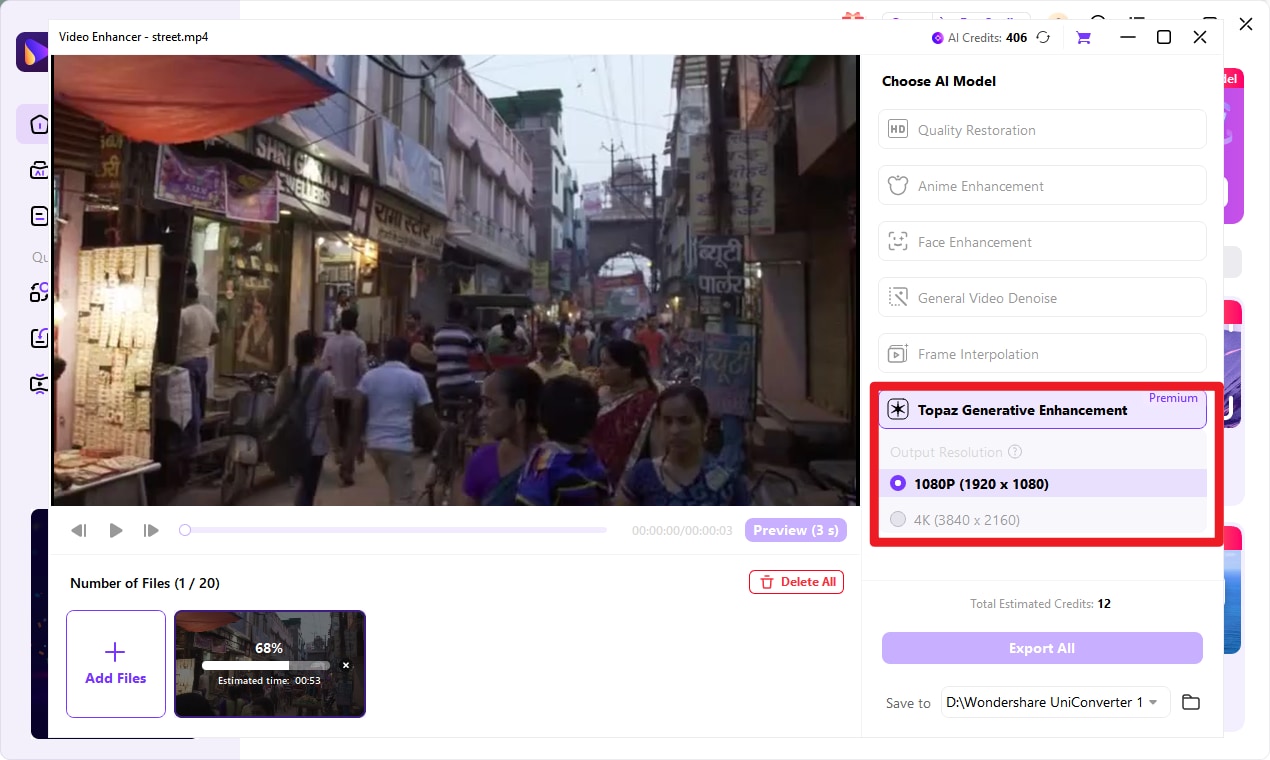
Topaz Generative Enhacement offers Topaz video enhancer API integrated and offers a more general but more professional enhancement effect.
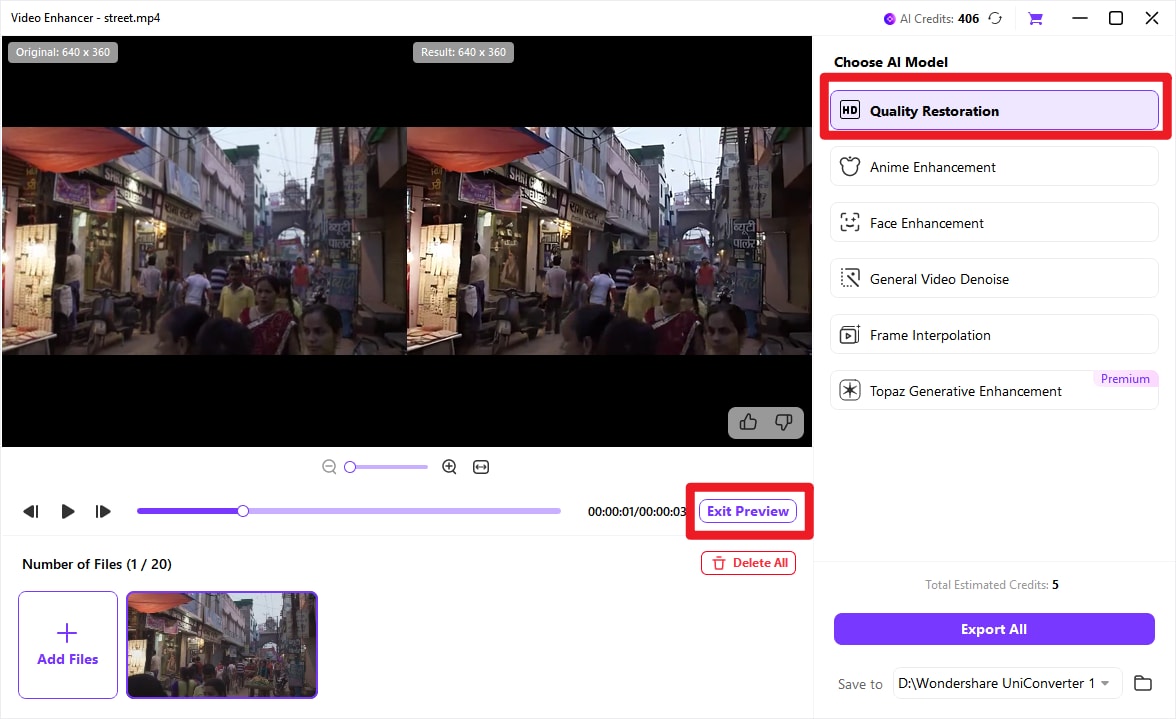
So, select the model you want. For this example, we’ll use the most common and popular model, Video Enhancement.
Step 4 Export Your Video
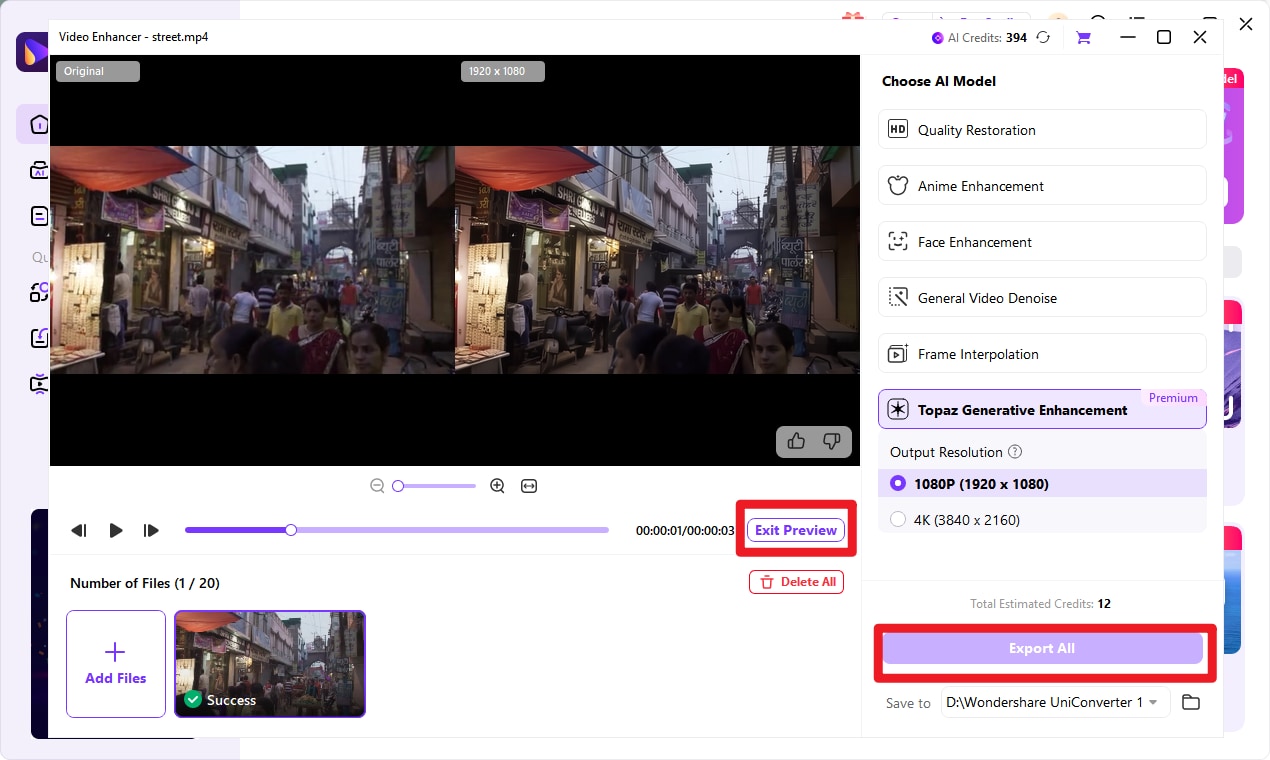
Click the "Preview" button to see what the enhanced video looks like. Click on “Export.” The longer the video, the longer the enhancing process will take. So, wait for the ‘Exporting…” bar to be depleted. A new window will automatically open with your upscaled video.
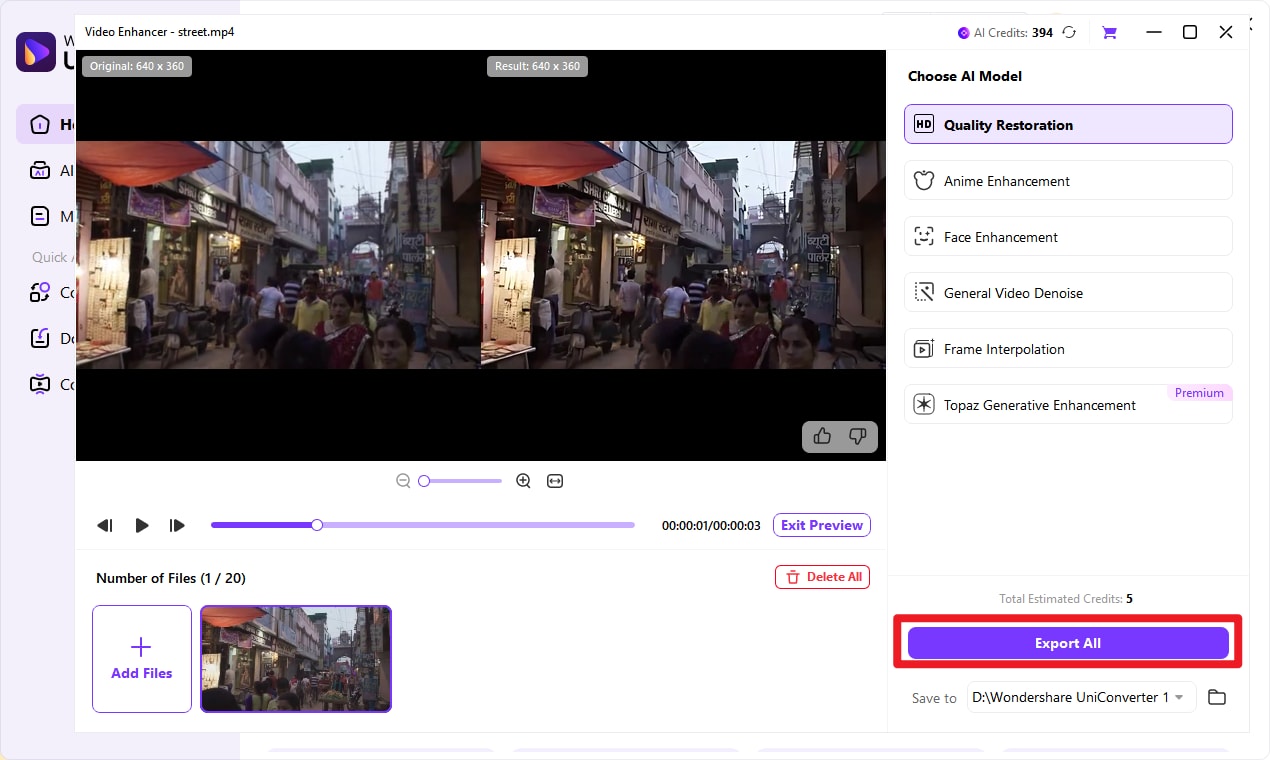
NOTE: For the “Frame Interpolation” model, you’ll also be asked to select a “Smoothness Setting,” which can be 2x (60 fps) or 4x (120 fps). The higher the frame rate, the smoother the video.
Tips : You can also choose Topaz Genenerative Enhancement model which has integrated Topaz video enhancer API, which offers a more versatile and more professinal visual effect.
This integration is engineered to intelligently recover lost detail and sharpen edges, while simultaneously restoring authentic vibrancy and correcting faded colors. Witness your footage regain its original clarity and lifelike tone. The refined improvement in definition and color is distinctly visible.

 print
print
