UniConverter User Guide
-
Get Started
-
Video Converter
- Convert DVD to Any Format | Wondershare UniConverter for Windows
- Add Media Files | Wondershare UniConverter for Windows
- Convert Video from Camcorder | Wondershare UniConverter for Windows
- Convert Videos for iPhone/iPad/Android Devices | Wondershare UniConverter for Windows
- Convert Videos for Social Network | Wondershare UniConverter for Windows
- Convert Videos from iOS & Android Devices | Wondershare UniConverter for Windows
- Convert Videos to Any Format | Wondershare UniConverter for Windows
- Convert Video to Audio | Wondershare UniConverter for Windows
- Mute Video | Wondershare UniConverter for Windows
- Add Audio to Video | Wondershare UniConverter for Windows
- Convert Multiple Video In Batches | Wondershare UniConverter for Windows
- Easily Convert 4K and 8K Videos | Wondershare UniConverter for Windows
- Convert Video to MP3 | Wondershare UniConverter for Windows
- Convert Video to GIF | Wondershare UniConverter for Windows
- Convert SDR Video to HDR | Wondershare UniConverter for Windows
- Convert Video to Image Sequence | Wondershare UniConverter for Windows
-
Audio Converter
-
Video Compressor
-
Downloader
-
Screen Recorder
-
Merger
-
DVD Burner
- Burn Videos to DVD | Wondershare UniConverter for Windows
- Convert DVD to ISO | Wondershare UniConverter for Windows
- Burn ISO to DVD | Wondershare UniConverter for Windows
-
Media Player
-
Video Editor
- Trim Video | Wondershare UniConverter for Windows
- Add Watermark | Wondershare UniConverter for Windows
- Crop Video | Wondershare UniConverter for Windows
- Apply Effect | Wondershare UniConverter for Windows
- Add Subtitle | Wondershare UniConverter for Windows
- Audio Track Volume | Wondershare UniConverter for Windows
- Auto Video Cutter | Wondershare UniConverter for Windows
-
Tools
- Image Converter | Wondershare UniConverter for Windows
- GIF Maker | Wondershare UniConverter for Windows
- Fix Video Metadata | Wondershare UniConverter for Windows
- CD Burner | Wondershare UniConverter for Windows
- Convert CD to MP3 | Wondershare UniConverter for Windows
- Convert Video to VR | Wondershare UniConverter for Windows
- Transfer Video/Audio Files to iOS Device | Wondershare UniConverter for Windows
- Transfer Video/Audio to Android Device | Wondershare UniConverter for Windows
- Subtitle Editor | Wondershare UniConverter for Windows
- Watermark Editor | Wondershare UniConverter for Windows
- Smart Trimmer | Wondershare UniConverter for Windows
- Background Remover | Wondershare UniConverter for Windows
- Auto Crop Video | Wondershare UniConverter
- AI Portrait | Wondershare UniConverter
- Intro & Outro | Wondershare UniConverter
- Vocal Remover | Wondershare UniConverter for Windows
- Noise Remover | Wondershare UniConverter for Windows
- Video Stabilization | Wondershare UniConverter for Windows
- AI Video Enhancer | Wondershare UniConverter for Windows
- AI Image Enhancer | Wondershare UniConverter for Windows
- AI Script Generator | Wondershare UniConverter for Windows
- Text To Speech | Wondershare UniConverter for Windows
- AI Subtitle Translator | Wondershare UniConverter for Windows
- AI Thumbnail Maker | Wondershare UniConverter for Windows
- Auto Highlight | Wondershare UniConverter for Windows
- Scene Detection | Wondershare UniConverter for Windows
- Remove Watermark | Wondershare UniConverter for Windows
- Voice Changer | Wondershare UniConverter for Windows
- AI Video Enhancer | Use AI Batch Image Enhancement
- Crop Image | Wondershare UniConverter for Windows
- Rotate Image | Wondershare UniConverter for Windows
- Resize Image | Wondershare UniConverter for Windows
- Image Edit | Wondershare UniConverter for Windows
- Anime Enhancement | Wondershare UniConverter for Windows
- Face Enhancement | Wondershare UniConverter for Windows
- Adjust Speed of TTS Audio | Wondershare UniConverter for Windows
- Voice Clone | Wondershare UniConverter for Windows
- Enable NVIDIA Acceleration | NVIDIA Graphics Driver Installation Tutorial on Win
- Smart Summarizer | Wondershare UniConverter for Windows
FAQs
Video/Audio Solutions
How to convert DVD to ISO file or DVD folder
Wondershare UniConverter (formerly known as Wondershare Video Converter Ultimate) is even capable of converting your DVDs to ISO files or DVD Folders. With this approach, you don’t have to rely on the optical media and the disc drive to watch your favorite movies as they can be accessed right from your local hard drive itself. Here’s how you can create a DVD folder or an ISO file out of a physical DVD:
How to Convert DVD to ISO File or DVD Folder - Wondershare UniConverter (Win) User Guide
Step 1 Access the DVD within Wondershare UniConverter.
Insert the source DVD to the DVD drive connected to your PC, launch Wondershare UniConverter, select the DVD Burner category from the Home section.

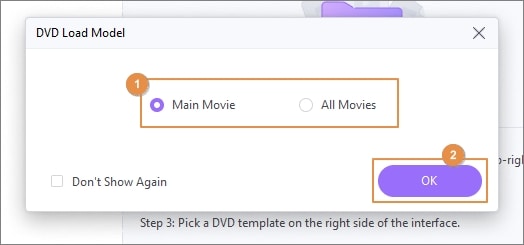
Click the Load DVD icon from the upper-left area of the center window, select the Main Movie or All Movies radio button on the DVD Load Model box, and click OK.


Step 2 Choose a DVD template.
Click the DVD icon from the right pane, choose your preferred template from the left pane of the DVD Template box that opens up, and optionally click the Browse (…) icons next to the Add Background Picture and Add Background Music fields to select a suitable custom picture and audio track for the selected template, and click OK.

Step 3 Customize the DVD settings.
From under the template thumbnail in the right pane, enter a name for the disc in the DVD Label field, and choose your preferred options from the Aspect Ratio, TV Standard, and Quality drop-down lists.

Step 4 Convert the DVD.
Select a DVD Folder or ISO File from the Burn video to the drop-down list at the top-right corner, and click Burn to convert the DVD to a DVD folder or ISO file.

Additional info:
If you want to change the default location the DVD folders or ISO files are saved to, and you can click the Options icon from the top-right corner, click Preferences, go to the Location tab, and click Change from under the Save Burned Folder/ISO files to section, pick your preferred destination folder, and click OK to save the changes.


 print
print
