User Guide
How to use Wondershare UniConverter (originally Wondershare Video Converter
Ultimate)?
Learn the step-by-step guide below.

UniConverter User Guide
-
Get Started
-
Video Converter
- Convert DVD to Any Format | Wondershare UniConverter for Windows
- Add Media Files | Wondershare UniConverter for Windows
- Convert Video from Camcorder | Wondershare UniConverter for Windows
- Convert Videos for iPhone/iPad/Android Devices | Wondershare UniConverter for Windows
- Convert Videos for Social Network | Wondershare UniConverter for Windows
- Convert Videos from iOS & Android Devices | Wondershare UniConverter for Windows
- Convert Videos to Any Format | Wondershare UniConverter for Windows
- Convert Video to Audio | Wondershare UniConverter for Windows
- Mute Video | Wondershare UniConverter for Windows
- Add Audio to Video | Wondershare UniConverter for Windows
- Convert Multiple Video In Batches | Wondershare UniConverter for Windows
- Easily Convert 4K and 8K Videos | Wondershare UniConverter for Windows
- Convert Video to MP3 | Wondershare UniConverter for Windows
- Convert Video to GIF | Wondershare UniConverter for Windows
- Convert SDR Video to HDR | Wondershare UniConverter for Windows
- Convert Video to Image Sequence | Wondershare UniConverter for Windows
-
Audio Converter
-
Video Compressor
-
Downloader
-
Screen Recorder
-
Merger
-
DVD Burner
-
Media Player
-
Video Editor
- Trim Video | Wondershare UniConverter for Windows
- Add Watermark | Wondershare UniConverter for Windows
- Crop Video | Wondershare UniConverter for Windows
- Apply Effect | Wondershare UniConverter for Windows
- Add Subtitle | Wondershare UniConverter for Windows
- Audio Track Volume | Wondershare UniConverter for Windows
- Auto Video Cutter | Wondershare UniConverter for Windows
-
Tools
- Image Converter | Wondershare UniConverter for Windows
- GIF Maker | Wondershare UniConverter for Windows
- Fix Video Metadata | Wondershare UniConverter for Windows
- CD Burner | Wondershare UniConverter for Windows
- Convert CD to MP3 | Wondershare UniConverter for Windows
- Convert Video to VR | Wondershare UniConverter for Windows
- Transfer Video/Audio Files to iOS Device | Wondershare UniConverter for Windows
- Transfer Video/Audio to Android Device | Wondershare UniConverter for Windows
- Subtitle Editor | Wondershare UniConverter for Windows
- How to Remove Subtitles, Watermarks & Objects | UniConverter for Windows
- Smart Trimmer | Wondershare UniConverter for Windows
- Background Remover | Wondershare UniConverter for Windows
- Auto Crop Video | Wondershare UniConverter
- AI Portrait | Wondershare UniConverter
- Intro & Outro | Wondershare UniConverter
- Vocal Remover | Wondershare UniConverter for Windows
- Noise Remover | Wondershare UniConverter for Windows
- Video Stabilization | Wondershare UniConverter for Windows
- How to Enhance Video Quality with AI | UniConverter for Windows
- AI Image Enhancer | Wondershare UniConverter for Windows
- AI Script Generator | Wondershare UniConverter for Windows
- Text To Speech | Wondershare UniConverter for Windows
- AI Subtitle Translator | Wondershare UniConverter for Windows
- AI Thumbnail Maker | Wondershare UniConverter for Windows
- Auto Highlight | Wondershare UniConverter for Windows
- Scene Detection | Wondershare UniConverter for Windows
- Remove Watermark | Wondershare UniConverter for Windows
- Voice Changer | Wondershare UniConverter for Windows
- AI Video Enhancer | Use AI Batch Image Enhancement
- Crop Image | Wondershare UniConverter for Windows
- Rotate Image | Wondershare UniConverter for Windows
- Resize Image | Wondershare UniConverter for Windows
- Image Edit | Wondershare UniConverter for Windows
- Anime Enhancement | Wondershare UniConverter for Windows
- How to Enhance Faces in Videos with AI | UniConverter for Windows
- Adjust Speed of TTS Audio | Wondershare UniConverter for Windows
- Voice Clone | Wondershare UniConverter for Windows
- Enable NVIDIA Acceleration | NVIDIA Graphics Driver Installation Tutorial on Win
- Smart Summarizer | Wondershare UniConverter for Windows
- How to Blur Faces and Moving Objects in Videos | UniConverter for Windows
- AI Media Agent | Wondershare UniConverter for Windows
FAQs
Video/Audio Solutions
Remove Watermark
Part 1: Introduction
Remove Watermarks uses AI technology to remove unwanted watermarks, people, and objects from images.
Wondershare UniConverter’s Remove Watermarks feature helps you quickly remove unwanted elements such as watermarks, passersby, and other distractions. A new AI Brush selection mode is now available in Manual mode. Simply brush once or twice over the target area, and AI will automatically detect the object boundaries and generate a complete selection, making object removal easier and more efficient.
Part 2: Guides
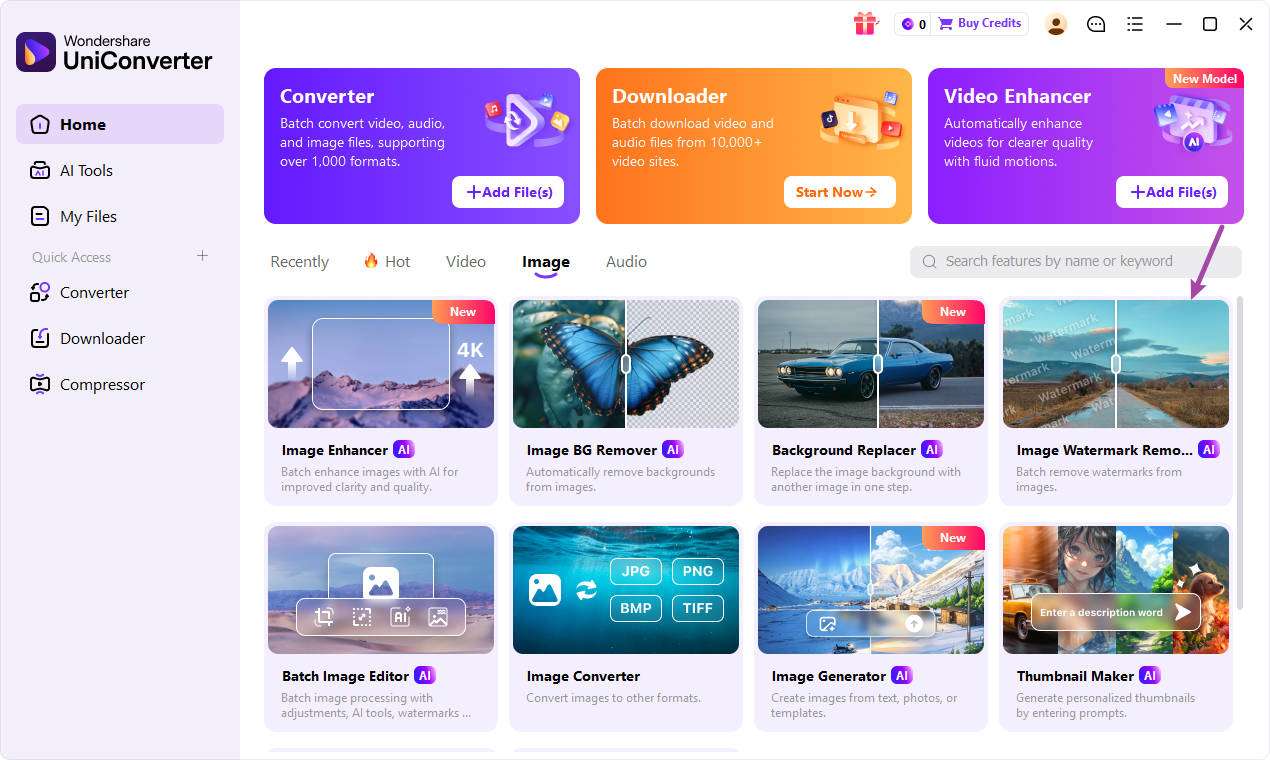
Step 1: Open Remove Watermarks
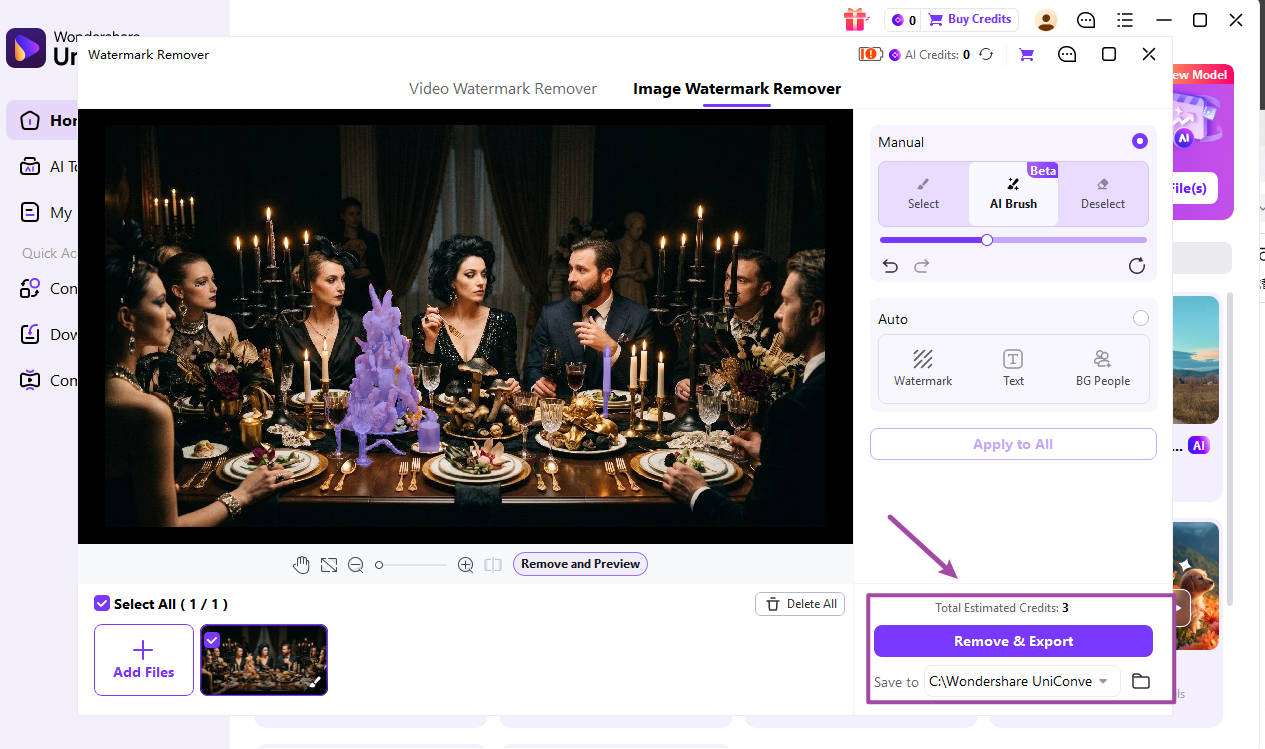
Launch Wondershare UniConverter and open Remove Watermarks. Select Image Watermark Remover to enter the image watermark removal interface, then add the image you want to process.
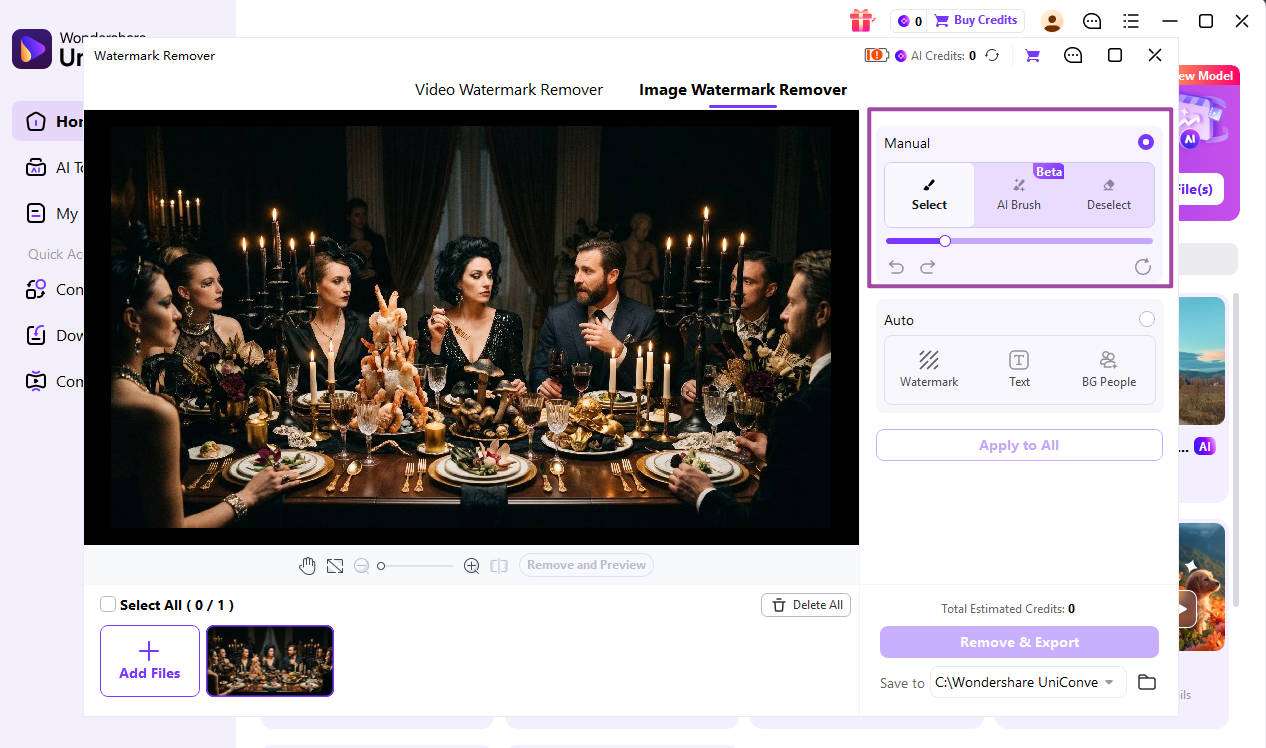
Step 2: Select a Selection Tool
In Manual mode, you can choose from three selection tools: Select, AI Brush, and Deselect.
Select lets you manually brush over the watermark, person, or object you want to remove. AI Brush uses AI to detect the target object automatically. Simply brush once or twice over the target area, and AI will identify the object boundaries and generate a complete selection. Deselect lets you remove unwanted areas from the current selection.
The AI Brush model will download automatically when you enter the feature for the first time. If the model download fails, click AI Brush again to retry the download.
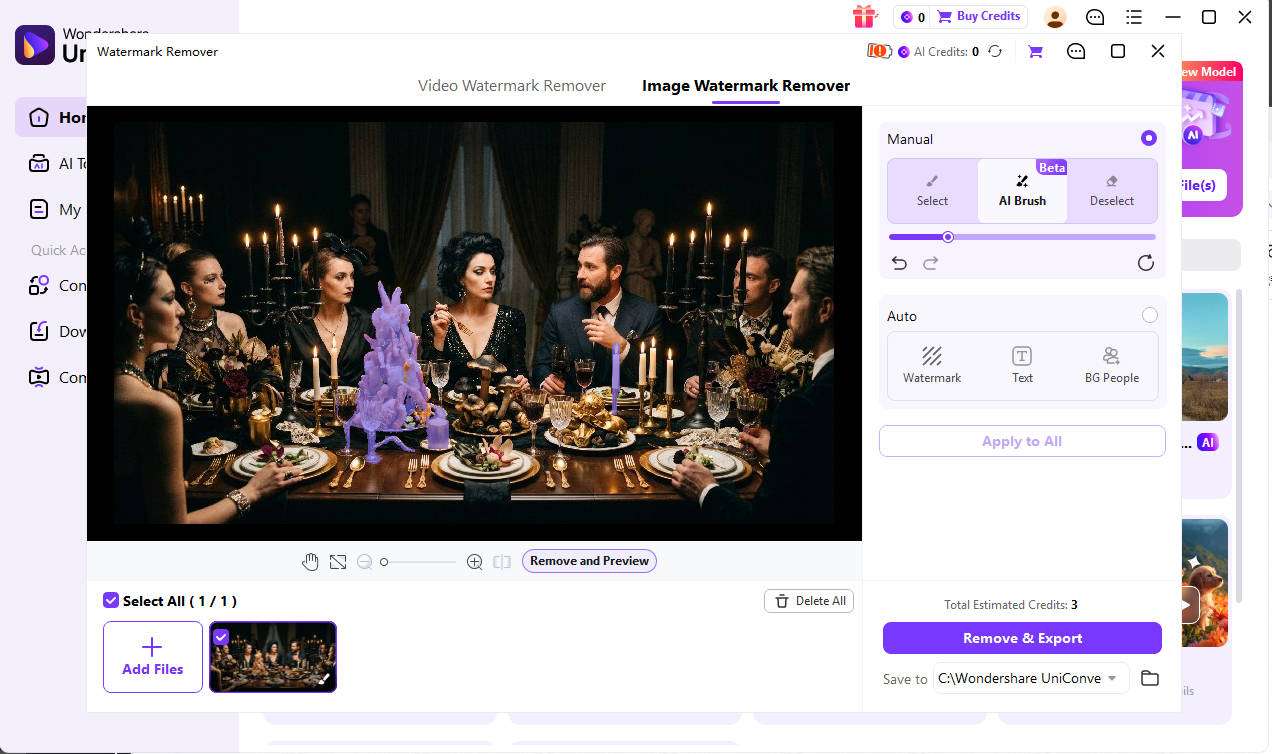
Step 3: Select the Target Area
Choose the appropriate selection tool and brush over the watermark, person, or object you want to remove.
When using Select, manually brush over the target area to create a selection. When using AI Brush, you only need to brush once or twice inside the target area. There is no need to trace the entire outline of the object.
If the selection includes an unwanted area, switch to Deselect and brush over the area you want to remove from the selection.
Once the target area is selected, click Remove and Preview to process the image and preview the result.
Step 4: Export the Result
Check the processed image in the preview area to make sure the watermark, person, or unwanted object has been removed as expected.
If further adjustment is needed, return to the selection tools and refine the target area before previewing the result again.
After confirming the result, click Remove & Export to save the processed image. The exported image will be saved to the selected location.
 print
print