User Guide
How to use Wondershare UniConverter (originally Wondershare Video Converter
Ultimate)?
Learn the step-by-step guide below.
Download the latest version | Secure & verified

Home > User Guide
UniConverter User Guide
-
Get Started
-
Video Converter
- Convert DVD to Any Format | Wondershare UniConverter for Windows
- Add Media Files | Wondershare UniConverter for Windows
- Convert Video from Camcorder | Wondershare UniConverter for Windows
- Convert Videos for iPhone/iPad/Android Devices | Wondershare UniConverter for Windows
- Convert Videos for Social Network | Wondershare UniConverter for Windows
- Convert Videos from iOS & Android Devices | Wondershare UniConverter for Windows
- Convert Videos to Any Format | Wondershare UniConverter for Windows
- Convert Video to Audio | Wondershare UniConverter for Windows
- Mute Video | Wondershare UniConverter for Windows
- Add Audio to Video | Wondershare UniConverter for Windows
- Convert Multiple Video In Batches | Wondershare UniConverter for Windows
- Easily Convert 4K and 8K Videos | Wondershare UniConverter for Windows
- Convert Video to MP3 | Wondershare UniConverter for Windows
- Convert Video to GIF | Wondershare UniConverter for Windows
- Convert SDR Video to HDR | Wondershare UniConverter for Windows
- Convert Video to Image Sequence | Wondershare UniConverter for Windows
-
Audio Converter
-
Video Compressor
-
Downloader
-
Screen Recorder
-
Merger
-
DVD Burner
-
Media Player
-
Video Editor
- Trim Video | Wondershare UniConverter for Windows
- Add Watermark | Wondershare UniConverter for Windows
- Crop Video | Wondershare UniConverter for Windows
- Apply Effect | Wondershare UniConverter for Windows
- Add Subtitle | Wondershare UniConverter for Windows
- Audio Track Volume | Wondershare UniConverter for Windows
- Auto Video Cutter | Wondershare UniConverter for Windows
-
Tools
- Image Converter | Wondershare UniConverter for Windows
- GIF Maker | Wondershare UniConverter for Windows
- Fix Video Metadata | Wondershare UniConverter for Windows
- CD Burner | Wondershare UniConverter for Windows
- Convert CD to MP3 | Wondershare UniConverter for Windows
- Convert Video to VR | Wondershare UniConverter for Windows
- Transfer Video/Audio Files to iOS Device | Wondershare UniConverter for Windows
- Transfer Video/Audio to Android Device | Wondershare UniConverter for Windows
- Subtitle Editor | Wondershare UniConverter for Windows
- Watermark Editor | Wondershare UniConverter for Windows
- Smart Trimmer | Wondershare UniConverter for Windows
- Background Remover | Wondershare UniConverter for Windows
- Auto Crop Video | Wondershare UniConverter
- AI Portrait | Wondershare UniConverter
- Intro & Outro | Wondershare UniConverter
- Vocal Remover | Wondershare UniConverter for Windows
- Noise Remover | Wondershare UniConverter for Windows
- Video Stabilization | Wondershare UniConverter for Windows
- AI Video Enhancer | Wondershare UniConverter for Windows
- AI Image Enhancer | Wondershare UniConverter for Windows
- AI Script Generator | Wondershare UniConverter for Windows
- Text To Speech | Wondershare UniConverter for Windows
- AI Subtitle Translator | Wondershare UniConverter for Windows
- AI Thumbnail Maker | Wondershare UniConverter for Windows
- Auto Highlight | Wondershare UniConverter for Windows
- Scene Detection | Wondershare UniConverter for Windows
- Remove Watermark | Wondershare UniConverter for Windows
- Voice Changer | Wondershare UniConverter for Windows
- AI Video Enhancer | Use AI Batch Image Enhancement
- Crop Image | Wondershare UniConverter for Windows
- Rotate Image | Wondershare UniConverter for Windows
- Resize Image | Wondershare UniConverter for Windows
- Image Edit | Wondershare UniConverter for Windows
- Anime Enhancement | Wondershare UniConverter for Windows
- Face Enhancement | Wondershare UniConverter for Windows
- Adjust Speed of TTS Audio | Wondershare UniConverter for Windows
- Voice Clone | Wondershare UniConverter for Windows
- Enable NVIDIA Acceleration | NVIDIA Graphics Driver Installation Tutorial on Win
- Smart Summarizer | Wondershare UniConverter for Windows
FAQs
Video/Audio Solutions
Easy Step Guide to Enable Your NVIDIA Acceleration
This tutorial provides a beginner-friendly, step-by-step guide to installing or updating NVIDIA graphics drivers. We’ll cover how to check your graphics card model, download the correct driver from NVIDIA’s official website, and complete the installation process. Additionally, we’ll introduce the GeForce Experience tool for those who prefer automatic driver management.
By the end of this guide, you’ll be able to confidently install or update your NVIDIA drivers and keep your system running at peak performance. 🚀
🧩Step 1: Confirm your graphics card model
Method 1: Via Device Manager
- Right-click [this computer] → Select [management]]
- Open Device Manager]
- Expand [Display Adapter]]
- Check the graphics card model (e. G. "NVIDIA GeForce RTX 3060")
Method 2: Use NVIDIA official tools (automatic detection)
Visit: https://www.nvidia.com/Download/Scan.aspx
🧩Step 2: Download the driver
- Open the official NVIDIA driver download page:
👉 https://www.nvidia.com/en-us/drivers/
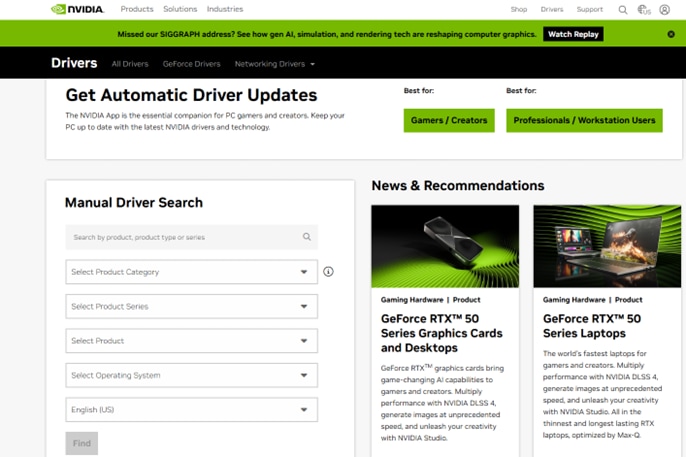
- Select the corresponding item: [When you select your product type, two download entries will appear on the page, as shown in the screenshot]]
- Product Type:GeForce / RTX / Quadro, etc
- Product Series: For example, RTX 30 Series
- Product (Product model): such as RTX 3060
- Operating System:like Windows 10 64-bit
- Click [Search]]
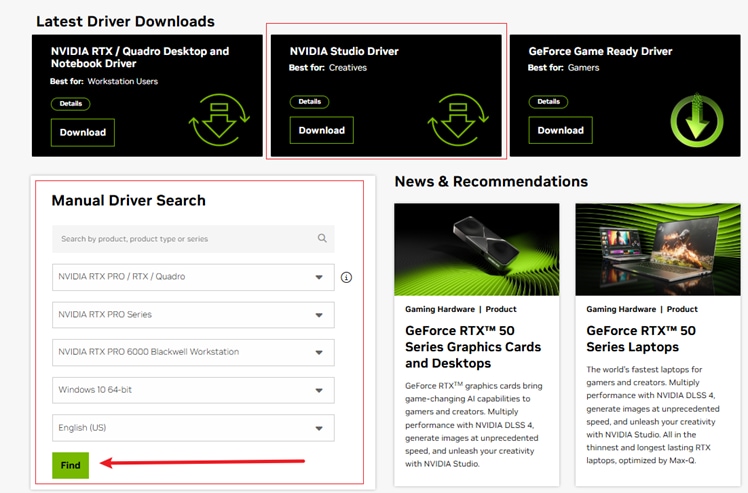
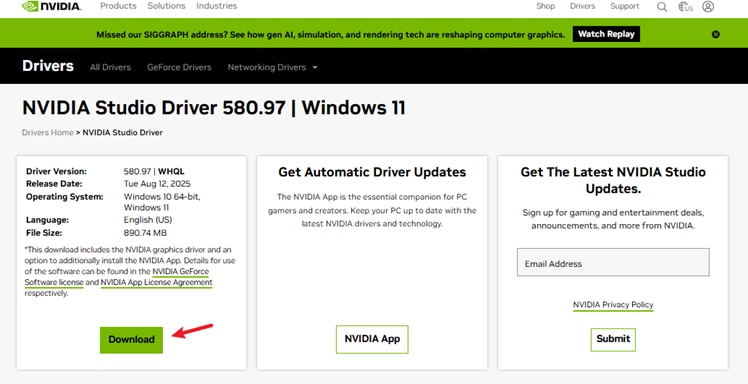
- Click [Download] to Download the driver installer (usually.exeFormat)
🧩Step 3: Install the driver
- Double click to download good.exeFile
- Select [NVIDIA graphics driver and GeForce Experience] (or driver only)
- Read and accept the license agreements
- Select the installation type:
- Quick Installation (recommend)
- Custom installation (components can be manually selected and a Clean Installation can be performed)
- Wait for the installation to complete → restart the computer
🚀Extra recommend: Automatically manage drivers using GeForce Experience
- Download address:
👉 https://www.nvidia.com/en-us/geforce/geforce-experience/ - After installation, log in to NVIDIA account, click [Drivers] → automatically detect the driver and install it
 print
print
