User Guide
How to use Wondershare UniConverter (originally Wondershare Video Converter
Ultimate)?
Learn the step-by-step guide below.

UniConverter User Guide
-
Get Started
-
Video Converter
- Convert DVD to Any Format | Wondershare UniConverter for Windows
- Add Media Files | Wondershare UniConverter for Windows
- Convert Video from Camcorder | Wondershare UniConverter for Windows
- Convert Videos for iPhone/iPad/Android Devices | Wondershare UniConverter for Windows
- Convert Videos for Social Network | Wondershare UniConverter for Windows
- Convert Videos from iOS & Android Devices | Wondershare UniConverter for Windows
- Convert Videos to Any Format | Wondershare UniConverter for Windows
- Convert Video to Audio | Wondershare UniConverter for Windows
- Mute Video | Wondershare UniConverter for Windows
- Add Audio to Video | Wondershare UniConverter for Windows
- Convert Multiple Video In Batches | Wondershare UniConverter for Windows
- Easily Convert 4K and 8K Videos | Wondershare UniConverter for Windows
- Convert Video to MP3 | Wondershare UniConverter for Windows
- Convert Video to GIF | Wondershare UniConverter for Windows
- Convert SDR Video to HDR | Wondershare UniConverter for Windows
- Convert Video to Image Sequence | Wondershare UniConverter for Windows
-
Audio Converter
-
Video Compressor
-
Downloader
-
Screen Recorder
-
Merger
-
DVD Burner
-
Media Player
-
Video Editor
- Trim Video | Wondershare UniConverter for Windows
- Add Watermark | Wondershare UniConverter for Windows
- Crop Video | Wondershare UniConverter for Windows
- Apply Effect | Wondershare UniConverter for Windows
- Add Subtitle | Wondershare UniConverter for Windows
- Audio Track Volume | Wondershare UniConverter for Windows
- Auto Video Cutter | Wondershare UniConverter for Windows
-
Tools
- Image Converter | Wondershare UniConverter for Windows
- GIF Maker | Wondershare UniConverter for Windows
- Fix Video Metadata | Wondershare UniConverter for Windows
- CD Burner | Wondershare UniConverter for Windows
- Convert CD to MP3 | Wondershare UniConverter for Windows
- Convert Video to VR | Wondershare UniConverter for Windows
- Transfer Video/Audio Files to iOS Device | Wondershare UniConverter for Windows
- Transfer Video/Audio to Android Device | Wondershare UniConverter for Windows
- Subtitle Editor | Wondershare UniConverter for Windows
- How to Remove Subtitles, Watermarks & Objects | UniConverter for Windows
- Smart Trimmer | Wondershare UniConverter for Windows
- Background Remover | Wondershare UniConverter for Windows
- Auto Crop Video | Wondershare UniConverter
- AI Portrait | Wondershare UniConverter
- Intro & Outro | Wondershare UniConverter
- Vocal Remover | Wondershare UniConverter for Windows
- Noise Remover | Wondershare UniConverter for Windows
- Video Stabilization | Wondershare UniConverter for Windows
- How to Enhance Video Quality with AI | UniConverter for Windows
- AI Image Enhancer | Wondershare UniConverter for Windows
- AI Script Generator | Wondershare UniConverter for Windows
- Text To Speech | Wondershare UniConverter for Windows
- AI Subtitle Translator | Wondershare UniConverter for Windows
- AI Thumbnail Maker | Wondershare UniConverter for Windows
- Auto Highlight | Wondershare UniConverter for Windows
- Scene Detection | Wondershare UniConverter for Windows
- Remove Watermark | Wondershare UniConverter for Windows
- Voice Changer | Wondershare UniConverter for Windows
- AI Video Enhancer | Use AI Batch Image Enhancement
- Crop Image | Wondershare UniConverter for Windows
- Rotate Image | Wondershare UniConverter for Windows
- Resize Image | Wondershare UniConverter for Windows
- Image Edit | Wondershare UniConverter for Windows
- Anime Enhancement | Wondershare UniConverter for Windows
- How to Enhance Faces in Videos with AI | UniConverter for Windows
- Adjust Speed of TTS Audio | Wondershare UniConverter for Windows
- Voice Clone | Wondershare UniConverter for Windows
- Enable NVIDIA Acceleration | NVIDIA Graphics Driver Installation Tutorial on Win
- Smart Summarizer | Wondershare UniConverter for Windows
- How to Blur Faces and Moving Objects in Videos | UniConverter for Windows
- AI Media Agent | Wondershare UniConverter for Windows
FAQs
Video/Audio Solutions
How to Remove Subtitles, Watermarks, and Objects from Videos
Wondershare UniConverter 18 helps you remove burned-in subtitles, video watermarks, and moving objects with AI-powered tools. The upgraded Video Eraser supports precise subtitle removal, Ultra AI watermark removal, batch processing, and moving-object tracking. Follow the steps below to remove unwanted content from videos on Windows.
How to Remove Subtitles, Watermarks, and Objects - Wondershare UniConverter (Win) User Guide
How to Remove Burned-In Subtitles from Videos
UniConverter 18 introduces a Subtitles mode in Ultra AI. It detects text and its appearance times within the selected area, helping remove burned-in subtitles without continuously affecting other parts of the video.
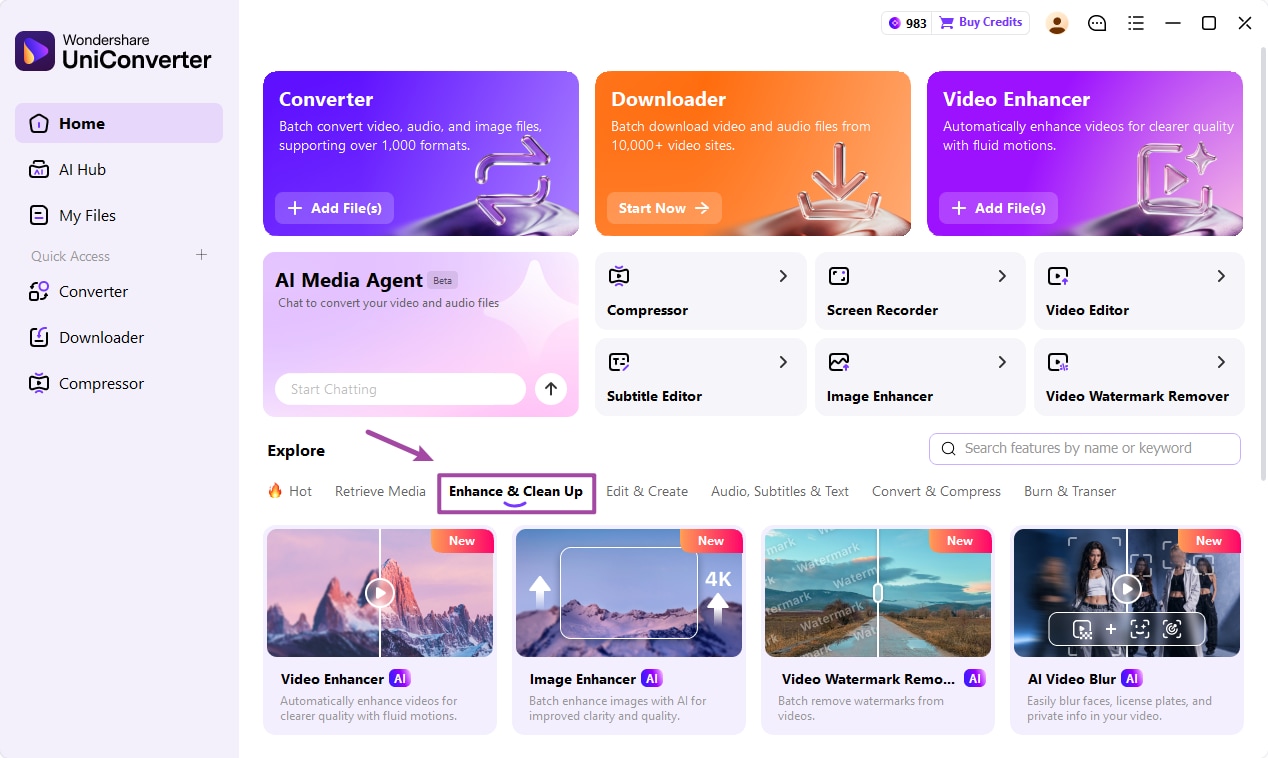
Step 1 Open Video Subtitle Remover.
Launch Wondershare UniConverter 18 and go to Enhance & Clean Up on the Home screen.
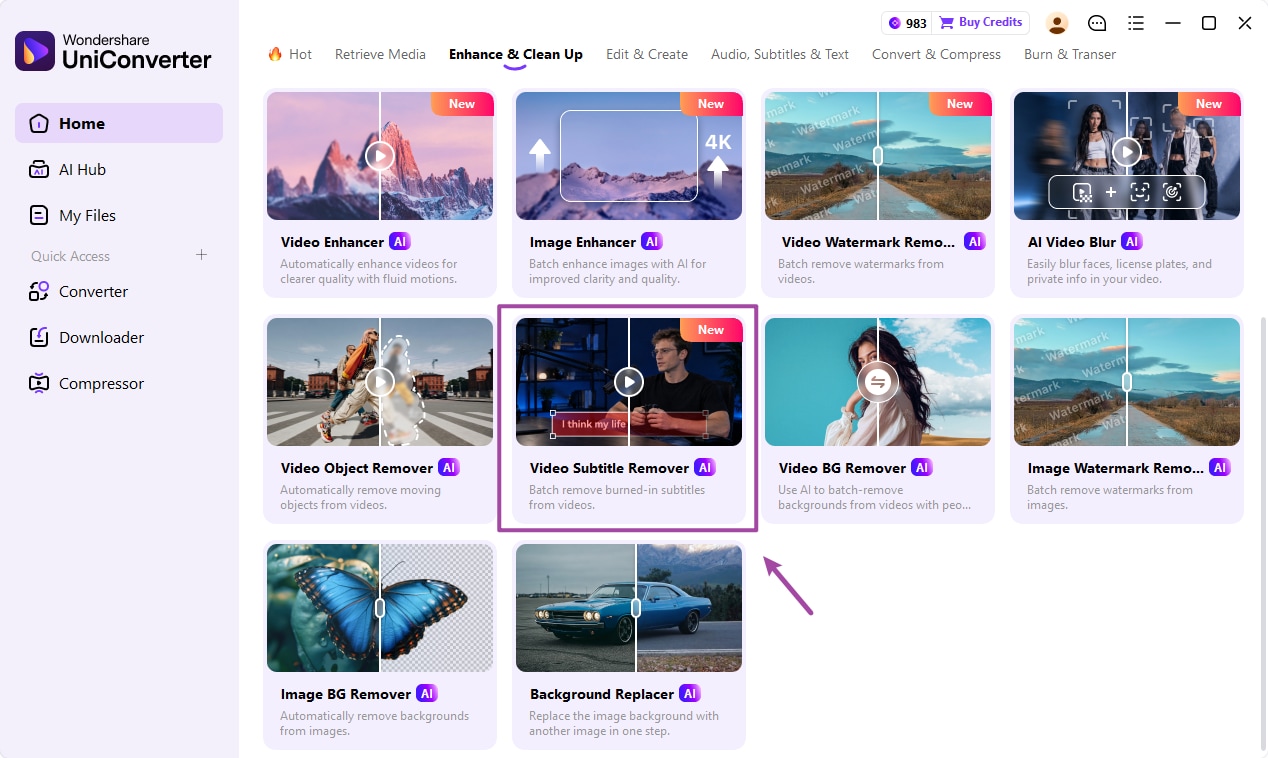
Click Video Subtitle Remover to open the Video Eraser workspace.
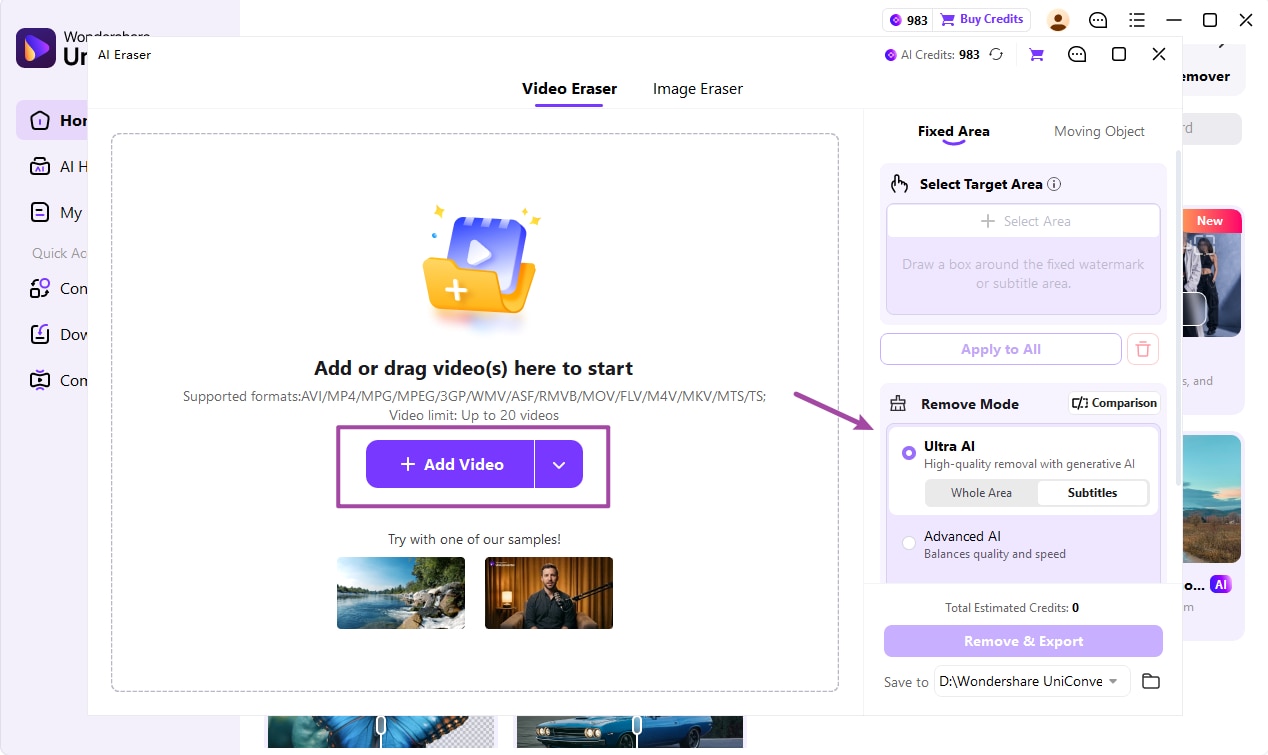
Step 2 Import a video and choose Subtitles mode.
Click Add Video to import a video containing burned-in subtitles. Under Fixed Area, select Ultra AI and choose Subtitles instead of Whole Area.
Step 3 Select the subtitle area.
Move the playhead to a frame where the subtitles are visible. Click Select Area and draw a box around the subtitle region. Make sure the selection covers the longest subtitles that may appear while avoiding unnecessary areas.
In Subtitles mode, Ultra AI detects text within the selected region and targets it when subtitles appear, helping preserve other on-screen content.
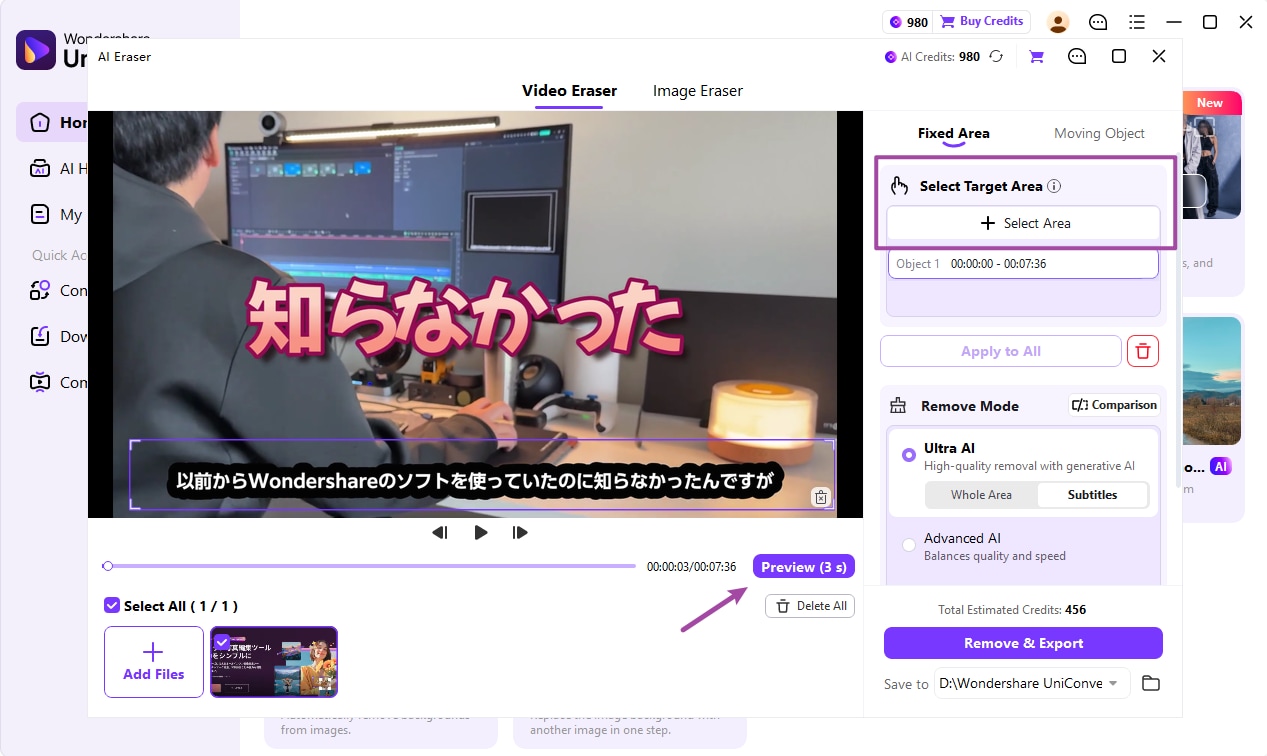
Step 4 Preview the subtitle removal.
Click Preview (3 s) to check the removal result. Review the processed clip to see whether the subtitles have been removed while other on-screen content remains intact.
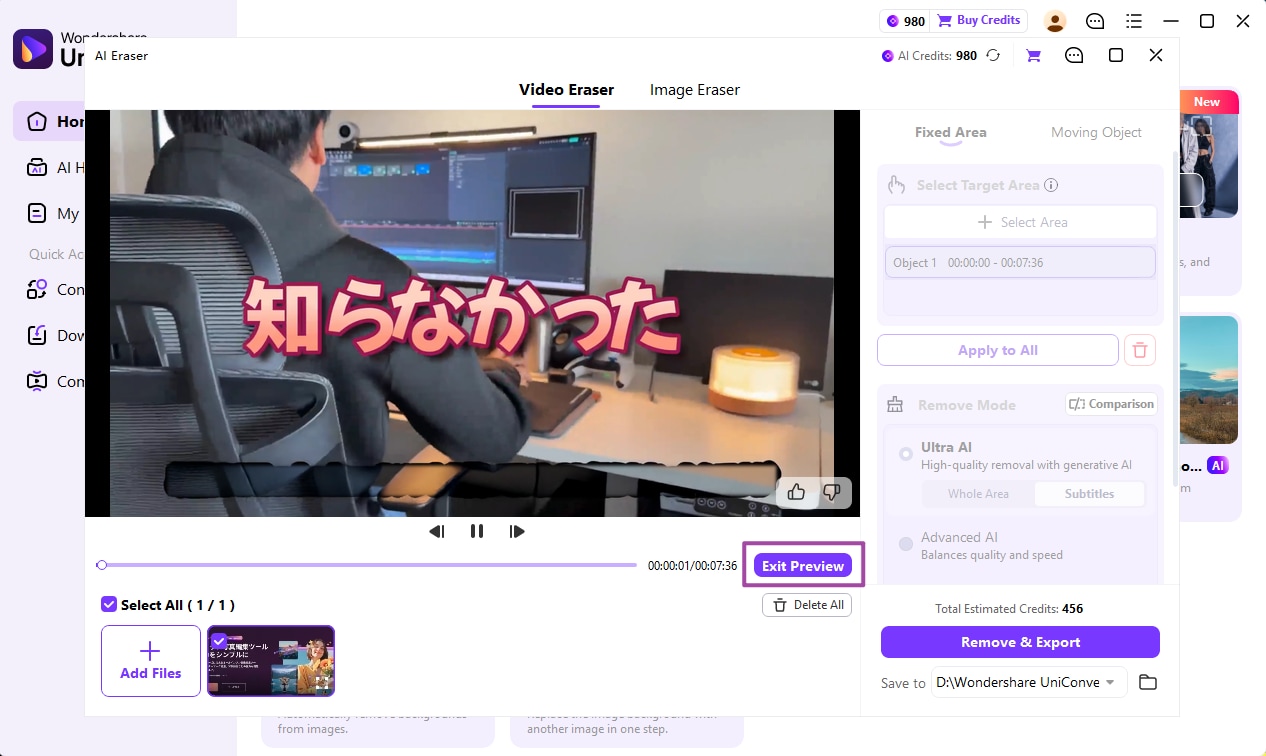
Note: Ultra AI previews process a 3-second clip and consume AI credits. Subtitles mode works best with subtitles that remain in a consistent position. Moving or highly stylized subtitles may produce less consistent results.
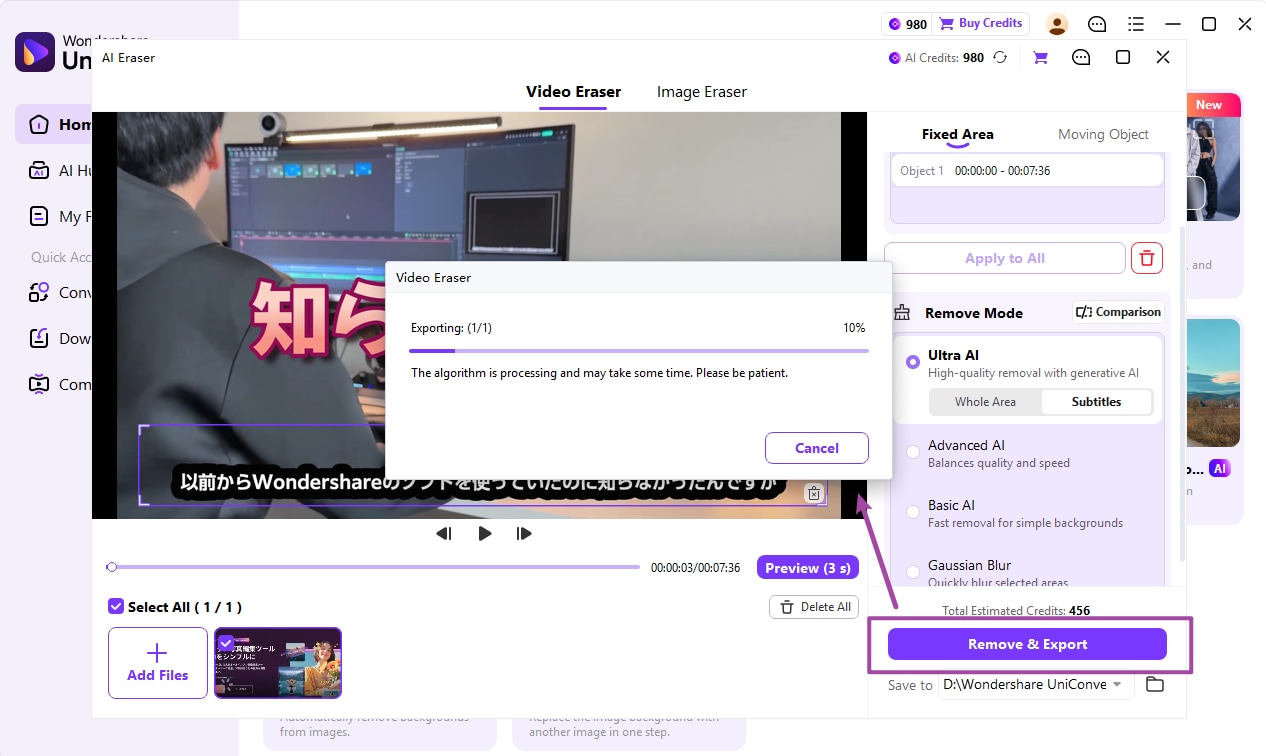
Step 5 Remove subtitles and export the video.
Choose the destination folder under Save to, review the estimated AI credits, and click Remove & Export. Wait for UniConverter to process and save the video.
How to Remove Video Watermarks with Ultra AI and Batch Processing
UniConverter 18 improves Ultra AI watermark removal for complex backgrounds and longer videos. You can select fixed watermarks or logos, preview the removal, and process multiple videos in a batch.
Step 1 Open Video Watermark Remover.
On the UniConverter Home screen, click Video Watermark Remover to open Video Eraser.
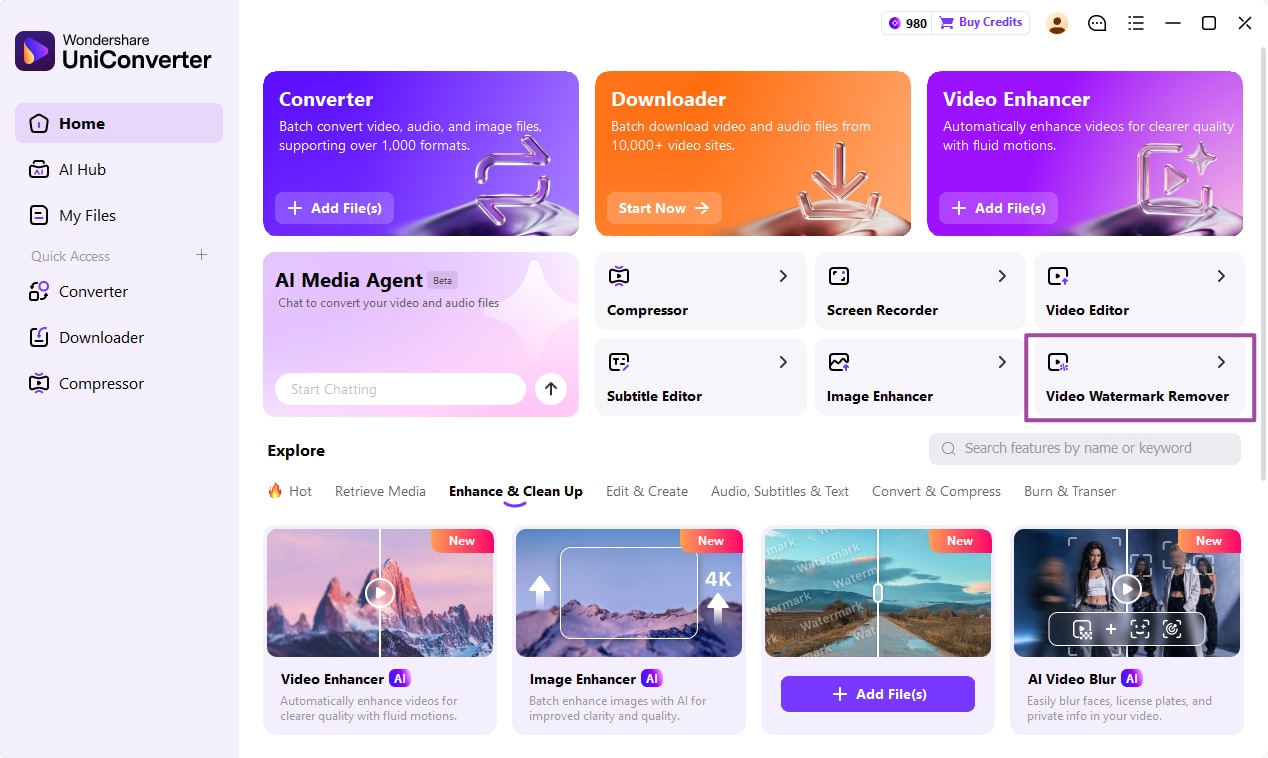
Step 2 Import a video and select the watermark area.
Click Add Video to import a watermarked video. Choose Fixed Area, select Ultra AI, and keep Whole Area selected.
Click Select Area and draw a box around the watermark or logo. Adjust the selection to cover the entire watermark while keeping the surrounding area as small as possible.
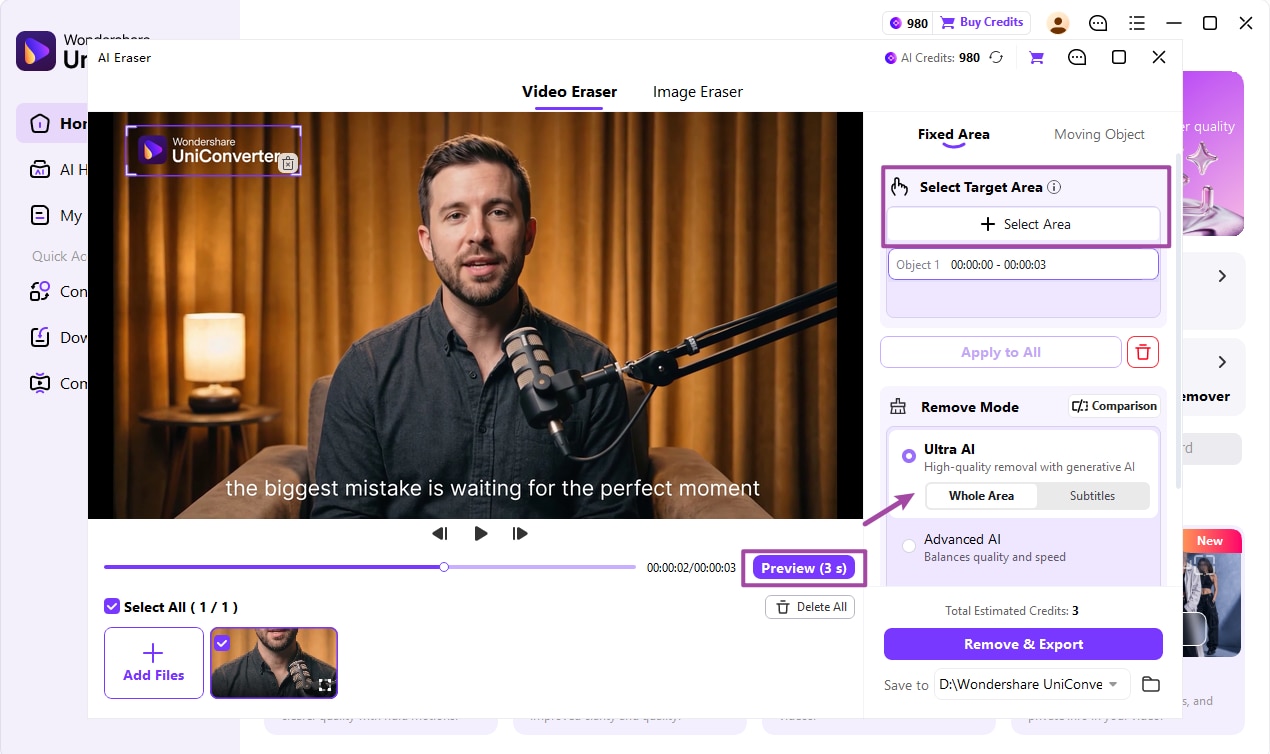
Note: Ultra AI supports videos up to 2 hours long, with a maximum resolution of 1080p and a frame rate of up to 60 fps. Results may vary depending on the watermark and background complexity.
Step 3 Preview and export the cleaned video.
Click Preview (3 s) to check the result. If needed, adjust the selected area before exporting.
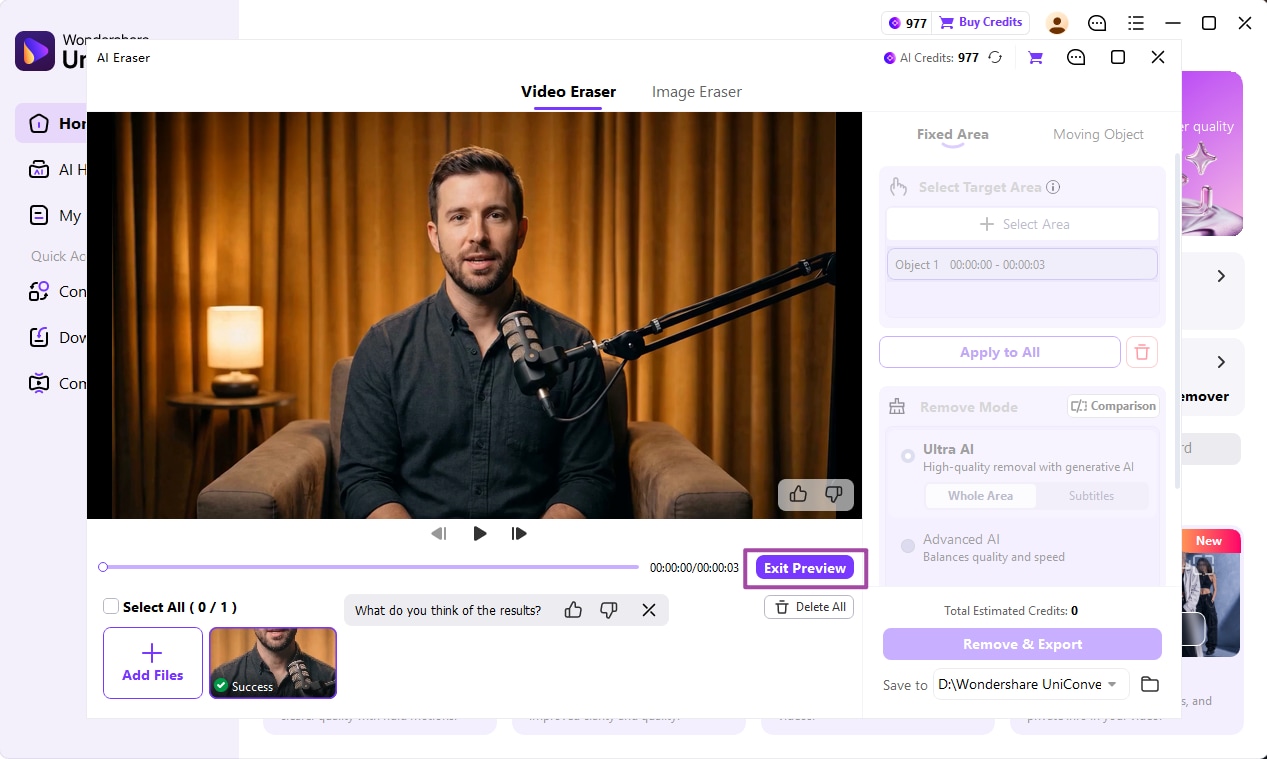
Choose a destination under Save to, review the estimated AI credits, and click Remove & Export to process the video.
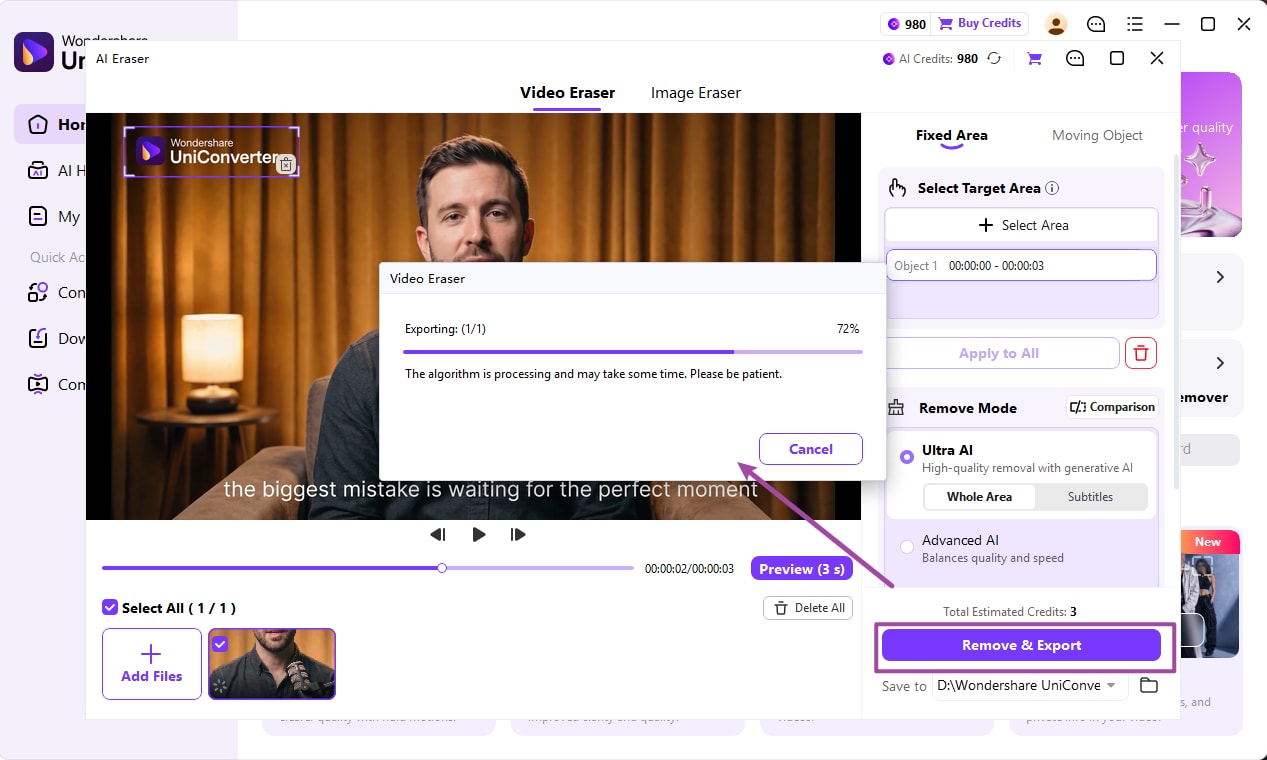
Step 4 Remove watermarks from multiple videos.
To process multiple videos, click Add Files to import additional files. Use the checkboxes or Select All to choose the videos you want to process. Check the removal settings for each video before exporting.
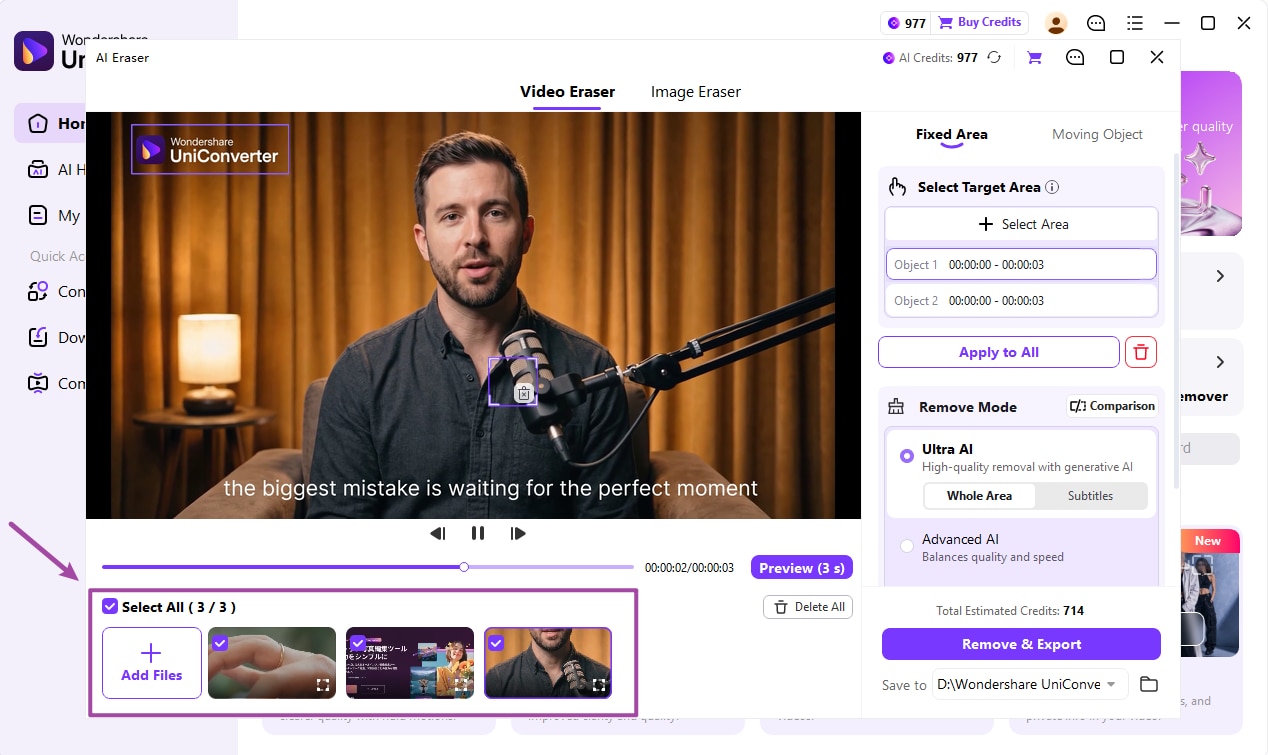
Click Remove & Export to start batch processing. UniConverter displays the progress as it processes the selected videos.
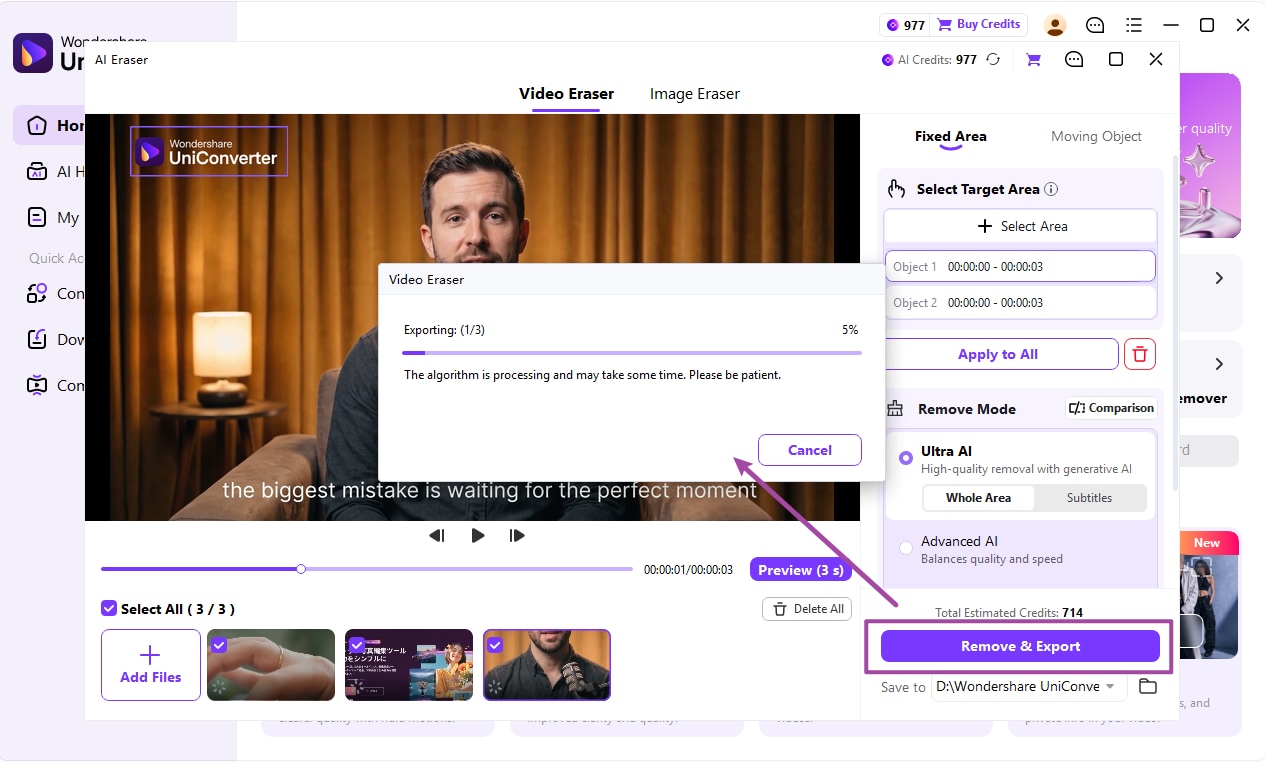
Note: Video Eraser supports importing up to 20 videos. Make sure the selected removal areas match the content of each video.
How to Remove Moving Objects from Videos with Tracking
The Moving Object feature helps remove unwanted objects that change position during a video. UniConverter 18 improves moving-object tracking and removal performance for cleaner results across frames.
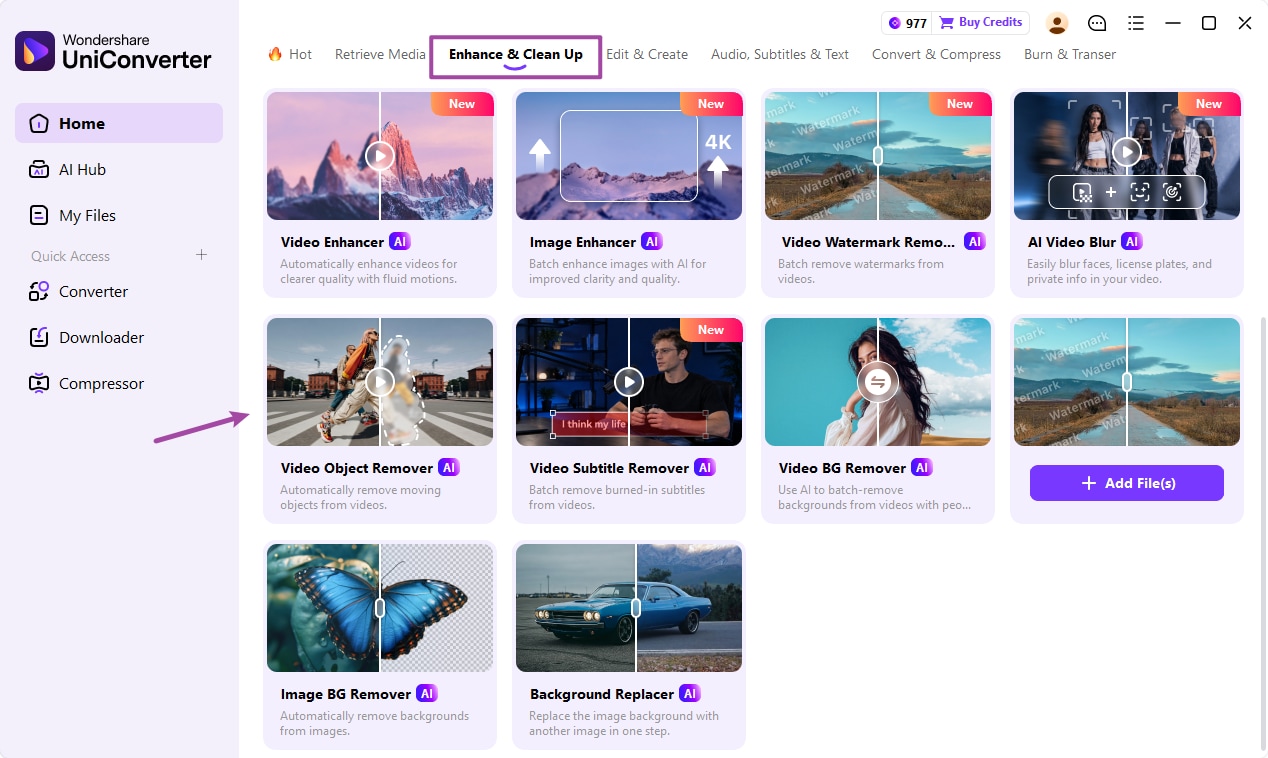
Step 1 Open Video Object Remover.
Go to Enhance & Clean Up on the UniConverter Home screen and select Video Object Remover.
Step 2 Import a video and mark the moving object.
Click Add Video to import a video containing the moving object you want to remove. Switch to Moving Object in the Video Eraser workspace.
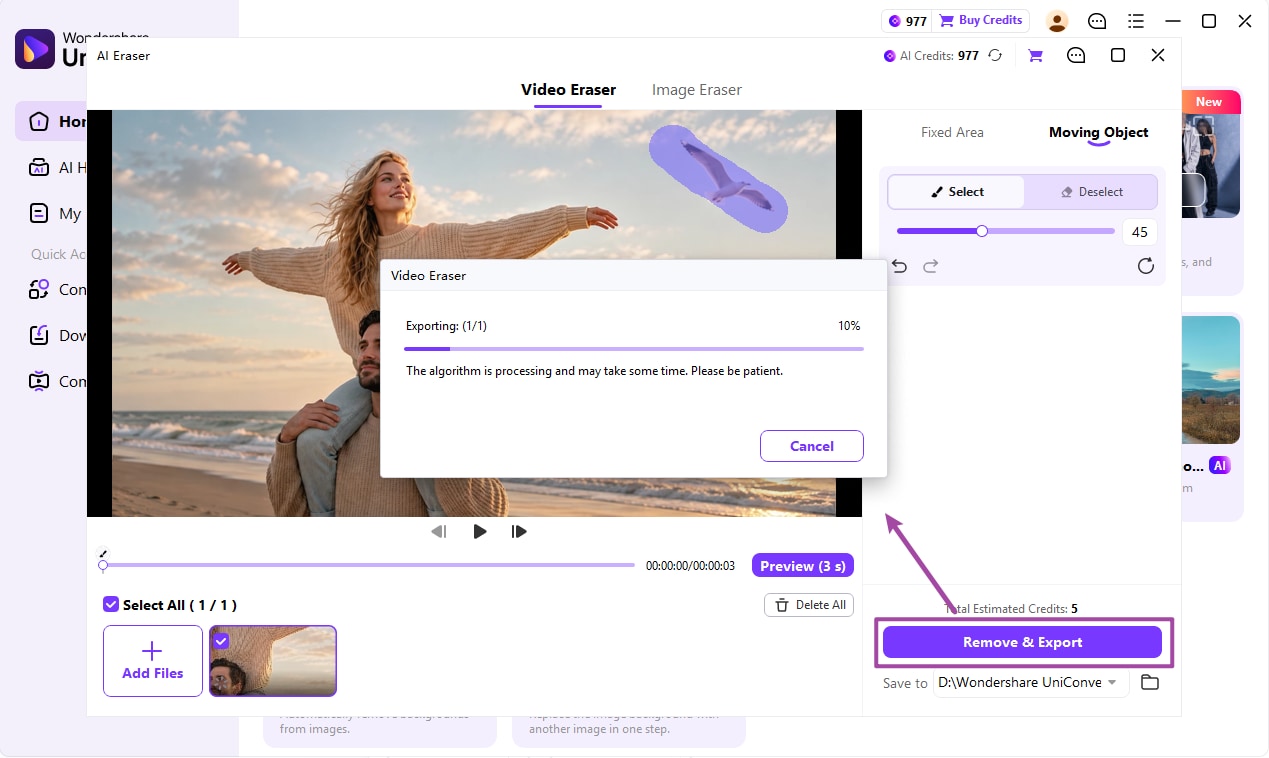
Choose Select and brush over the unwanted object in the video preview. Adjust the brush size using the slider, or use Deselect to correct the selection.
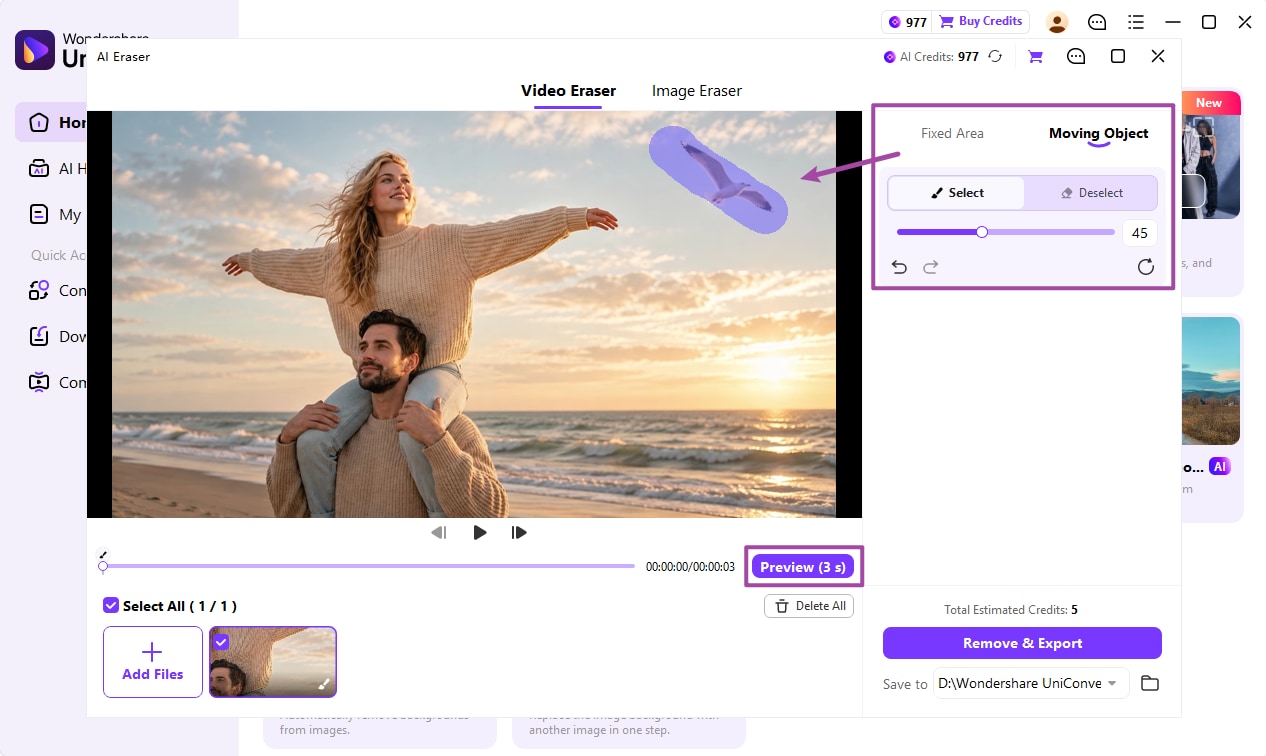
Step 3 Preview the object removal.
Click Preview (3 s) to check the result. The moving-object removal algorithm follows the marked target across frames to remove it from the scene. Review the preview and refine the selection if needed.
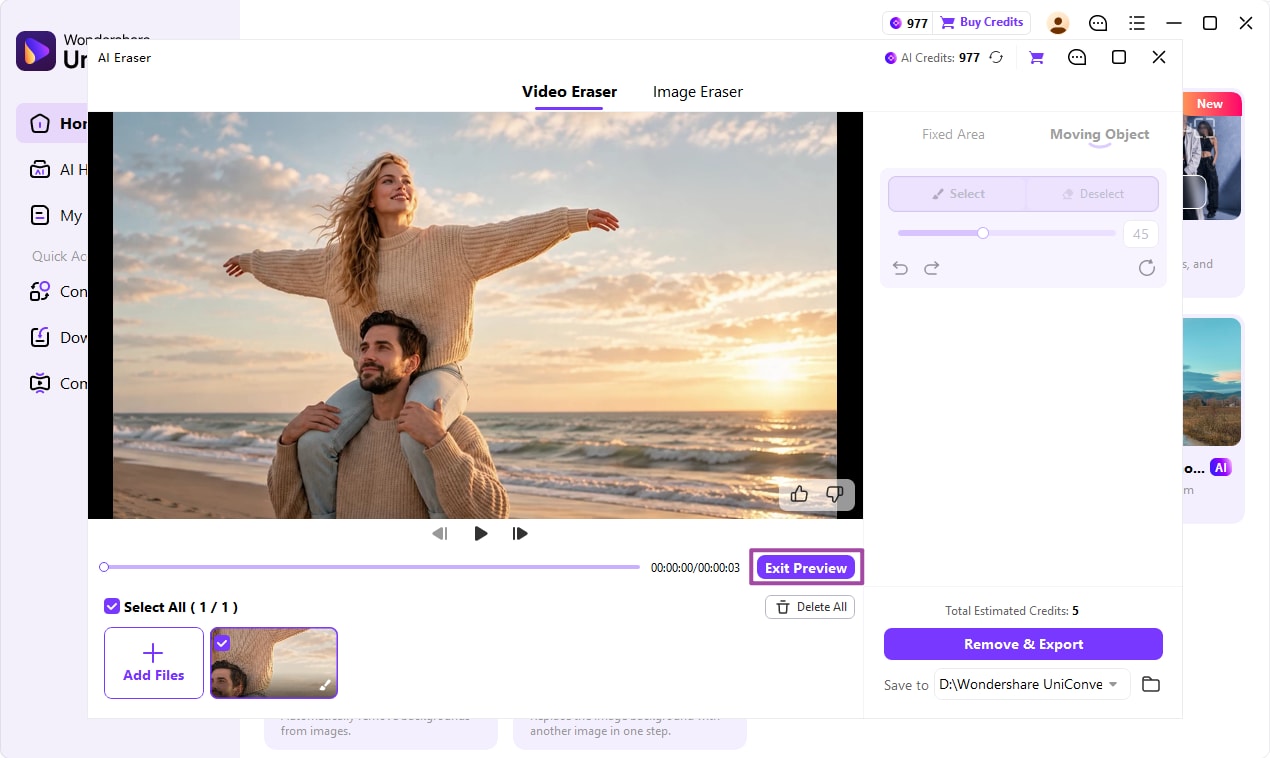
Note: Results may vary when objects move quickly, become heavily occluded, or blend into complex backgrounds.
Step 4 Remove and export the video.
Choose the output folder under Save to, check the estimated AI credits, and click Remove & Export. Wait for the processing to finish and save the cleaned video.
 print