
Video2X is a free, open-source video upscaler and frame-interpolation framework. This Video2X tutorial focuses on the Windows desktop workflow; Linux packages are also available. If you are comparing options first, see our free video upscaler guide.
In this guide
- Video2X review: verdict, features, pros and cons
- Video2X system requirements: AVX2 and Vulkan
- How to download and install Video2X on Windows
- Which Video2X model and upscale factor should you choose?
- How to use Video2X to upscale a video
- Video2X troubleshooting: installation, speed and output
- Video2X vs. UniConverter: compare the trial-and-error workflow
- Video2X FAQ
Video2X review: verdict, features, pros and cons
Our verdict: Video2X is a useful choice for people who want an open-source upscaler and can spend time configuring models. Its Windows GUI lowers the barrier, but CPU and GPU compatibility, driver setup and model choices still matter. This is a documentation-based review; we have not run a controlled output-quality or performance test for this article.
| At a glance | Video2X |
|---|---|
| Price | Free, open-source software; GNU AGPL v3 |
| Core functions | Video and image upscaling; frame interpolation |
| Models and engines | Real-ESRGAN, Real-CUGAN, Anime4K and RIFE for interpolation |
| Platforms | Windows GUI; Linux packages; container options including macOS |
| Best fit | Users comfortable testing settings on a compatible computer |
Pros: Free and open source; includes multiple processing engines; Windows GUI and command-line options; supports compatible NVIDIA, AMD and Intel GPUs.
Cons: Precompiled builds require AVX2 and a Vulkan-capable GPU; model selection and troubleshooting take time; output quality depends on the source and settings; the official desktop guide is incomplete.
Is Video2X good? It is a practical option for anime or other low-resolution footage when you want to experiment with models at no software cost. It is not automatically the best choice for every clip: render speed and visual results require a test on your own source and hardware.
Video2X system requirements: AVX2 and Vulkan
Before downloading Video2X, check both your CPU and graphics setup. According to the official project, its precompiled binaries require AVX2 CPU instructions, while the GPU must support Vulkan. A sufficiently recent GPU also needs a working compatible driver; a model name alone does not prove that Vulkan is configured correctly.
| Requirement | What to check | Why it matters |
|---|---|---|
| CPU with AVX2 | Look up the exact CPU model and instruction-set specifications on Intel's or AMD's website. Video2X lists Intel Haswell and AMD Excavator generations or newer as examples. | Without AVX2, the official precompiled build may not run. Windows version and GPU driver updates do not add missing CPU instructions. |
| Vulkan-capable GPU | Check the GPU model and install the current compatible driver from its manufacturer. Video2X lists NVIDIA Kepler, AMD GCN 1.0 and Intel HD Graphics 4000 or newer as examples. | Video2X uses Vulkan for its supported GPU processing paths. A missing or unsuitable driver can prevent GPU detection. |
| Storage and source | Keep the original, ensure room for the output, and start with a short representative clip. | Output size and processing time depend on the video, settings and hardware. |
On Windows, find your CPU under Settings → System → About and your graphics device in Device Manager → Display adapters. Verify specifications against the manufacturer. If the installer warns about Vulkan, update the GPU driver and restart; if your hardware does not support it, a driver update cannot create that support.
No AVX2 CPU or compatible GPU? Consider these paths
Use the official cloud notebook: The project links an official Google Colab notebook for users without a powerful local GPU. Google says free GPU resources and session duration depend on availability and usage, with free notebooks running for at most 12 hours; access to a specific GPU or a full 12 hours is not guaranteed. Cloud processing also means considering where source files are uploaded and stored.
Explore a custom build: Advanced users can investigate the source-build documentation. The project's build configuration offers an AVX2 optimization flag that is off by default, but dependency requirements and a successful non-AVX2 build have not been verified. Do not assume building from source removes every hardware requirement.
How to download and install Video2X on Windows
- Open the official download. Go to the Video2X GitHub releases page. Under the release assets, find
video2x-qt6-windows-amd64-installer.exe. Choose the installer, not the source-code archive. - Run the installer. Double-click the downloaded file and follow the setup prompts. The official Windows installation guide says you can choose the installation folder and a desktop shortcut.
- Launch and check for warnings. Open Video2X. If it reports missing components or Vulkan support, resolve those messages before starting a full-length job.
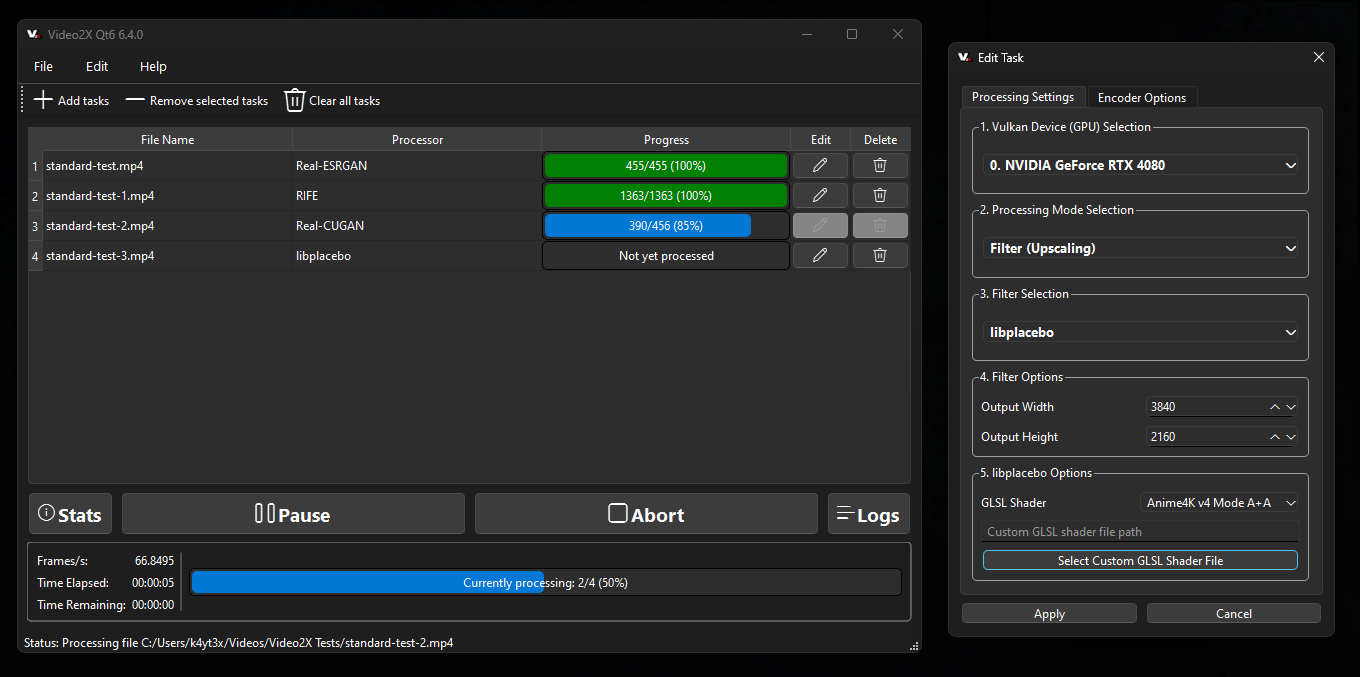
For Linux, use the packages or AppImage listed in the official project documentation. Video2X also documents container images for Linux and macOS; do not assume the Windows installer runs natively on a Mac.
For safe installation, start with the official GitHub project rather than assuming every similarly named website is affiliated with it.
Which Video2X model and upscale factor should you choose?
Video2X separates upscaling from frame interpolation. Upscaling increases frame dimensions; interpolation creates intermediate frames to change motion smoothness. RIFE is for frame interpolation, so choosing it alone does not increase resolution.
| Source or goal | Starting point | Check in a short test |
|---|---|---|
| Animation or anime | Try an anime-oriented Real-ESRGAN or Real-CUGAN model, or Anime4K. | Line edges, flicker and fine patterns; compare more than one setting if needed. |
| Live-action footage | Try an available general-purpose Real-ESRGAN model rather than assuming an anime model suits people and textures. | Faces, skin, text and artificial-looking texture. |
| Smoother motion | Consider RIFE frame interpolation as a separate task. | Movement around hands, fast objects and scene cuts. |
Available engines, models and settings depend on the Video2X build. Start at 2× when supported and compare it with a larger setting only if you need the extra pixels. For example, 1280 × 720 at 2× becomes 2560 × 1440; at 4× it becomes 5120 × 2880. A multiplier applies to each dimension, so 4× does not automatically mean 4K. To produce 3840 × 2160 from 1920 × 1080, the target is 2× in each dimension.
More pixels do not guarantee recovered detail. Upscaling can exaggerate compression blocks or create invented textures; heavily blurred or missing detail may remain unrecoverable.
To compare source material without copying third-party test results, the project provides a 240p standard clip and published Real-CUGAN and Real-ESRGAN outputs. These examples illustrate model differences, not render speed; the project attributes the underlying clip to its copyright holder.
How to use Video2X to upscale a video
The current official desktop guide is incomplete, and controls can differ by release. Use the following workflow as a practical guide to the task; confirm the exact labels in your installed version before processing.
- Prepare a short sample. Copy a few seconds containing representative faces, motion, edges and dark areas. Keep the untouched original in a separate folder.
- Add the sample to Video2X. Open the desktop interface and add your local video to the processing task. Check the source dimensions so you can calculate the target resolution.
- Select an upscaling engine and model. Choose an available Real-ESRGAN, Real-CUGAN or Anime4K option appropriate to your footage. Leave frame interpolation off for the first upscaling test unless smoother motion is also required.
- Set the scale or output dimensions. Choose a supported 2× setting or a target size, depending on the selected engine. Check the resulting aspect ratio and output format, then select an output location different from the source.
- Process and review the sample. Start the task and open the completed file in a video player. Compare at the same display size for halos, shimmering, distorted faces and unnatural textures. Listen for audio and confirm the file plays correctly.
- Run the full video. Adjust model or scale if needed, process the original clip, and verify the saved resolution, duration, audio and playback before deleting any intermediate test files.
Video2X troubleshooting: installation, speed and output
| Problem | Likely cause and next check |
|---|---|
| Video2X will not start | Check the exact CPU for AVX2 and confirm that you downloaded the Windows installer for your system. Read any runtime message before reinstalling. |
| Vulkan warning or GPU not detected | Confirm Vulkan support and install the appropriate GPU driver. On dual-GPU systems, check the active device and driver configuration. |
| Processing is slow or fails | Higher dimensions and demanding models increase work. Test a shorter clip and lower supported scale; check available GPU memory, storage and driver status. |
| Output looks worse | A model may sharpen noise or invent details. Try another model or a smaller scale; inspect moving frames rather than judging a single still. |
| No sound or incompatible output | Play the exported sample in another player and inspect its audio and codec. Check output settings in your installed build and retain the original; audio handling may depend on the source and encoding settings. |
Video2X vs. UniConverter: compare the trial-and-error workflow
Both workflows let you judge a result before processing the full video. In the Video2X sample-export workflow, each comparison involves rendering the sample, opening the output, reviewing it, changing settings and exporting again. UniConverter’s Windows Ultra (Gen AI) workflow provides a 3-second preview and an Original/Result comparison in the interface. It reduces file-handling steps, although generating a preview still takes processing time and its cost and speed depend on the current plan and device.
Video2X suits users who want an open-source tool and are comfortable checking hardware and models. If you prefer a guided Windows or Mac desktop workflow, Wondershare UniConverter Video Enhancer offers quality enhancement, model selection, a short preview and batch processing. The Windows Ultra (Gen AI) workflow includes a 3-second preview and output choices including 2×, 4×, 1080P and 2K. Check the current export terms in the app.
For low-resolution footage, start with Quality Enhancement → Ultra (Gen AI) on Windows, choose a suitable resolution, and inspect the result before exporting.
Video2X vs. UniConverter: which fits your workflow?
| Factor | Video2X | UniConverter Video Enhancer |
|---|---|---|
| Cost | Free, open source under AGPL v3 | Commercial software; check current trial and export conditions |
| Workflow | Choose processing engines and settings; check hardware and drivers | Desktop enhancement interface with model and output choices |
| Review cycle | Export a sample, open the result, adjust settings and repeat as needed | Official Windows guide documents a 3-second preview for Ultra (Gen AI) |
| Best fit | Users who prefer a free configurable toolkit | Users who want a guided preview and export workflow |
How to enhance a video with UniConverter on Windows
- Open the enhancer: Install and launch UniConverter 18. From Home, choose Enhance & Clean Up → Video Enhancer.
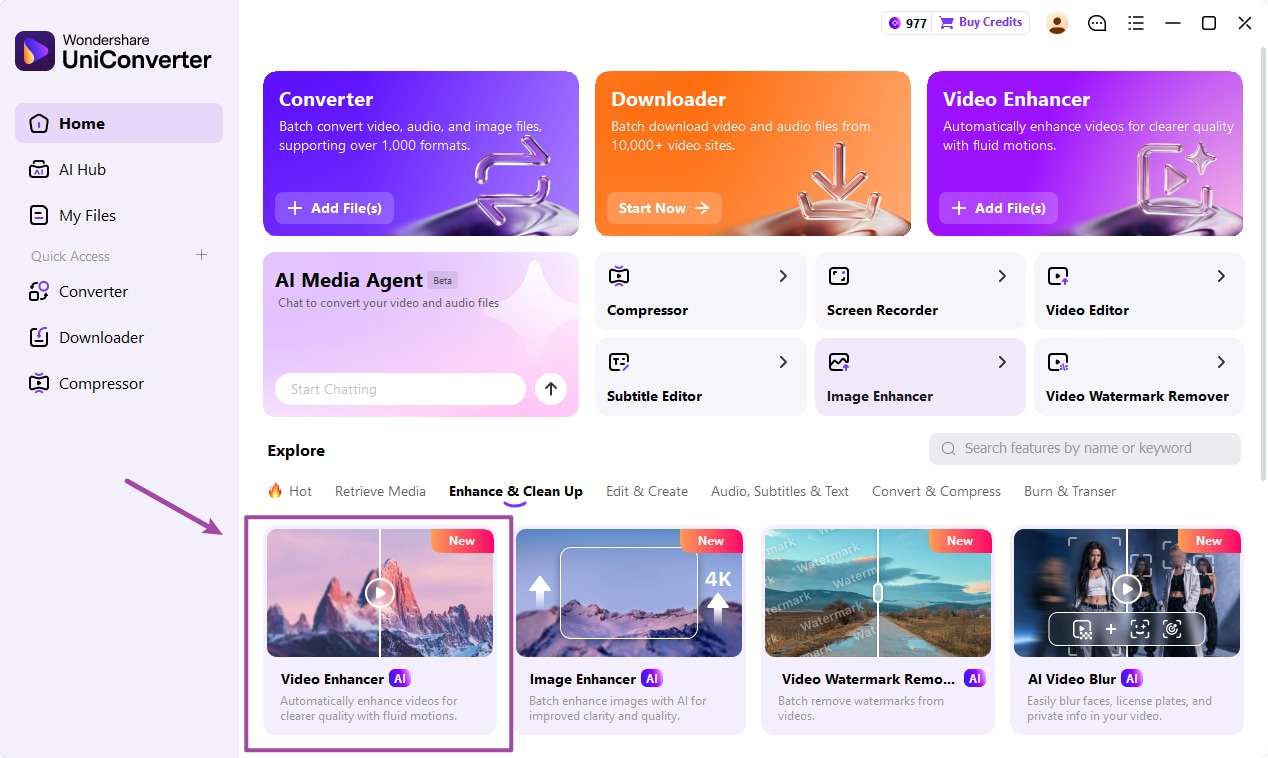
Open Video Enhancer from the UniConverter 18 home screen. Screenshot from the official UniConverter Windows guide. - Add your video: Under Enhancement & Upscaling, select Quality Enhancement → Ultra (Gen AI), then click Add Video or drag in your clip.
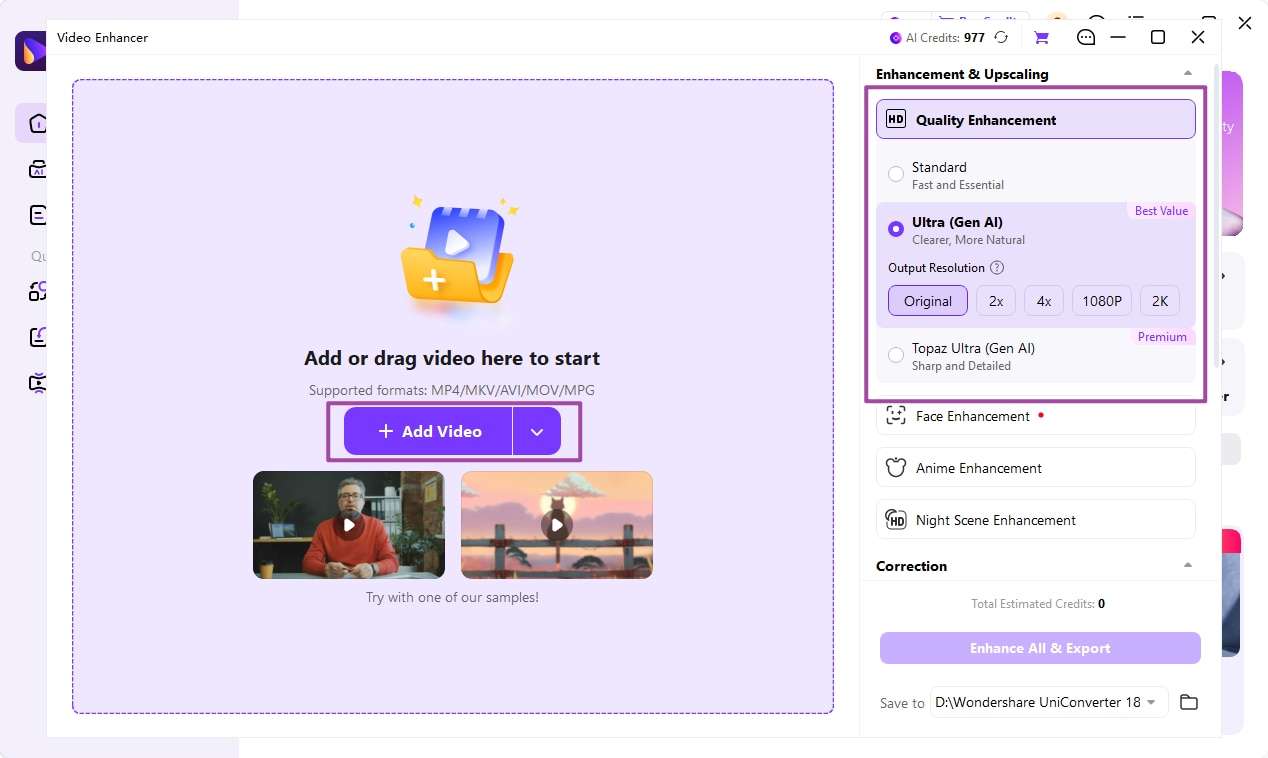
Choose Quality Enhancement and Ultra (Gen AI), then add a video. Screenshot from the official UniConverter Windows guide. - Choose the output: Select an available Output Resolution. For example, choose 1080P when an HD output suits the source and destination.
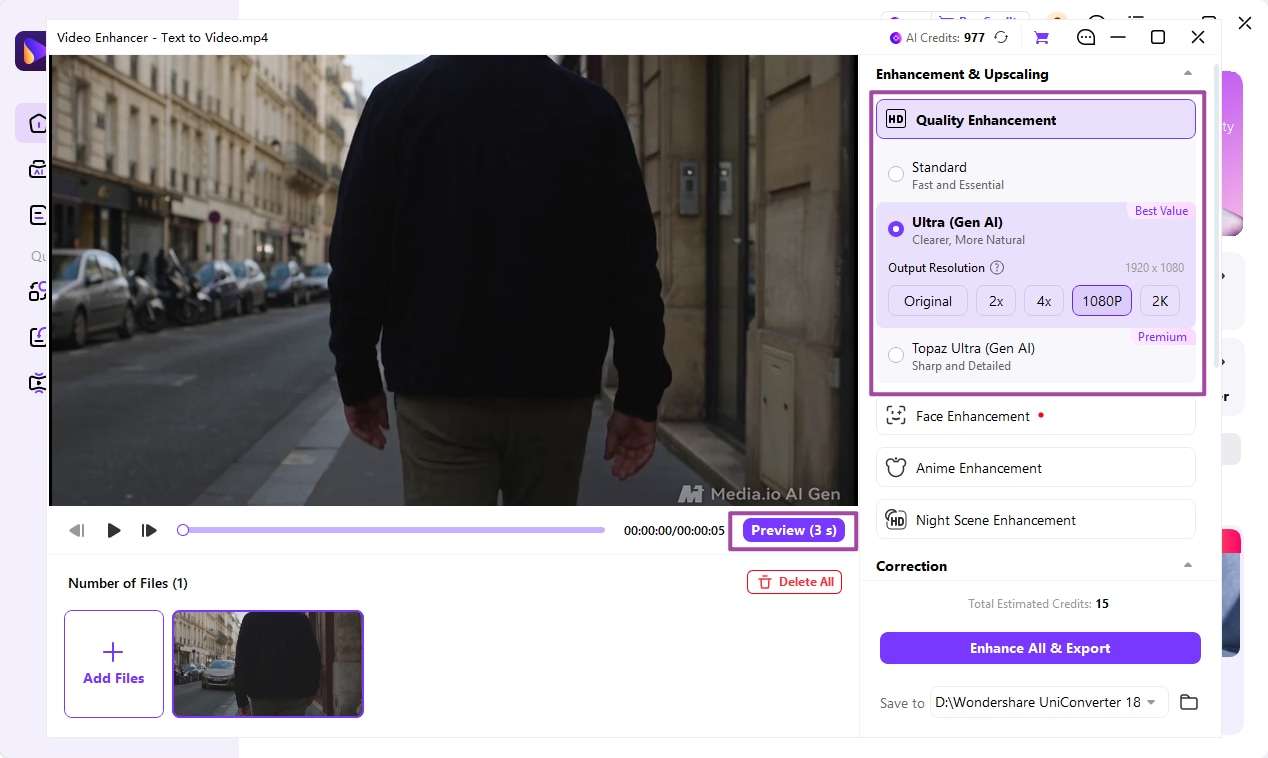
Select an output resolution and prepare the 3-second preview. Screenshot from the official UniConverter Windows guide. - Preview before exporting: Click Preview (3 s), then compare Original and Result. Look at moving edges, faces and noise; if the result looks artificial, reconsider the output or the suitable enhancement mode.
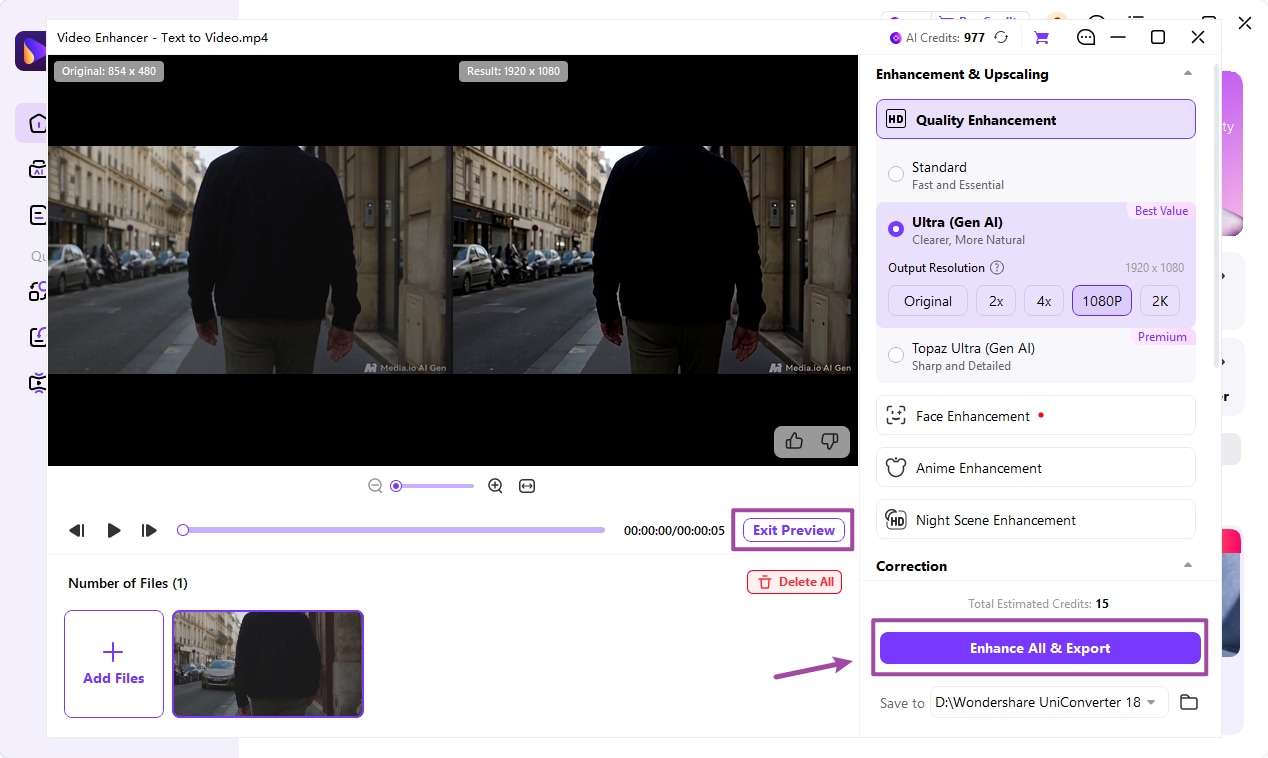
Compare the original and preview result in UniConverter. Screenshot from the official UniConverter Windows guide. - Save and verify: Choose a destination under Save to, click Enhance All & Export, and confirm the task. When it finishes, play the exported video and check its dimensions and audio.
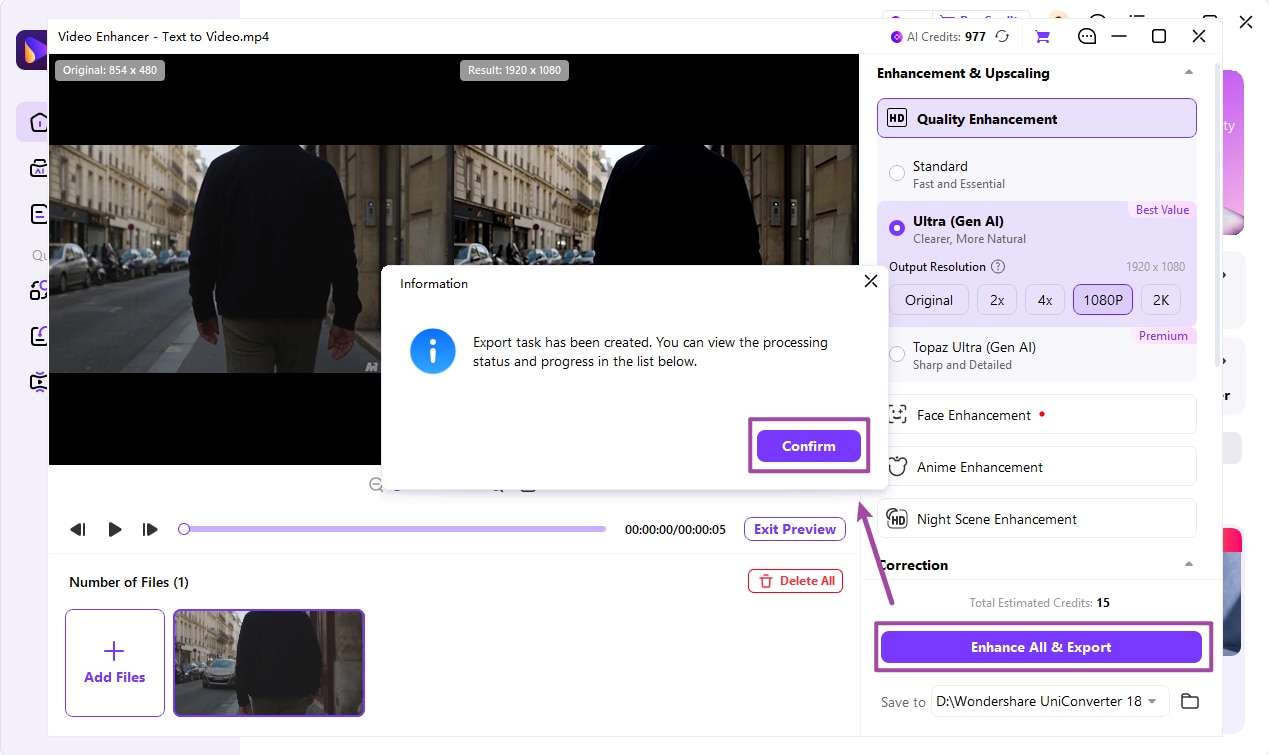
Create an enhancement export task and confirm it. Screenshot from the official UniConverter Windows guide.
The official Video Enhancer guide shows the Windows interface. For more specific problems, see how to unblur a video and how to upscale video to 4K. If you have multiple clips, review the batch video enhancement workflow.
When Video2X is the better fit
Choose Video2X if you want a free open-source tool, enjoy comparing engines or want to try Real-CUGAN on animation. If you lack a suitable local GPU, evaluate the official Colab notebook before paying for another tool. Organizations that modify, redistribute or offer software over a network should review the AGPL v3 license and dependent licenses against their use case; ordinary use alone should not be described as triggering every license obligation.
How long does it take? There is no defensible universal estimate for a 10-minute 1080p-to-4K job without the source frame rate, model and GPU. For a rough estimate, time a representative 10-second excerpt. If it takes 30 seconds, a 10-minute clip contains 60 such segments, giving about 30 minutes before fixed overhead. This is arithmetic, not a measured Video2X benchmark.
Video2X FAQ
-
Is Video2X good for upscaling videos?
Video2X is a useful free open-source upscaler for people who want to choose models and are comfortable with setup. Choose a model that suits the footage and inspect its output.
-
Is Video2X safe to use?
Download releases from the official Video2X GitHub project and avoid unverified repackaged installers. Open-source code is inspectable, but this alone does not guarantee the safety of every third-party download.
-
Is Video2X free, and can businesses use it?
Video2X is free and licensed under GNU AGPL v3. Businesses should review the license and dependent licenses for their specific deployment, especially if modifying, distributing or providing software over a network.
-
How do I download Video2X?
Open the official Video2X GitHub releases page and download the Qt6 Windows amd64 installer. Run it and follow the installation prompts; Linux packages and a cloud notebook are also available.
-
Can I use Video2X without a powerful GPU?
Yes. The project provides a Google Colab notebook that uses cloud resources when available. Free GPU access and session length are not guaranteed, and cloud use involves handling your video on remote infrastructure.
-
Can Video2X upscale a video to 4K?
Yes, with suitable settings and source dimensions. A 1920 × 1080 source enlarged 2× becomes 3840 × 2160; 2× or 4× describes the change in each dimension, not a fixed 4K output.
-
What is the difference between Video2X upscaling and RIFE?
Upscaling increases frame dimensions. RIFE creates intermediate frames for smoother motion; using RIFE alone does not increase resolution.
-
What is a Video2X alternative with a preview?
UniConverter Video Enhancer offers a documented 3-second preview for its Windows Ultra (Gen AI) workflow, so you can compare the original and enhanced result before full export.