

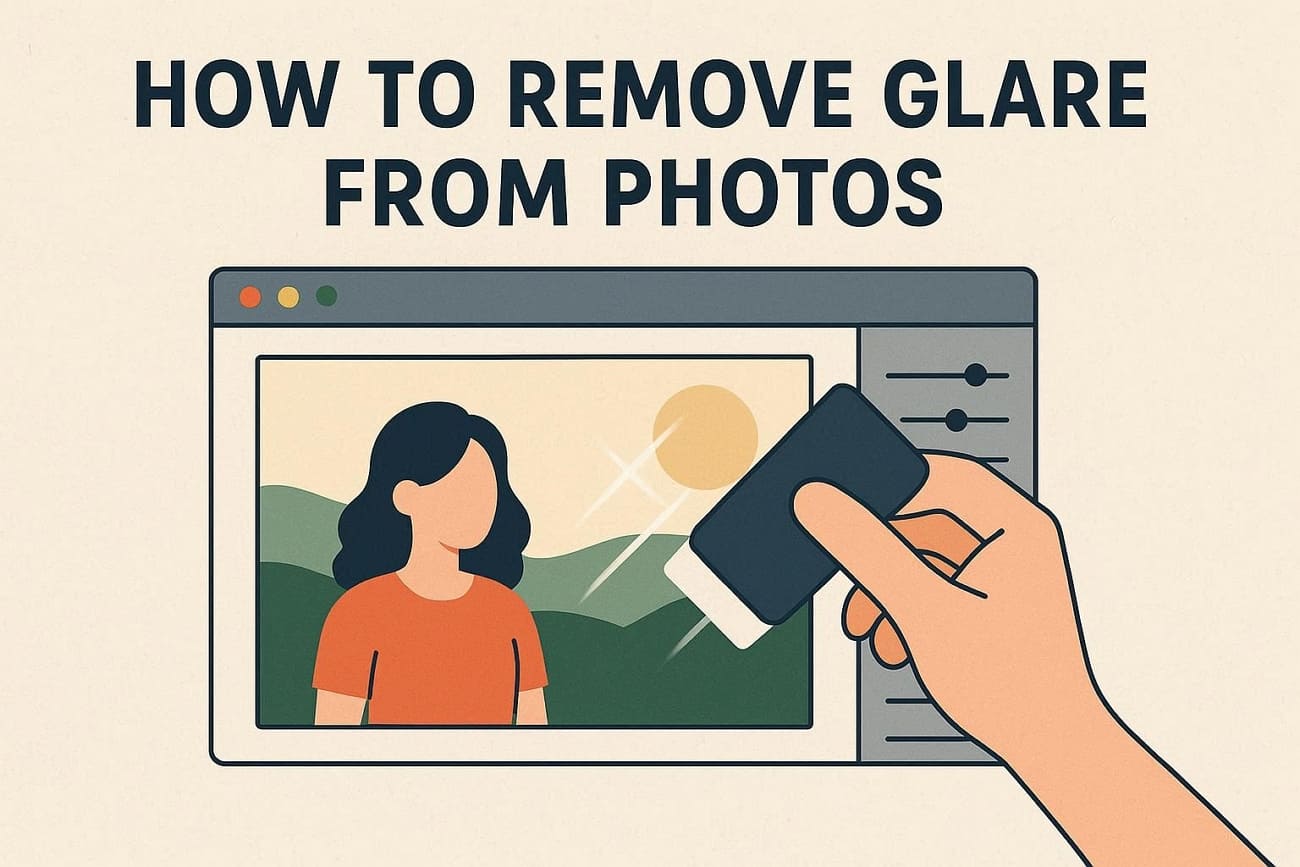
Glare from sunlight or screens hides important details and makes faces or objects hard to see. A lot of individuals struggle with this problem when taking pictures indoors or outdoors. Alongside, ordinary editing tools do not always help. Therefore, when one removes glare, it restores clarity and makes images look natural and professional.
Since amateurs usually question how to remove glare from photo, this guide explains easy ways using free tools, desktop solutions, and mobile apps. Whether you want quick fixes on your phone or precise edits on a computer, these methods will help you recover details.
- Manual tools like Photoshop offer precise control but require editing skills and time.
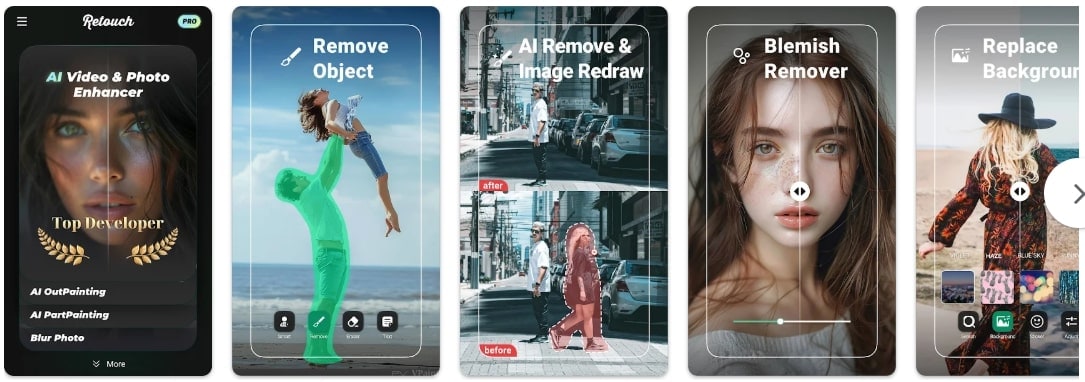
- AI-powered online tools such as X-Design, insMind, YouCam Online Editor, Photo Director, YouCam, and Perfect Retouch provide faster, automated glare reduction with varying levels of consistency.
- For users handling multiple images, Wondershare UniConverter Desktop stands out as a batch photo glare remover, enabling efficient processing and stable results with minimal manual effort.
In this article
- What Is Glare in Your Photo? Understanding Glare Types You Might Encounter
- Features to Look Out For in Unique Photo Glare Removers
- The Top Tools & Methods For Glare Removal [Simplified]
- Comparing The Best Ways to Remove Glare from Photos
- Pros and Cons of AI vs. Manual Glare Removal
- 5 General Tips to Avoid Glare When Shooting Photos
- Conclusion
- Frequently Asked Questions
Part 1. What Is Glare in Your Photo? Understanding Glare Types You Might Encounter
It is basically a bright light that spoils the image and makes colors pale and details hard to see. This happens when light bounces inside the camera or lens instead of forming a clear picture. Many times, dust or filters can also make glare worse and reduce contrast. While learning how to remove a glare from a photo, various tools and apps also exist to address this need.
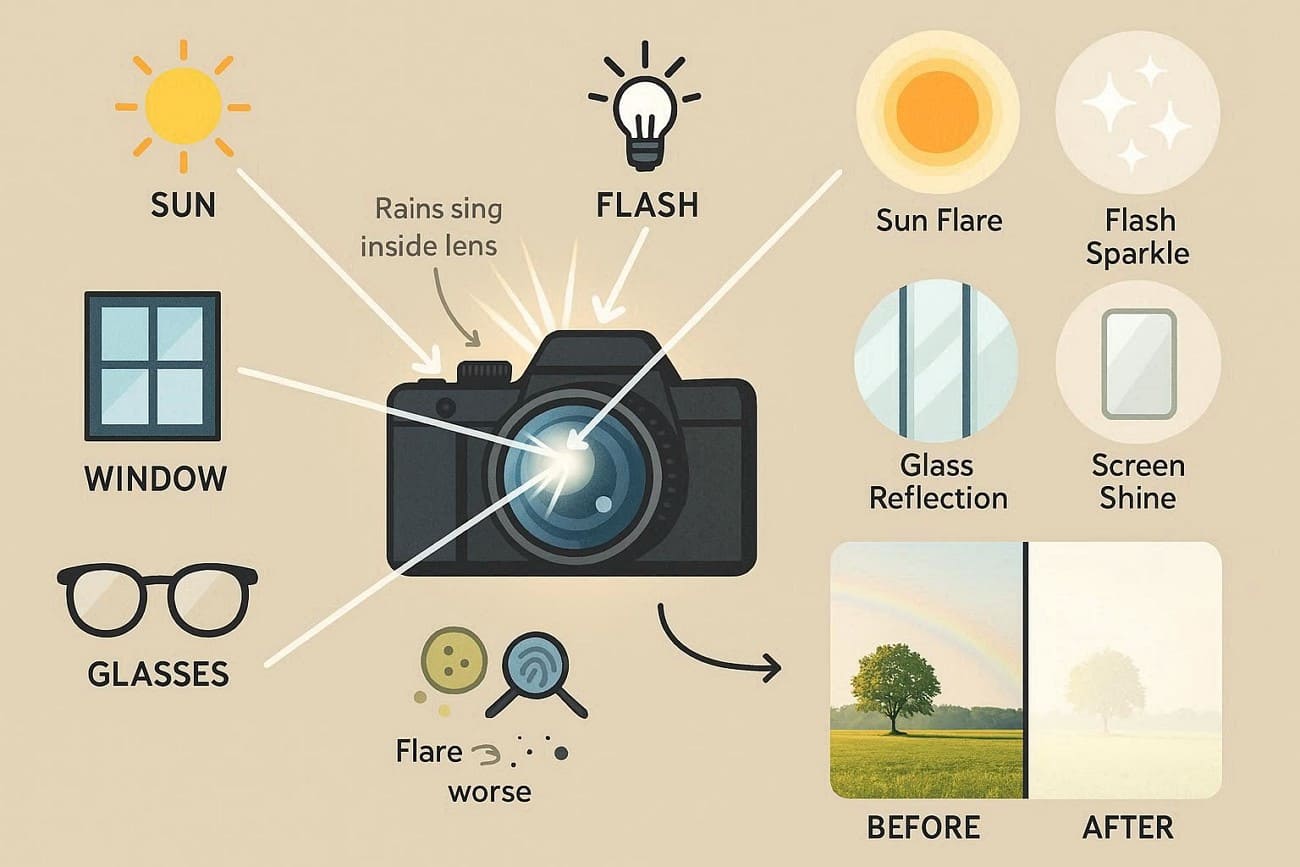
Photos with glare may appear washed out, with weak shadows, pale patches, or streaks near bright sources. Thus, many users are unaware that glare can be of many types, and a few of them are listed below for clarity:
| Glare Type | Description | Common Cause in Photos | Effect on Image |
| Sunlight/Outdoor Glare | Haze, flare, or bright streaks when shooting toward the sun or bright sky. | Direct sunlight or bright sky entering the lens, especially near or in the frame. | Colors look pale, contrast drops, and flare shapes or haze appear over the scene. |
| Flash/Artificial Light Glare | Bright hot spots, streaks, or harsh shiny areas from lamps or camera flash. | On-camera or strong off-camera flash, bare bulbs, or bright LEDs facing the lens. | Skin or subjects may have blown-out shiny areas, harsh reflections, or spots. |
| Glass/Reflection Glare | White patches or mirrored spots on glass surfaces in the scene. | Light bouncing off eyeglasses, framed photos, display cases, or prints. | Distracting white patches or reflections hide details and draw attention away from the subject. |
| Screen, Window, or Mirror Reflections | Clear reflections of lights, people, or surroundings on flat shiny surfaces. | Bright room lights or sunlight reflecting on screens, windows, or mirrors. | Ghost images, double subjects, or a cluttered look make the photo messy and confusing. |
Part 2. Features to Look Out For in Unique Photo Glare Removers
While learning how to remove glare from a photo, it's important that you choose the right glare remover. No matter if it’s online, desktop, or app, this section offers 5 considerations to consider when picking the right option:
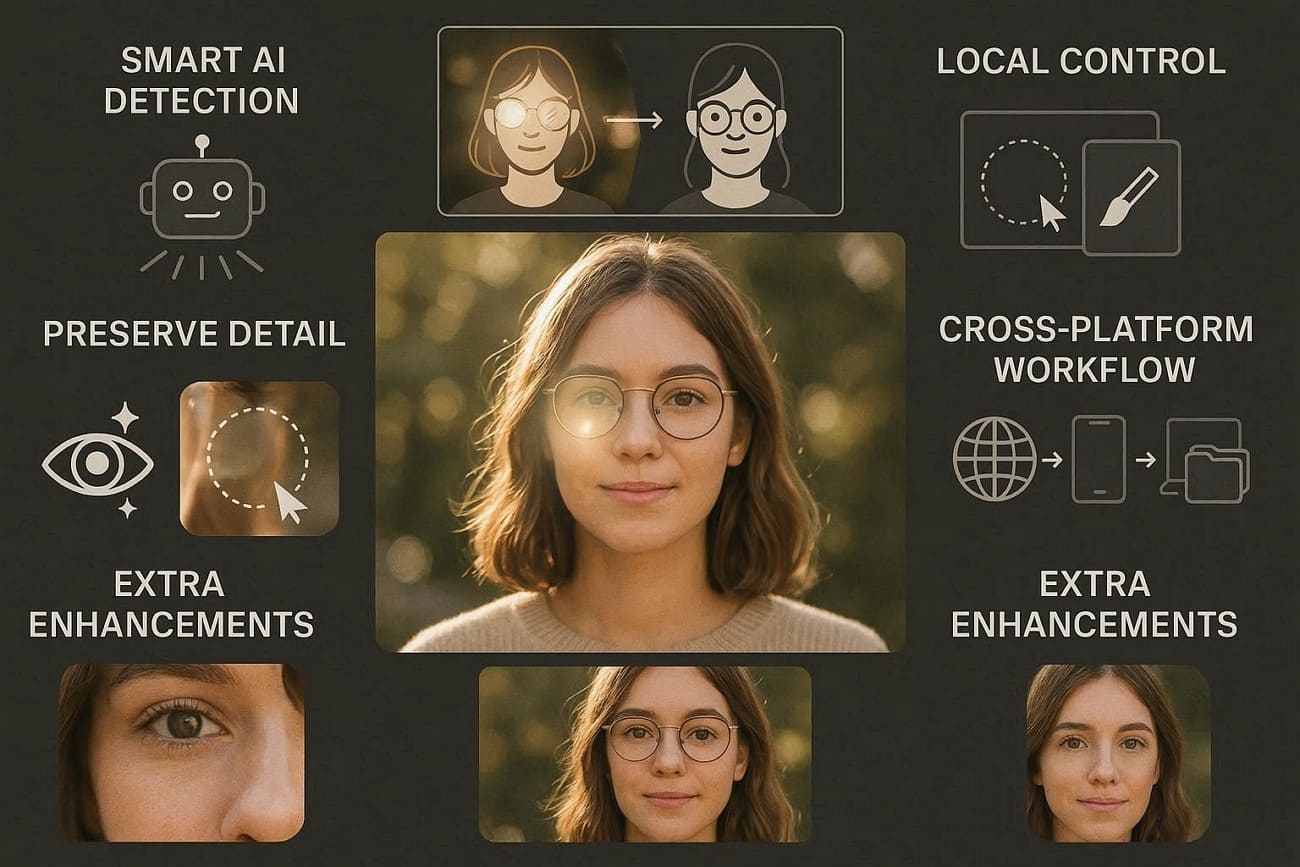
Smart AI Glare and Reflection Detection: Look for tools that automatically detect glare, lens flare, and reflections on glasses, windows, or shiny surfaces. If you have an innovative AI tool, it also recreates what lies behind the glare, and keeps shapes and textures natural rather than blurry or smeared.
Local Control with Brushes or Masks: Choose tools that let you select only the areas with glare using brushes, boxes, or lasso shapes. Hence, this prevents damage to highlights you want to keep, like the natural sparkle or glow in the eyes or on products.
Preservation of Detail and Natural Look: Know that high-quality software keeps skin texture, hair, and sharp edges intact while reducing bright spots and reflections. Not just that, it keeps realistic lighting and colors, so the edited area matches the rest of the photo naturally.
Cross-Platform Access and Workflow Flexibility: Select those solutions that can be used on web, mobile apps, and desktop software to be more convenient and flexible in work processes. Also, it should be able to facilitate batch editing, drag-and-drop uploads, and rapid export to JPG, PNG, or 4K to simplify and speed up editing.
Additional Enhancement Effects: Some of the modern editors will have dehaze, color correction, blemish removal, background cleanups, and image upscaling. Therefore, an all-in-one tool will allow you to eliminate glare, enhance contrast, retouch faces, and remove distractors within a single location.
Part 3. The Top Tools & Methods For Glare Removal [Simplified]
To learn how to get glare out of photos, this section covers desktop, online, and mobile app tools with a detailed guide. So, review the details and locate an option that suits your needs and expertise.
Group 1. Desktop Solutions
If you want to know how to get the glare out of a picture with full control and AI capabilities, adhere to the listed desktop tools:
UniConverter Desktop
For situations where glare is layered into the image, the UniConverter Watermark Remover intelligently analyzes surrounding pixels to fill bright, washed-out glare areas with realistic, matching textures. This tool supports batch processing that allows you to remove glare from multiple images at once. For use cases, you can find it works perfectly as red eyes remover, blemish remover, and so on. To that end, it offers the Brush as a Selection tool that users can adjust to their preferences.
The Deselect option allows making corrections easier in case of errors, but the Undo or Redo options may also be utilized. Also, the software preserves original quality, even in 4K and HDR files, and supports a wide variety of files such as MP4, MOV, AVI, JPG, and PNG. The movements can also be controlled using the Hand Control option to eliminate unintentional highlights.
Key Features
Video Watermark Remover: The tool also offers a video watermark remover tool with the option to choose an AI Model and Watermark Areas.
Versatile: UniConverter also includes basic editing tools such as crop, trim, and rotate, providing a secure, ad-free workflow.
Preview or Compare: Regardless of the Watermark Remover used, the tool allows a quick review of results, with the option to compare before and after.
Secure and Choose Save Location: The tool’s official versions are tested for security, are free from malware and ads where users can choose the desired Save To location.

AI Photo Glare Remover for Natural Results
Guide to Remove the Glare From Images With UniConverter Watermark Remover
For those who seek to remove glasses glare from photo, here is how UniConverter can help you:
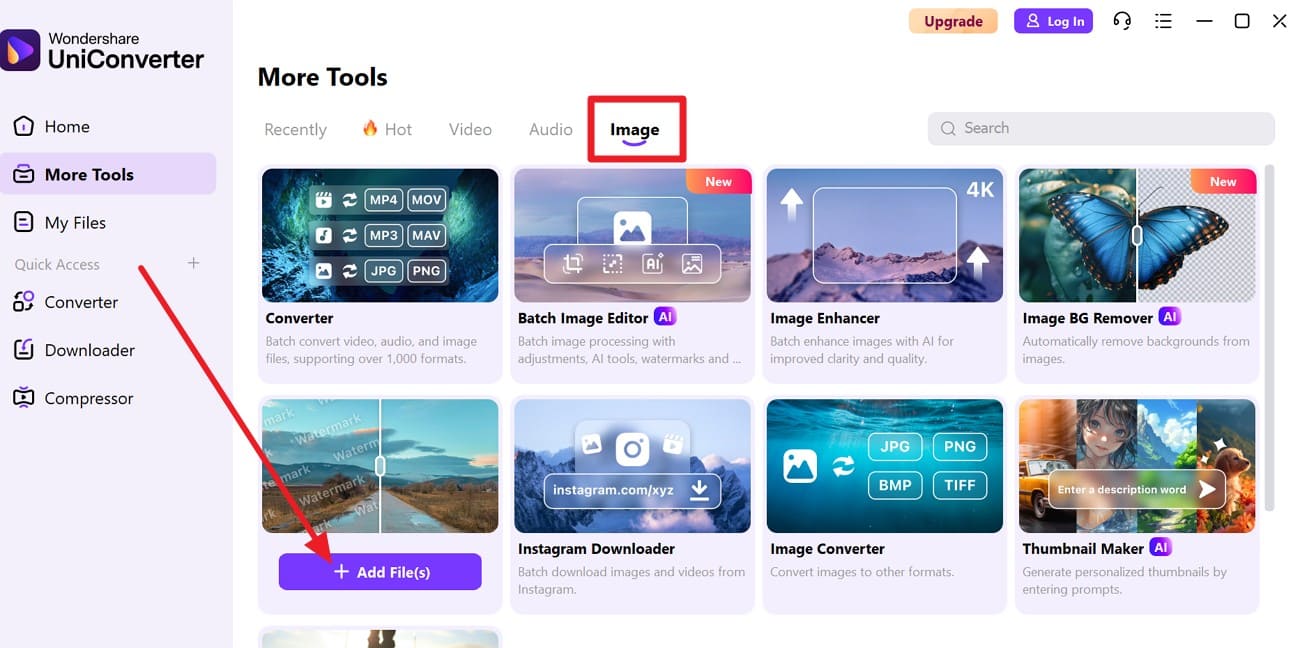
Step 1. Locate Watermark Remover for Images on the Tool
Tap the “+Add Files(s)” button on the “Watermark Remover” tool within the “Image” tab.
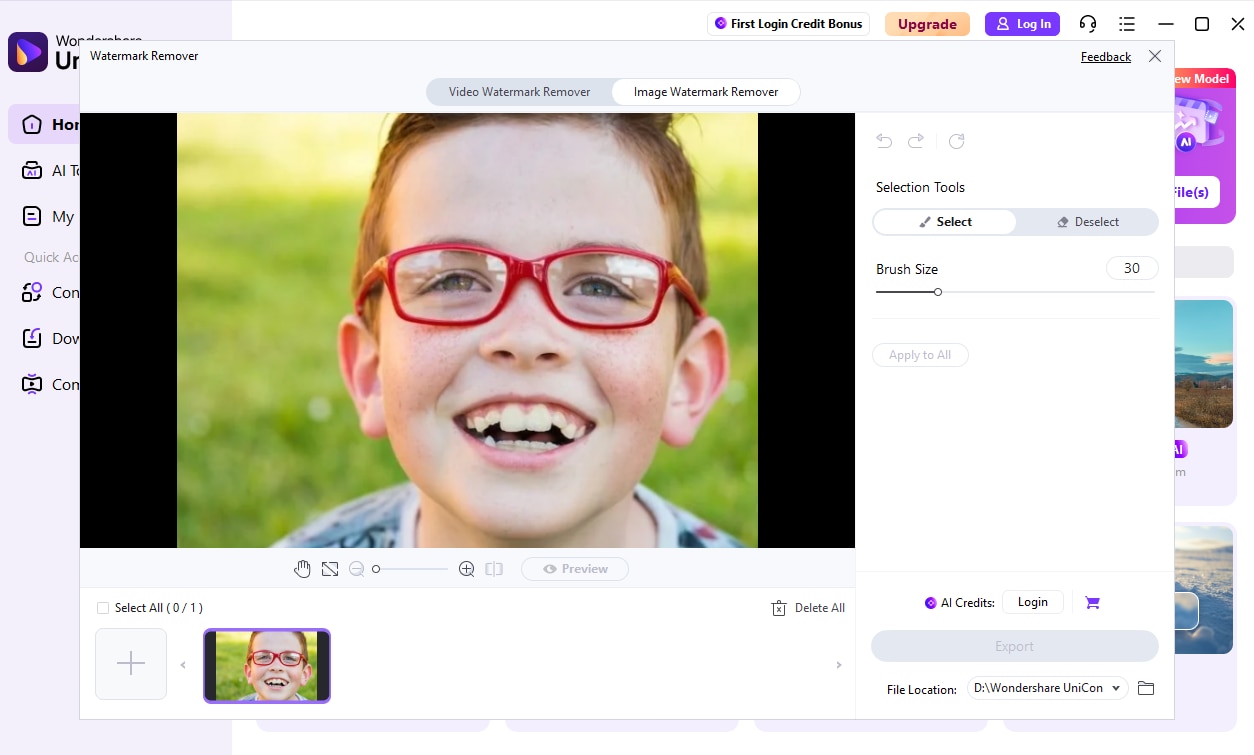
Step 2. Add a Glared Image and Highlight the Part with the Brush Tool
Add the image with glare, go to “Selection Tools,” adjust the brush size, and highlight the glare area. Undo or redo the changes and press the “Preview” button to commence the process.
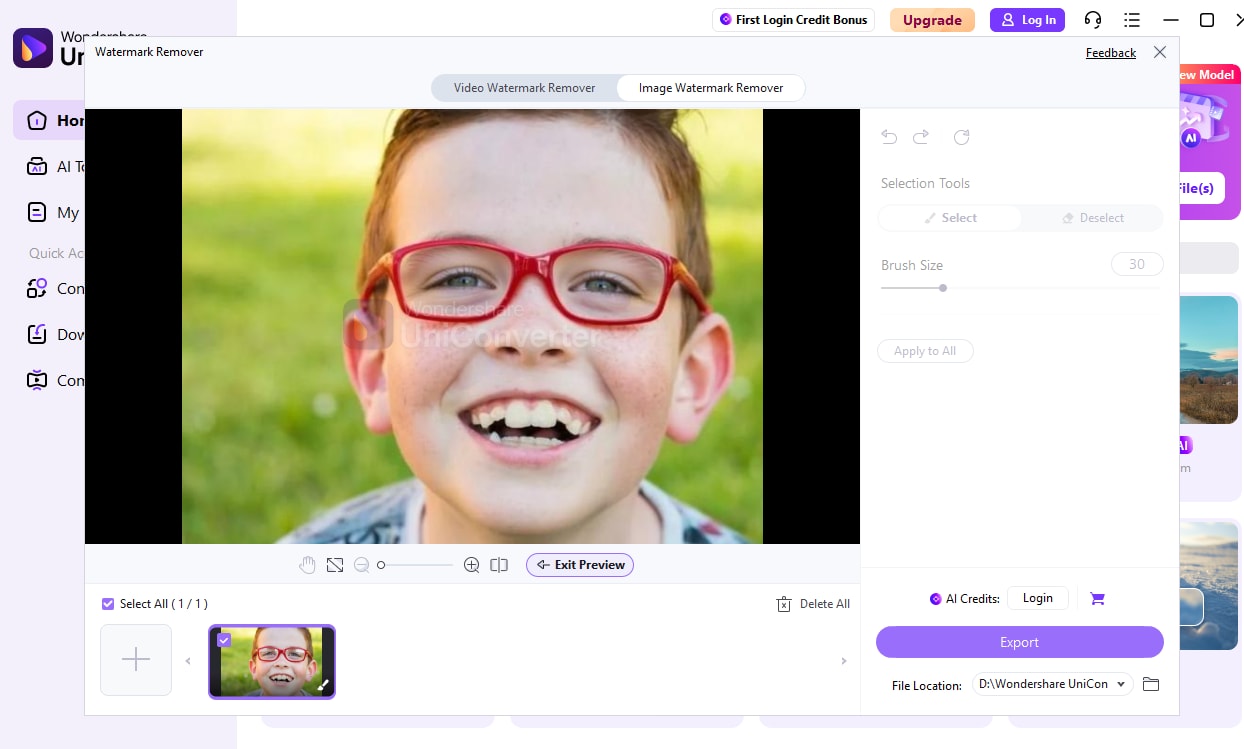
Step 3. Preview or Compare the Changes and Export to the Device
When the procedure ends, pick the “File Location” and press the “Export” button to save the results.
Adobe Photoshop
One can also use Photoshop in situations where they question how to take glare out of a photo. It works well for reflections on glasses, windows, or shiny surfaces. Additionally, users can target glare precisely with selections and layers and leave the rest of the photo untouched. Not just that, brightness, contrast, and color can be corrected only in the glare area, once the given steps are performed:

Step 1. To know how to remove glasses glare in Photoshop, select the “Rectangular Marquee Tool” and select the areas that contain glare.
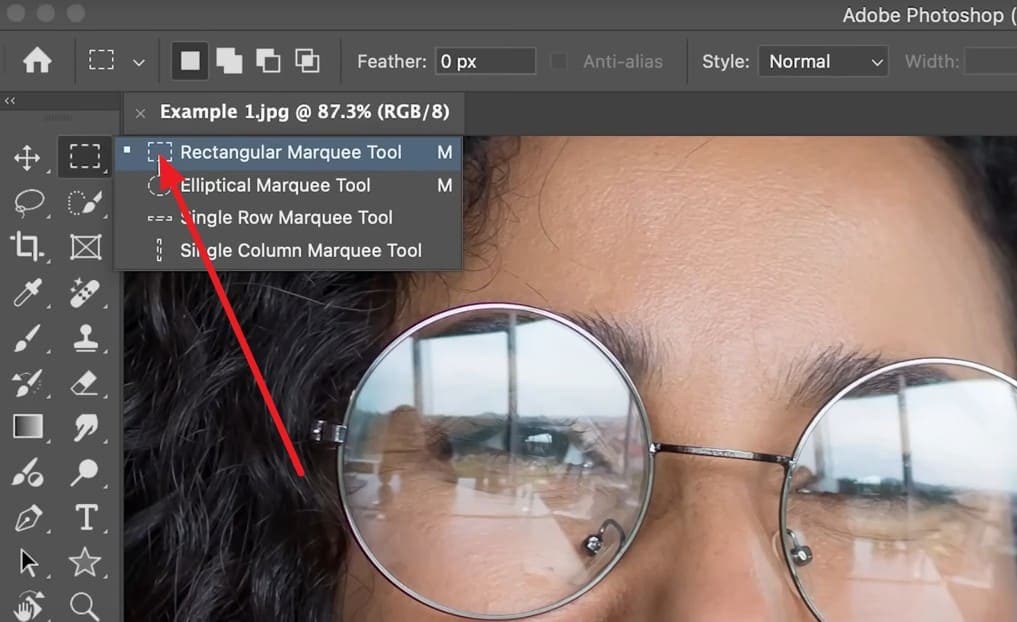
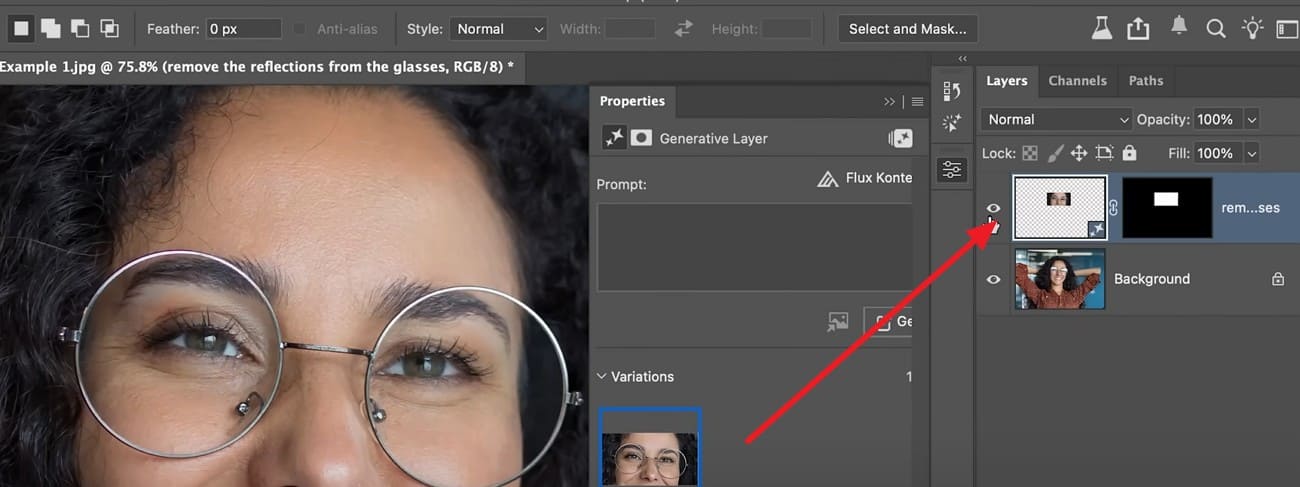
Step 2. Type the prompt in the “Contextual Taskbar” and select a model, such as Flux, by pressing the “G” icon. After that, press the “Generate” button to let the tool extract glare in real-time.
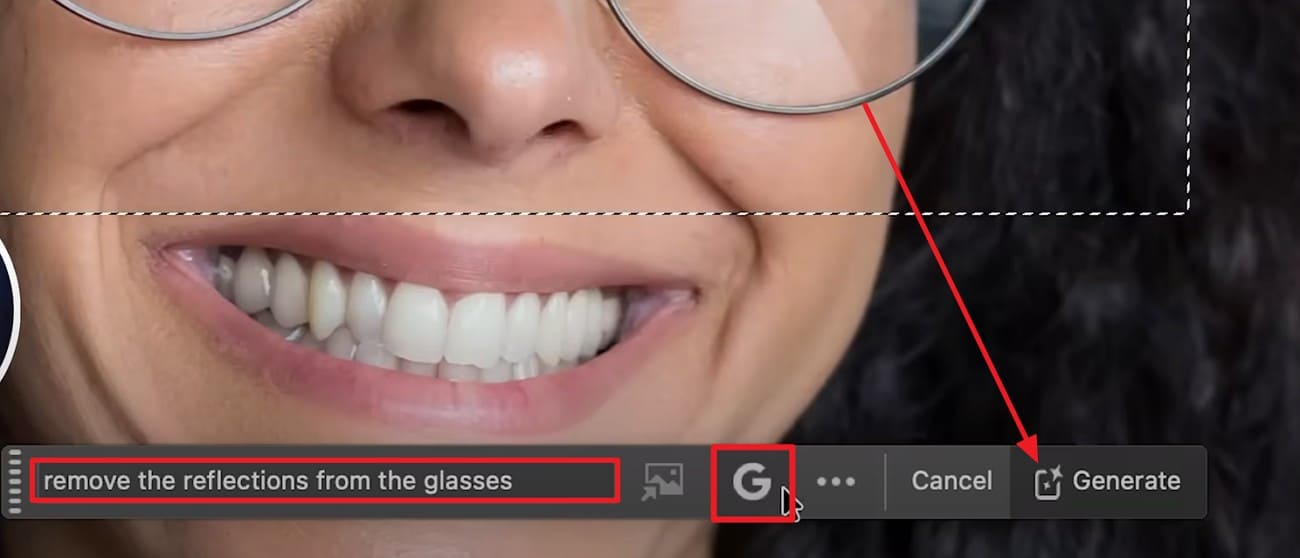
Step 3. Tap the “Eye” icon under the Lock section to view the before-and-after comparison as the process completes.
Key Features
Strong reflections can be fixed using Clone Stamp, Healing, Content-Aware, or Generative Fill tools.
Batch actions and presets quickly apply edits to multiple similar photos, saving time efficiently.
Photoshop keeps glare removal in workflow, allowing sharpening and image prep without switching apps.
Online AI Tools
If one asks how to remove light glare from photo or any other glare for free, given online solutions can be helpful:
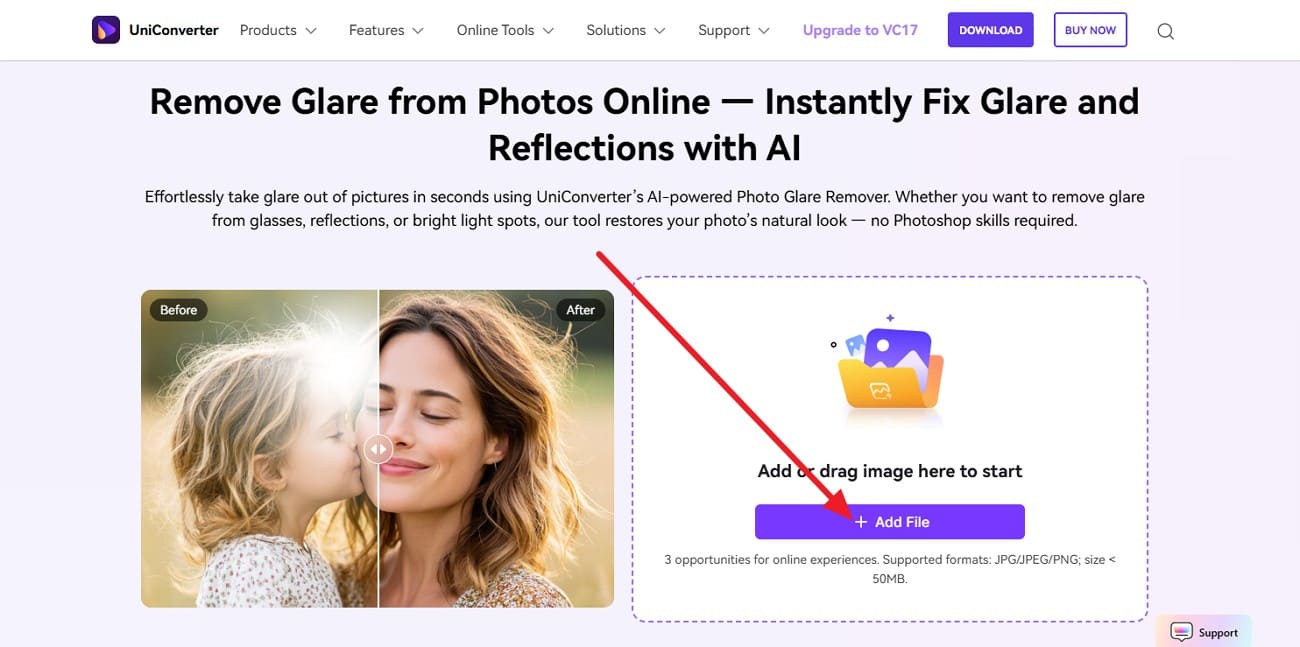
UniConverter Online Version
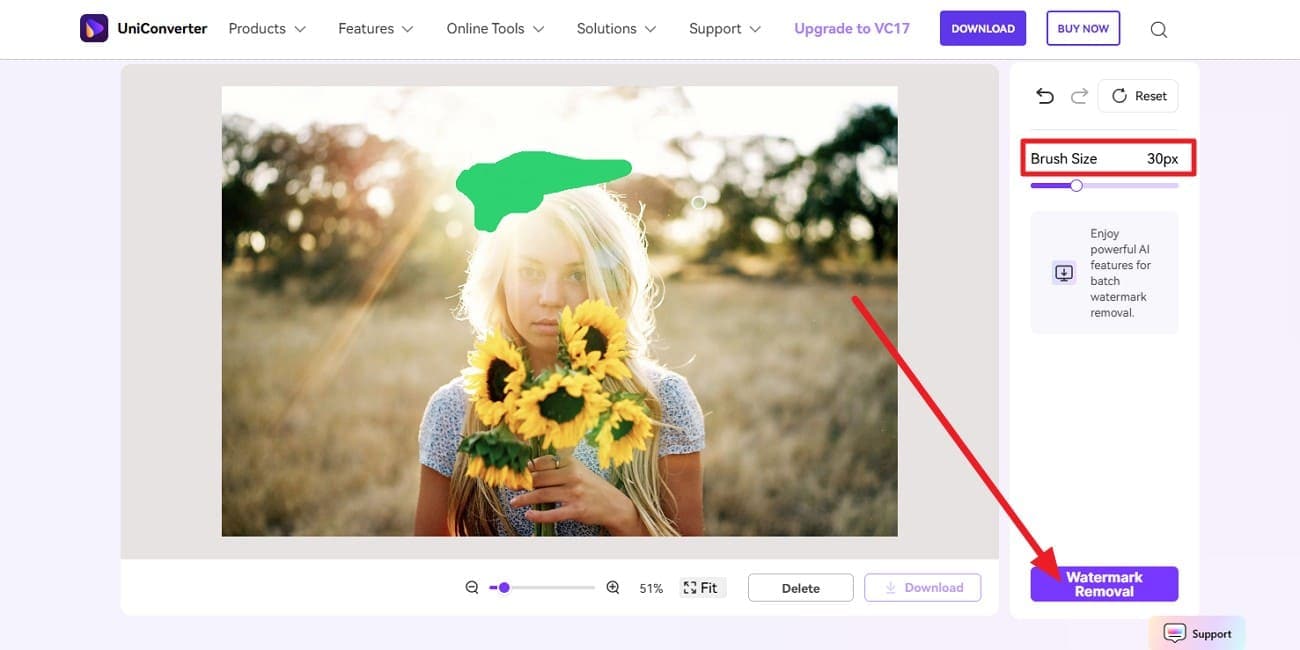
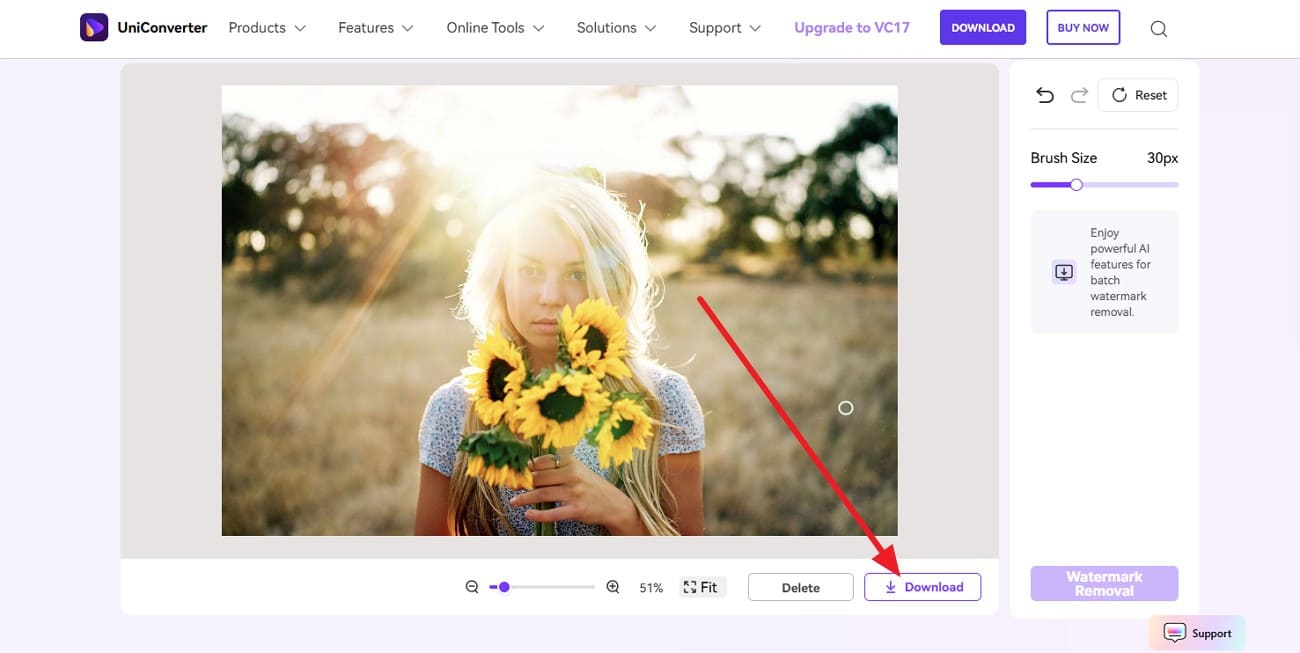
UniConverter’s glare remover uses AI to remove reflections and bright spots while preserving natural, sharp photo detail. It rebuilds areas affected by sunlight, flash, or reflections, and works only on glare areas since the brush is adjustable to 30px. Additionally, it allows undoing and redoing changes to avoid affecting other parts. Above all, it works on web, desktop, and mobile, allowing quick online fixes on the go, as guided below:

Step 1. Access the Tool and Add the Glared Image
Press the “+Add File” option and upload the image that contains glare.
Step 2. Adjust the Brush Size and Highlight the Glare
Adjust the “Brush Size,” highlight the glared part, and press the “Water Removal” option.
Step 3. Preview and Download the Results to the Device
When the process completes, click the “Download” button to save the results.
Pros
Supports batch watermark removal and handles many glare types.
Supports standard image formats with a 50 MB size limit.
Allows you to reset or Zoom in and out for precise highlighting.
Rebuilds areas affected by sunlight, flash, or reflections effortlessly.
Cons
Requires a stable connection; heavy or batch edits require the desktop version.
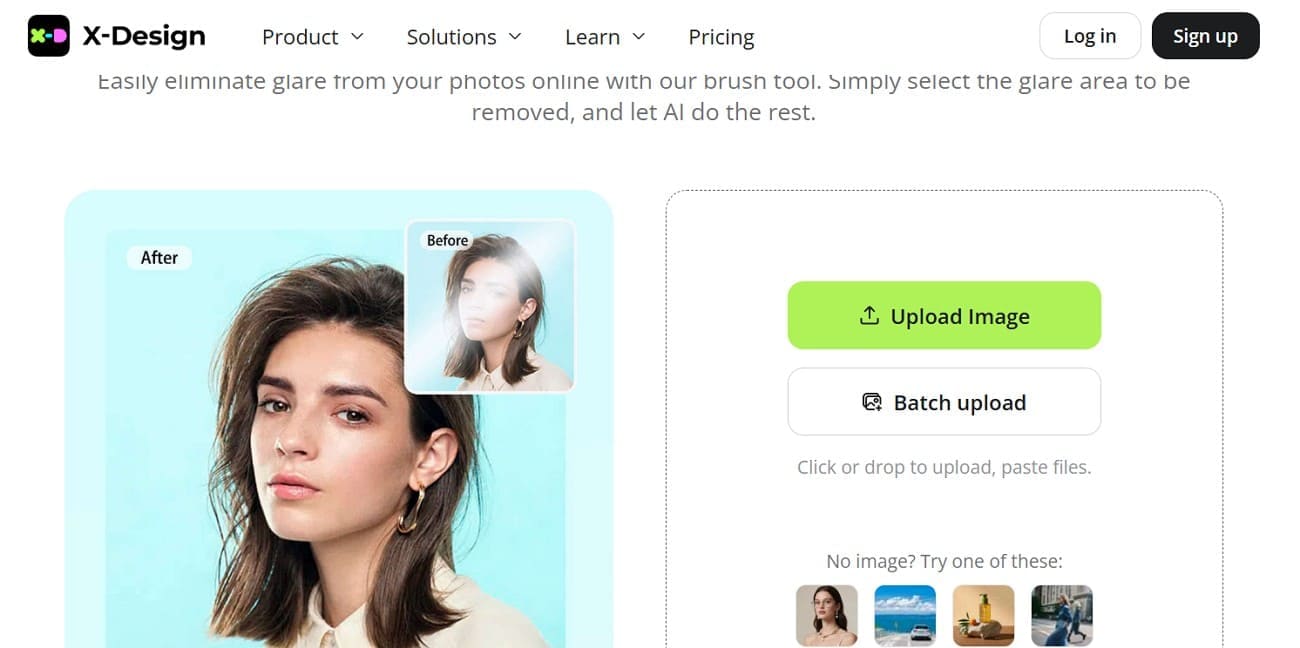
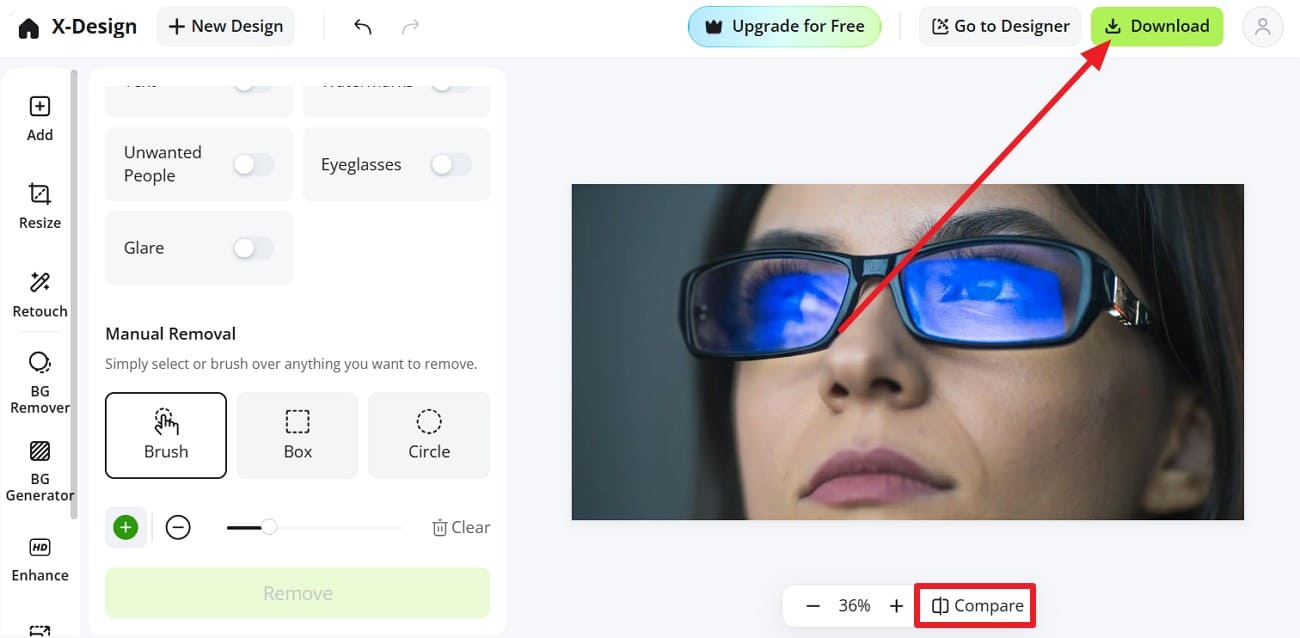
X-Design
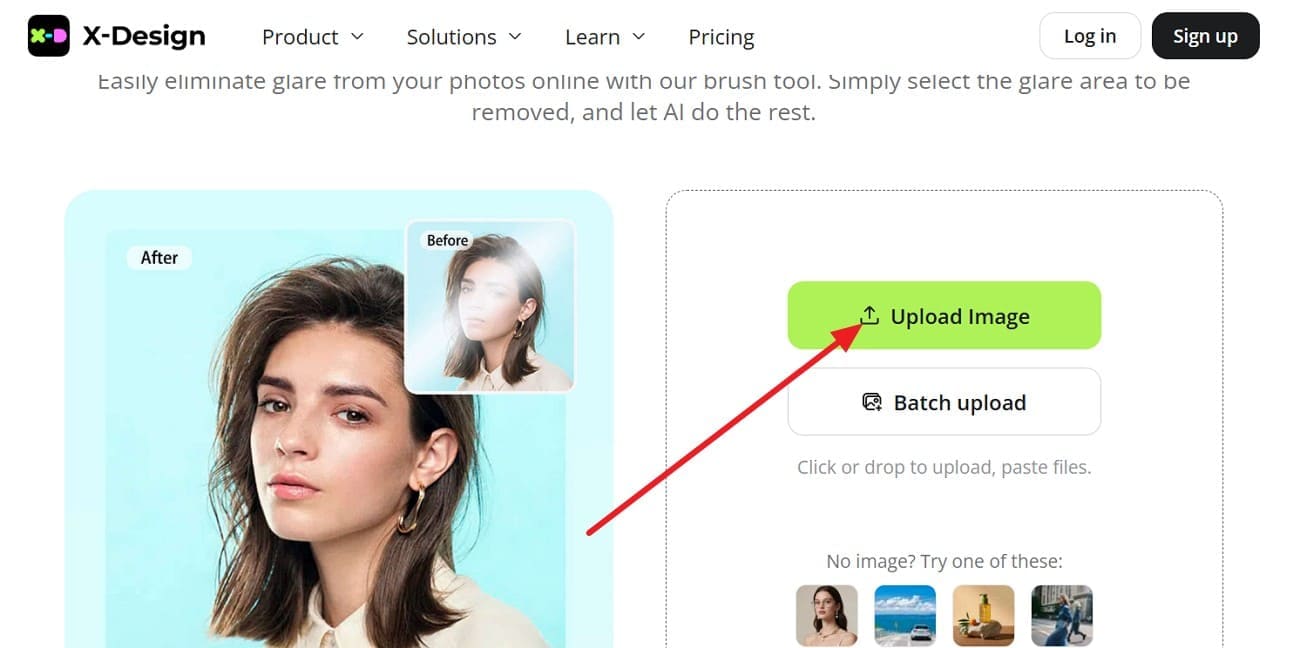
While learning how to remove glare from glasses in Photoshop, if you find the process hectic, use this tool. X-Design’s glare remover uses AI to remove bright spots and reflections and offers both AI and manual modes. Users can mark the glare with a brush or box, and the AI fills the area with nearby detail for a natural look. With an intuitive interface, here is how this tool ensures seamless usage:
Step 1. Choose the “Upload Image” on the tool and add the glared image.
Step 2. Go to the “Manual Removal” tab, choose the “Brush” option, and highlight the glare area. After that press the “Remove” button to let the AI detect the highlighted part.
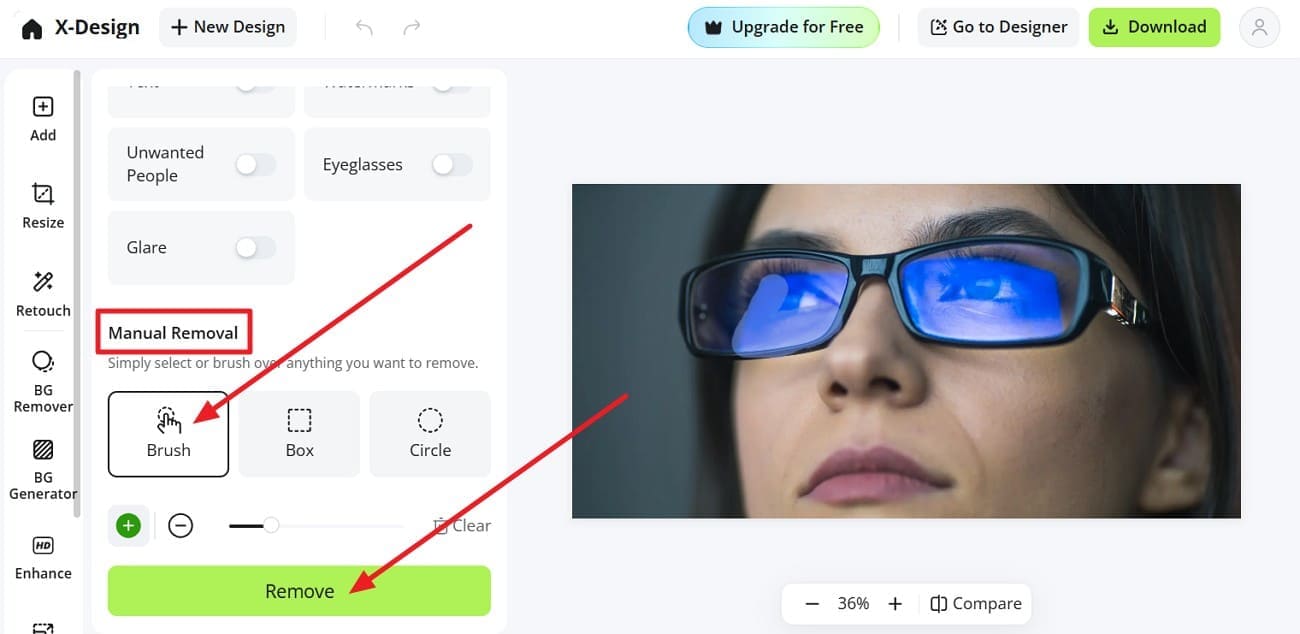
Step 3. Hover over the “Compare” icon to view the changes, then press the “Download” button to save.
Pros
Supports batch processing of up to 30 photos to clear images at once.
Access the X-Design app on iPhone or Android, other than online tools.
Can remove watermarks, stickers, dates, or blemishes, and change backgrounds.
Cons
Relies on simple AI tools, lacks layers, masks, and RAW options.
Performance depends on device, struggles processing high-resolution batches consistently well.
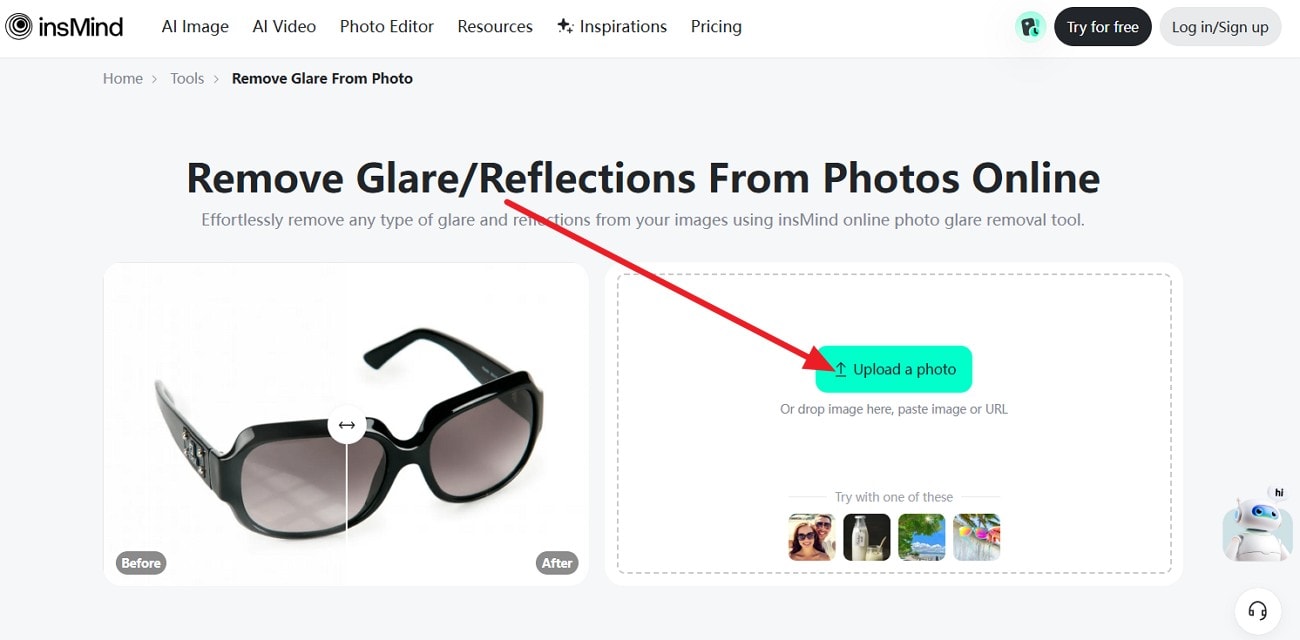
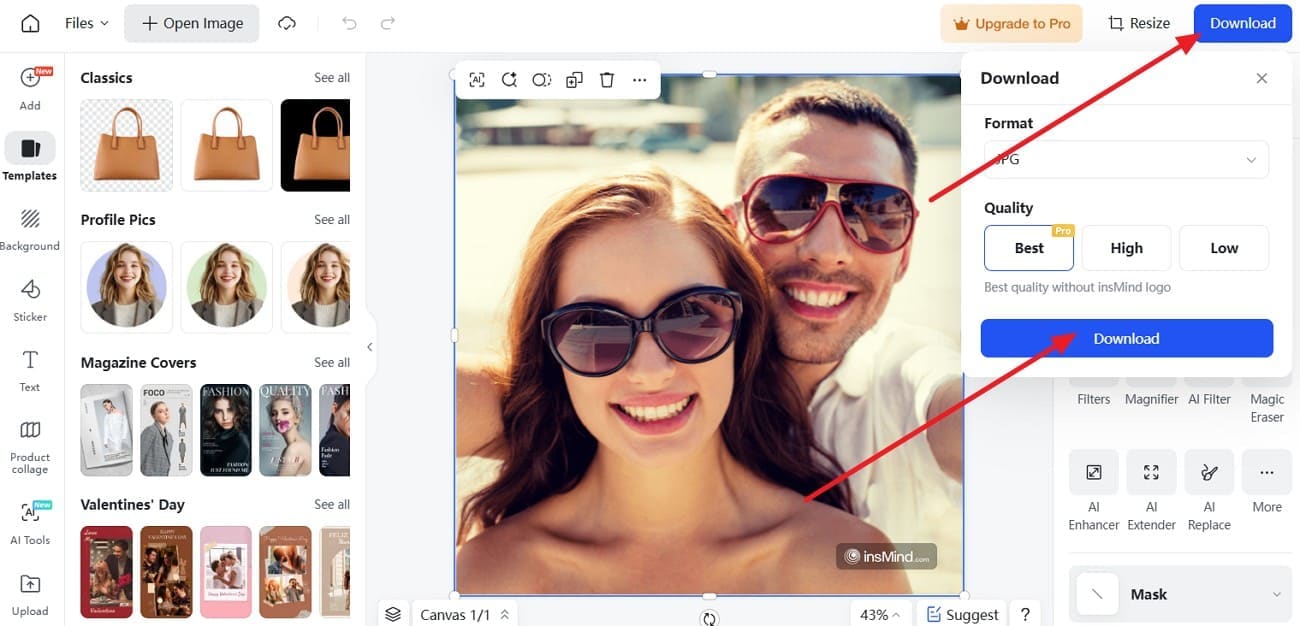
insMind
To know how to get rid of glare in photos, insMind detects bright spots and reflections on glass, mirrors, windows, or skin, and treats only the affected parts. Using its Magic Eraser tool, users can use the Brush tool to highlight the glared part with the option to undo and redo changes. Whereas the Select tools make selection seamless in one click, the usage of the Brush tool is guided below:
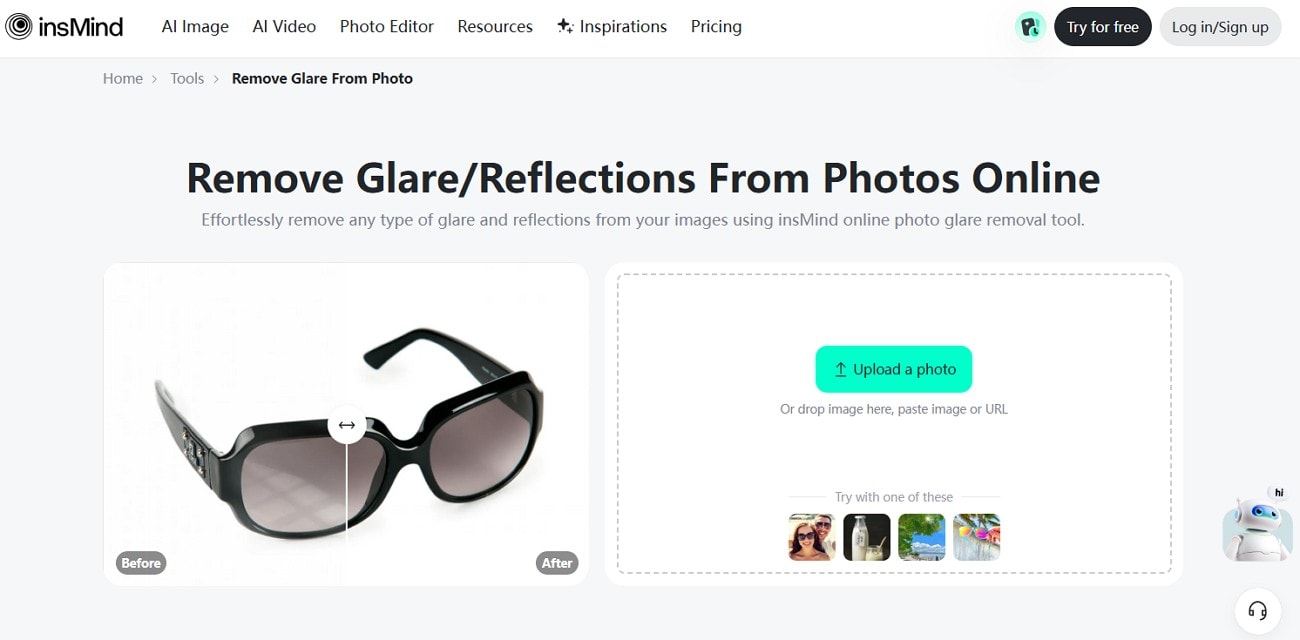
Step 1. Select the “Upload A Photo” option in the tool, then insert the glare image and choose the “Magic Eraser.”
Step 2. In the popup window, choose the “Brush” tool, highlight the area, and tap the “Start” button to initiate the process.

Step 3. When it ends, tap the “Download” button, choose the format and quality, and tap the “Download” button.
Pros
Auto glare removal works fast with no software installs required.
Removes glare while keeping clarity for clean, professional-looking shots.
Useful for casual and pro users needing quick glare cleanup.
Cons
Automation only, lacking layers, masks, or fine detailed adjustment tools.
Requires an internet upload, risky for large or sensitive private files.
YouCam
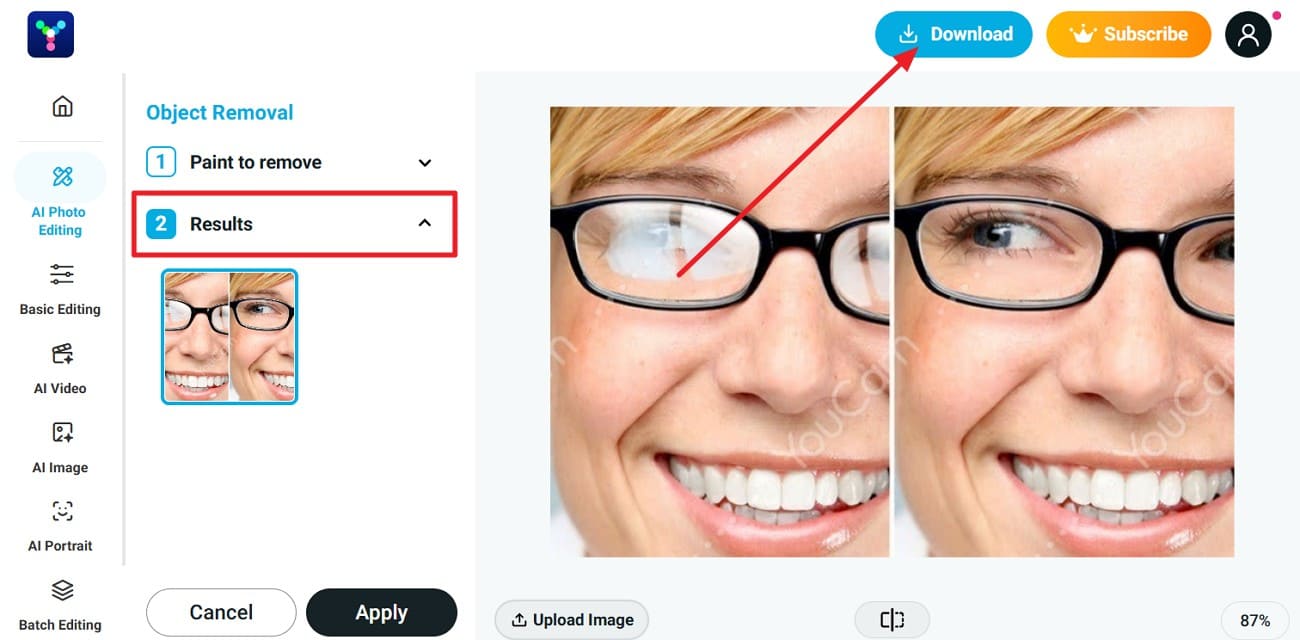
YouCam allows you to remove glasses glare from photo online free and allows you to highlight the glare areas with the Brush. Users can adjust its size seamlessly to target specific areas while avoiding effects on other parts. Unlike other tools, it also offers the option to choose the Quality between Standard and Professional for high-end results. Since the interface is intuitive, here is how you can remove glare with it:

Step 1. Click the “Try Now” button when you open the tool to add the glare image.

Step 2. Pick the “Select” tool, adjust the “Brush Size,” highlight the area, and press the “Remove” button.
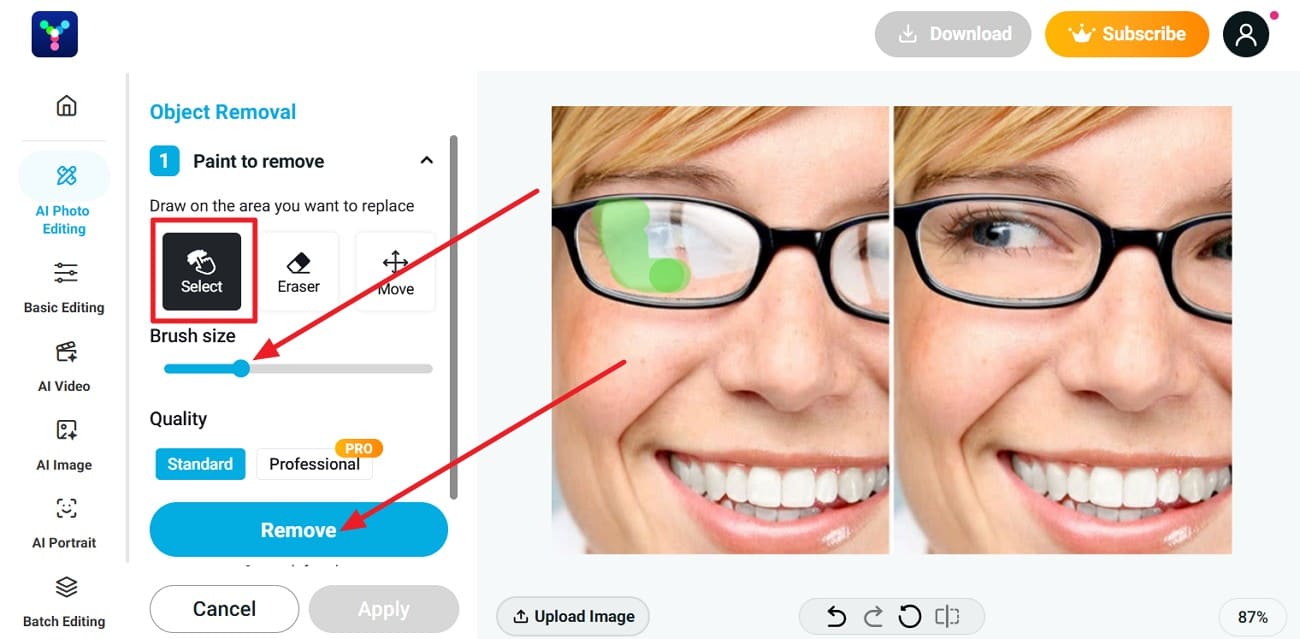
Step 3. Once directed to the “Results” tab, compare the changes and press the “Download” button.
Pros
AI detects and reduces glasses, sun, and object glare automatically.
Browser-based tool works anywhere, no installs needed on devices.
Part of YouCam editor, combining glare fixes with enhancements.
Cons
AI struggles restoring severe glare, sometimes leaving soft or imperfect areas.
Free tiers restrict resolution, exports, and heavy usage without subscriptions.
Mobile Apps
When you prefer editing on the go, these mobile apps handle glare removal effortlessly:
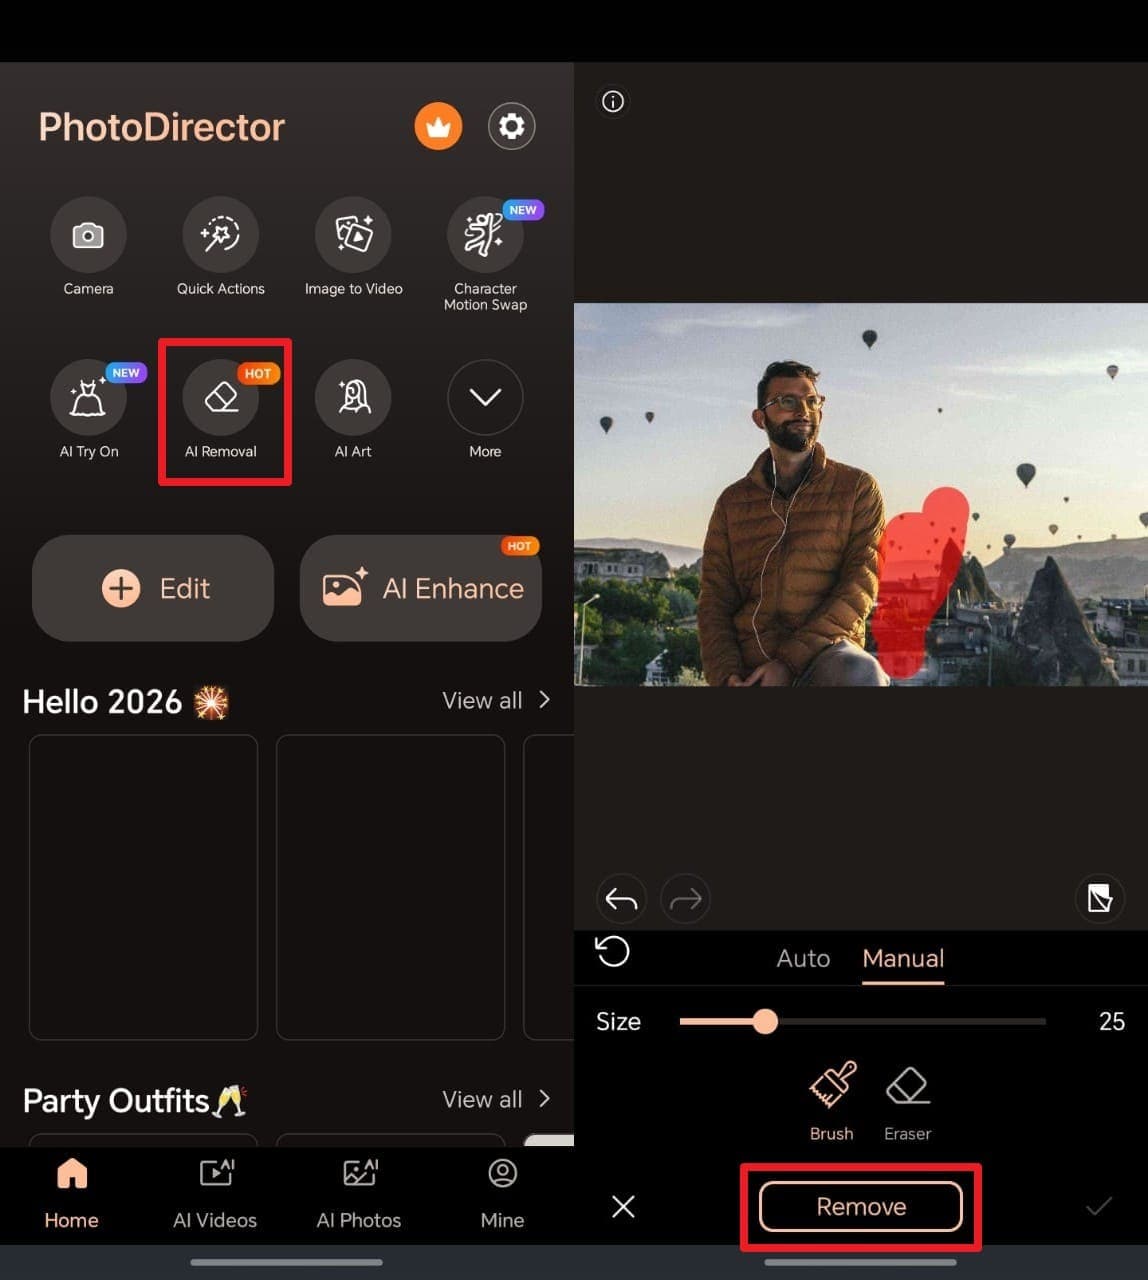
PhotoDirector (Android/iOS)
It offers an advanced AI-powered photo editing experience and lets you remove glare in seconds. PhotoDirector AI Removal feature detects and erases unwanted and selected glare from your image. Plus, users can fine-tune edits with advanced sliders for tone and sharpness control. The app also supports Ultra HD 4K output to preserve every detail and color accuracy. So, go through the steps to learn how to get glare out of photos:

Instruction.
Step 1: When accessing the main screen, head to the “AI Removal” feature and import your photo.
Step 2: Next, highlight the glare area you wish to remove and press the “Remove” button.
Step 3: The app will then remove glare and download the output.
Pros
Contains multiple AI retouching tools, reducing manual edits and improving speed.
Supports cloud integration for seamless saving and sharing across multiple platforms.
Works on most Android and iOS devices with optimized performance.
Cons
AI removal struggles with extremely complex backgrounds or overlapping objects.
The free version includes ads that can interrupt editing flow occasionally.
YouCam Perfect (Android/iOS)
You can also use the YouCam Perfect app to remove bad glare from your photos. While using its AI Removal, it lets you mark the glare and reflections to remove them. Upon doing this, you will also be able to preview the edited photo before saving it to your phone. Anyhow, review the given guide to understand how to get the glare out of a picture via this app:
Instruction.
Step 1: Go to the app’s “AI Removal” section to import an image and mark the glare area.
Step 2: Later, tap the “Remove” button and let the app initiate the process.
Step 3: When done, preview the changes and tap “Save” to export the image.

Pros
The app’s AI removal supports PNG exports for flexible design usage needs.
A wide variety of AI filters helps create unique and eye-catching selfies.
Even enables you to apply different filters to your glare-removed image.
Cons
Many advanced AI features are locked behind paid subscription plans.
File exports in the free version include watermarks, reducing usability.
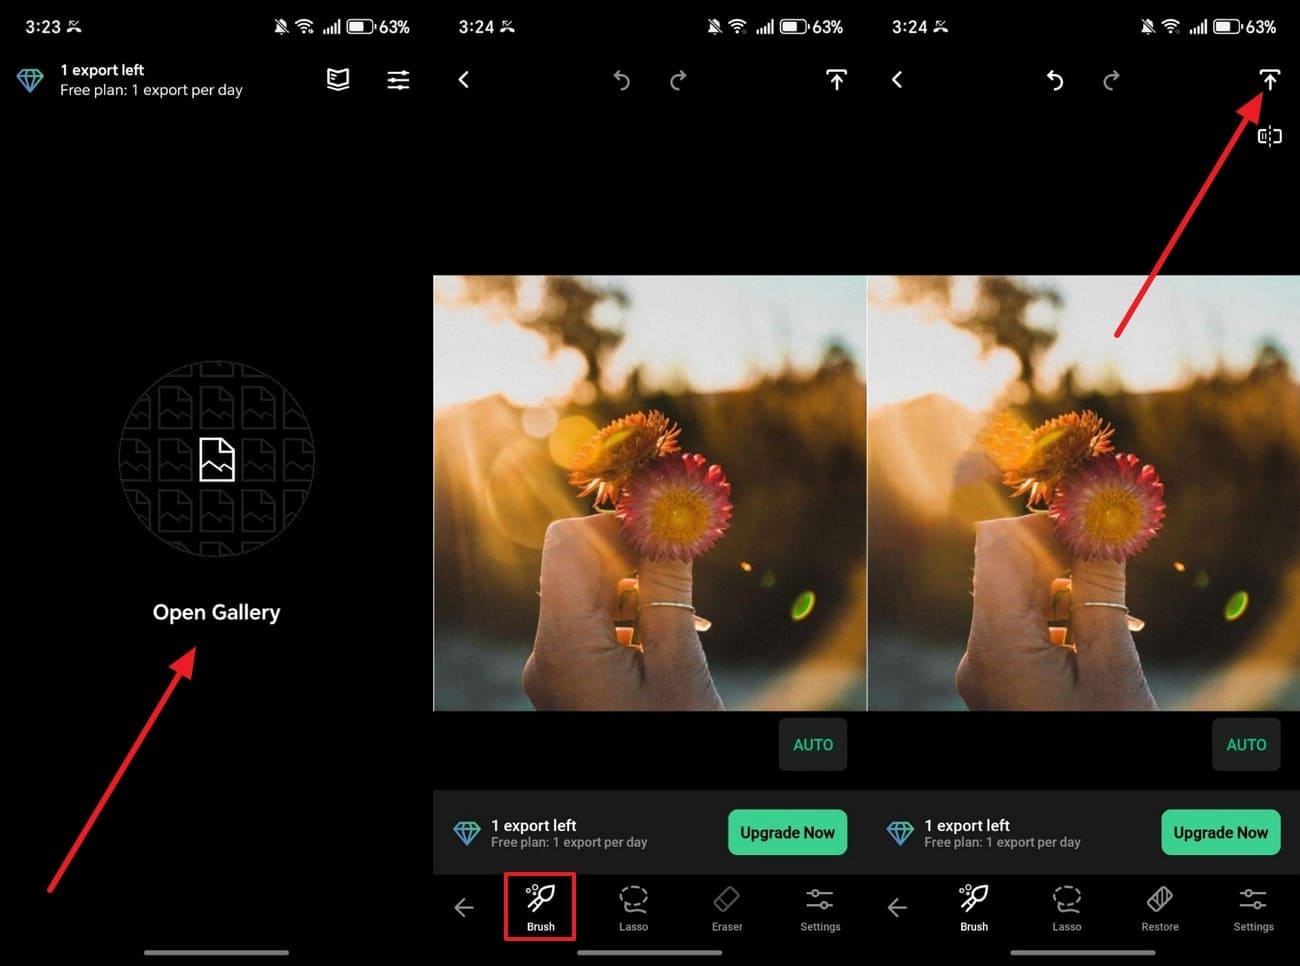
Retouch (Android)
Retouch is another famous AI photo eraser app designed for effortless glare removal. Its AI-powered Brush instantly deletes unwanted glare or distractions naturally. Users can mark content manually, and AI restores the background seamlessly afterward. In addition, the app includes automatic cutout tools for replacing or changing photo backgrounds. Hence, take guidance from the steps to find out how to remove light glare from photo:
Instruction.
Step 1: Upon seeing the app’s main display, tap the “Open Gallery” option to select the glare-effect photo.
Step 2: Next, opt for “Brush” to point out the glare area, and Retouch will initiate removing it.
Step 3: Upon waiting for a few seconds, tap the “Save” icon to export the image.
Pros
Efficient AI engine delivers fast, clear, and consistent editing performance.
Quick saving speeds up exporting and sharing final edits on platforms.
Provides over 100 filters and stickers for artistic personalization.
Cons
AI removal may sometimes blur details or distort textured background surfaces.
Batch editing is unavailable, requiring manual removal for each image separately.
Part 4. Comparing The Best Ways to Remove Glare from Photos
After exploring multiple solutions, it becomes easier to compare their strengths. While learning how to remove a glare from a photo, this comparison helps you identify which glare removal method is best:
| Method / Tool | Platform | AI Glare Detection | Manual Control | Output Quality | Batch Processing | Best For |
| UniConverter Desktop | Windows/macOS | Yes | Brush, Deselect, Undo | 4K, HDR preserved | Yes | Professional, bulk glare removal |
| Photoshop | Windows/macOS | Partial (Generative Fill) | Advanced layers, masks | Industry-grade | Yes | Precision manual editing |
| UniConverter Online | Web | Yes | Adjustable brush | High (web-optimized) | Limited | Quick online fixes |
| X-Design | Web/Mobile | Yes | Brush, box selection | Good | Yes (up to 30) | Casual batch edits |
| insMind | Web | Yes | Basic brush | Good | No | Fast automatic cleanup |
| YouCam Online Editor | Web | Yes | Brush size control | Medium–High | No | Glasses glare, selfies |
| PhotoDirector | Android/iOS | Yes | Sliders, selection | Ultra HD 4K | No | Mobile high-quality edits |
| YouCam Perfect | Android/iOS | Yes | Brush-based | Medium | No | Selfies, social media |
| Retouch | Android | Yes | Brush marking | Medium | No | Quick object or glare removal |
Hence, among the available options, UniConverter stands out as the best and most effortless tool for glare removal. Its combination of advanced AI and 4K-quality preservation makes it the clear winner for both casual users and professionals.
Part 5. Pros and Cons of AI vs. Manual Glare Removal
Once you understand the available tools, it’s important to compare AI-based and manual glare removal approaches. The table below highlights how both methods differ in workflow efficiency and suitability for various editing needs:
| Aspect | AI Glare Removal | Manual Glare Removal |
| Speed | Fixes glare in seconds across multiple photos instantly. | Slower; each photo needs careful hands-on correction. |
| Ease | One-tap removal with smart auto-detection tools. | Involves precise brushwork, masking, and clone adjustments. |
| Accuracy | Works great for mild glare on flat surfaces. | Excels on faces, glasses, or mixed reflections. |
| Texture Quality | May blur fine details or smooth skin too much. | Retains natural pores, highlights, and subtle shadows. |
| Creative Control | Minimal; AI predicts changes automatically. | Total control over tone, lighting, and retouch depth. |
| Consistency | Keeps uniform edits ideal for product or batch shots. | Tailors result differently for each unique photo. |
Part 6. 5 General Tips to Avoid Glare When Shooting Photos
Even with the best tools, it’s easier to prevent glare apart from learning how to get rid of glare on glasses. Below are simple, practical tips to capture clean photos without unwanted shine or reflections:
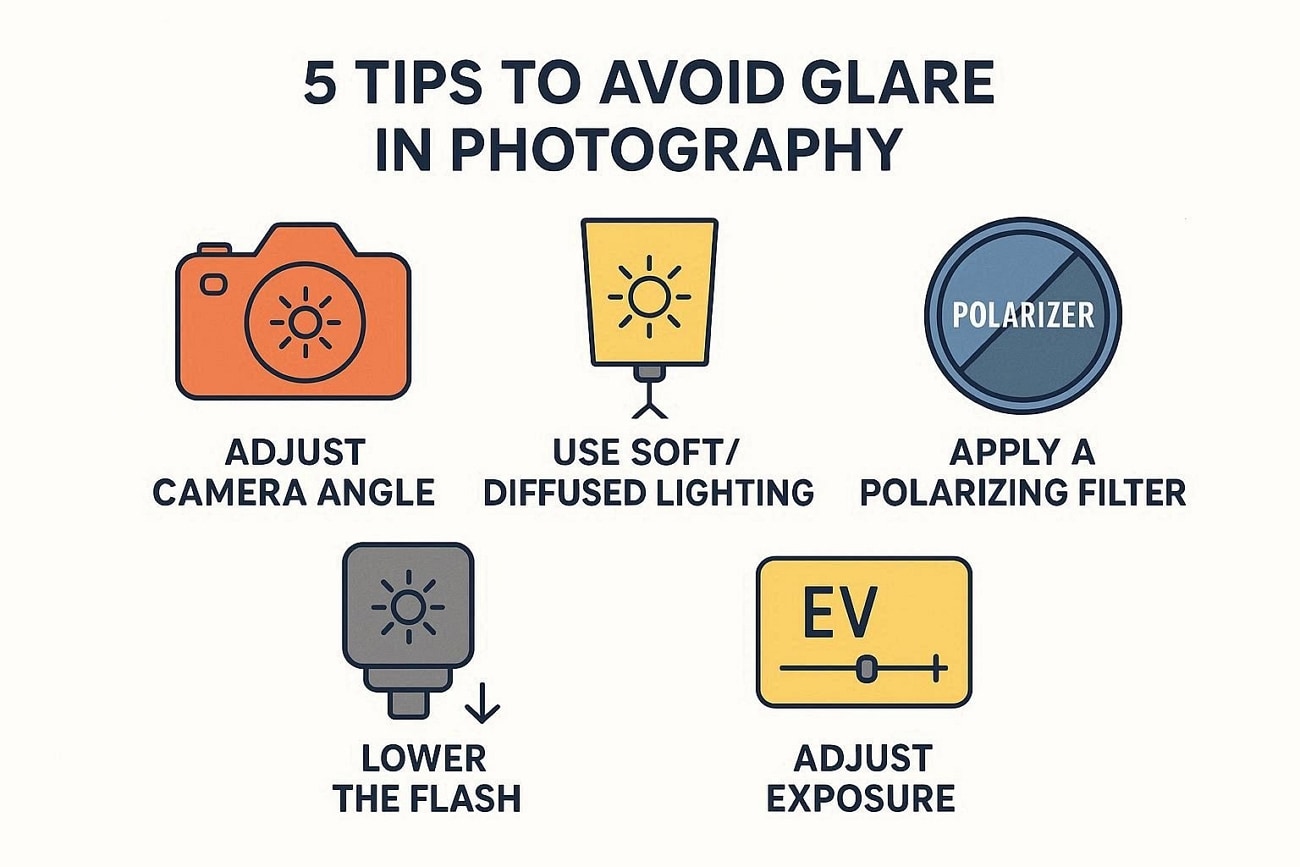
Adjust Angle: Change your camera position slightly to stop light from directly hitting the lens. This small move can instantly reduce reflections and bring out true photo colors.
Soft Lighting: Use diffused or indirect light instead of harsh sunlight or strong lamps indoors. Soft lighting helps create smooth shadows and balanced brightness on every subject.
Polarizing Filter: Attach a polarizing filter to your camera lens to cut shiny surface reflections. It’s especially useful when learning how to get rid of glare on glasses.
Lower Flash: Turn off or reduce flash intensity when shooting reflective objects. Overpowered flashes cause shiny spots on glass, faces, or polished surfaces.
Adjust Exposure: Slightly reduce exposure or brightness settings on your camera before pressing capture. This helps control highlights and maintain visible details in bright or shiny areas.
Conclusion
In summary, removing glare helps restore clear details and a more balanced look. Whether it’s sunlight or flash, knowing how to remove glare from photo improves every shot’s quality. So, this article has explored several tools and apps to help remove glare. Yet, for quick and professional edits, try UniConverter, the best choice for natural glare correction anytime.
FAQs
-
1. Can glare removal damage the original photo quality?
Using improper or low-quality tools may reduce sharpness or remove fine details, which can affect overall image quality. Reliable software helps protect image integrity during glare correction. Professional tools like UniConverter are designed to maintain resolution while reducing unwanted bright reflections. -
2. Which photo formats support glare removal?
Most glare removal tools support common formats such as JPG, PNG, and TIFF. High-quality RAW images may require desktop software for more precise control. Always check a tool’s format compatibility before editing sensitive or high-bit-depth files. -
3. Does glare removal work on old photos?
Yes. Digital editing can reduce glare on scanned or older photographs. Some AI-based tools can intelligently reconstruct partially hidden details, though strong reflections or damaged areas may still require manual retouching. -
4. How can I prevent glare when taking photos?
The most effective method is adjusting the angle between the light source, the subject, and the camera so reflections are directed away from the lens. Repositioning lights, slightly turning the subject, or diffusing harsh light with curtains or softboxes can greatly reduce glare before shooting. -
5. What if the glare is very strong and hides important details?
If glare completely blows highlights to pure white, the original detail is usually lost and cannot be fully recovered. Advanced retouching techniques—such as cloning, AI reconstruction, or manual painting—may help, but retaking the photo under improved lighting conditions often yields the best results.

