

You watch a video, and it appears blurry and difficult to watch. This is annoying, and it may be a time-sensitive matter, but you can make any video clearer online, using different desktop programs or a mobile application. All you need to do is select the appropriate choice that allows you to adjust brightness, sharpness, and resolution within seconds.
You can enhance the quality of video with ease in order to use it at school, work, or on social media. In that regard, this guide presents the most helpful free tools, detailed step-by-step guidance, and tips that are recommended by specialists.
In this article
- Quick Fix: How to Make a Video Clearer with Built-in Tools
- Fast & Free: Make Video Clearer Online
- How to Make a Video Clearer with a Dedicated Desktop Tool?
- How to Make a Video Clearer with a Mobile App?
- Prevention Is Better Than Cure: How to Record a Clear Video
- Conclusion
- Frequently Asked Questions

Part 1. Quick Fix: How to Make a Video Clearer with Built-in Tools
If you question how to make a video clearer with PC and mobile apps, this section lists some options with detailed guides and recommendations.
Option 1: Using The Photos App Editing Tools
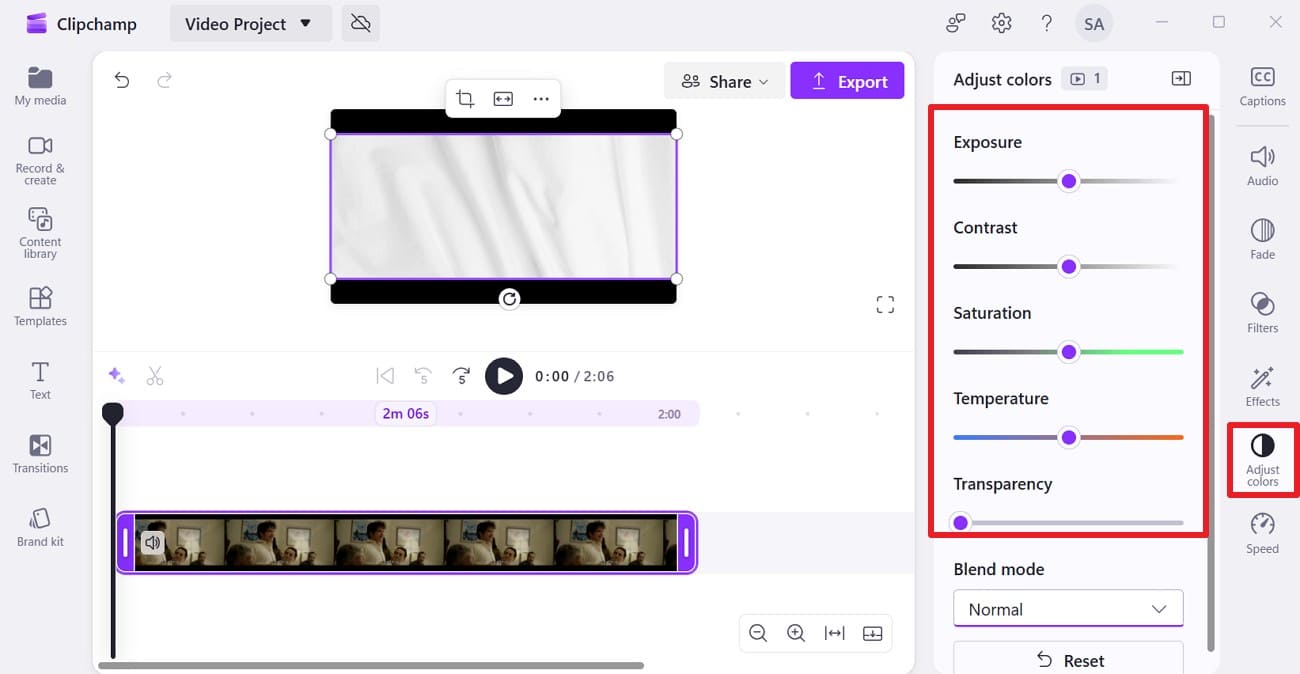
The Photos app links to Microsoft Clipchamp, which lets you adjust video exposure, contrast, and saturation, along with other settings. Not just that, users can choose from various “Blend Modes” like normal and overlay while enhancing the video. With the option to undo and redo the changes, the app also enables one to add transitions and text while having a clearer video in real time.
With the option to collapse the timeline or apply filters, here is how you can make a video clear within the Auto Adjust section.
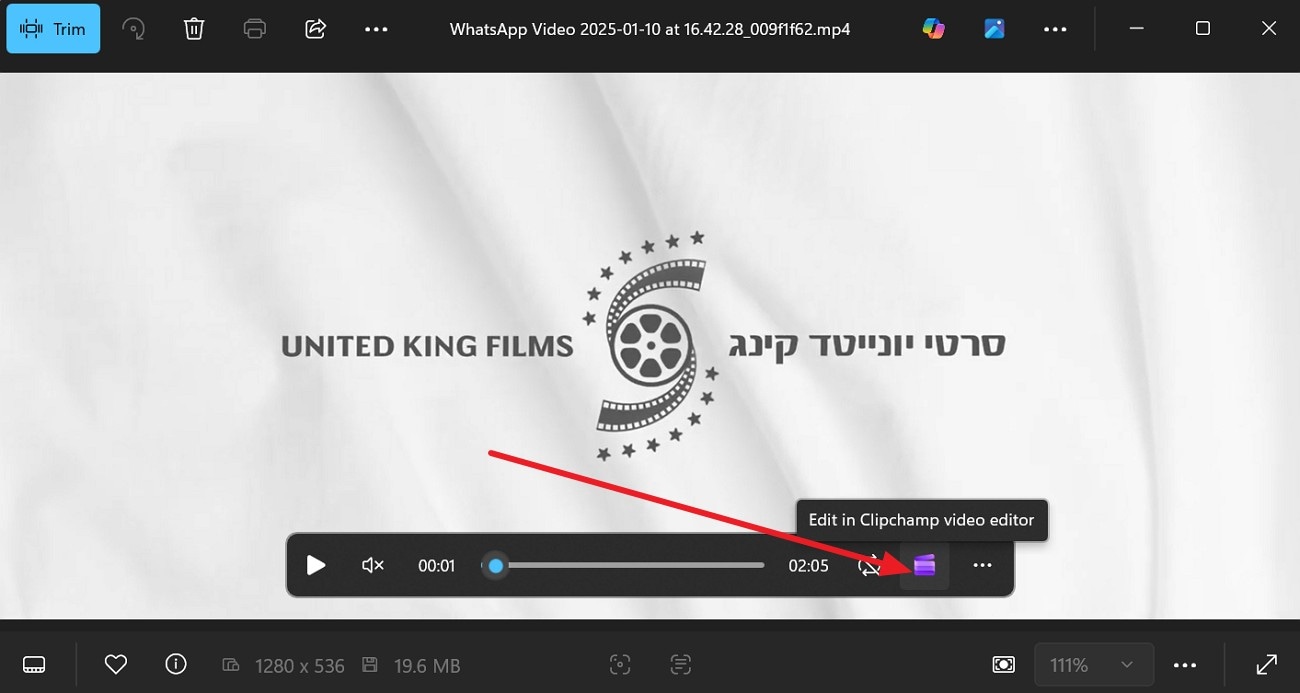
Step 1. Upon opening the video in Photos App, choose the “Microsoft Clipchamp Video Editor” icon.
Step 2. When directed to the tool, select the “Auto Adjust” section and adjust settings such as “Exposure, Contrast, Saturation, or Temperature.”
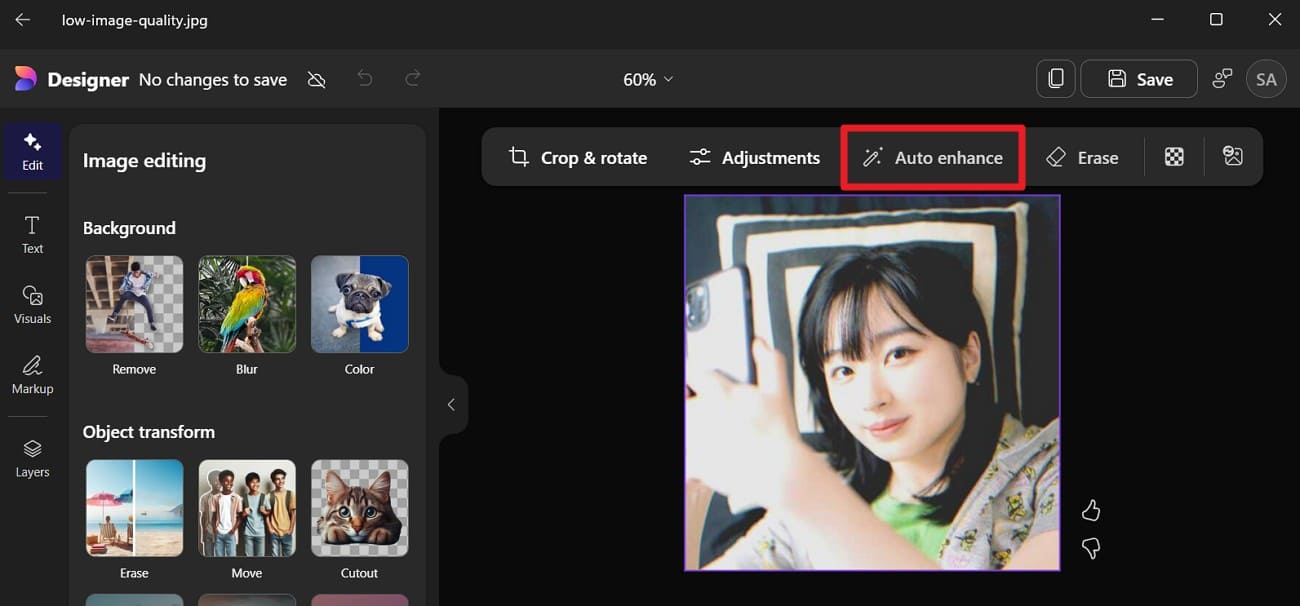
Want Sharper Photos Rather Than Clearer Videos? Microsoft Designer Helps
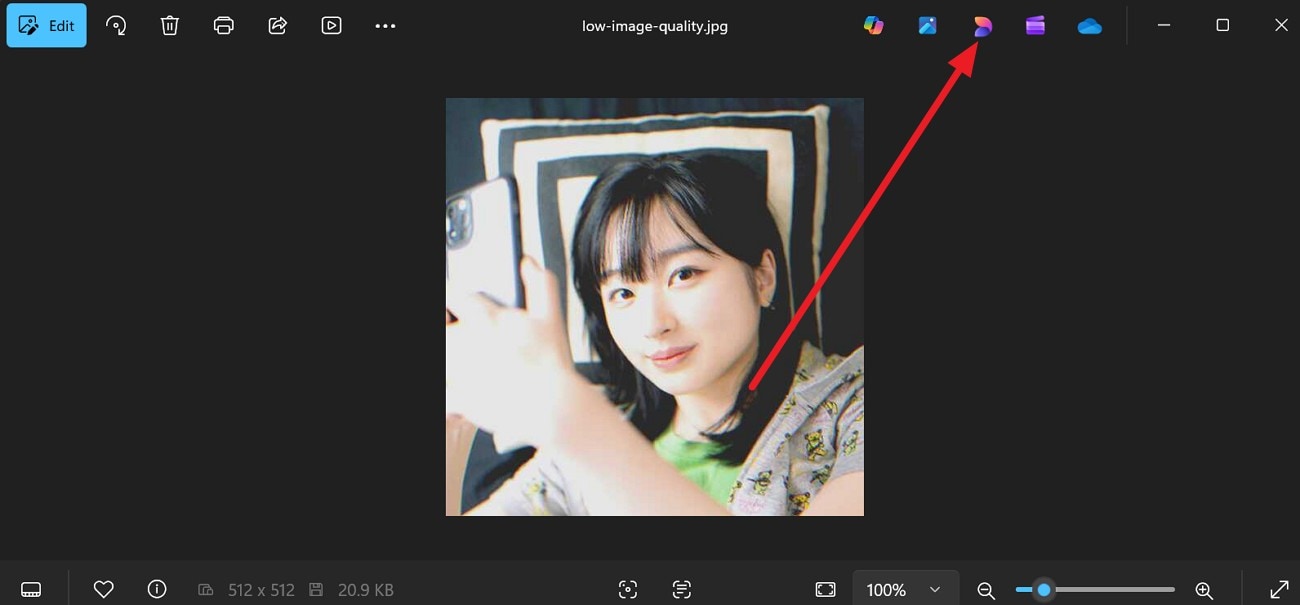
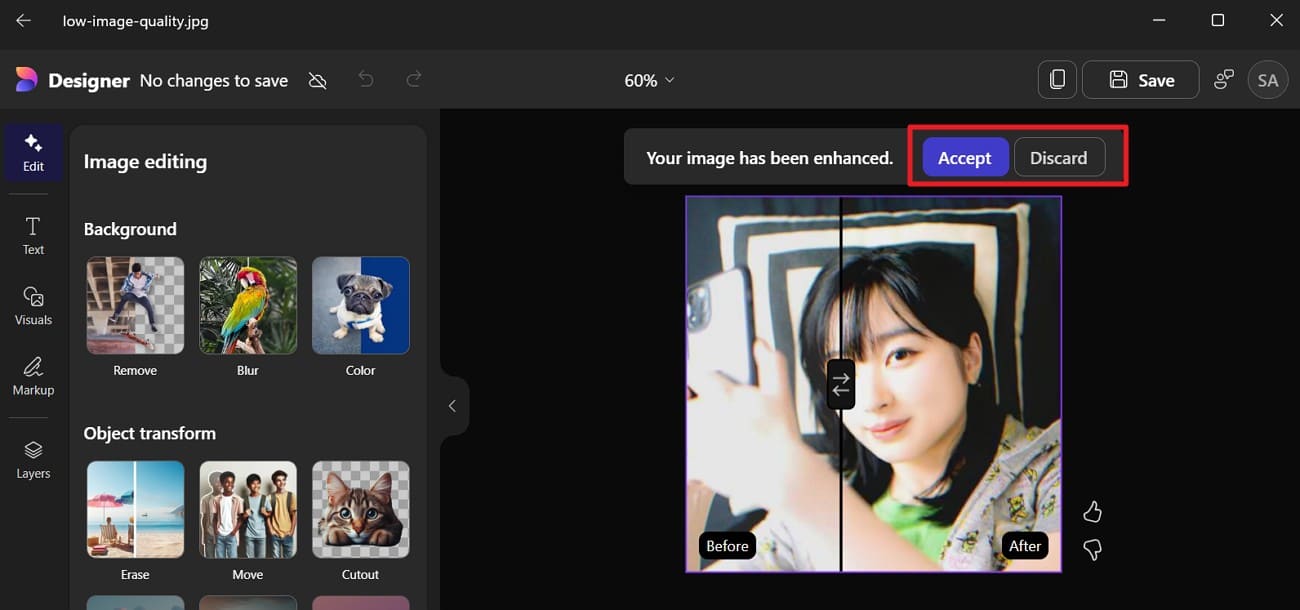
While learning how to make a video clearer for free, if you seek to enhance images, Microsoft Designer can help. This tool offers an Auto Enhance feature that lets you upscale blurry photos in one tap, with an option to view before and after, as illustrated below:
Step 1. Choose the "Microsoft Designer” icon as you open the image on the Photos App.
Step 2. Press the “Auto Enhance” feature at the top, then wait for the process to complete.
Step 3. Select “Accept” or “Discard” when comparing the before and after.
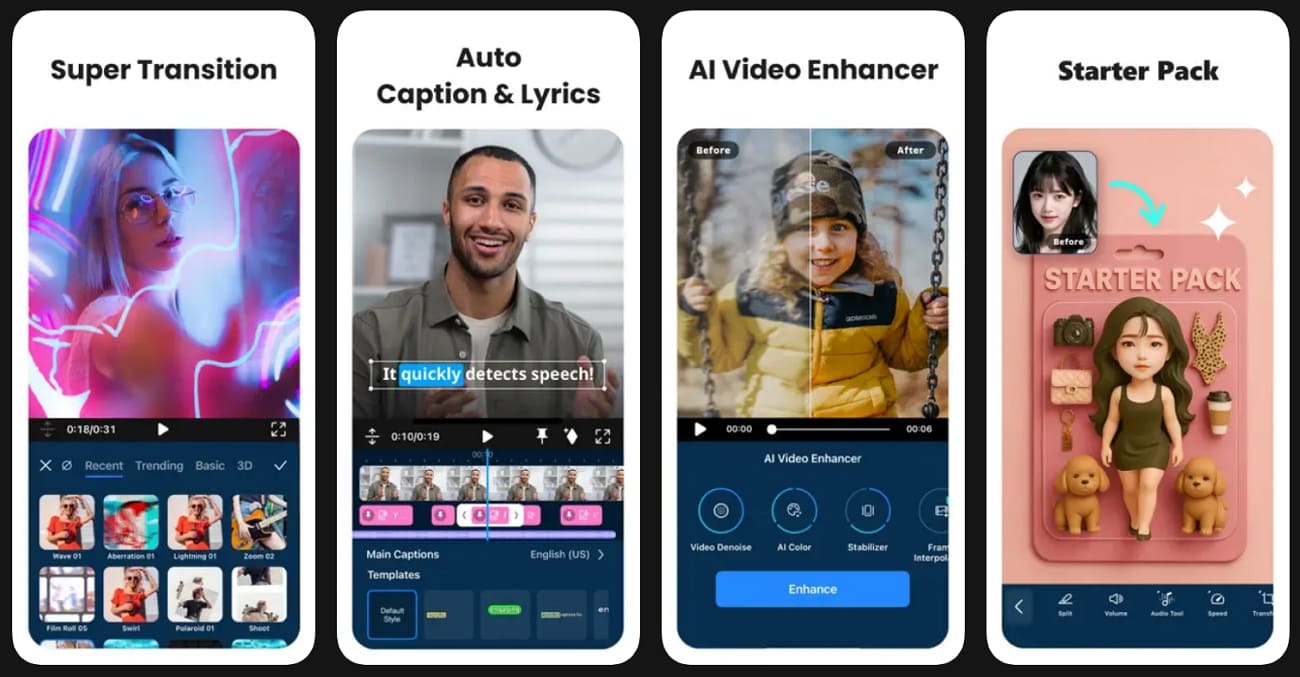
Option 2: Third-Party iOS Apps [CapCut - Android | iOS]
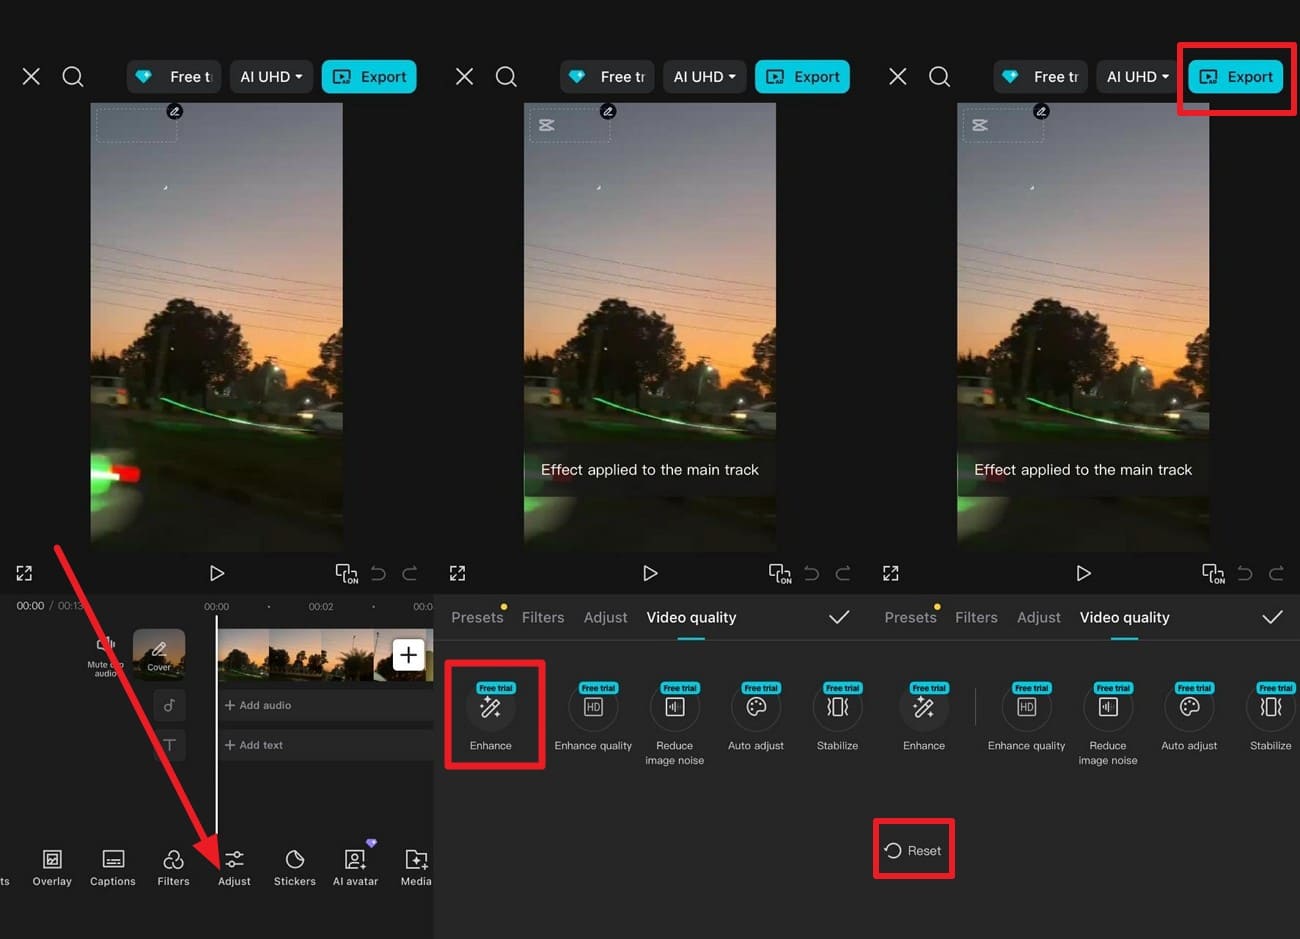
If one asks how to make a video clearer on an iPhone, applications like CapCut allow you to adjust quality via multiple options. Users can either select the “Adjust” feature to change contrast or temperature or use the “Video Quality” tool. Within the Video Quality tool, users can get AI-powered assistance with features such as Enhance, Enhance Quality, and Auto Adjust for complete control.
So, with the facility to reset the changes or see the before and after, here is how you can upscale blurred video with CapCut:
Instructions.
Press the “Add” button as you import the video and head to the “Adjust” tab to choose the Video Quality” section. There, select the “Enhance” feature or another option, and wait for the process to complete. Now, preview the before and after to “Export” or tap “Reset” to redo the video enhancing.
Pro Tip: How to Film a Clearer Video on iPhone from the Start
Instead of going through the trouble to know how to make a blurry video clearer, it is preferable to shoot the video using the right settings to prevent blurry effects. Therefore, if you are unfamiliar with some tricks, follow the listed tips of the experts:
- Switch 4K & The Right Frame Rate: Open Settings, then, under the camera, you will find Record Video, then, 4K, 30 fps, which should be used in daily videos, and 60 fps when recording fast action videos. Therefore, these settings provide additional details in comparison to 1080p. Besides, the high quality comes in handy when you want to crop and correct the shake later without making the video look smooth.
- Lock Focus & Exposure: In the camera app, frame your subject, then press and hold the screen until you see the AE/AF Lock. This will maintain the focus and brightness thereafter, then slide your finger up or down to regulate the light in order to make the subject clear and natural.
- Keep The Phone Steady: When testing the settings, it is also recommended to hold the phone with both hands or apply a tripod or gimbal. It is also advisable to lay your arms on a hard surface where possible, as this will lessen shake and blur. Moreover, enable the additional stabilization in the Camera settings in case your phone has that feature.
- Lighting Before You Shoot: Position your subject close to soft light, such as a window or a shadowy location, and do not use strong light behind the subject. When the background is too bright, focus on the subject and make it a little bit darker to get a better color on the skin.
- Keep Colors & Detail Stable: Turn on white balance lock if your phone allows it, as this stops color changes during the video. Alternatively, turn off features like HDR if they cause flicker and use one color setting for a clean and steady look.
Part 2. Fast & Free: Make Video Clearer Online
Other than PC or mobile apps, this section will guide you on how to make a video clearer online for free with the 3 simple tools given ahead:
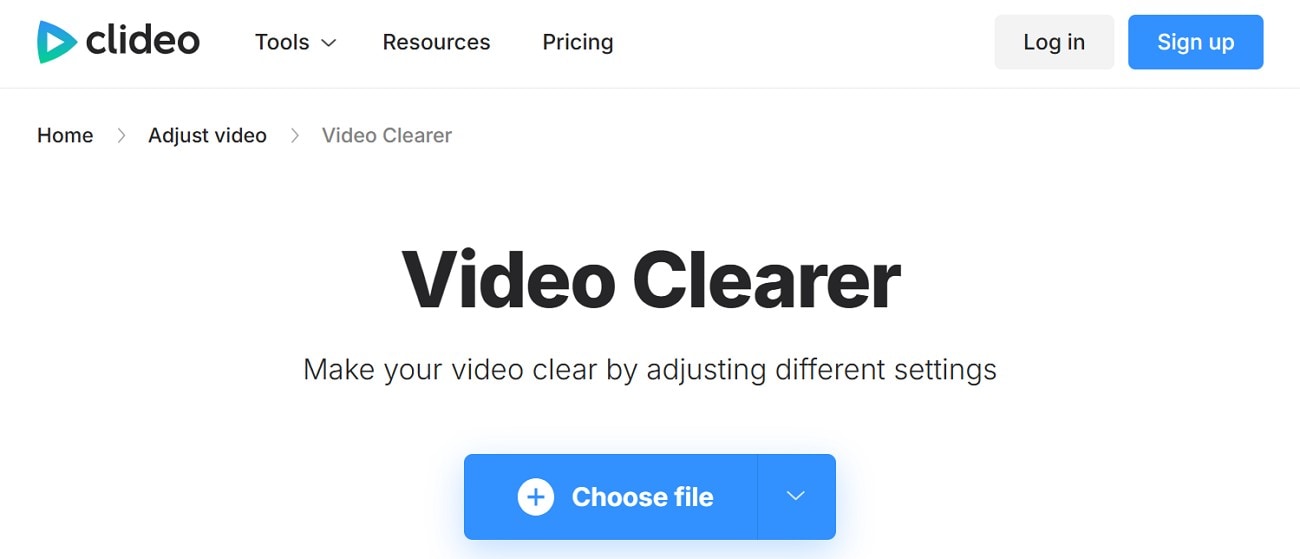
Clideo
Best For: Social clips, simple YouTube videos, screen recordings, or casual videos.
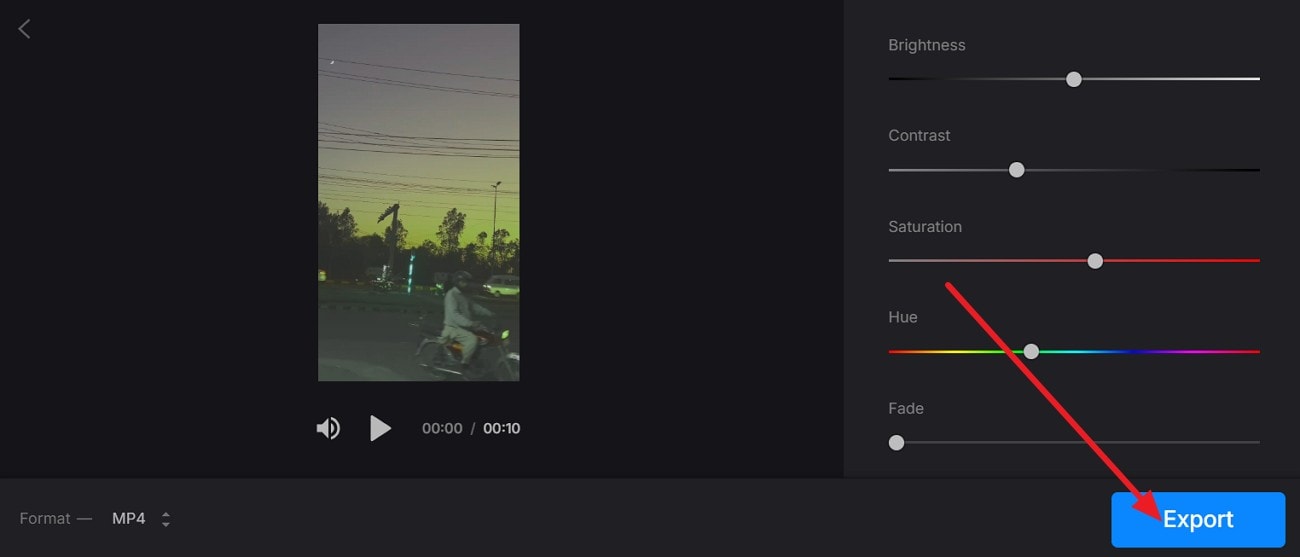
With the option to import video from Google Drive, Phone, or PC, this tool is a quick and straightforward way to clear video. Additionally, it allows you to adjust the brightness and contrast, along with the sliders, to have complete control over the results. Unlike other tools, this tool can import video files in formats such as MP4, MOV, and MKV.
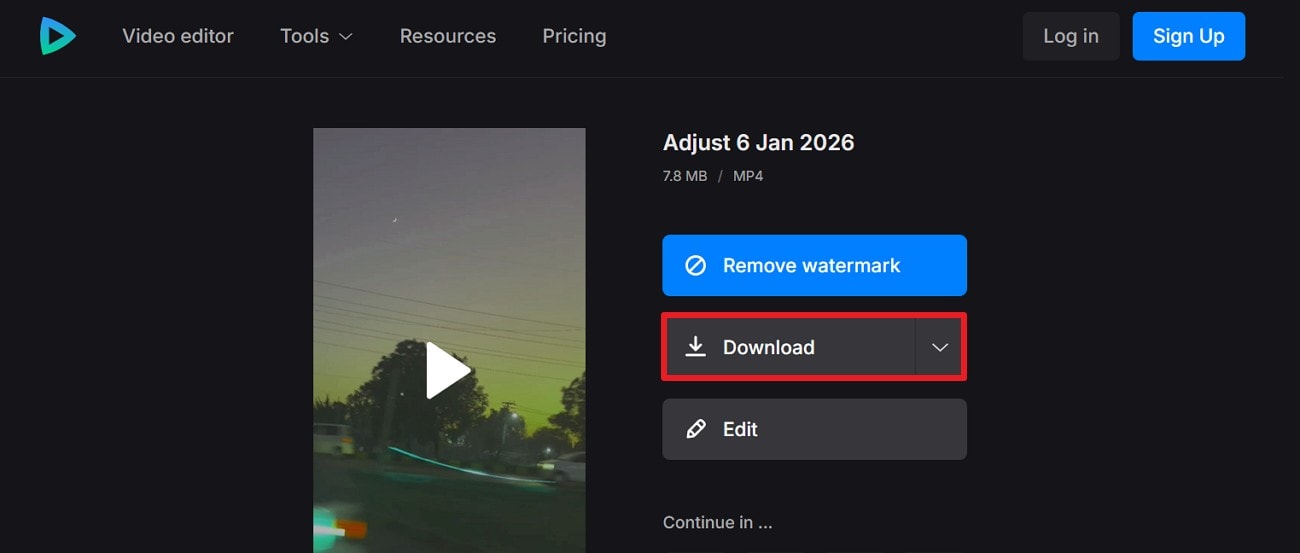
To offer a clearer video, this tool is intuitive and features a simple interface, which makes it an ideal option for beginners. Besides this functionality, users can use it to remove a watermark from the video with the option to play it to preview changes. So, to determine how this tool allows you to easily export, review the listed guidelines:
Step 1. Adjust the settings like “Contrast, Saturation, or Hue” as you upload the video and press the “Export” button to save results.
Step 2. There, remove the watermark, select the “Download” option, or edit the video further.
Pros
Works in modern browsers, no installation needed, saves time, and avoids unsafe downloads.
Accessible on iPhone, Android, Windows, and Mac using a browser or an app.
Allows you to edit the cleared video further or reset the settings.
Cons
Large, long, high-quality videos may need an upgrade or compression.
No sharpening, noise reduction, color grading, or timeline editing tools.
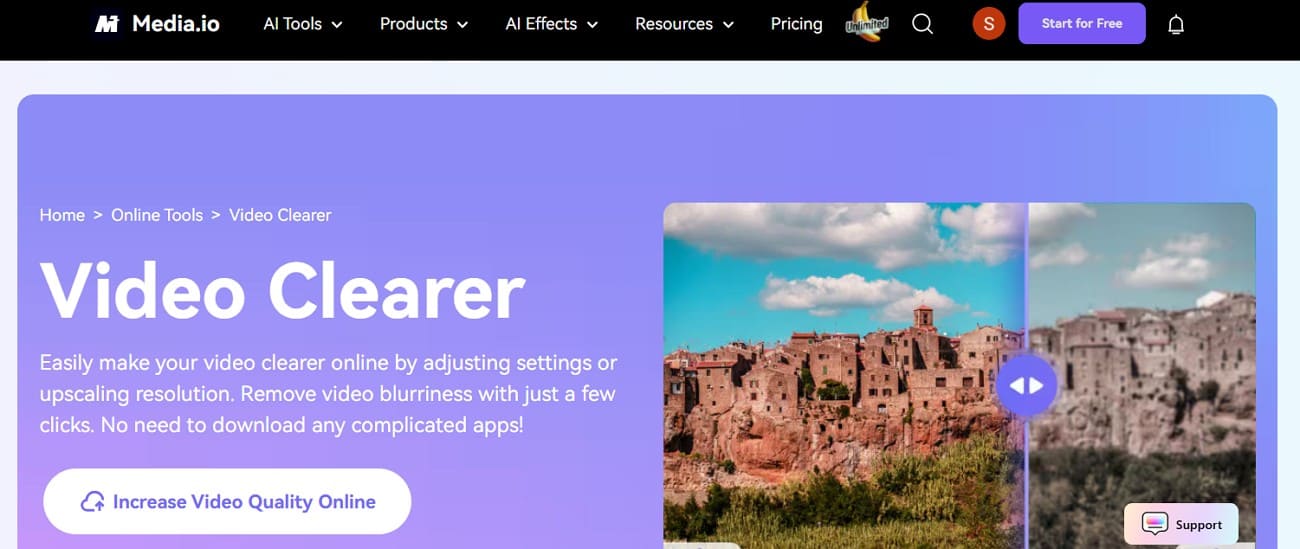
Media.io
Best For: Quickly improving short, low to medium-quality clips automatically.
As a versatile blurry video clearer tool, it features a Video Enhancer where users can choose from Basic and Quality styles. To reduce noise and improve video clarity, the tool leverages AI-based sharpening and texture enhancement capabilities. Additionally, users can see the before and after of the cleared video to determine the changes.
Furthermore, one can get instant upscaled videos to HD or 4K without any compression artifacts. Not just that, it is seamless to use and keeps edges and subjects looking sharp once the footage is cleared. To avoid manual edits, it automatically balances brightness, contrast, and saturation to make colors look more vivid and natural. So, to know how you can access this tool on a web browser to clear video, here are the simple instructions:
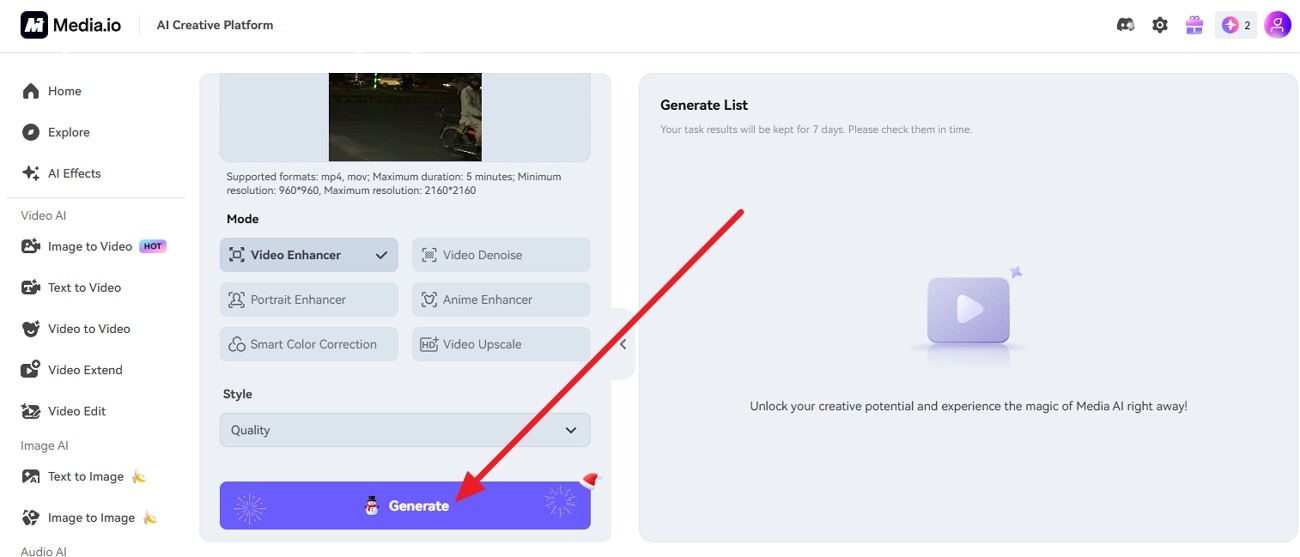
Step 1. Within the “Video Enhancer” mode, press the “Drag Files Here or Click to Upload” option and upload the blurred video.
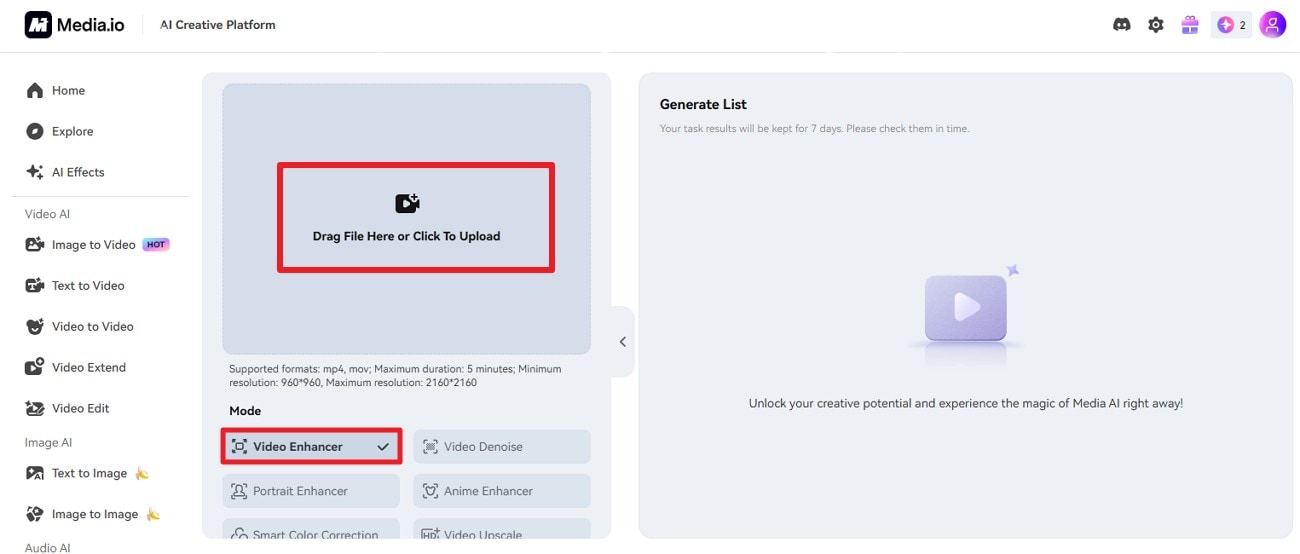
Step 2. Now, press the “Generate” button and wait a few seconds to have a clearer video.
Pros
Supports MP4, MOV, MKV formats; clips usually up to five minutes.
Saves improved videos in HD or 4K, ready to share
Files stay on Media.io servers temporarily, deleted in 7 days for privacy.
Cons
Few manual controls; cannot fine-tune sharpening, noise, or color grading.
Needs uploading and downloading; slow or may fail on a weak internet.
Flixier
Best For: Slightly blurry videos needing sharpening, brightness, noise reduction, trimming, or text overlay.
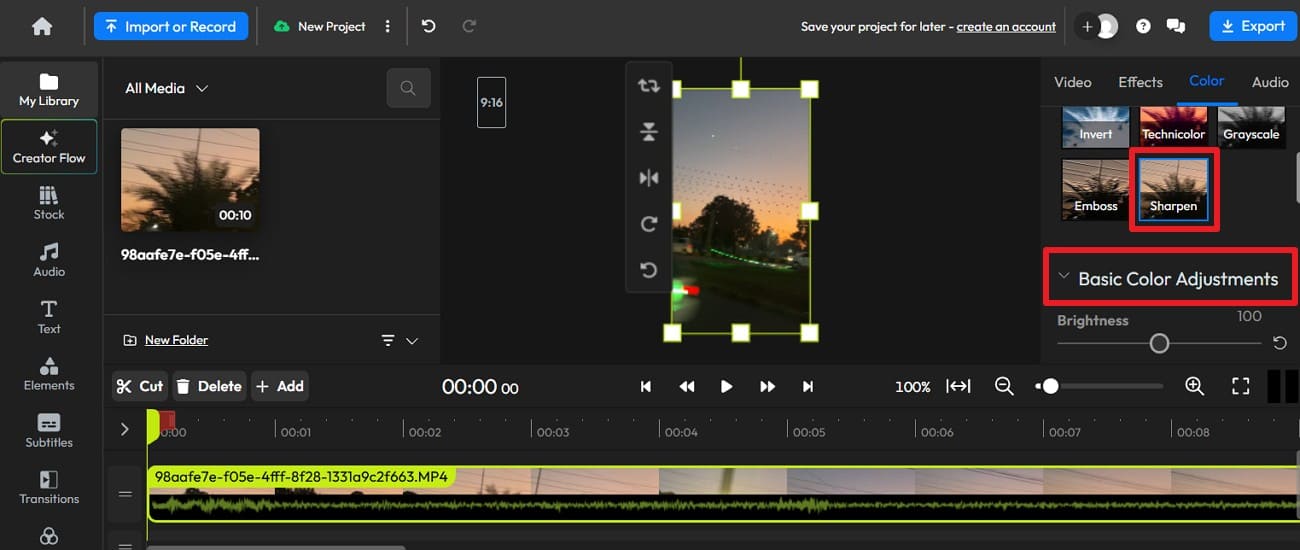
This blurry video clearer free option allows you to upload media files from various sources like Google Drive, Dropbox, or a PC. In addition, users can insert blurred video URLs or drag and drop files for quick upscaling. To make footage look natural and clear, users can choose from filters such as Sharpness to achieve instant results.

However, if you prefer to have more control, you can choose Basic Color Adjustments, such as Brightness or Saturation. When one opts for the manual upscaling, the tool enables them to choose the Blend Color or reset the adjustments for quick editing. So, to know how you can clear certain parts or clips within the Flixier timeline, review the listed steps:
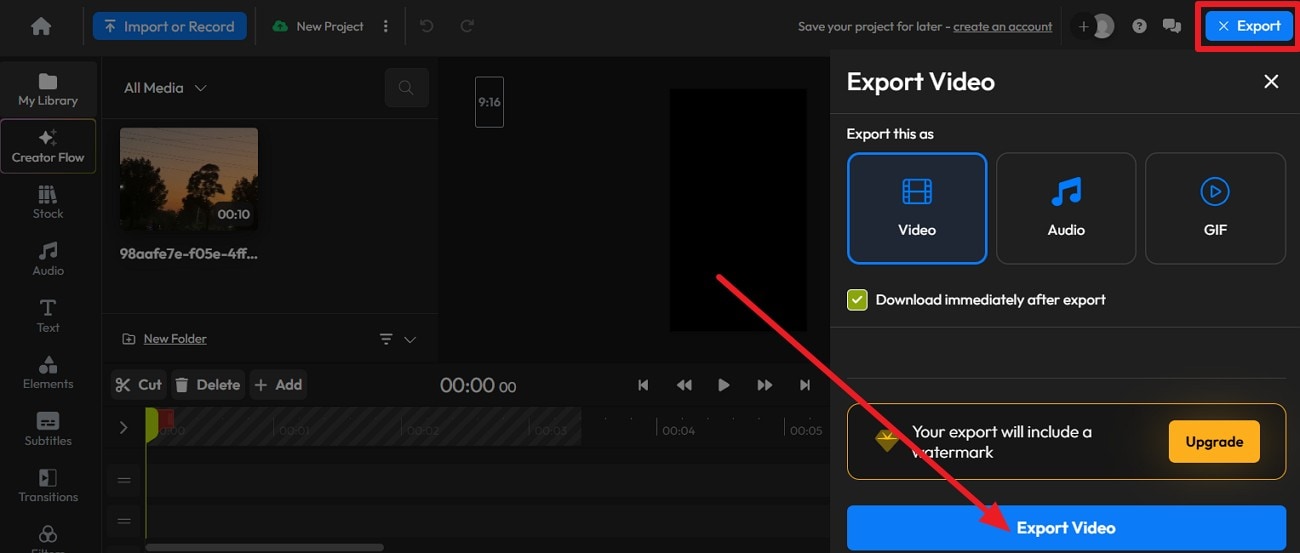
Step 1. In the Filter section, select “Sharpen” or “Basic Color Adjustments” to sharpen the video.
Step 2. Tap the “Export” button, select the “Video” format option, then press the "Export Video" button.
Pros
Allows you to choose to export video as GIF, audio, or video.
Users can directly share the cleared video to social media platforms.
You can add or cut blurred videos in the timeline to improve quality.
Cons
Processing is on remote servers; it cannot work offline like desktop editors.
The free version is for light use; heavy use requires a paid plan.
Part 3. How to Make a Video Clearer with a Dedicated Desktop Tool?
Other than online Clideo video clearer, if you prefer to clear videos offline, try the 3 simple desktop options given below:
Wondershare UniConverter
Best For: Users wanting easy, one-click fixes for low-quality or compressed videos.
With its batch processing facility, UniConverter is a top-notch solution that saves manual hassle and processes multiple videos at once. Additionally, the tool includes various AI models, including Quality Restoration and Face Enhancement. Not just that, you can also use it to remove noise and frame interpolation in real time, or enhance videos to 4K clarity without requiring any skills.
In addition, the tool allows you to preview the cleared video, which you can save to the desired location on your PC. So, while having complete control over the process, users can easily use this tool since the entire process is guided, and it comes with an intuitive interface. Unlike other tools, you can use this tool online or on a desktop at a low cost with a short learning curve.
Guide to Clear Video in Real Time with UniConverter
To make a blurry video clearer with UniConverter’s AI Models, review the listed steps for guidance:
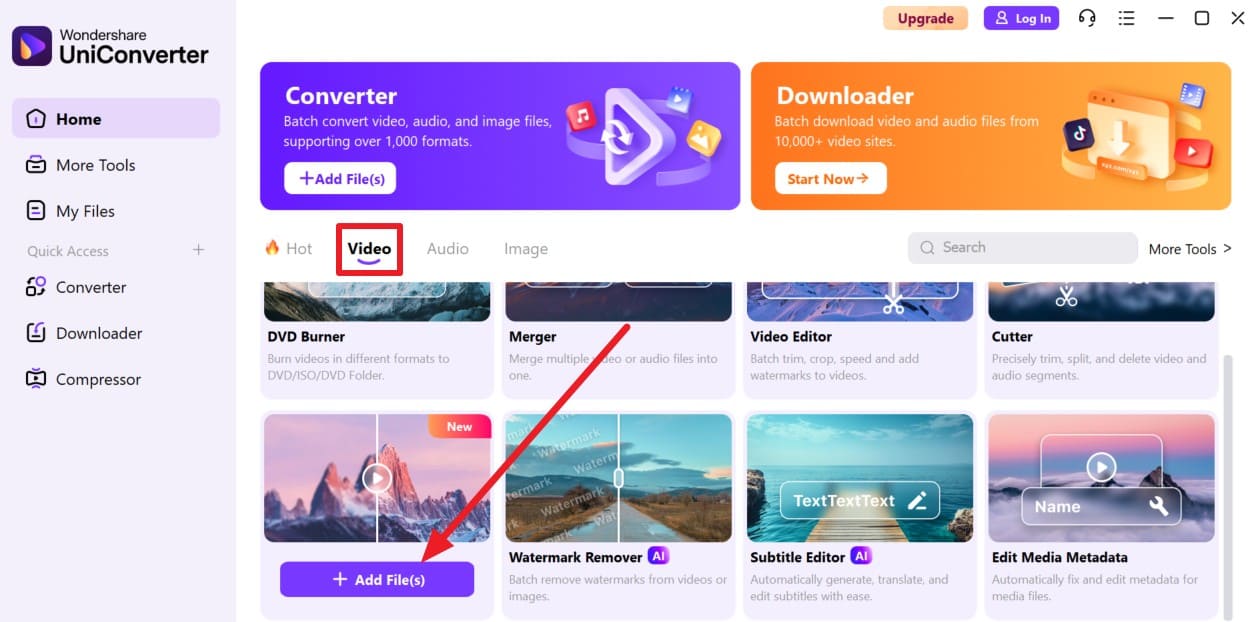
Step 1. Access the Video Enhancer Tool & Add the Blurred Video
Head to the “Video” tab on the tool and press the “+Add Files(s)” button as you locate the “Video Enhancer.”
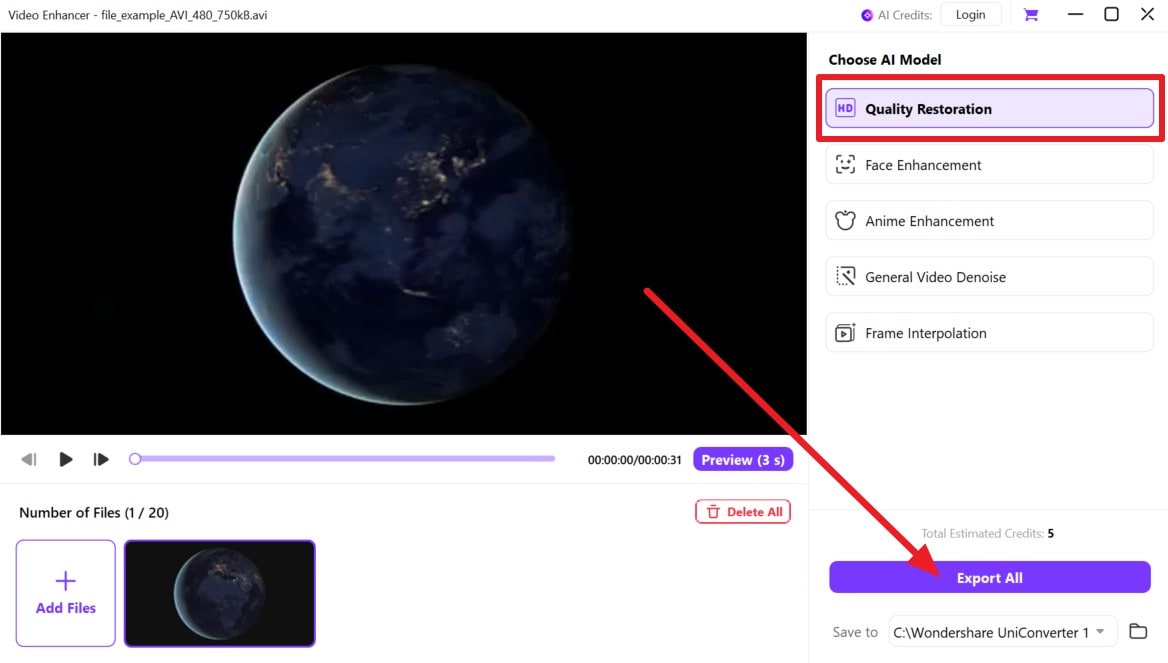
Step 2. Choose the AI Model and Start the Process
When you import the video, select an AI model, such as “Quality Restoration,” then click “Export” to confirm and start the process.
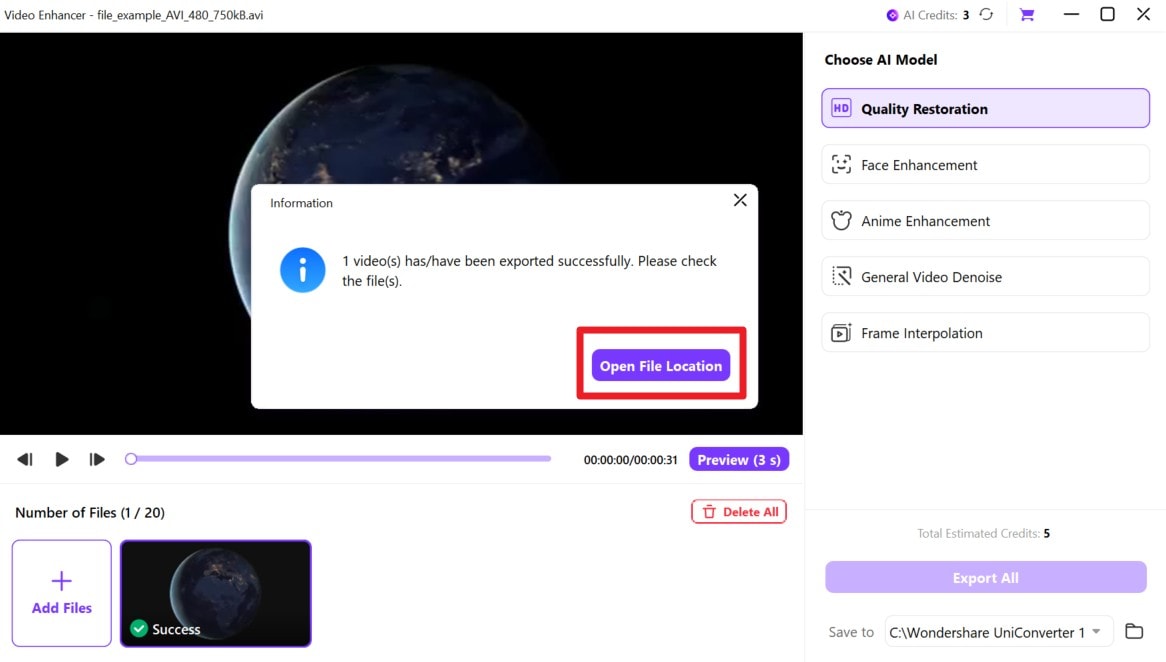
Step 3. Open the File Location to Preview the Changes
Select “Open File Location” when the process completes to preview the changes.
Pros
Processes many files, supports 1000+ formats, edits, converts, and compresses them together.
The desktop version processes locally, is safer for privacy, and handles large files better.
Automatically sharpens, fixes blurry videos, upscales to 4K–8K, and improves colors.
Cons
Many AI tools limit usage with credits or plans before a paywall.
Presets are easy, but advanced users may find controls too basic.

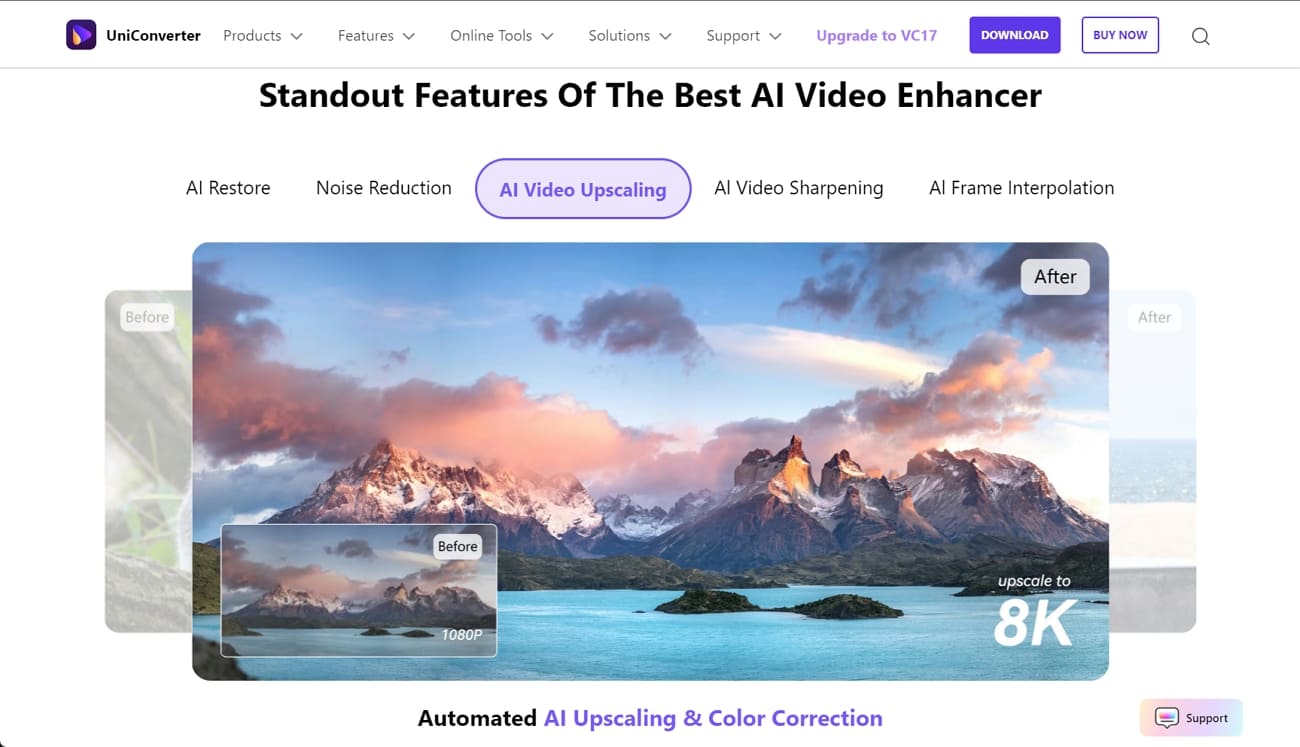
AI Video Clearer for Sharper, Cleaner Footage
VikPea Video Enhancer
Best For: Those who want simple AI fixes to improve everyday videos easily.
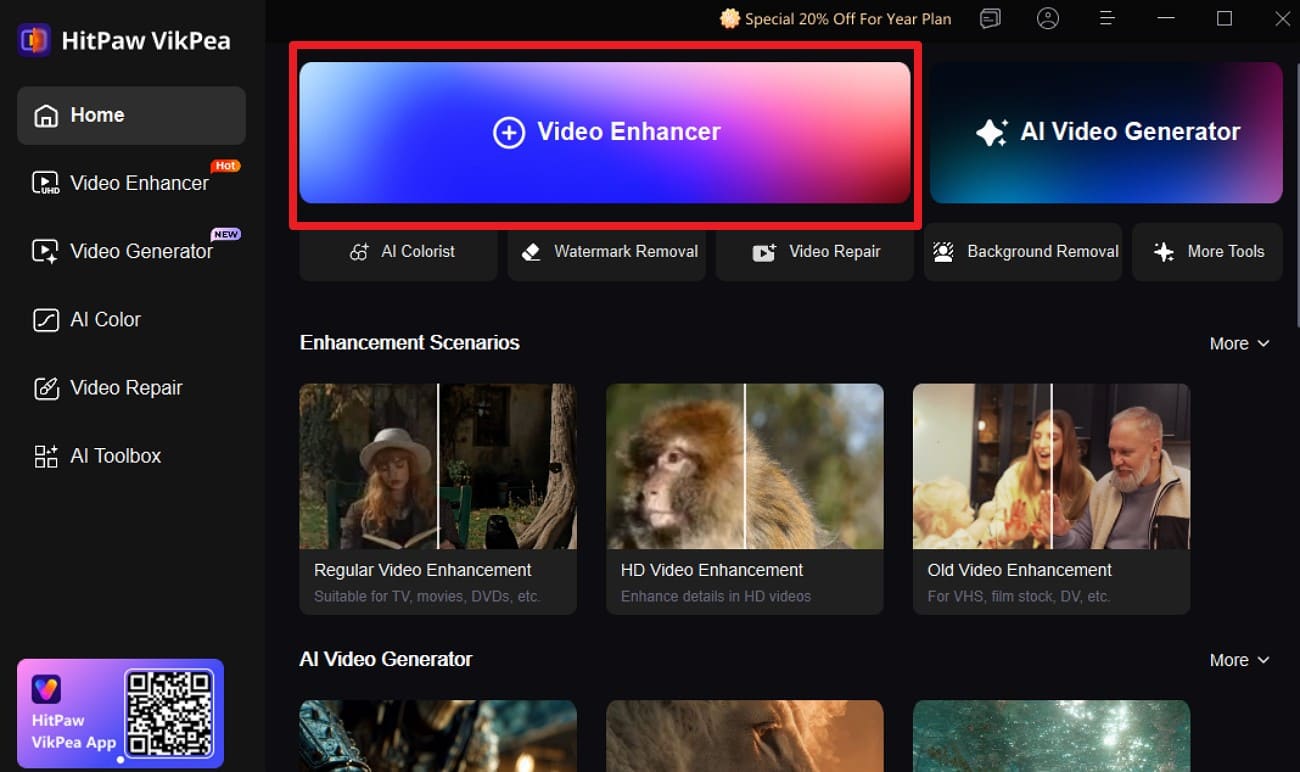
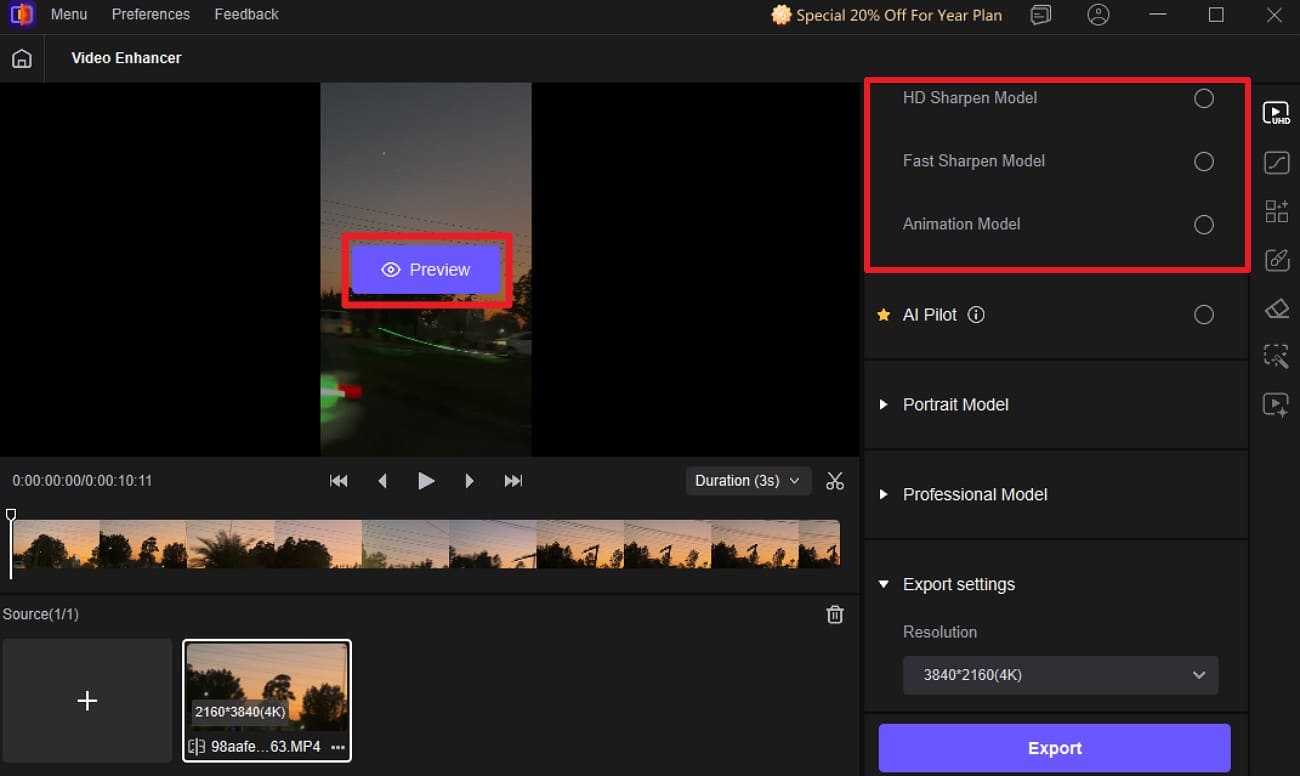
Leveraging AI models, VikPea is another option to make video clearer in no time, and an intuitive interface makes usage for beginners seamless. Additionally, the tool allows you to process multiple videos at once with batch processing to save manual effort. Users can choose from over 7 AI models within Video Enhancer with the option to trim videos and clear specific parts of a clip.
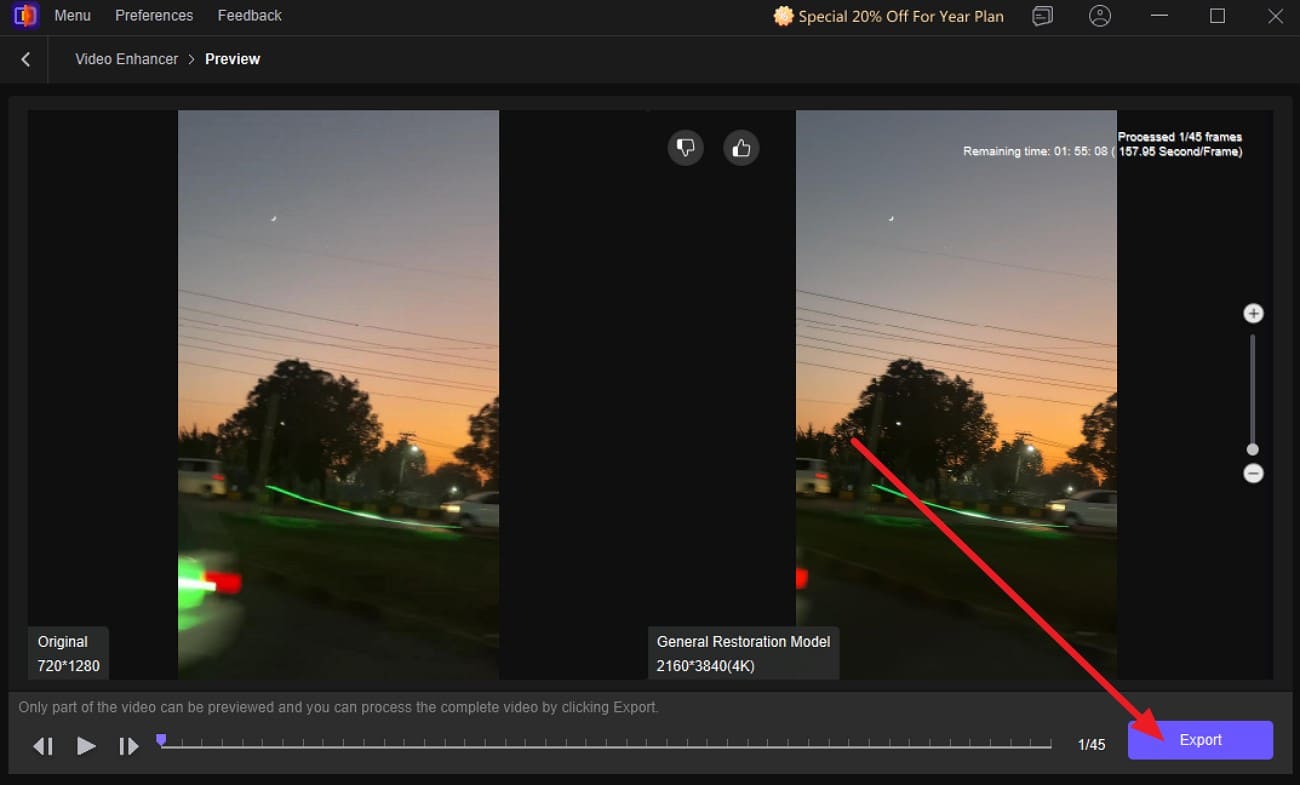
Not just that, users can choose from various Export Settings like Resolution from 2x to 4x. On the contrary, you can also select a custom resolution to ensure you have complete control over the final video quality and size. With VikPea, you can also preview the cleared video with the option to zoom in or out, as guided below:
Step 1. Choose the “Video Enhancer” tool from the homepage and import the blurred videos.
Step 2. Pick the “AI Model” listed on the right side and press the “Preview” button to start the process.
Step 3. Once it ends, preview the changes and click the “Export” button to save the video.
Pros
Works with MP4, MOV, MKV, AVI, FLV, WMV, and many other formats.
Enhances via cloud or locally for privacy, speed, and offline use.
Upscales SD to 8K, adds detail, reduces noise, and avoids stretched pixels.
Cons
Quality depends on a correct AI model; wrong choices may look unnatural.
Marketing claims are strong; real results may vary by clip.
Adobe Video Enhancer
Best For: Users who want complete professional editing and only slightly soft footage.
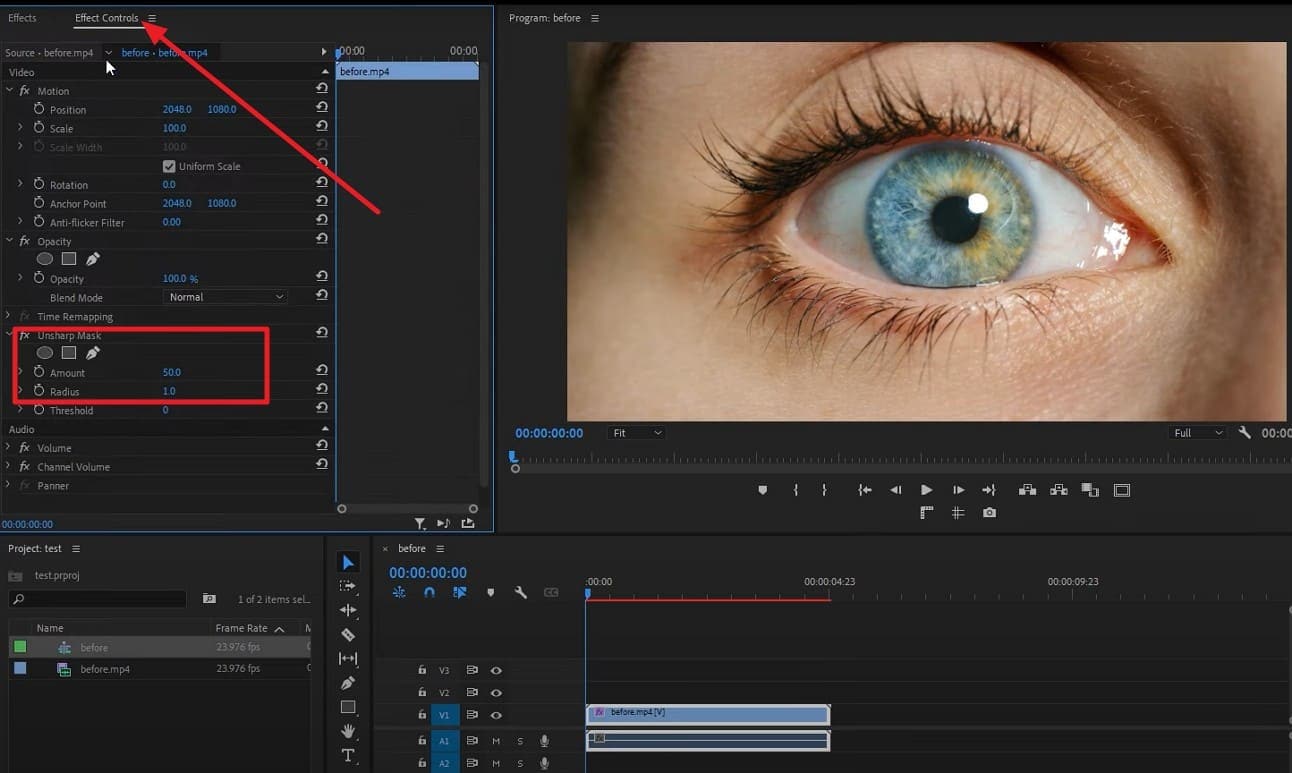
This tool is another solution to those who question how to make a blurry video clearer, as it features Unsharp Mask and Sharpen tools. The Unsharp Mask is the main tool for sharpening that lets you control the Amount, Radius, and Threshold to make edges clearer and details stand out. On the contrary, the Sharpen filter is simpler and has a Strength slider to boost edges.
This tool works well for light sharpening or with Unsharp Mask on adjustment layers. Additionally, users can also adjust Exposure, Contrast, Highlights, and Shadows in Lumetri Color. Besides, Noise reduction tools or plugins help avoid making the grain worse when you apply Unsharp Mask or Sharpen. So, to know how you can use the Sharpen tool, review the given steps:
Step 1. Head to the Effects search bar and type “Sharpen” tool and add it to your clip.
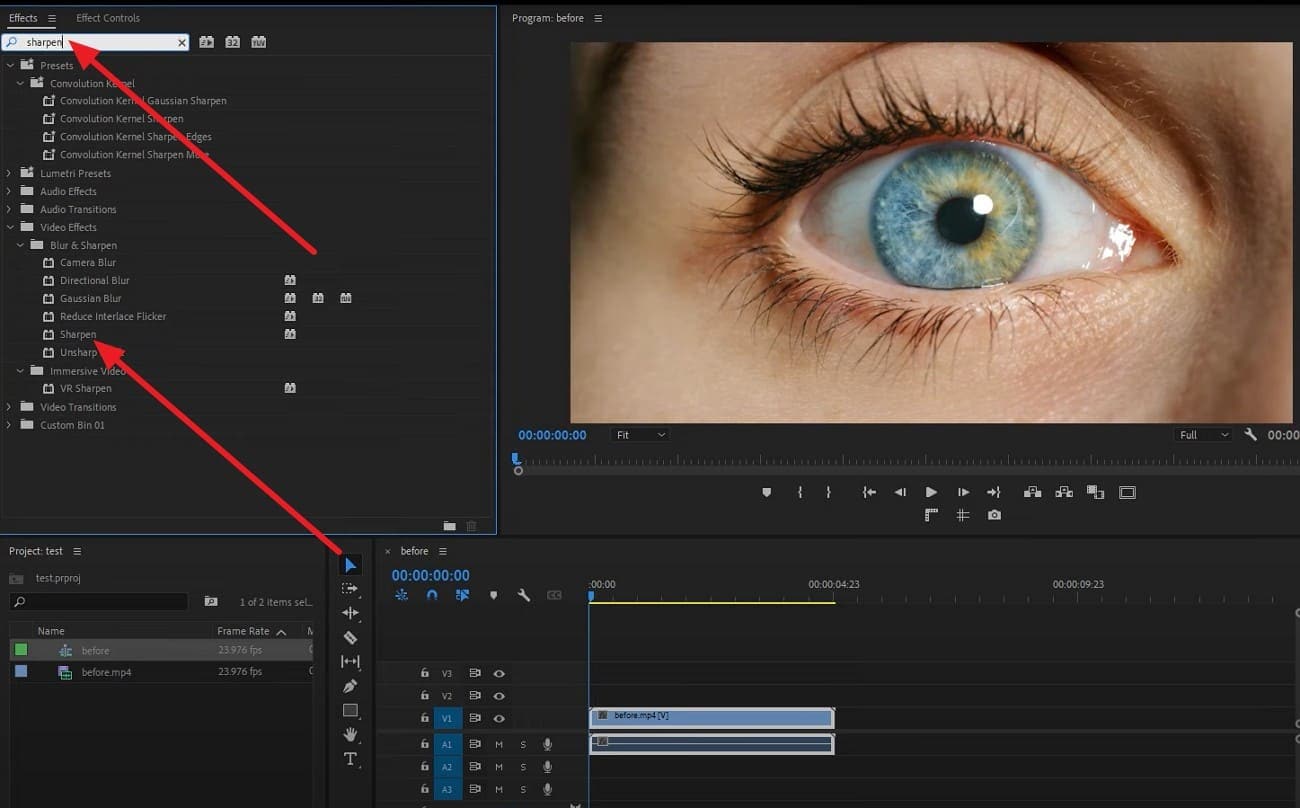
Step 2. Go to the “Effect Controls” now and increase the “Sharpen Amount.”
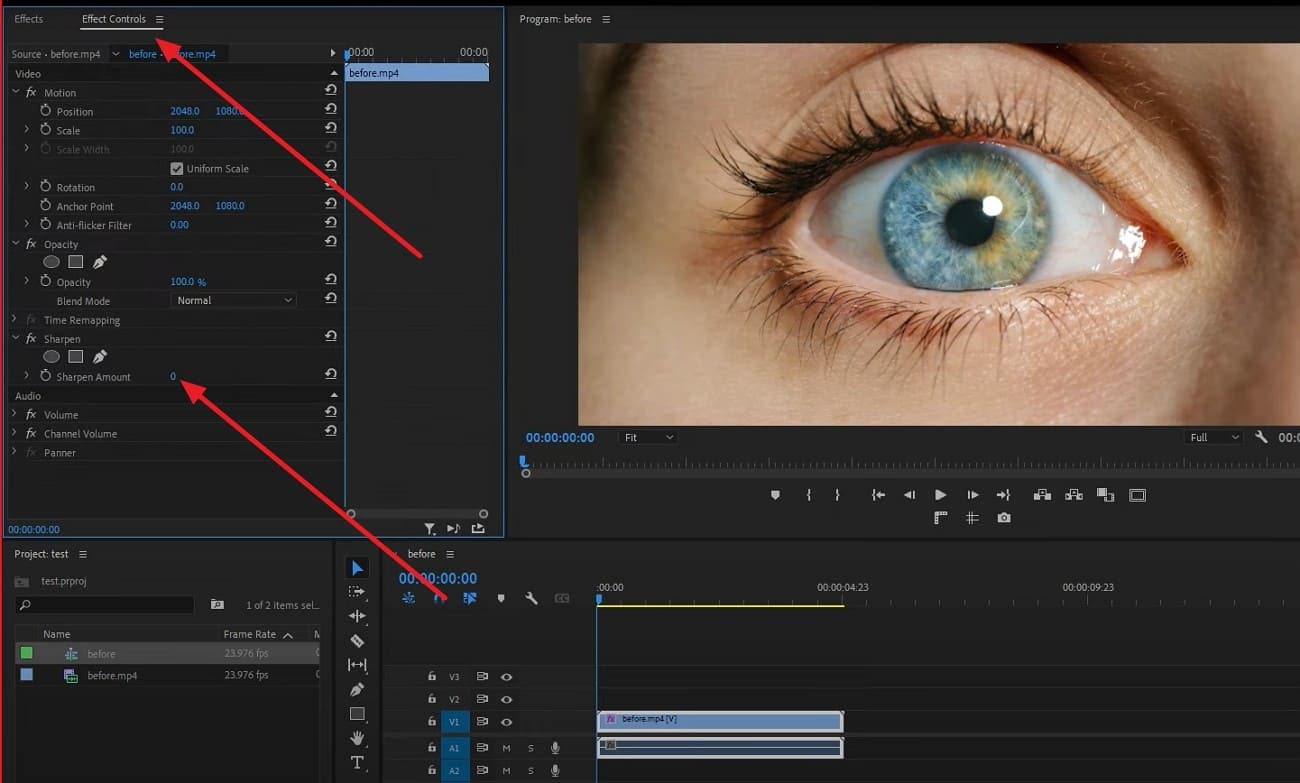
Step 3. If the blur persists, search for “Unsharpen Mask” in the Effects search bar and add it to the video. Head to the “Effect Control” and under the “UnSharp Mask,” set the Amount to 50 and Radius to 25 to clear the video.
Pros
Keyframes, masks, and tracking let you sharpen specific areas precisely.
A large plugin and tutorial ecosystem extends blur and sharpness features.
Includes sharpening tools, masks, and color options to improve soft videos.
Cons
Complex interfaces can overwhelm users who want simple, blurry video fixes.
Requires an expensive Adobe subscription, not ideal for occasional use.
Part 4. How to Make a Video Clearer with a Mobile App?
If using the video clearer online tool is too cumbersome on the go, this section recommends 3 intuitive applications to clear the video in no time.
PowerDirector - AI Video Editor (Android | iOS)
Best For: Users who want a full editor with AI to clean up slightly blurry videos.
The dedicated video enhancer tool in this app is designed to upscale the color and reduce the noise effect in the clip. Additionally, users can use it to remove the shake effects that cause blurred footage to have stable footage in no time. Alternatively, one can also use it to fix the colors via innovative AI algorithms to save the manual editing needed.
Thus, it resolves the query on how to make a video clearer on an iPhone since one can access it on Android and iOS and needs no skills. For low-resolution clips, AI Video Upscaler increases resolution to HD or 4K, restores lost detail, reduces blur, and improves overall perceived quality. So, to know how you can use its Enhance tool, adhere to the given guidelines:
Instructions.
Choose the “Video Enhance” tool, add the blurred video, and pick the “Video Denoise” feature under the Video Enhance tool. After that, press the “Enhancer” button, and once the process ends, preview the results under the “Results” section or edit again.

Pros
You can use the sharpness slider to make edges clearer and crisper.
Cleanup tools reduce pixelation and blockiness in compressed clips for clarity.
Costs less than high-end upscalers, offering full NLE and AI features.
Cons
Results depend on source quality; low-bitrate or soft clips look artificial.
Some AI features are limited to specific platforms or paid plans.
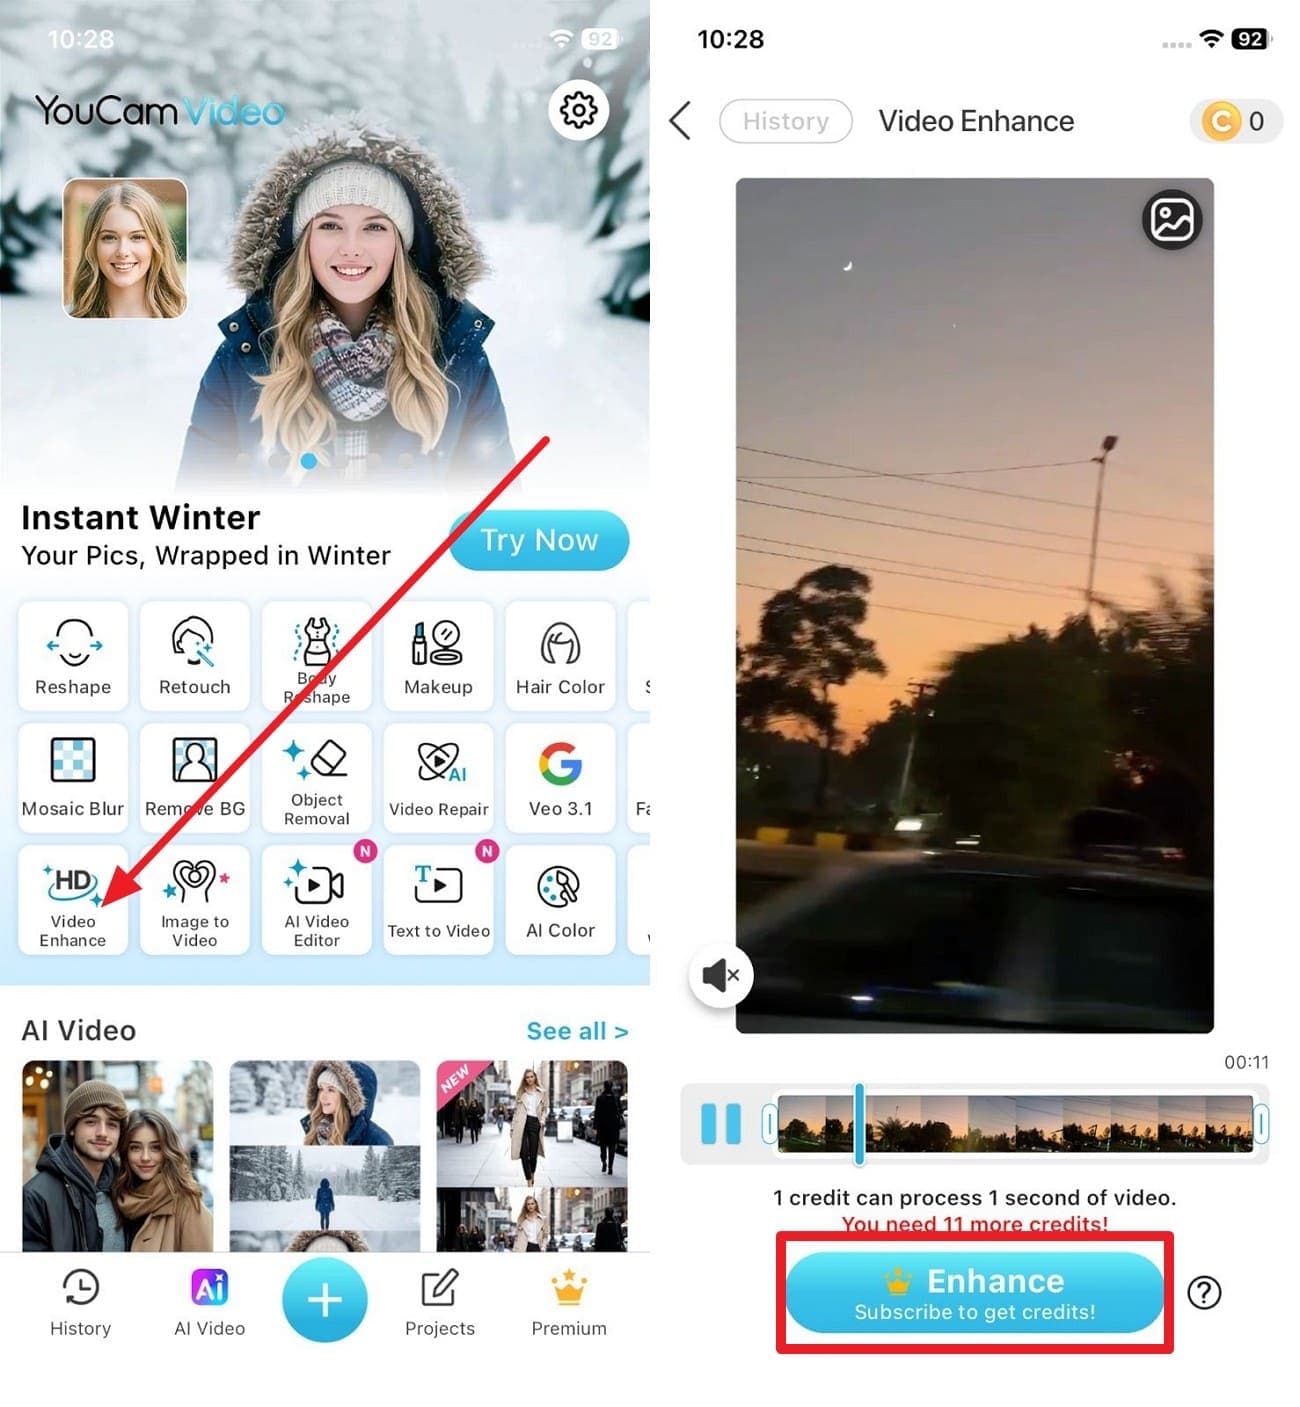
YouCam Video (Android | iOS)
Best For: Fast AI polishing for phone-shot selfies and social videos, enhancing faces.
To have a clearer video, its AI tools can make blurry or low-resolution videos sharp, clear, and more professional. The AI Video Enhance tool works with a single tap to sharpen details, increase resolution to 4K/30fps, and make videos clearer. Additionally, it can enhance the faces and make selfies or portraits look sharper and more defined.
While being the versatile option, the Noise reduction tool cleans grain or low-light footage, so videos appear smoother and more readable. Furthermore, the app also handles fast-moving scenes, and motion smoothing reduces motion artifacts to make the action look fluid and less blurry. Regarding video enhancing, detailed instructions are given below for guidance:
Instructions.
Choose the “Video Enhance” tool, import the clip, and press the “Enhance” button.
Pros
Designed for social videos, easy export, filters, and vertical formats.
Offers a video body editor to make your Instagram reels more attractive.
Simple sliders and presets make it beginner-friendly with no learning curve.
Cons
Not a full NLE; lacks advanced timeline, audio, and video tools.
It can improve mild blur but cannot fully fix severe motion blur.
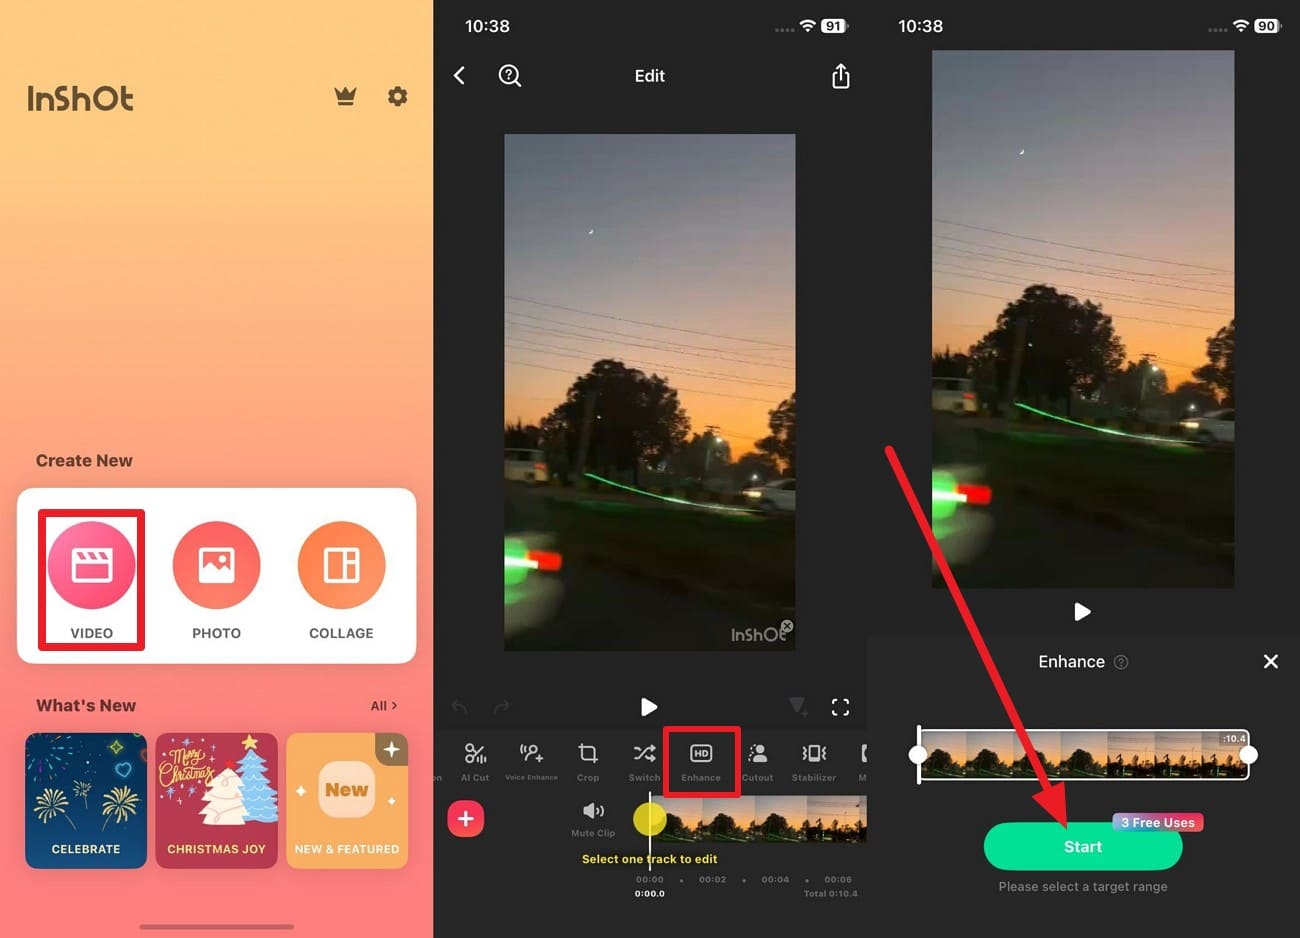
InShot (Android | iOS)
Best For: Fast, simple clarity fixes for mobile social videos, not severe blur.
If you still question “how to make a video clearer” on the go, InShot makes soft or slightly blurry videos sharper and more detailed using built-in tools. The Sharpen effect boosts edge contrast and makes footage appear more in focus. One can also use the Enhance tool to save the manual edit needs and can preview results within the same interface.
Besides, the HDR or stylized detail effects add micro contrast and extra perceived detail, and make the video crisp. Users can also adjust basic corrections like trim, speed changes, filters, and overlays, or combine with sharpen and HDR effects to polish content. As far as enhancing is concerned, here are the detailed instructions for you:
Instructions.
Opt for the “Video” option on the app, import the video, and choose the “Enhance” tool to “Start” the process.
Pros
Exports up to 4K with resolution and frame rate control.
Simple mobile interface with touch controls for sharpening, brightness, and filters.
Perfect for TikTok, Reels, and Shorts with quick edits and tweaks.
Cons
Too much sharpening or HDR can create halos, noise, and a fake look.
Lacks pro tools like deep color grading, noise reduction, and stabilization.
Part 5. Prevention is Better Than Cure: How to Record a Clear Video
Sometimes, it's better to record a perfect video so that you don’t need a video clearer tool. For that, adhere to the given tips and tricks to record an ideal video that looks sharp and professional from the start:

Keep Your Shot Steady: Use a tripod, phone clamp, or gimbal to hold the camera in one place. If you hold the phone in one hand, use both hands, tuck your elbows in, and move your body as a single unit to reduce shake.
Make Sure the Lighting Is Good: Place your subject in bright, even light, and face them toward a window, soft lamp, or open shade. Know that good light lets the camera capture clear edges and faces and reduces blur or noise.
Clean Your Lens: Wipe the camera lens gently with a microfiber or soft cotton cloth. Also, do not use rough fabric or tissue that can scratch the lens, and keep the phone in a case that protects the camera.
Lock Focus and Exposure Manually: Tap your subject in the camera app, then press and hold until AE/AF Lock appears. Hence, this keeps focus and brightness steady and avoids major changes in composition mid-shot.
Avoid Digital Zoom: Move the camera closer to the subject rather than using digital zoom. Digital zoom reduces sharpness and adds noise, so stay at a normal distance to keep videos clear and detailed.
Conclusion
To wrap up, this guide has resolved the query on how to make a video clear with online, desktop, and app-based video clearer options. Alongside that, some experts’ tips are given so that you can limit the need for these tools and shoot a perfect video in one take. Still, for situations requiring minor adjustments, using the desktop solution UniConverter is recommended for its AI models and batch processing.
FAQs
-
1. Why do some videos look blurry?
Videos often look blurry because the camera cannot capture enough detail. Common causes include low light, motion during recording, poor focus, camera shake, and low resolution. These factors reduce sharpness and make details appear soft or smeared. -
2. Can post-production make a blurry video clearer?
Post-production can improve clarity to some extent by enhancing edges, contrast, and colors. However, severe blur cannot be fully fixed because details that were never captured cannot be restored completely. The final quality still depends heavily on the original recording. -
3. Is phone quality the main factor in making a video clearer?
Phone quality does affect video clarity through sensor size, lens quality, and resolution. However, lighting conditions, focus accuracy, camera stability, and proper recording settings often have a greater impact on sharpness than hardware alone. -
4. What settings should I adjust to improve clarity when editing?
Start by adjusting exposure and brightness carefully, then increase contrast slightly. Correct white balance and colors first, and only apply a small amount of sharpening and stabilization afterward to avoid introducing noise or artifacts. -
5. How can I make a video look clearer while recording?
Use good lighting (natural daylight or LED lights), keep the camera steady with a tripod, clean the lens, avoid digital zoom, and record at least in 1080p—preferably 4K. Proper focus and stable shooting conditions greatly improve video clarity.

