

If you are dealing with rough outlines or blocky corners, you are not alone. Pixelated edges are a very common issue when you are working with low-resolution images, resized graphics, or AI-generated visuals. The good news is that you can smooth pixelated edges using Photoshop’s image smoother on your desktop.
In this article, we will walk you through the steps to use the image smoother in Photoshop by using tools like Select and Mask and Blur. Further, you will also explore free alternatives that will help you smooth pixelated edges without compromising the image quality.
- Cause of Pixelation: Images appear jagged due to low resolution, excessive scaling, compression artifacts, or poor masking techniques.
- Photoshop Method: Tools like Feather, Select & Mask, and Gaussian Blur help smooth edges but require multiple steps and experience.
- Beginner Challenge: Photoshop’s complex tools and steep learning curve make image smoothing difficult for new users.
- Efficient Solution: Wondershare UniConverter offers AI-powered smoothing with simple workflow and batch processing support.
In this article
- Why Images Look Pixelated or Jagged in Photoshop?
- How to Use Image Smoother in Photoshop (Step-by-Step)?
- How Image Smoother Works in Photoshop After Removing the Background?
- Why Photoshop’s Image Smoother Can Be Difficult for Beginners?
- 6 Best Photoshop Alternatives to Smooth Pixelated Images
- How to Smooth Pixelated Edges in an Image for Free Using UniConverter?
- Comparison Table: Photoshop vs. UniConverter vs. Other Image Smoothers
- Conclusion
- FAQ
Part 1. Why Images Look Pixelated or Jagged in Photoshop?
Images look pixelated because of the way they have been created, edited, or exported. The issue does not originate from Photoshop but from a variety of different reasons that are listed below:
Low Image Resolution: Images that have low resolution do not have the necessary pixel data for creating smooth curves or clean edges. When you zoom in on such images, every pixel becomes visible and becomes blocky or uneven.
Excessive Upscaling: Scaling an image beyond its original size excessively stretches the existing pixels. Even when you try to fill in the missing details, the result is often jagged outlines and rough corners. This issue shows up in logos, texts, and other such illustrations.
Poor Masking: When you excessively refine harsh edges, the resultant image shows jagged lines. Before copying or masking these regions, you will have to clean up the selection.
Low-Quality Image Files: When you download images from the internet or save images after heavy compression, the edges lose their details. JPEG artifacts and color banding with exaggerated pixelation make it hard to smooth pixelated edges.
Rasterizing Text: Text and vector shapes behave like regular images when they are rasterized. When there is any scaling or transformation after rasterization, jagged edges appear.
Part 2: How to Use Image Smoother in Photoshop (Step-by-Step)?
Follow these simple steps to use the image smoother on Adobe Photoshop and make smooth pixelated edges in your image:
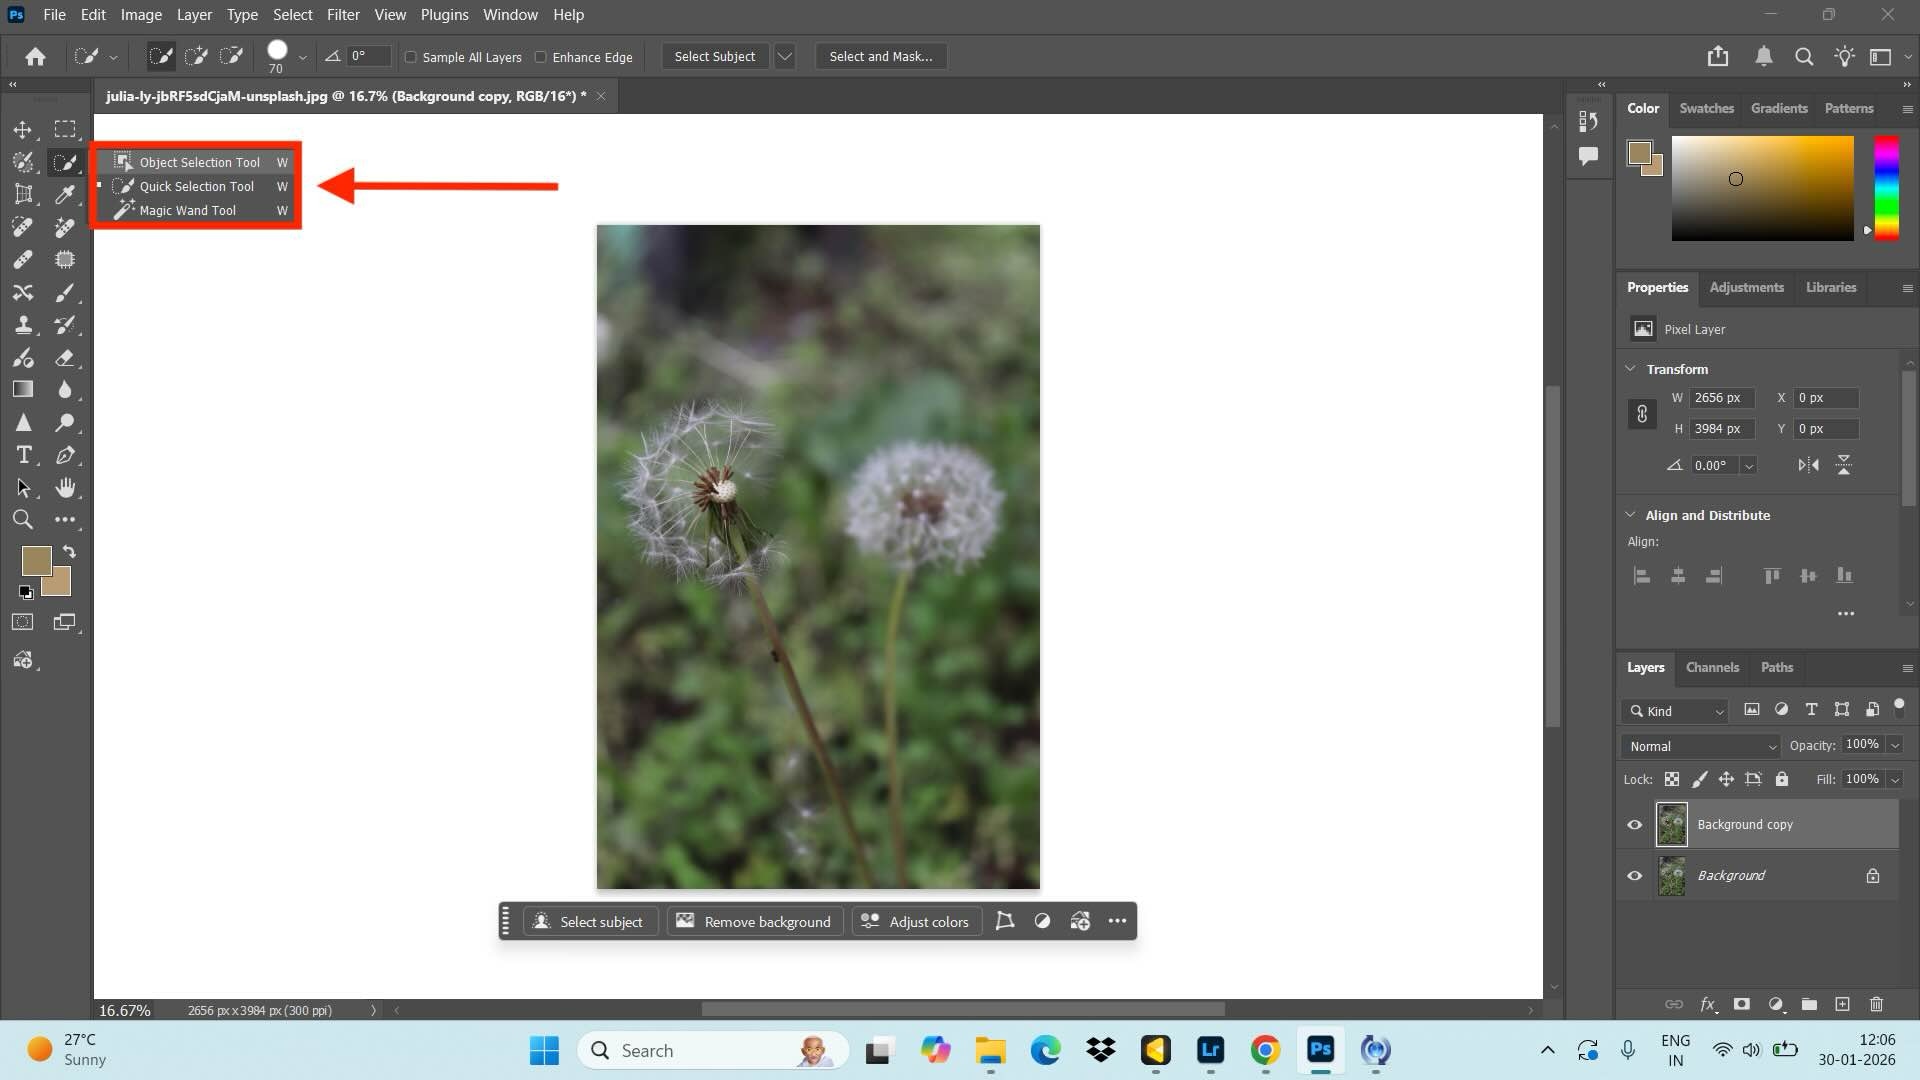
Step 1. Open your image in Adobe Photoshop and use the “Selection” tool to select the object or area where you want to smooth the edges.
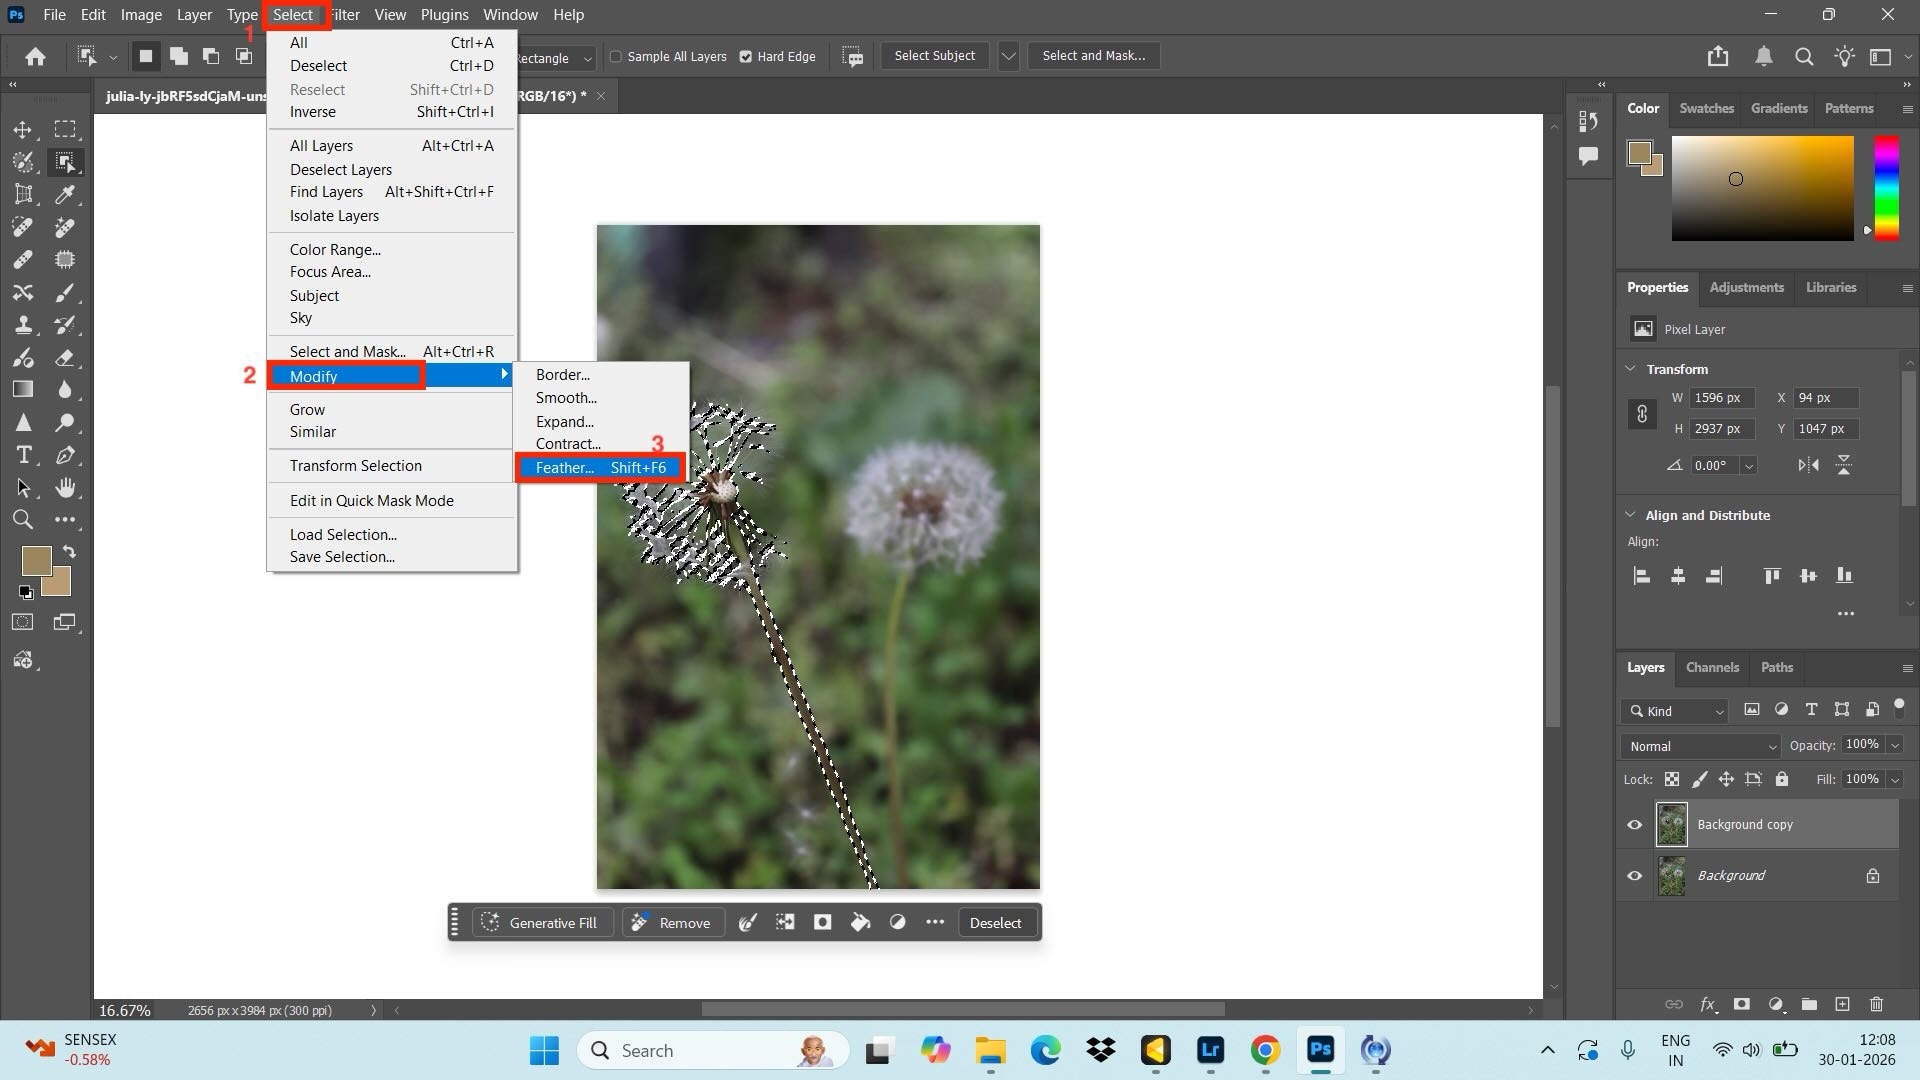
Step 2. You can smooth an image with the “Feather” tool. Click “Select” > “Modify” > “Feather,” and enter the feathering value and click “Ok” to apply the changes.
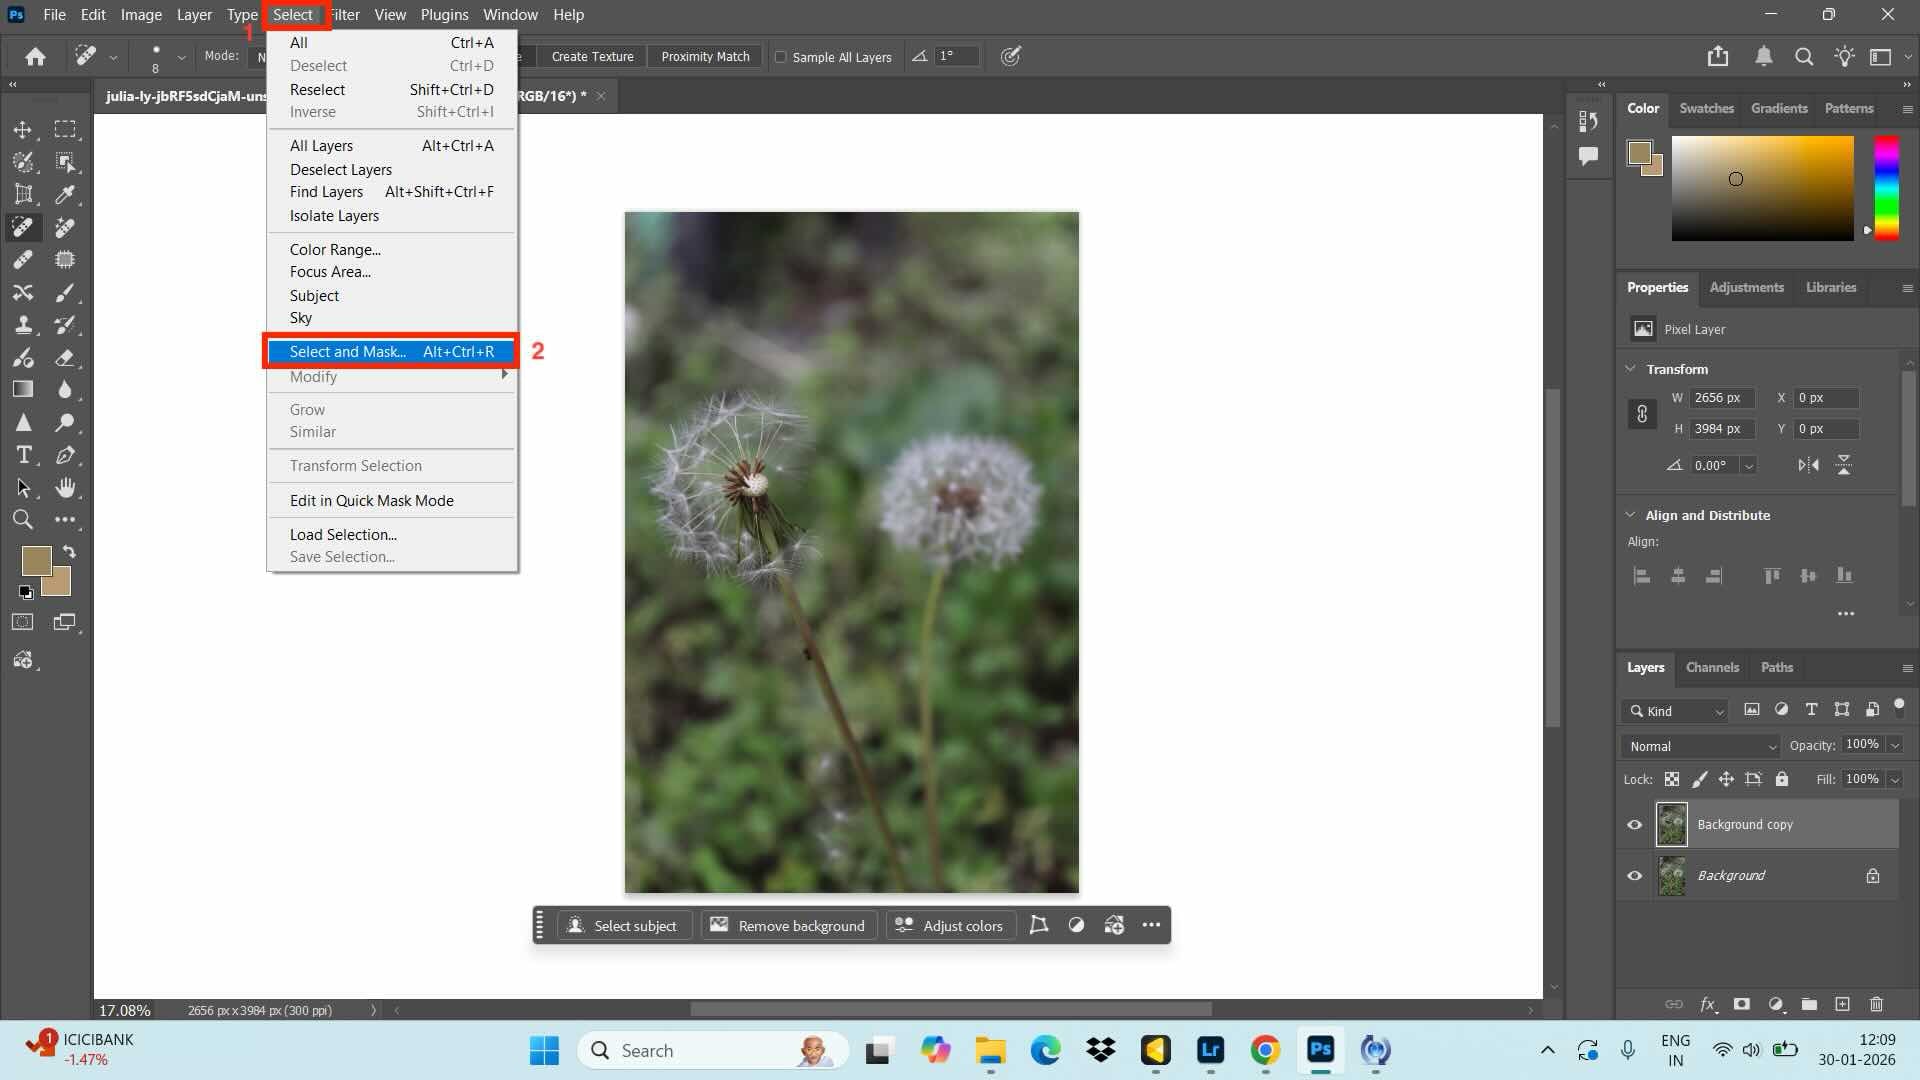
Step 3. You can use the “Select and Mask” button in the menu bar. Choose the “Smooth” option, and adjust the level as per your requirement for image smoothing.
Part 3: How Image Smoother Works in Photoshop After Removing the Background?
With Photoshop, you can remove the background of the image and then smooth pixelated edges by following these steps:
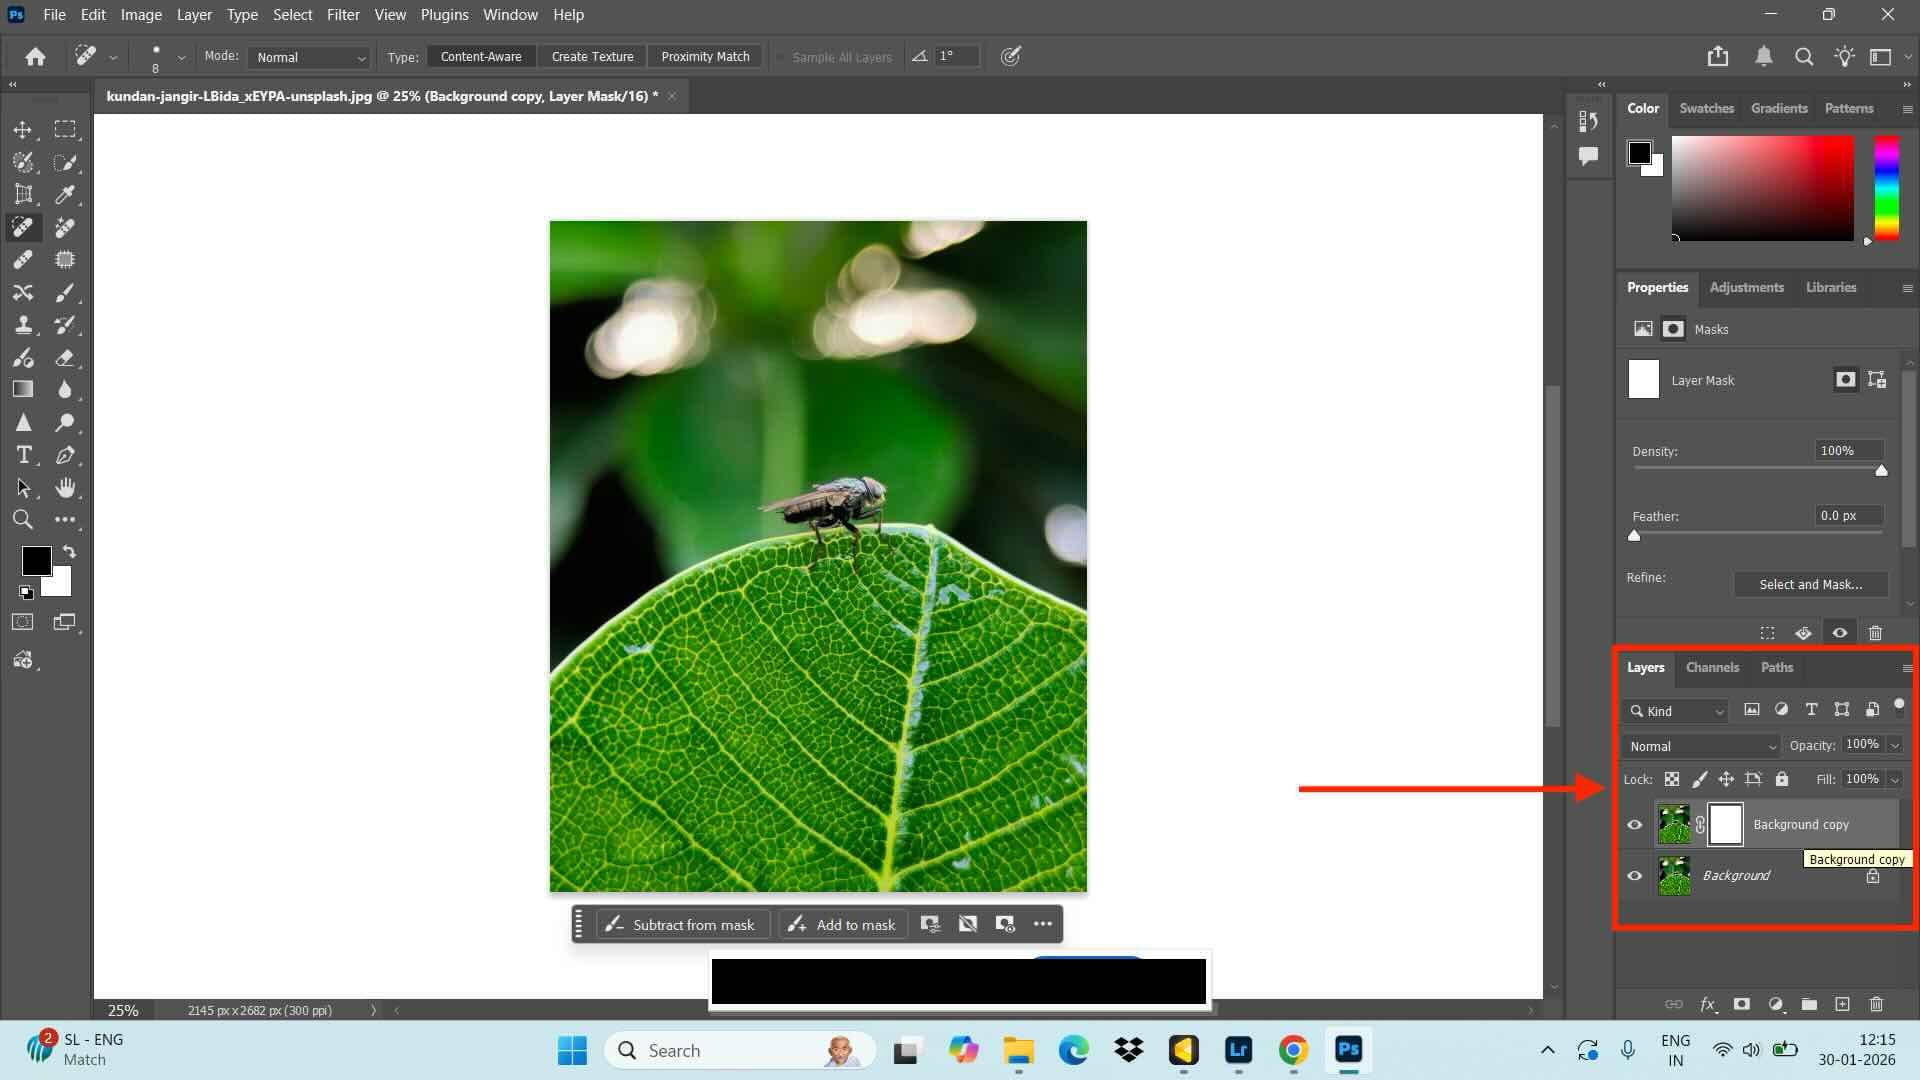
Step 1: Upload the image and click on the layer mask thumbnail in the layer panel on the right side.
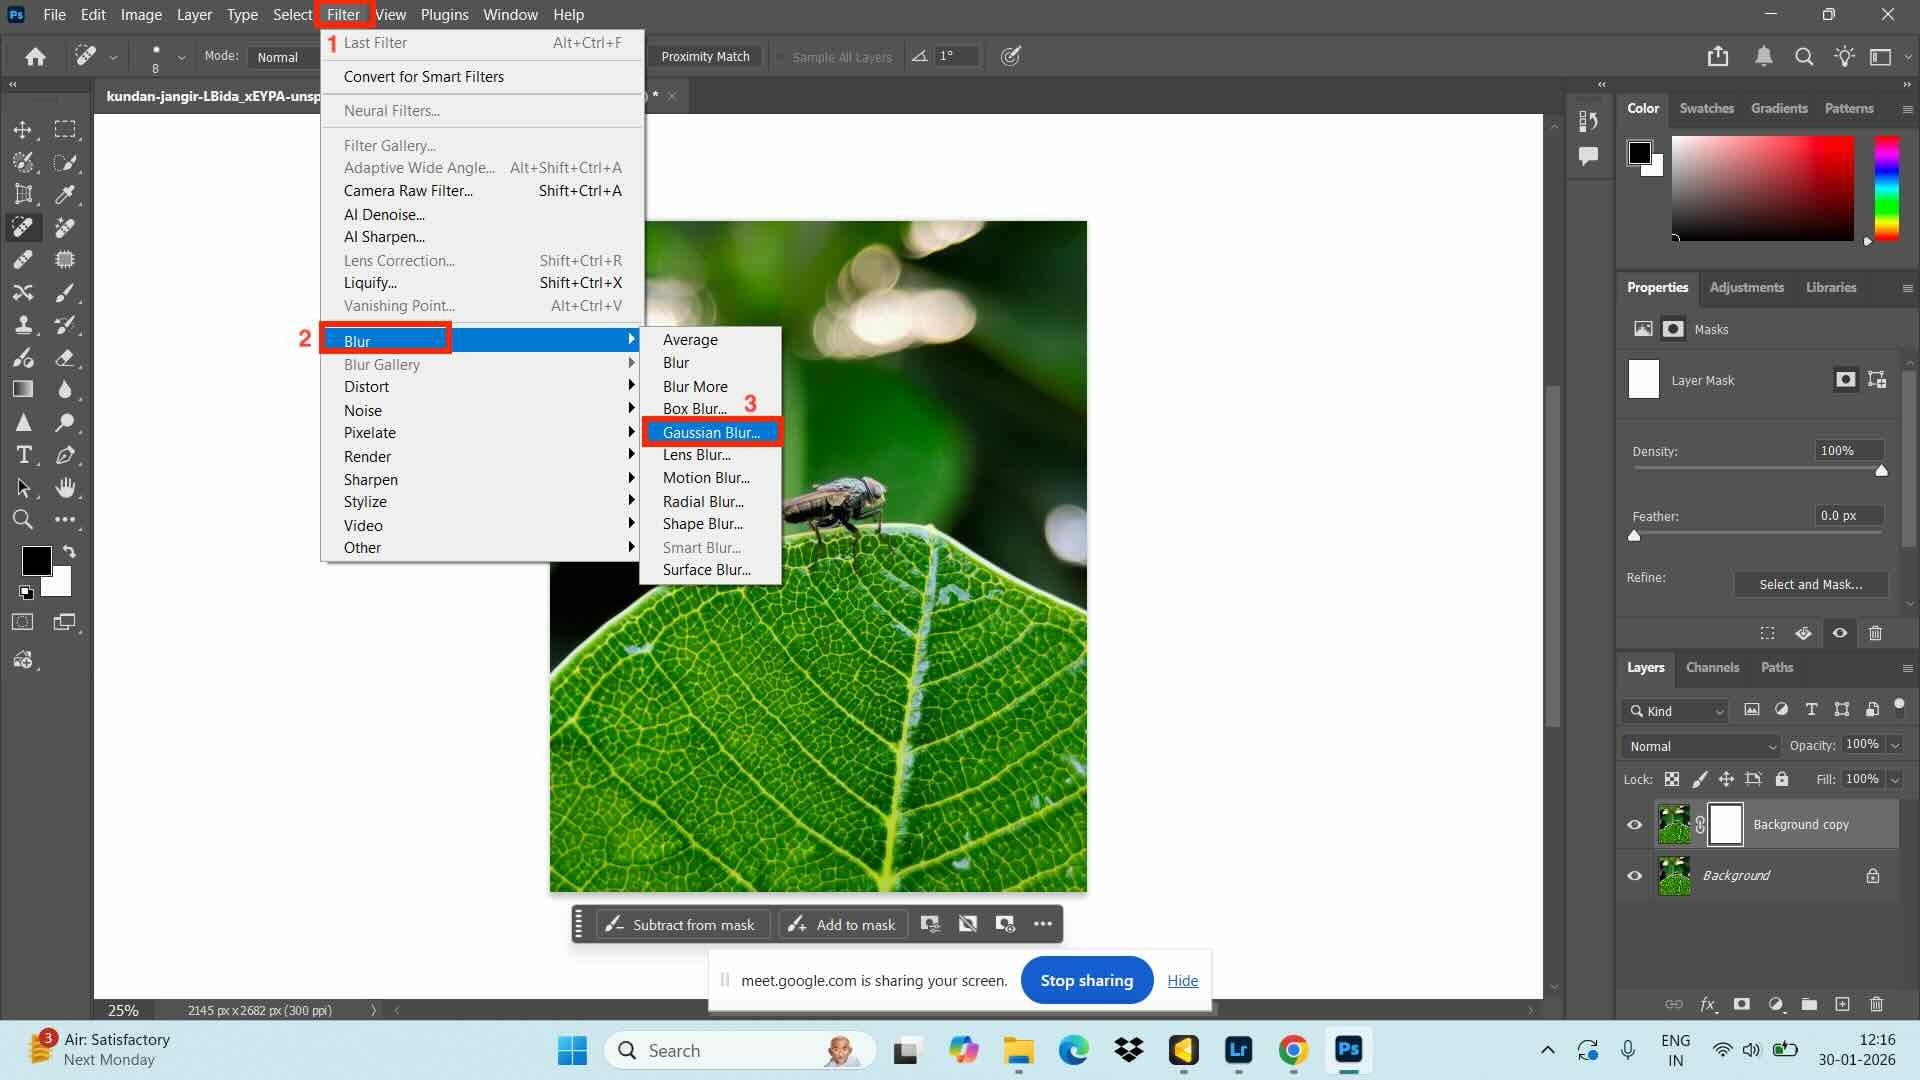
Step 2: Navigate to Filter > Blur > Gaussian Blur.
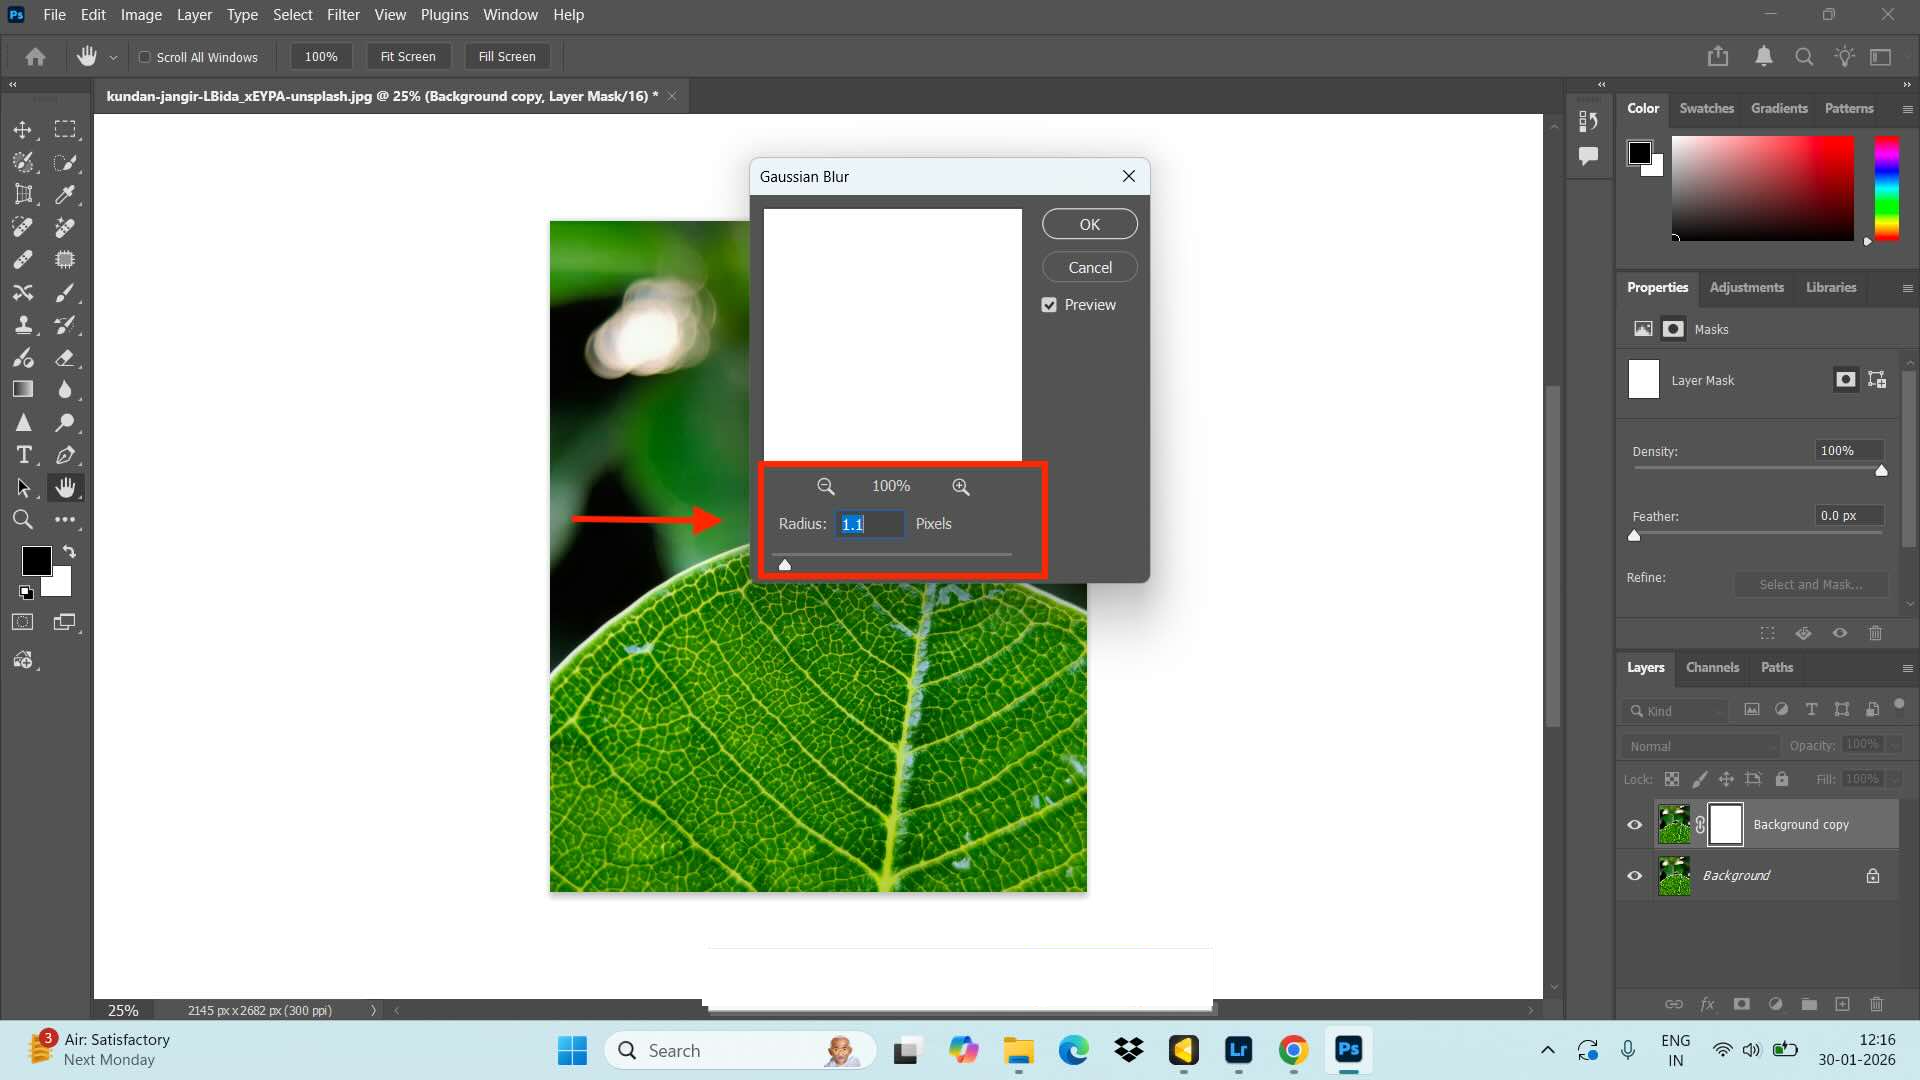
Step 3: As per the requirement, set the radius to a number usually from 0.5 to 2 pixels.
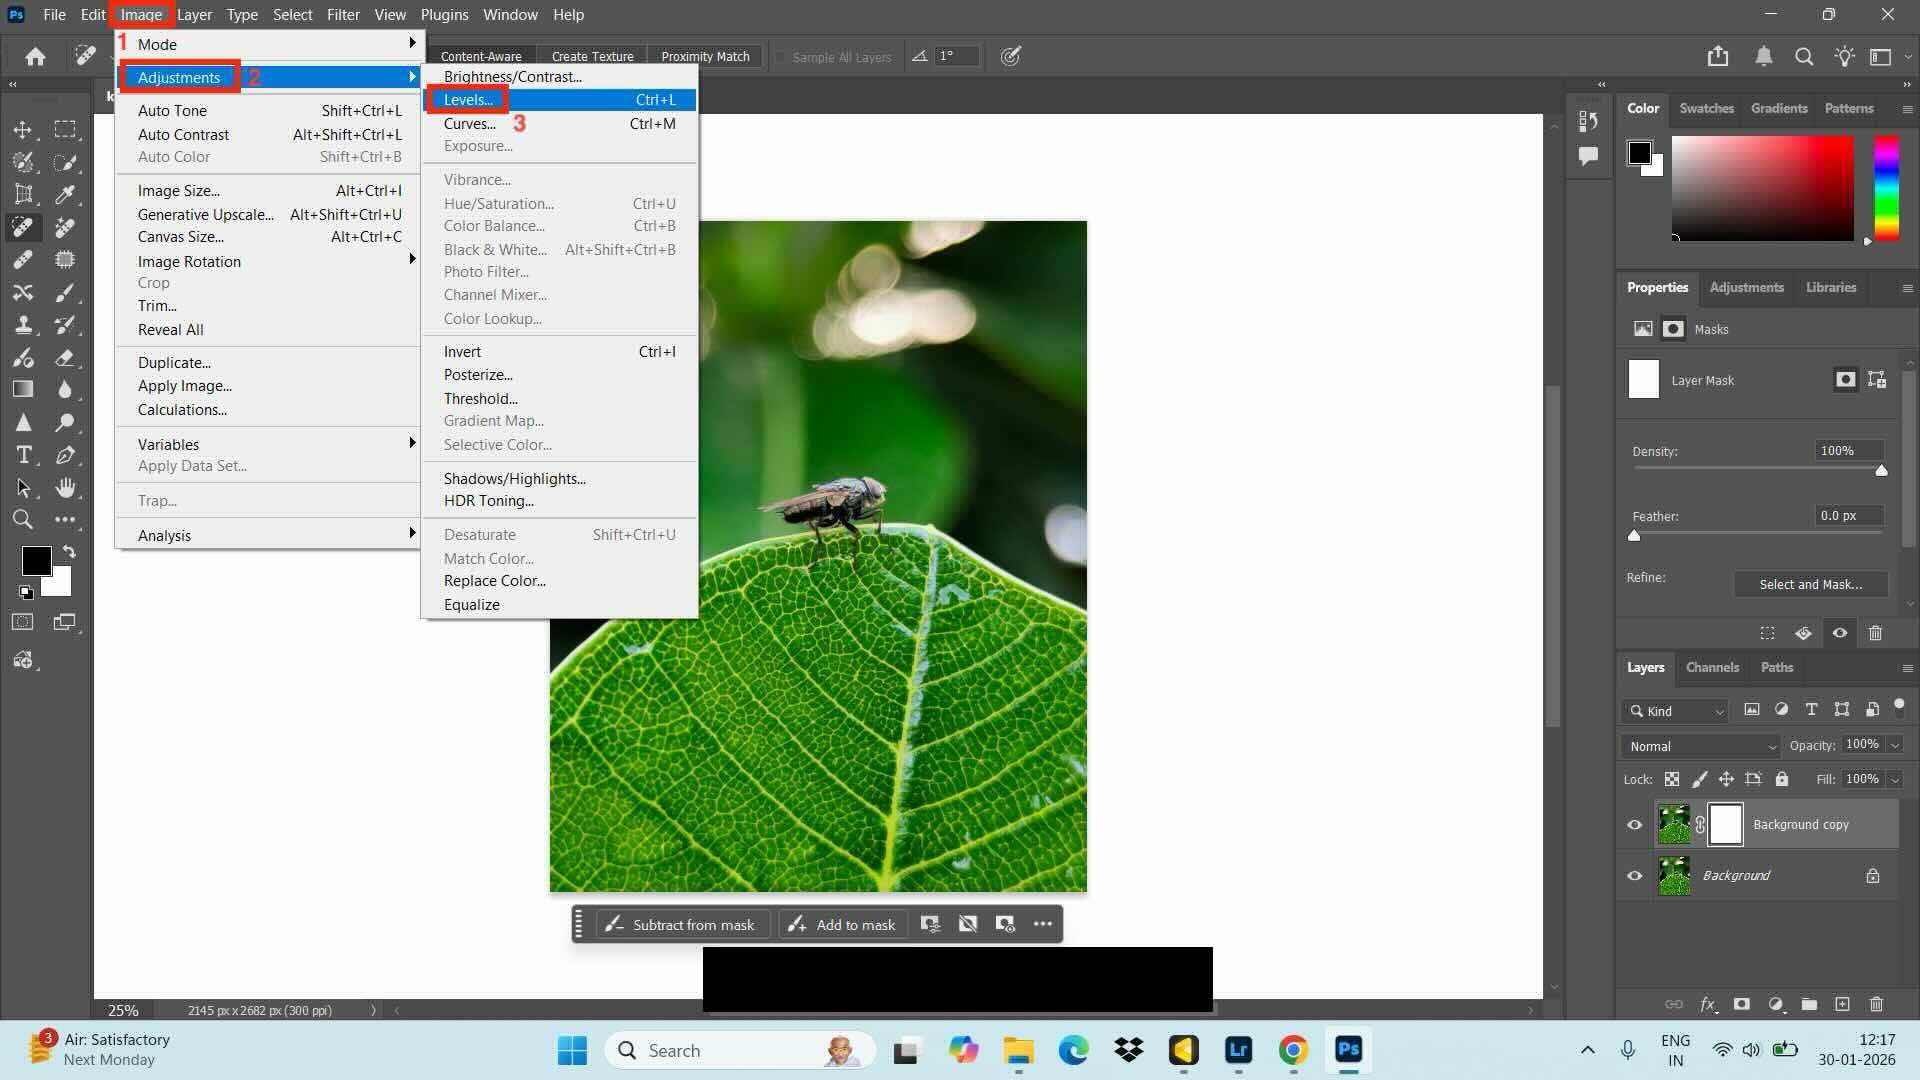
Step 4: Click the Image option from the menu bar and navigate to Adjustment > Levels. Drag the black and white slider towards the center to sharpen the edges of the image.
Part 4: Why Photoshop’s Image Smoother Can Be Difficult for Beginners?
Photoshop has a steep learning curve, making it difficult for beginners. It can be overwhelming for new users who are trying to smooth pixelated edges. The main reasons why beginners struggle with Photoshop are listed below:
Too Many Tools and Settings: Photoshop provides multiple tools and methods to perform the same task. This makes it highly confusing for beginners to decide on the tool and the workflow they should choose.
Steep Learning Curve: Every action in Photoshop requires multiple steps. For instance, when you want to smooth pixelated images, you need to understand selections, masks, brush hardness, opacity, and blending. These steps are highly technical and unintuitive.
Non-Destructive Editing Process: Photoshop works on non-destructive workflows using Smart Objects and layer masks. When beginners do not use them properly, the changes become permanent and force them to restart the entire process.
Subscription Cost Barrier: The paid subscription for Photoshop is a discouraging factor for beginners who only want to smooth pixelated images occasionally. Apart from subscription, you are forced to invest significant time to learn about the different tools.
Limited Guidance for Real-World Problems: Although there are tutorials, beginners struggle to apply them in real-world conditions. This is because every photo is different, and it is confusing to decide which smoothing method works best for a specific case.
Part 5. 6 Best Photoshop Alternatives to Smooth Pixelated Images
You can choose from beginner-friendly alternatives to Photoshop to smooth pixelated images with ease using Wondershare UniConverter, GIMP, Affinity Photo, Fotor, Krita, or Pixlr Editor.
1. Wondershare UniConverter

Wondershare UniConverter is a complete media toolkit. It uses AI-driven smoothing to fix pixelated edges and can easily handle large batches, making it suitable for creators who need to complete multiple tasks at once. Another strength of Wondershare UniConverter lies in combining video and image enhancement tools with format compression and batch conversion.
Key Features
- A batch image enhancer to improve the quality of multiple images at once.
- Image BG remover lets you remove the background and add a new one as per your requirement.
- With the watermark editor, you can easily remove the watermark and create a personalized watermark.
- Convert multiple images from one format to another with ease.
2. GIMP
GIMP (GNU Image Manipulation Program) is a free, open-source image editor that is capable of Photoshop-level smoothing and refinements. Although there is a learning curve, the flexibility and zero-cost subscription plan make GIMP a better choice for budget-conscious beginners.
Key Features
Advanced selection tools like Paths and Fuzzy Select are available in GIMP.
There is plugin support for extended features.
Feature support such as color correction and layer masks.
3. Affinity
Affinity Photo is another professional image smoother tool for smoothing pixelated edges with Photoshop-level control without renewing subscription fees. Affinity Photo’s smoothing and anti-aliasing tools are precise, and performance in large files is ideal. However, there is a moderate learning curve when it comes to using advanced features.
Key Features
Precise edge smoothing for pixelated edge images with one click.
You get live filter layers and masking functionalities.
High-resolution support and non-destructive editing workflow.
4. Fotor
Fotor is an AI-powered image editor tool that lets you enhance and smooth pixelated edges with one click. It is suitable for beginners who want instant results with minimal technical controls. You can use Fotor for casual edits and social media graphic designs.
Key Features
One-touch AI image enhancement tool for instant results.
You get access to cloud templates and presets.
The Pro version provides batch processing and editing options.
5. Krita
Krita is a digital and illustration suite that lets you complete brush and smoothing control. Although Krita is built primarily for drawing and illustration, its edge smoothing and layer tools work well for cleanup and softening jagged edges. Beginners may feel overwhelmed when using Krita for basic smoothing tasks.
Key Features
You get access to anti-aliasing options for removing jagged edges.
Layer-based editing for complete control over the workflow.
Advanced functionalities for professional cleanup and smoothing.
6.Pixlr
Pixlr is an online, cloud-based image editor that works on your browser. You get the necessary functionalities to smooth pixelated edges and simple retouching features. However, ads may distract your workflow when using Pixlr.
Key Features
Advanced functionality for layer and mask editing.
Works seamlessly on any modern browser.
You get support for anti-aliasing
Part 6: How to Smooth Pixelated Edges in an Image for Free Using UniConverter?
Follow these steps to use the image smoother feature of Wondershare UniConverter:
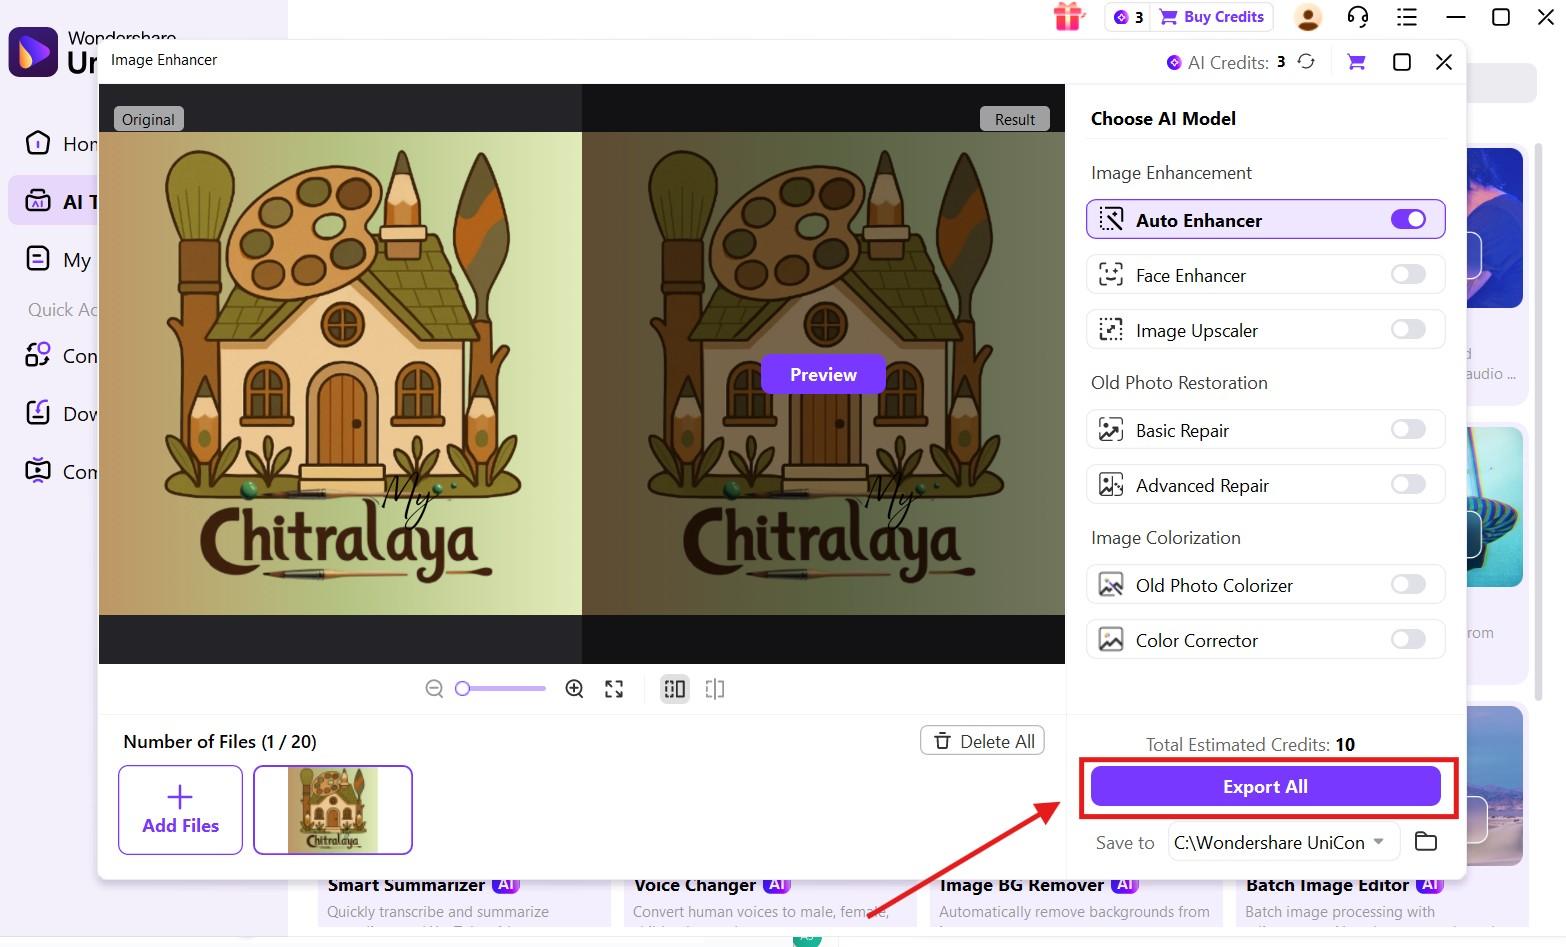
Step 1. On the Wondershare UniConverter dashboard, click on the “AI tools” button on the left-hand menu.
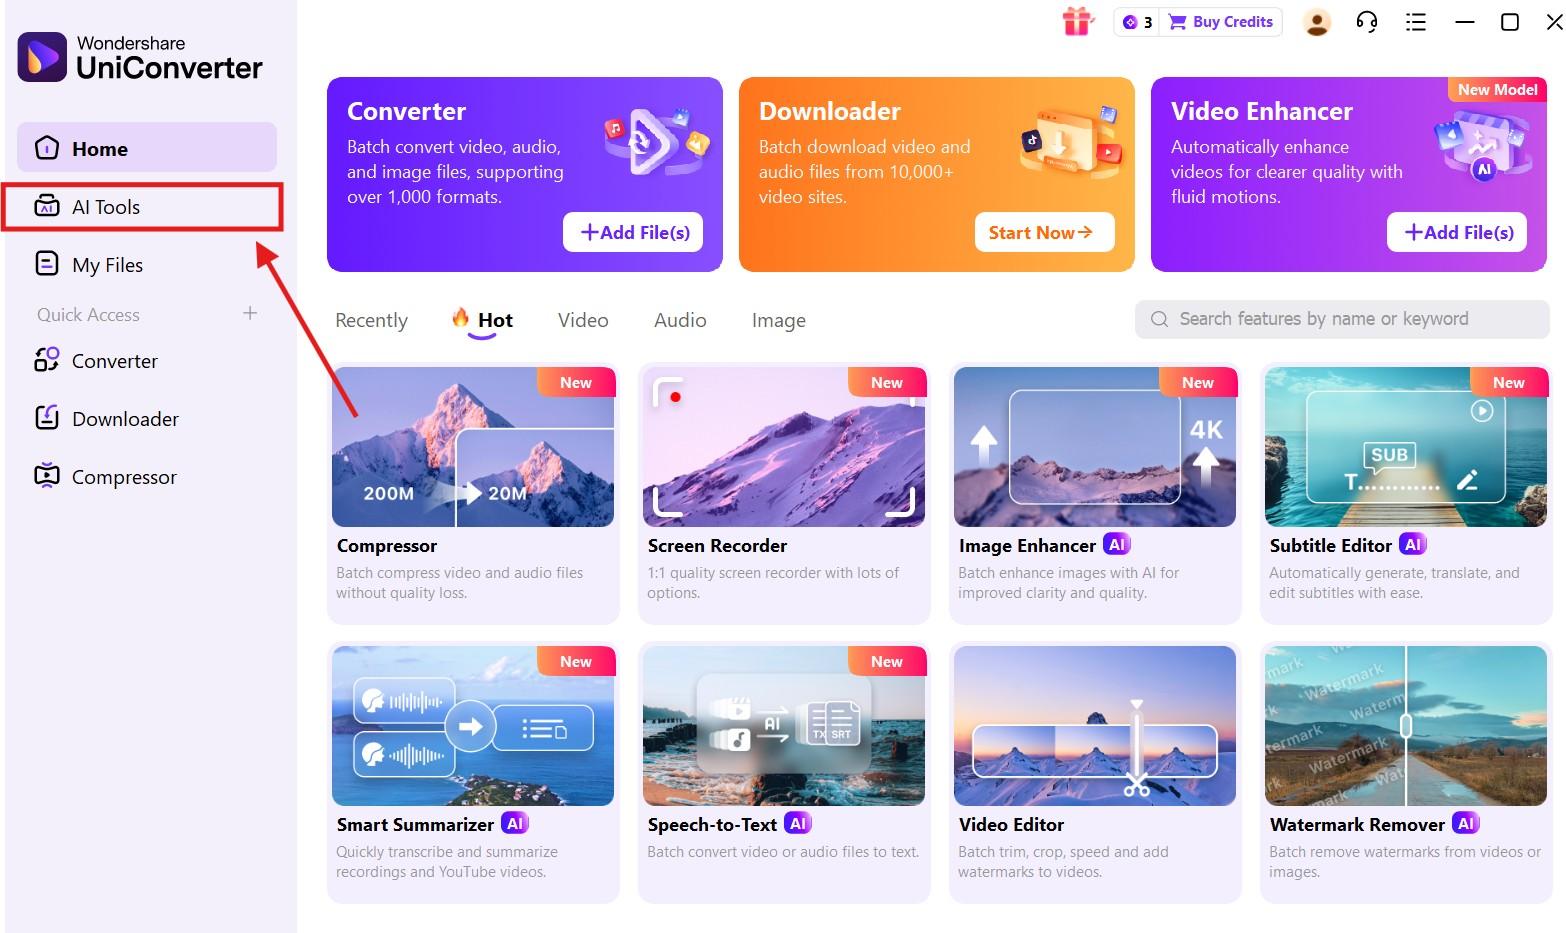
Step 2. Click on the “Image enhancer” option.

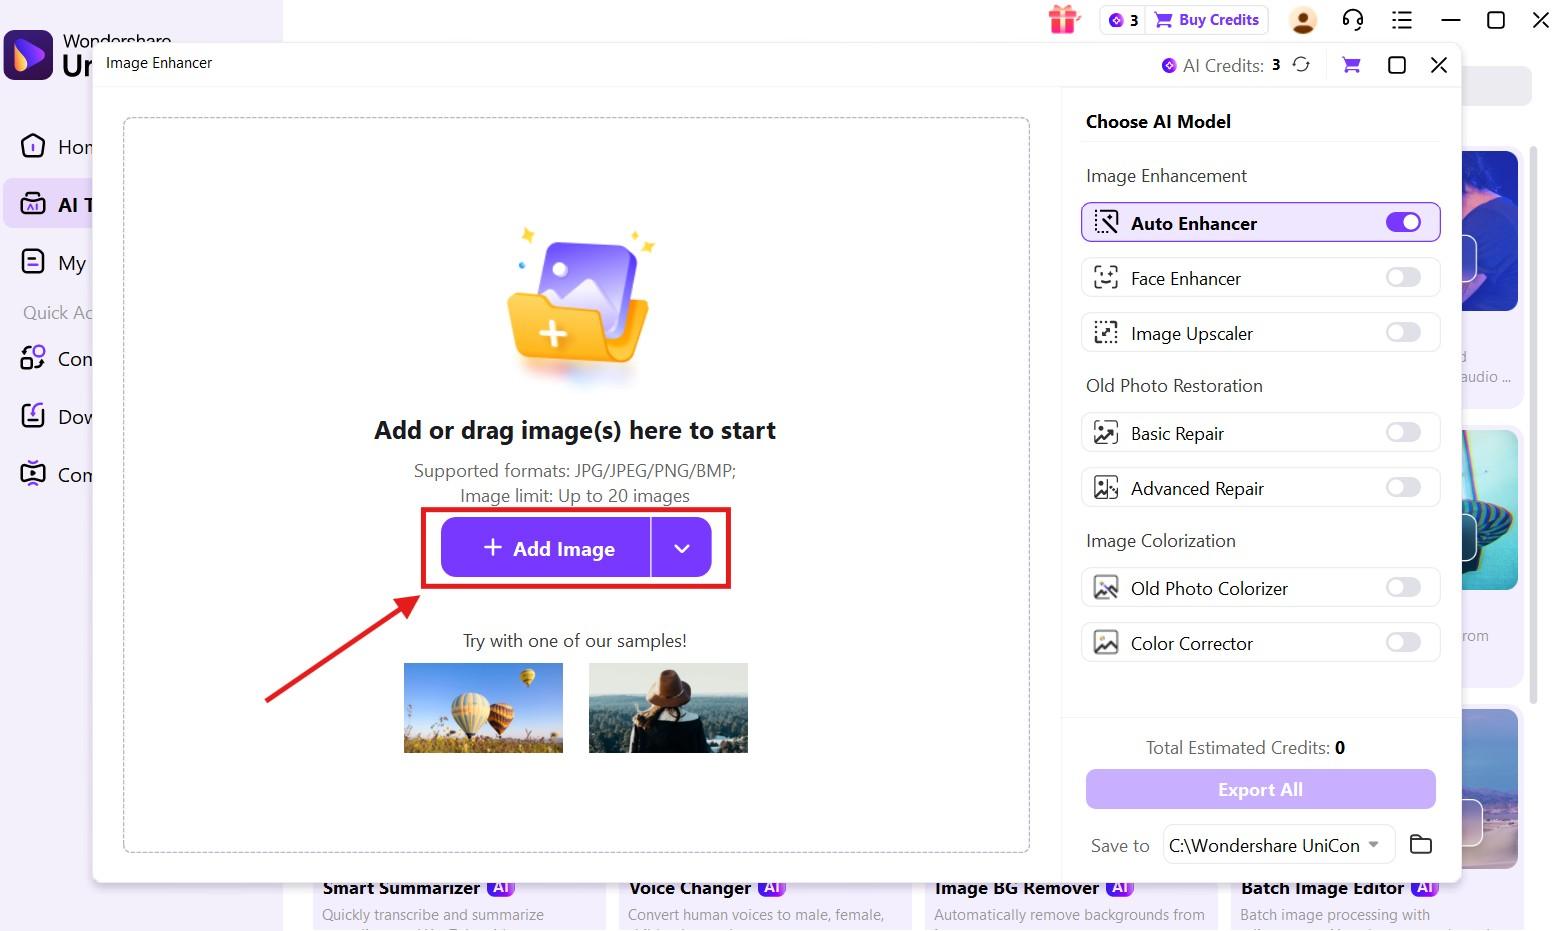
Step 3. Upload the image that you want to edit by clicking the “Add File” button.
Step 4. Once the file has been uploaded, choose the right tool as per your requirement.
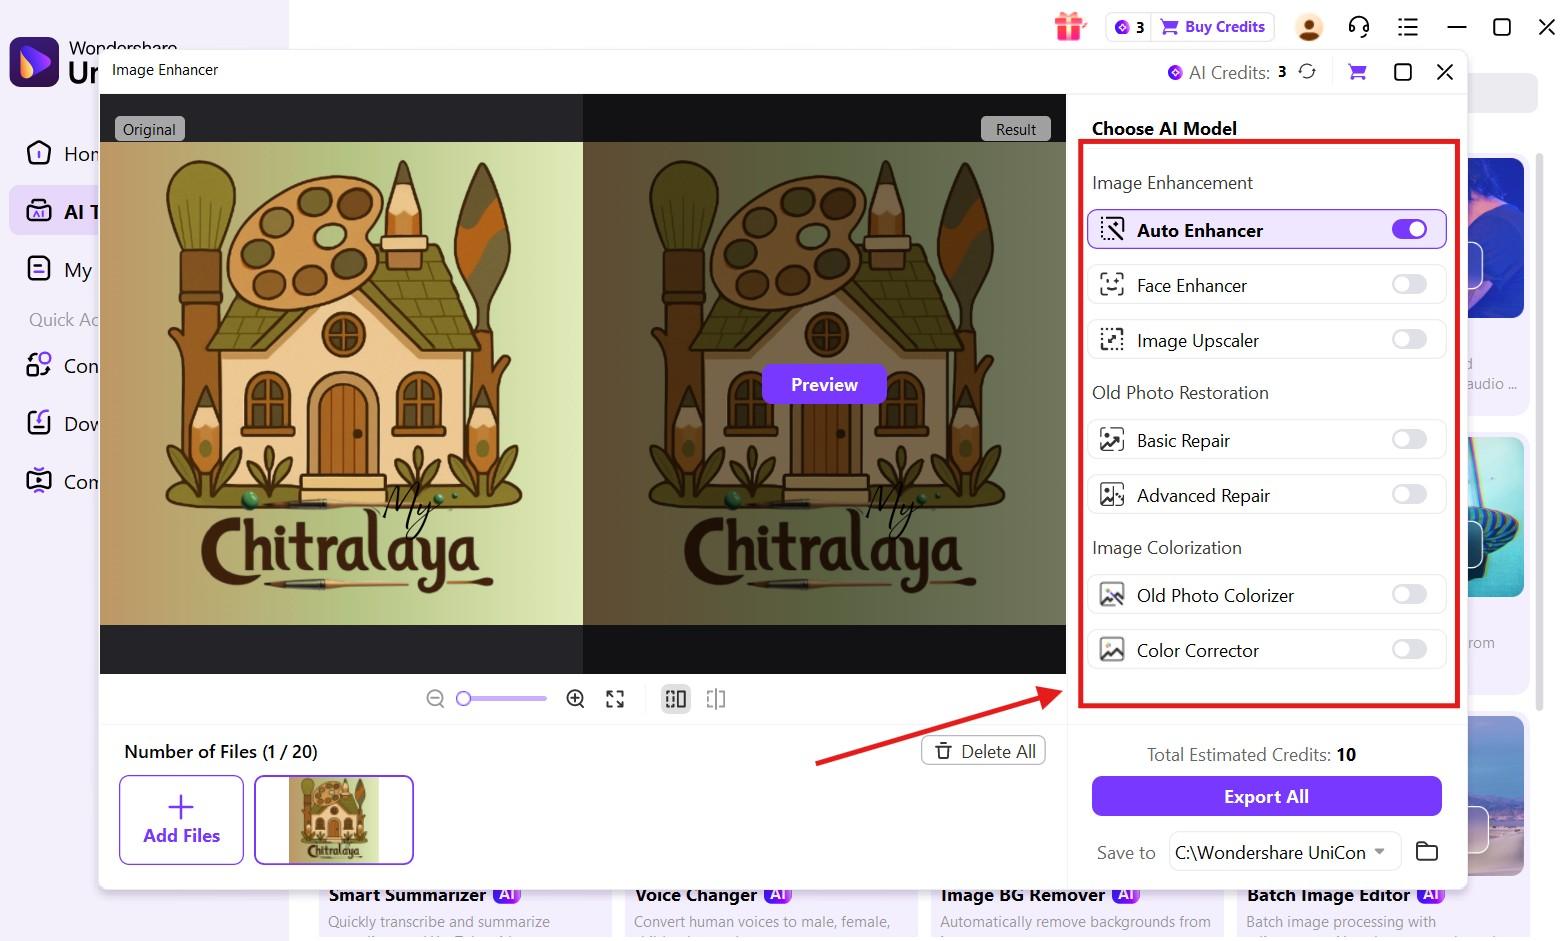
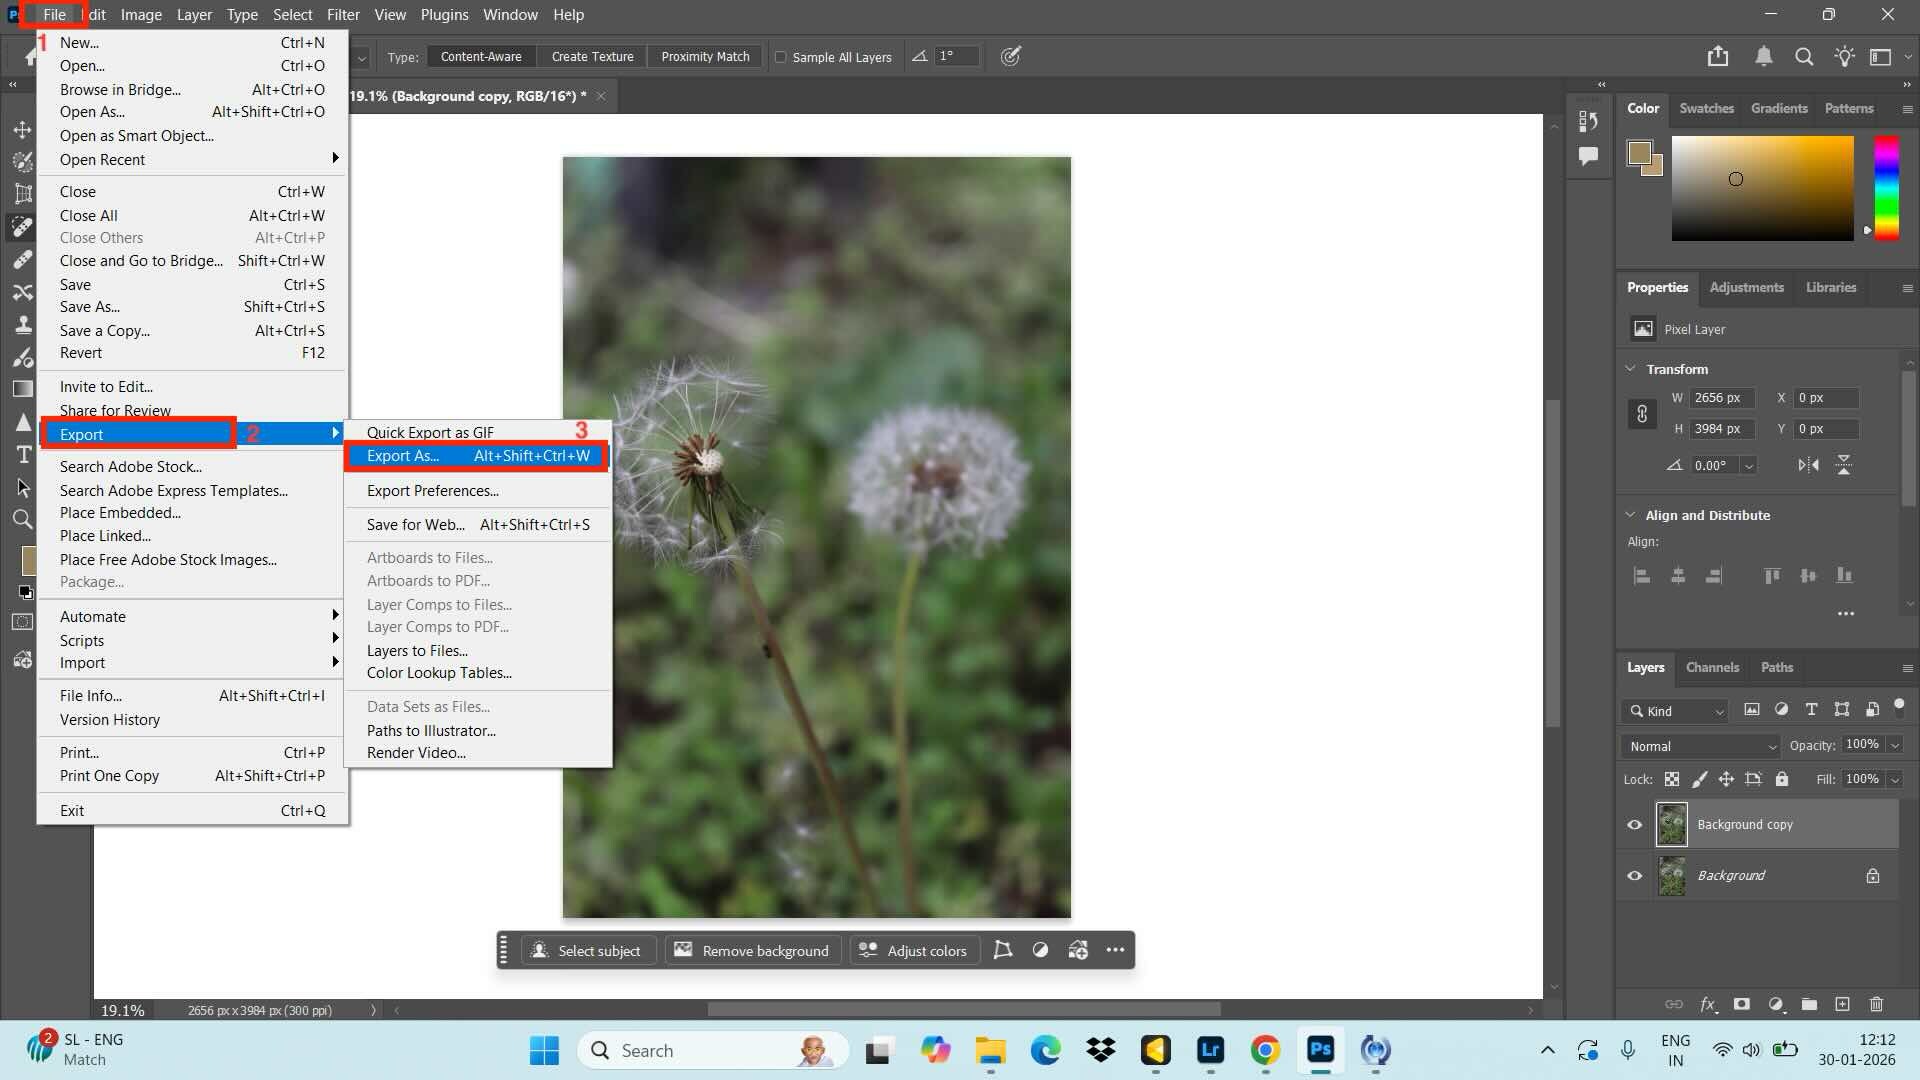
Step 5. Click on the “Export All” button to save the edited image to your device.

Easy Image Smoother with One-Click Enhancement
Part 7: Comparison Table: Photoshop vs. UniConverter vs. Other Image Smoothers
Choosing the right tool depends on your technical requirements, skill level, complexity of the tool, and your budget. The table below will help you make an informed decision.
| Feature | Ease of Use | Skills Required | Method to Smooth Pixelated Edges | Automation | Batch Processing | Free Version available | Offline Usage |
| Photoshop | Steep learning curve | Advanced | Manual tools & filters | Low | Slow for beginners | No | Yes |
| Wondershare UniConverter | Very easy | Beginner | AI-powered smoothing | AI-based automation tools | Very fast | Yes (limited functionalities) | Yes |
| GIMP | Moderate | Intermediate | Manual filters | Low | Yes | Yes | Yes |
| Affinity Photo | Moderate | Intermediate | Manual tools | AI-based | Yes | Trial version available | Yes |
| Fotor | Very easy | Beginner | AI-based smoothing | High | No | Yes | No |
| Krita | Moderate | Intermediate | Brush & filter tools | Low | No | Yes | Yes |
| Pixlr | Very easy | Beginner | Auto-enhance tools | Medium | No | Yes | No |
Conclusion
Photoshop’s image smoother provides you with comprehensive functionality. However, the steep learning curve makes it difficult for beginners to use Photoshop. This is where AI-powered tools like Wondershare UniConverter stand out with batch processing and simple navigation. You can smooth pixelated edges quickly while preserving the image clarity for web images, social media graphics, and print designs.
Try Wondershare UniConverter today and see how its image smoother works seamlessly!
FAQs
-
1. Is smoothing pixelated edges the same as blurring?
No. Blurring softens the entire image, while smoothing pixelated edges targets only jagged edges to improve overall visual quality without overly softening details. -
2. Will smoothing pixelated edges affect printing quality?
Smoothing can improve print quality by reducing jagged lines. However, excessive smoothing may remove fine details, so it’s best to preview the image before final printing. -
3. Does smoothing pixelated edges work better on certain image formats?
Yes. High-quality formats like PNG, TIFF, and high-resolution JPG respond better. Heavily compressed or low-quality images show more limited improvement. -
4. Can image smoothing fix extremely low-resolution images?
Smoothing can reduce rough edges but cannot fully restore lost details. For better results, combine it with upscaling or enhancement tools. -
5. Is it better to smooth edges before or after resizing an image?
It’s generally better to smooth edges after resizing. Resizing defines the final pixel structure, and smoothing afterward helps refine edges and reduce scaling artifacts.

