Part 1. How to Compress an Animated GIF Within Seconds?
GIFs have been an Internet classic for quite some time now. They are often used to bring some life to an otherwise dull image or video. However, you will find several GIFs online that are of rather astounding size.
A GIF animation with a size of 1 MB or more often simply doesn't make sense. It can be critical to your website's overall performance.
But where can you compress it to 50 or even 100 kilobytes?
In this tutorial, we'll have a close look at all the available options on how to compress a GIF quickly without any damage to the original quality.
Part 2. How to Compress a Gif Without Quality Damage?
So, when it comes to compressing a GIF file size, the main concern for any user is what if it causes quality damage? Well, it is not an issue if you use reliable, powerful, yet user-friendly software, such as Wondershare UniConverter.
It maintains the original file quality and completes the task at an incredible 120x speed, which is miles ahead of any other platform providing similar services.
Here are some key elements offered by the UniConverter:
- Lossless Compression
- No Color Reduction
- Multiple Compression Modes(High, Low, and Standard)
- Customization(Enabling you to edit resolution, size, and format)
- Batch Compression
Download Wondershare UniConverter now on your Windows or Mac system, and go through the following guide to compress GIFs in no time:
Step 1 Launch the UniConverter
Run the software on your desktop. From the home screen, click on Tools.
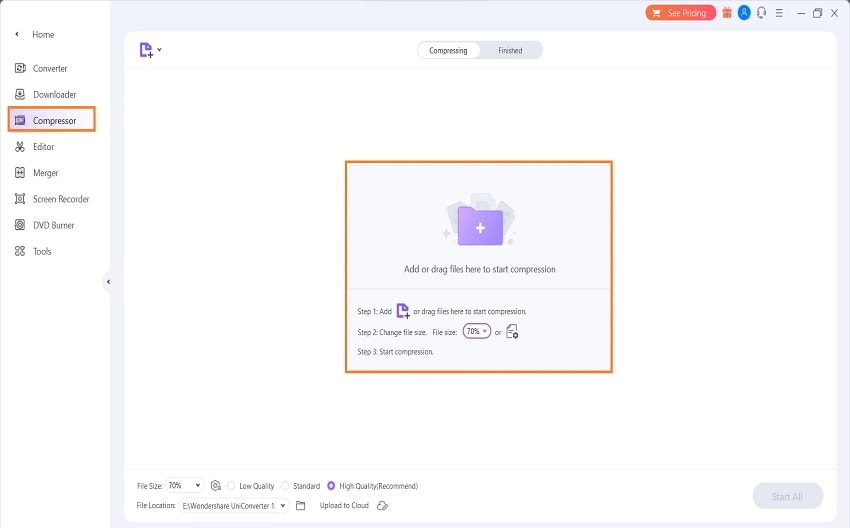
Next, head over to the Video/Audio section, and click the Compressor tab. Following that, press the +/Add button to upload the GIF file you wish to compress.
Step 2 Compress your GIF
Once the file is uploaded, click the Settings tab to adjust the Compression Ratio. The average File Size will be displayed on the interface.
Moreover, you can Preview the changes.
Under Advanced Settings, you can adjust the Frame Rate, Resolution, and Bitrate. Click OK.
Step 3 Save the Compressed File
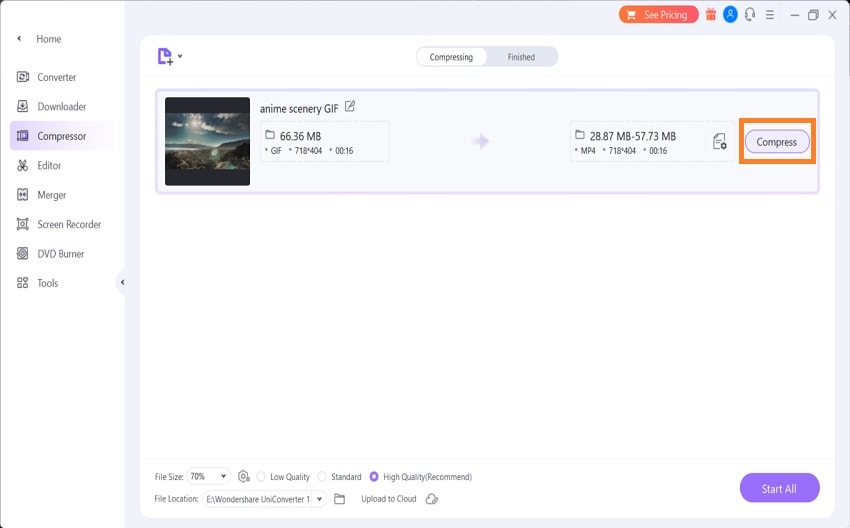
Upon getting the required results, click the File Location tab to select a new folder to save the compressed GIF.
Finally, click Compress to start the resizing process. You will find the newly formatted GIF in the chosen folder.
Using this platform, you can also convert your video to GIFs and vice versa.
So, what are you waiting for?
Download this handy program now and compress a GIF file before uploading them to your blogs or social media profiles.
Wondershare UniConverter — All-in-one Video Toolbox for Windows and Mac.
Edit videos on Mac by trimming, cropping, adding effects, and subtitles.
Converter videos to any format at 90X faster speed.
Compress your video or audio files without quality loss.
Excellent smart trimmer for cutting and splitting videos automatically.
Nice AI-enabled subtitle editor for adding subtitles to your tutorial videos automatically.
Download any online video for teaching from more than 10,000 platforms and sites.
Part 3. How to Compress a GIF Online Free?
What if you cannot perform GIF compression with Wondershare UniConverter on your computer due to its performance or incompatibility issues?
Well, there is no need to worry as there is another way out for you. Simply access the online converter Media.io by using your browser from any mobile phone or desktop, and compress GIFs without losing quality. The web interface is smooth and offers a high processing speed.
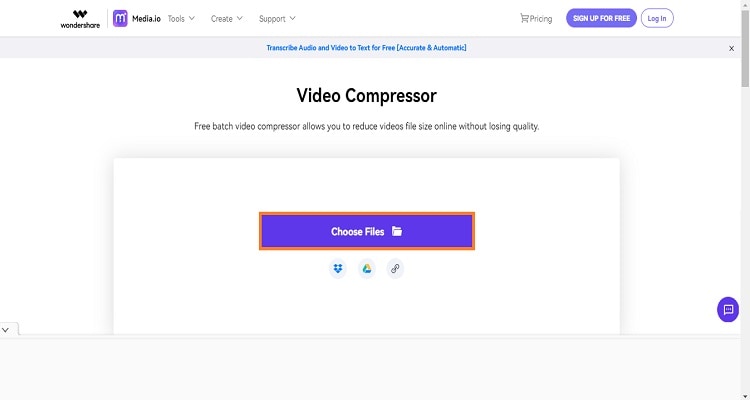
Here are some additional features that Media.io offers:
- Batch Compression
- Share the Compressed GIF Directly to Social Media
- Supports Multiple Formats and Resolutions
Follow the steps to compress GIF files online for free with Media.io:
Step 1: Upload the File
Open Media.io from your browser, and access the Video Compressor section.
Click Choose Files to upload the GIF from your device. Also, you can click the Dropbox, Google Drive, or URL tab to add the file from the stated platforms.
Step 2: Compress it
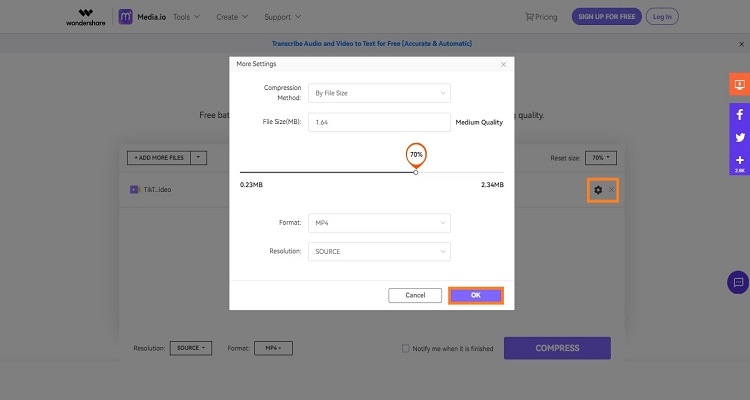
Adjust the Reset Size, Resolution, and Format. Next, click the Settings icon to set the file quality and size. Click OK when you are done.
Step 3: Download the Compressed File
Now, Click Compress.
The processing will take some time, depending on the file type. Once the compression is complete, click Download to save the GIF to your device.
Also, you can access the drop-down menu next to the Download tab to upload the GIF to your cloud accounts(Google Drive/Dropbox).
Without downloading any software on your device, you can get similar quality and features to compress a GIF quickly, thanks to Online UniConverter.
Part 4. Some Tricks to Improve Your GIF Quality
There is no point in posting low-quality GIFs on your blogs.
Why?
Well, the viewers won't be able to properly understand the content, leaving both you and them frustrated.
So, what should you do to prevent this from happening? It is known that compressing GIFs could compromise the file quality.
Simply check out the following valuable and practical tips to manage your GIF quality.
- Try to Use a High-Quality GIF Compressor
The most obvious tip is opting for a reliable and potent GIF image compressor, which is capable of maintaining the file's original quality. One tool you can use is the Wondershare UniConverter!
Using this software, you can adjust the quality yourself and also edit the various parameters associated with the GIF file. It is definitely the wisest option to correctly optimize your GIFs within the best quality and size before posting them on your blog or social media accounts.
- Try to Reduce the Number of Frames
GIFs are a series of frames that play in succession to create a video-like effect. However, you can save ample space on your website by reducing the number of frames in a GIF.
Still, you need to be very careful not to reduce the number so much that the frames start to skip, and the animation makes no sense.
There are also times when reducing the number of frames can actually improve the GIF. In general, use your best judgement when deciding how many frames to include in your GIF.
- Try Reducing the Number of Colors
The file size of your GIF animation is mainly determined by the colors used. Therefore, it's best to use fewer colors to keep the file size small. The more color you use, the chances of the GIF being a low-quality one surges.
So, you can use black or white color in the background to minimize file size and retain good quality at the same time.
However, if you are persistent in using other colors, then we recommend not using hot ones, such as Red, which is known to be spacious. Replace such colors with the ones having a cooler contrast, like Blue, Teal, or Pink.
- Minimize the Use of Animations
It is never a good idea to overdo anything. The same implies to GIFs as well! Over-animating your GIF can often be tempting; however, resist this urge!
Creating a successful GIF is not based on your ability to animate multiple elements but instead on your ability to pick and choose which parts genuinely need to be animated.
This often means that less is more. By animating only the necessary elements, you are more likely to end up with a GIF that looks polished and professional.
Conclusion
Posting GIFs on your website or social media profile is an excellent way to attract a new audience. However, this plan could easily backfire if the size is out of proportion. For this reason, it is suggested to opt for a well-optimized and compressed GIF.
After reading the solutions and tips in this post, we hope that you now fully understand how to compress a GIF file. However, if you intend to get the job done quickly with no quality loss, then Wondershare UniConverter is the best choice!


