Noise can be a significant problem when trying to record audio. Whether background noise from a busy street or electronic interference from nearby electronic devices, noises can ruin an otherwise great recording.
Thankfully, there is the >Audacity Noise Reduction tool that you can use to reduce or eliminate noise from your recordings. This tutorial will show you how to remove background noise from your recordings using Audacity and another audio editor alternative.
Therefore, by the end of this article, you will be able to use Audacity to remove any background noise from your audio recordings and produce high-quality results with a little effort!
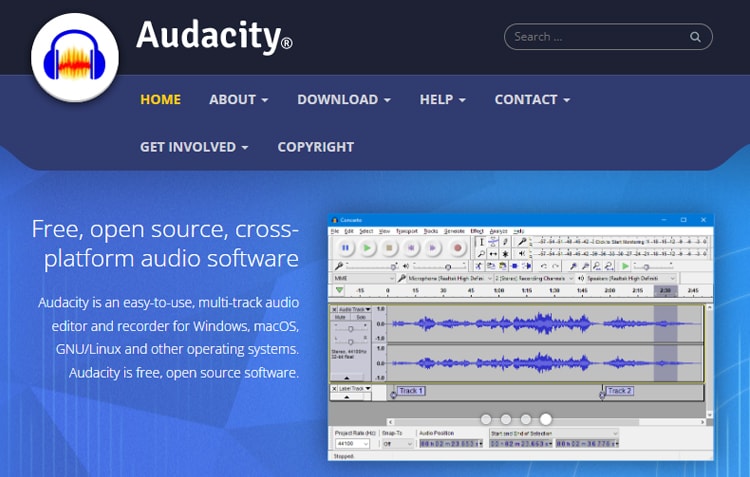
Part 1: Something you must know about Audacity
Audacity is a free and open-source audio editor, making it one of the most popular audio editing software. Hobbyists and professionals love using Audacity for its advanced features. Whether you want to remove wind noises, Audacity is good to go.
Other than editing audio, Audacity can also directly capture sound from various sources, including microphones, turntables, cassette tapes, and streaming audio. Once captured, the audio can be edited and mixed using various tools, including filters, equalization, and noise removal.
Take a look at Audacity specifications below:
Audacity Compatibility: Windows, macOS, Linux.
Cost: Free
Features of Audacity:
- Audio editor, such as cut, copy, splice, or mix sounds together
- Having a wide variety of built-in effects and filters can be used to improve the sound quality of your audio
- Export your edited audio files in a variety of formats
- A built-in recorder that allows you to record new audio directly into Audacity
Part 2: How to remove noise in Audacity
Noise removal is a fundamental part of audio processing. In many cases, noise is unwanted sound that can degrade the quality of an audio recording. This unwanted noise is a common problem when recording audio.
Fortunately, any noise is relatively easy to fix with Audacity audio editor. With Audacity, even removing echo is no longer a problem.
If you find it difficult, follow these step-by-step guides to remove any noise from your recordings in Audacity. This tutorial will use the newest Audacity version (Audacity 3.2.0) for Windows.
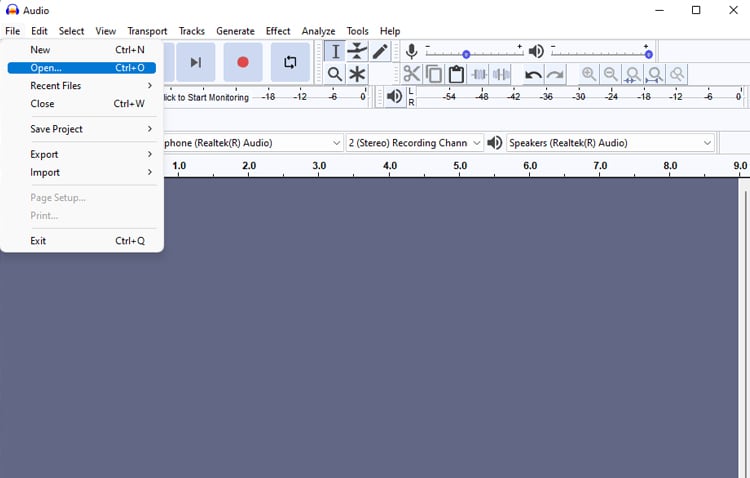
Step 1 Launch Audacity and open the file you want to edit.
To open and add the file, click File > Open and select the audio file you want to edit.
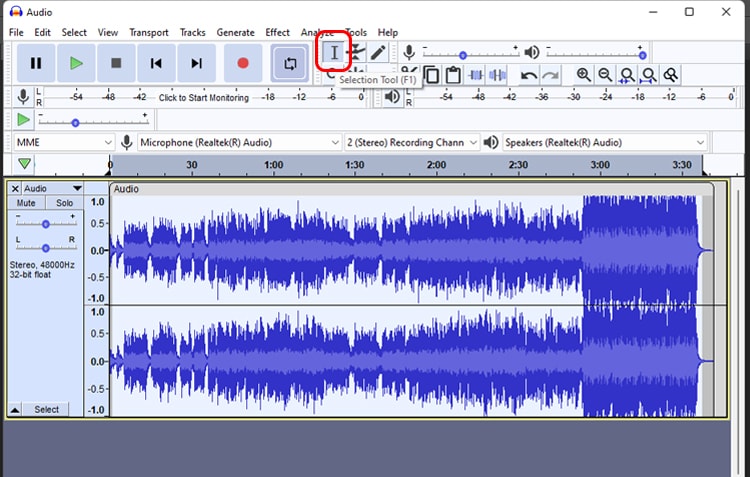
Step 2 Select a portion of the recording that contains only noise
Use the Selection tool to select the noise. This selection shouldn’t contain any speech or other audio you want to keep. If it does, the noise reduction process will remove some of that speech along with the noise.
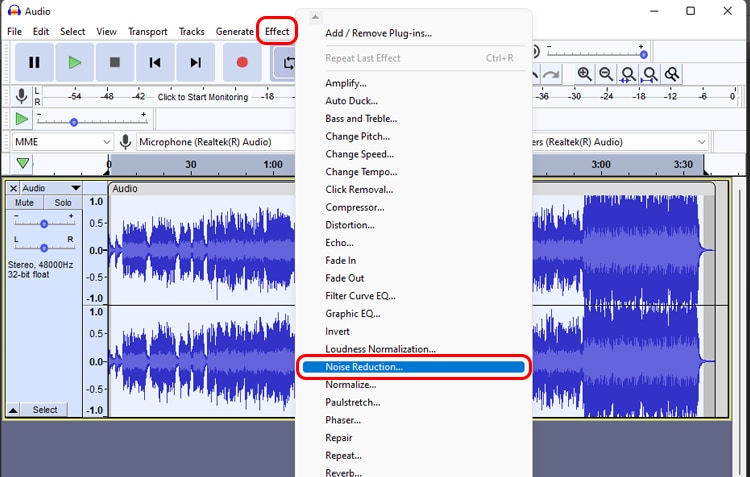
Step 3 Add Noise Reduction effect
Once you have selected the noise, go to Effect > Noise Reduction. After the Noise Reduction window shows up, click Get Profile. It will analyze the selected noise and create its profile. Once the profile has been created, click OK.
Step 4 Start removing the noise from your recording
Now that Audacity gets the profile of what the noise sounds like, it can begin removing it from the rest of your recording. Select the entire recording (Ctrl+A).
Then, go to Effect > Noise Reduction again. This time, adjust the level of noise reduction to your liking and click OK.
Step 5 Save your edited file
Once it has all been set, you can save your edited sound in File > Save Project > Save Project As. Choose the file location, then click OK to close the window. Your recording audio is now noise-free!
Part 3: How to achieve the best settings for Audacity Noise Reduction
There is a debate on the best settings for Noise Reduction on Audacity to remove noises. The truth is, there isn’t one correct answer. The best way to find the best settings is to experiment and see what’s best for your specific needs.
Therefore, you can play around with the settings until you find the perfect combination for your audio. In Audacity’s Noise Reduction window setting, you might see Noise Reduction, Sensitivity, and Frequency Smoothing.
If you are not sure about what they meant, take a look at their functions:
- Noise Reduction: processes how much you want to remove the unwanted sound from the audio signal.
- Sensitivity: determines how sensitive the noise reduction process is. A higher sensitivity will result in more noise being removed from the audio signal, while a lower sensitivity will leave more of the original noise in the recording.
- Frequency Smoothing: a process of reducing the sharpness of sound frequencies. It can make an audio signal sound less harsh and more pleasant to listen to.
As far as we can recommend, you can try setting your Noise Reduction into:
- Set the noise reduction to -12 dB
- Set the sensitivity to 50%
- Set the frequency smoothing band to 3 kHz
Part 4: A powerful alternative for Audacity to remove noise
Despite the wide range of features and functions above, there are a few drawbacks when using Audacity:
- Audacity is complex. You can do a lot with the software, but learning how to use all of its features takes time.
- It has its share of bugs and glitches.
On the brighter side, Audacity is not the only available audio editing software program. Many other options might be more suitable for you. One of them is Wondershare’s UniConverter Noise Remover which is just as good as Audacity.
Take a look at the UniConverter details:
UniConverter Compatibility: Windows and macOS
Cost: Free
UniConverter Features:
- Video/Audio Editor
- Audio Extraction
- Video/Audio Noise Remover
There are several advantages that UniConverter has compared to Audacity when it comes to noise removal, including:
- Ability to remove video background noise and not limited to audio format only.
- More user-friendly interface. Making it easier to use for those who are unfamiliar with audio editing software.
- Remove any noise instantly using AI.
- Ability to handle a wider range of video and audio formats.
So, how to remove noise using a UniConverter? In this tutorial, we will use UniConverter on Windows.
Wondershare UniConverter — All-in-one Video Toolbox for Windows and Mac.
Edit videos on Mac by trimming, cropping, adding effects, and subtitles.
Converter videos to any format at 90X faster speed.
Compress your video or audio files without quality loss.
Excellent smart trimmer for cutting and splitting videos automatically.
Nice AI-enabled subtitle editor for adding subtitles to your tutorial videos automatically.
Download any online video for teaching from more than 10,000 platforms and sites.
Step 1
Launch UniConverter on your computer and open Noise Remover.
If you haven’t downloaded it, you can download the software first from Wondershare UniConverter website. Don’t worry; the feature is free to use. You can launch the software and open Noise Remover in the Home menu once installed.

Step 2
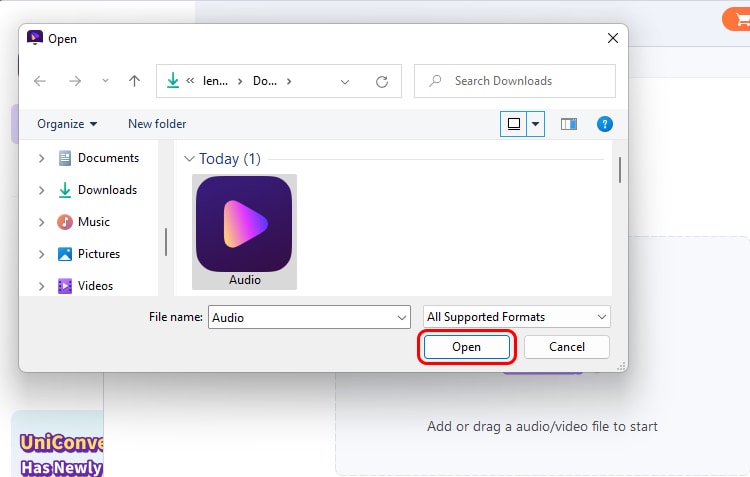
Add the files you want to remove background noise.
Step 3
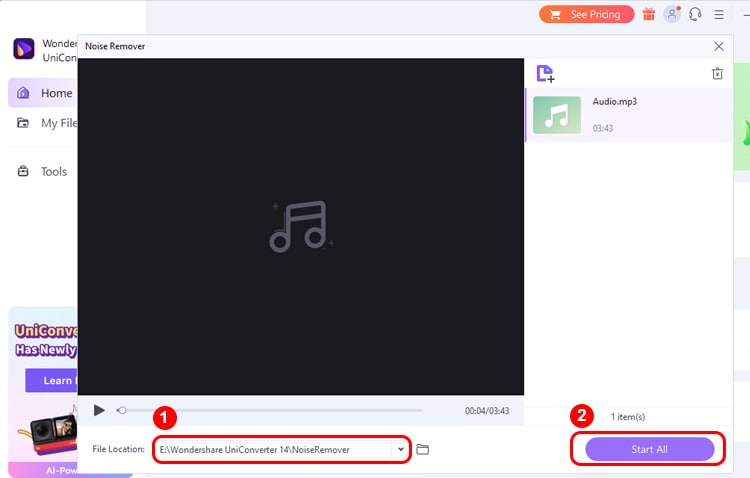
Change the file location and start removing noises.
Before you start the removal process, change the file location to the desired folder. After it’s all set, click the Start All button to start the noise removal process. UniConverter will remove and reduce the noise in your audio automatically.
UniConverter's noise reduction features are some of the best in the business. By using advanced algorithms, UniConverter can effectively remove unwanted noise from your videos. This results in a cleaner and more polished video that impresses your viewers.
So, if you're looking for a video converter with excellent noise reduction capabilities, look no further than UniConverter. With UniConverter, you can rest assured that your videos or audio will have the best result.
The End
Noisy audio recordings are a common problem, but there are ways to fix them using software like Audacity and UniConverter. In Audacity, you can use the “Noise Reduction” tool to help reduce the noise. However, Audacity can be hard to use.
Meanwhile, UniConverter is another free alternative with a Noise Remover tool that is handy to remove any noise from audio more easily. Noise Remover tools ensure you can clean up your audio files and make them sound great.

