Microsoft Word has a dictation feature that helps users enhance their work speed and productivity. By dictation, users can prevent themselves from typing, which automatically increases their efficiency. Moreover, people who have disabilities such as arthritis can use the dictation feature with great accessibility. The speech-to-text Word feature is beneficial for beginners whose typing skills are not developed yet.
This article will guide you on how to use the Microsoft speech-to-text feature conveniently. Hence, keep reading this article to improve your work productivity while using Microsoft Word.
Part 1: What you should know about Microsoft speech to text
Microsoft speech-to-text feature can be easily accessed either through your microphone or hotkeys. Using this option, you can dictate your textual data, and the program will type it with great accuracy. This will automatically eliminate your manual effort in typing a large document. Speech-to-text Word also has various additional attributes that you can utilize according to your preferences. To discover the additional options, keep reading this section.
1.1 Settings option
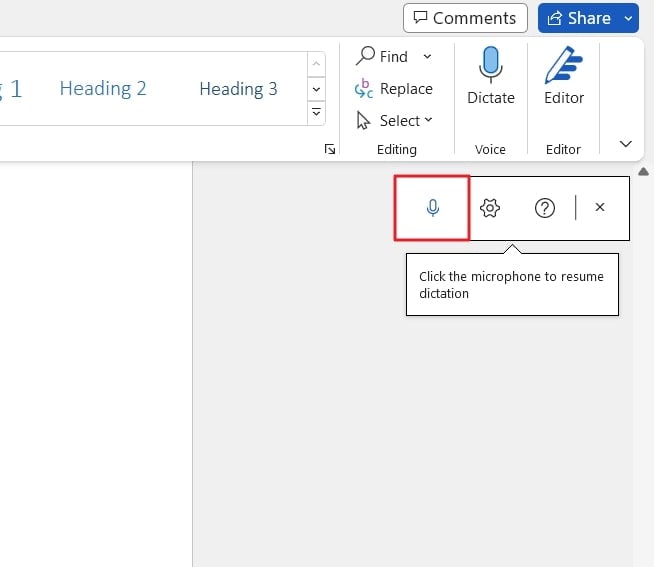
You can find the settings option on the right side of the microphone button on your computer’s screen. Using this option, you can customize the settings according to your needs to boost your productivity instantly. Through this option, you can enable the “Auto-Punctuation” feature to insert the punctuation marks automatically. By activating this option, the program will automatically add hyphens, commas, full stops, and other punctuation marks without manual command.
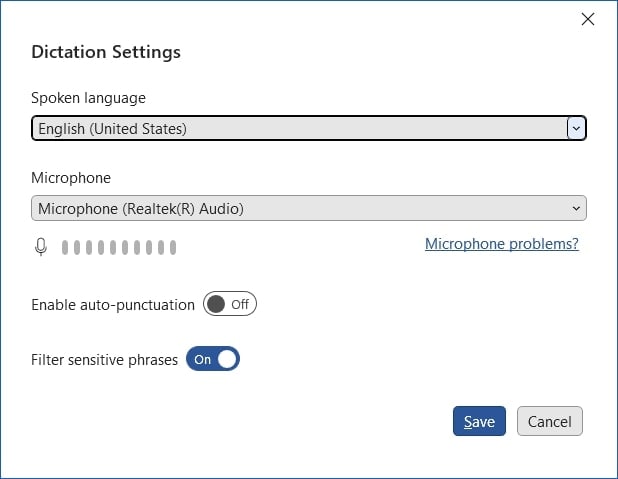
You can also use the “Filter” option to cloak any sensitive phrase on Word. Whenever you encounter any sensitive or awkward word, Microsoft will replace it with "***." Moreover, the program offers the option of "Languages" through which people belonging to diverse backgrounds can use the dictation mode. In the following table, you can discover the supported and preview languages in Microsoft Word. Remember that preview languages have less accuracy.
| Supported Languages | Preview Languages |
|
· Chinese (China) · English (Australia) · English (Canada) · English (India) · English (United Kingdom) · English (United States) · French (Canada) · French (France) · German (Germany) · Hindi · Italian (Italy) · Japanese · Portuguese (Brazil) · Spanish (Spain) · Spanish (Mexico)
|
· Arabic (Bahrain) · Arabic (Egypt) · Arabic (Saudi Arabia) · Bulgarian · Chinese (Traditional, Hong Kong) · Chinese (Taiwan) · Croatian (Croatia) · Czech · Danish · Dutch (Netherlands) · English (New Zealand) · Estonian · Finnish · Greek · Gujarati (India) · Hebrew · Hungarian · Irish · Korean · Latvian · Lithuanian · Maltese · Marathi (India) · Norwegian (Bokmål) · Polish · Portuguese (Portugal) · Romanian · Russian · Slovak · Slovenian · Swedish (Sweden) · Tamil (India) · Telugu (India) · Thai · Turkish (Turkey) · Vietnamese |
1.2 Help option
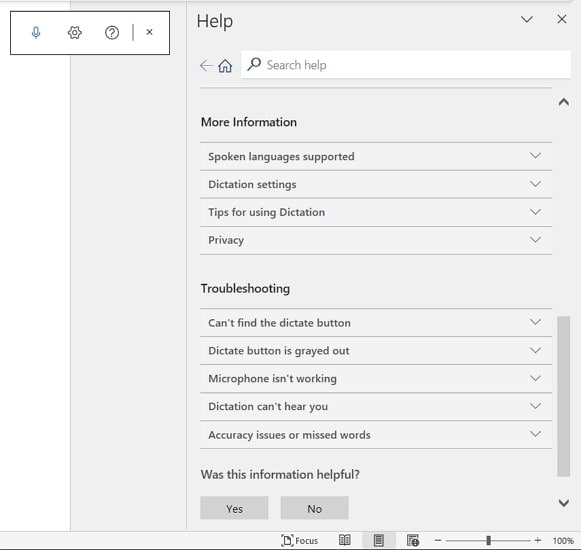
Using the Help option, you can learn different things and settings about the Dictate feature. Moreover, you can also find some valuable tips for utilizing the dictation mode efficiently. If you are worried about your privacy settings, you can also navigate to the Help option to check if your information will be shared with Microsoft or not.
Furthermore, if you have some troubleshooting issues, such as dictation can't hear you, accuracy issues, or other problems, the Help feature can assist you.
1.3 Commands
You can also use different commands to perform specific actions in Microsoft Word. This will help you to complete your tasks on Microsoft Word without any hassle. To use the commands option in the voice-to-text Word feature, check the following table:
Punctuation
| Full Stop | . |
| Comma | , |
| Question Mark | ? |
| Exclamation Mark | ! |
| New Line | New Line |
| Apostrophe-s | 's |
| Colon | : |
| Semicolon | ; |
| Open and Close Quotes | " " |
| Hyphen | - |
| Ellipsis, dot dot dot | … |
| Begin/Open and End/Close Single Quote | ' ' |
| Left/Open and Right/Close Parentheses | ( ) |
| Left/Open and Right/Close Bracket | [ ] |
| Left/Open and Right/Close Brace | { } |
Editing
| Undo |
| Delete* |
| Delete That* |
| Delete Last [1-100] Words/Sentences |
| Delete [Word or Phrase] |
| Insert Space |
| Backspace |
| Backspace [1-100] |
Formatting
| Bold |
| Italics |
| Underline |
| Strikethrough |
| Superscript |
| Subscript |
| Indent |
| Decrease Indent |
| Clear All Formatting |
| Align [left, center, right] |
Creating lists
| Start List |
| Start Numbered List |
| Next Line |
| Exit Line |
Symbols
| Asterisk | * |
| Backslash | \ |
| Forward Slash | / |
| Vertical Bar Sign | | |
| Backquote | ` |
| M-dash | — |
| N-dash | – |
| Paragraph Sign | ¶ |
| Section Sign | § |
| Ampersand and Sign | & |
| At Sign | @ |
| Copyright Sign | © |
| Registered Sign | ® |
| Degree Symbol | ° |
| Caret Symbol | ^ |
Wondershare UniConverter — All-in-one Video Toolbox for Windows and Mac.
Edit videos on Mac by trimming, cropping, adding effects, and subtitles.
Converter videos to any format at 130X faster speed.
Compress your video or audio files without quality loss.
Excellent smart trimmer for cutting and splitting videos automatically.
Nice AI-enabled subtitle editor for adding subtitles to your tutorial videos automatically.
Part 2: How to start the speech-to-text feature in Word
The Microsoft Word dictation feature is accurate and convenient for various users. Through voice recognition technology, you can dictate words and save yourself from manual work. Thus, you can use your microphone to use this advanced feature on Microsoft Word. To activate this feature, here are the simple steps:
Step 1: Open your Microsoft Word and navigate to the “Home” tab. From the right side of the Home panel, click on the “Dictate” button. Afterward, you would hear a beep sound. Moreover, the button will turn into a blue recording light.
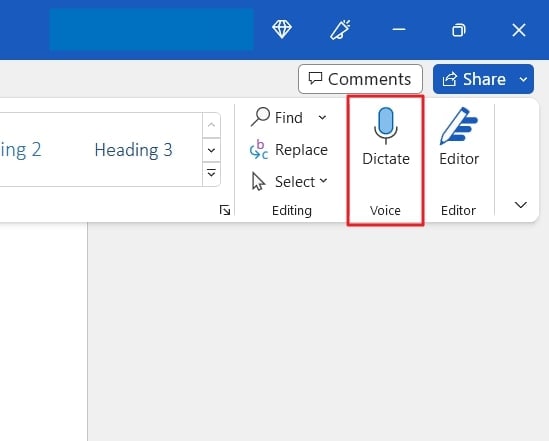
Step 2: Now the program can hear you, so you have to speak clearly using a microphone attached to your computer. You can also add punctuation in the dictation mode using the commands discussed in the above part. Once you are done, you can click on the "Dictate" button. Or, you can say, "Turn the dictate feature off" on your microphone.
Part 3: The best alternative software for speech to text
The Microsoft Word dictation feature can only work for documents. However, if you want to use more advanced software for the speech-to-text feature, Wondershare UniConverter is the recommended option. This advanced speech-to-text software is available for Windows and Mac platforms. It comes with multiple editing features that allow users to modify their videos or audio.
Among its various AI tools, the auto-subtitle generator can be used to add subtitles to video files automatically. It supports various video and subtitle formats that you can select according to your choice. Due to its 100% accuracy, you trust this auto-subtitle generator to transcribe your voice to text efficiently.
Key features of subtitle generator of UniConverter
- The auto-subtitle generator of this tool supports more than 100 languages. Thus, people belonging to different backgrounds can use this tool to add subtitles to their video files.
- You can also customize the subtitles font and outline width according to your desire.
- For a real-time preview, this tool provides a subtitle timeline through which you can check the accuracy of subtitles while using the auto-subtitle option.
Steps to use auto-subtitle generator in UniConverter
To use the auto-subtitle generator of UniConverter, here are the easy steps that you can utilize:
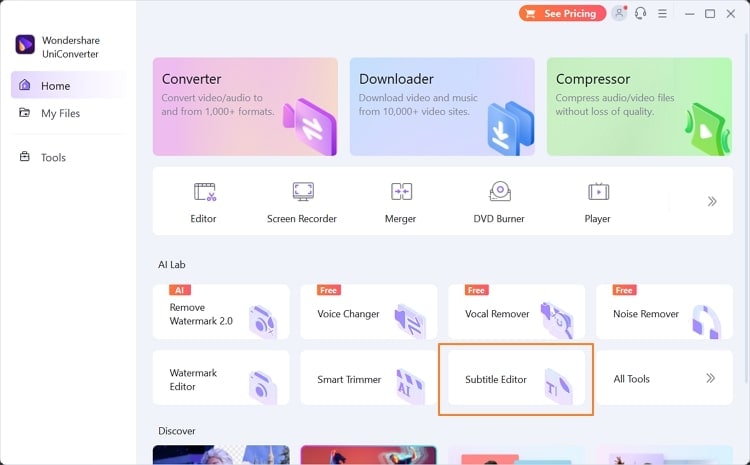
Step 1 Access the subtitle generator tool
Once done with launching UniConverter on your system, go to the "AI Lab" section and click on "Subtitle Generator."
Step 2 Import your desired video file
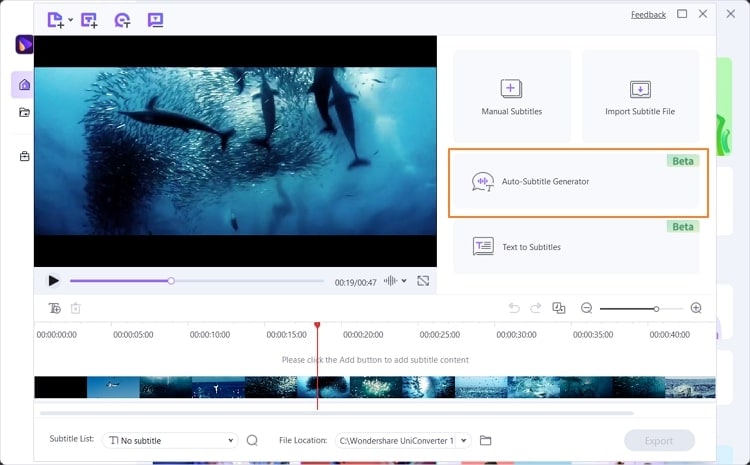
Now, hit the "Add File" button and import the video file of your choice from the computer. After this, you have to click on the “Auto Subtitle Generator” option from the right side. This feature uses smart voice recognition technology through which it automatically creates subtitles. You can also select any preferred language from the given options.
Step 3 Export the video with subtitles
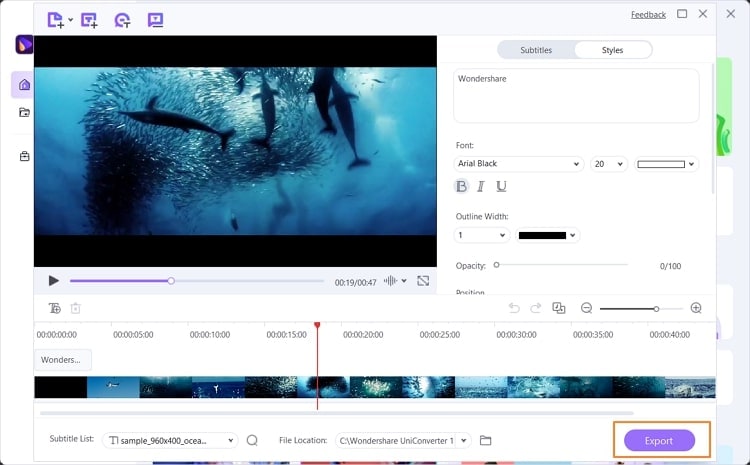
Once the subtitles have been created, you can change their font, width, position, and opacity. To save the video file, you can go to the “File Location” tab to choose the destination place on your desktop. Afterward, hit the “Export” button.
Conclusion
If you want to increase your work efficiency and typing speed, then you should opt for the latest version of Microsoft Word to use the Dictate feature. This article taught you how to use the Microsoft speech-to-text feature and all the important commands that you will need while using it.
Moreover, we have also introduced an advanced speech-to-text software, UniConverter, through which you can auto-generate the subtitles for your video files.

