


We've all experienced the irritation of background noise during a Zoom meeting, no matter whether it's a pet bark or you forgot to mute yourself. These disruptions can annoy the meeting participants, which affects the meeting flow. Hence, when maintaining professionalism in a virtual environment, finding the right way to mute yourself quickly is essential, especially on different devices.
Therefore, this guide will walk you through the multiple ways to mute your audio on this meeting platform. Whether you want to know how to mute Zoom on Windows or Mac, this guide will provide detailed steps. Plus, we'll introduce you to an innovative transcriber by the end of this guide to help you regain access to details you missed in meetings because of distortions.
In this article
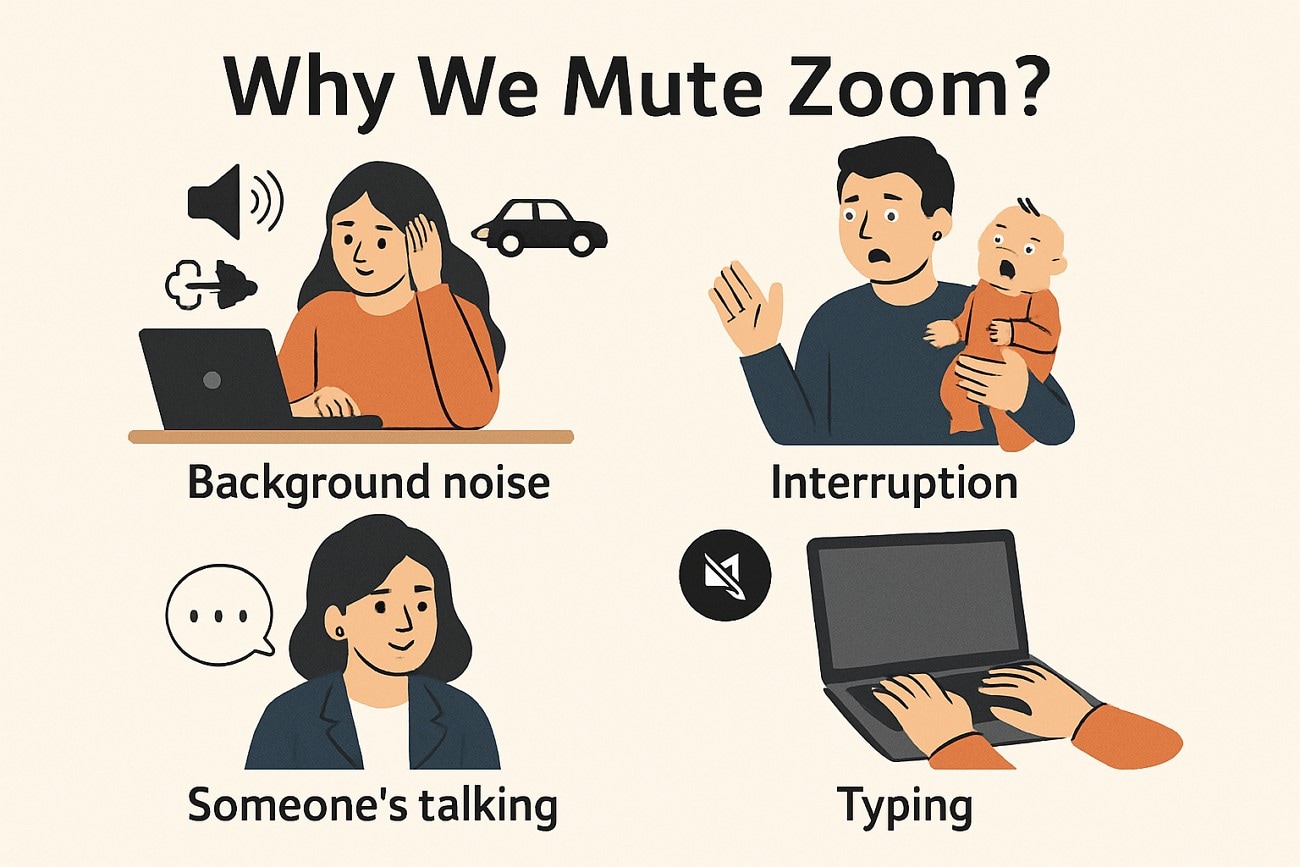
Part 1. Why We Mute Zoom?
It's better to understand the possible reasons for muting in the first place before you know how do you mute on Zoom. Let's discuss several scenarios where turning off your microphone can help maintain a professional environment during meetings:
Avoid Background Noise
Whether it’s traffic sounds or a phone ringing, these everyday noises can easily distract others on the call. It helps you prevent those disruptions and keeps the focus on the meeting.
Avert Echo
If someone else is speaking and you have your microphone on, it can create an echo or distortion. When you turn off your mic during someone else’s speech, it helps maintain clear audio for everyone.
Multitask in a Noisy Environment
Sometimes, we are in noisy environments like a busy coffee shop or a hall with multiple people. In these cases, you can mute your mic to confirm you don’t broadcast all the background chatter to the meeting.
Wait for Your Turn to Speak
Instead of constantly adjusting your mic and worrying about unnecessary noise, you can mute and wait for your turn. It allows you to be ready when it's your moment to contribute.
Control Accidental Sounds
We’ve all made the mistake of typing, shuffling papers, or even munching on snacks while on a Zoom call. Muting your mic prevents those random noises from interrupting the conversation and keeps things professional.

Accurate Batch Audio to Text Converter for Win and Mac
Part 2. How to Mute Zoom on Windows and Mac by Zoom Settings
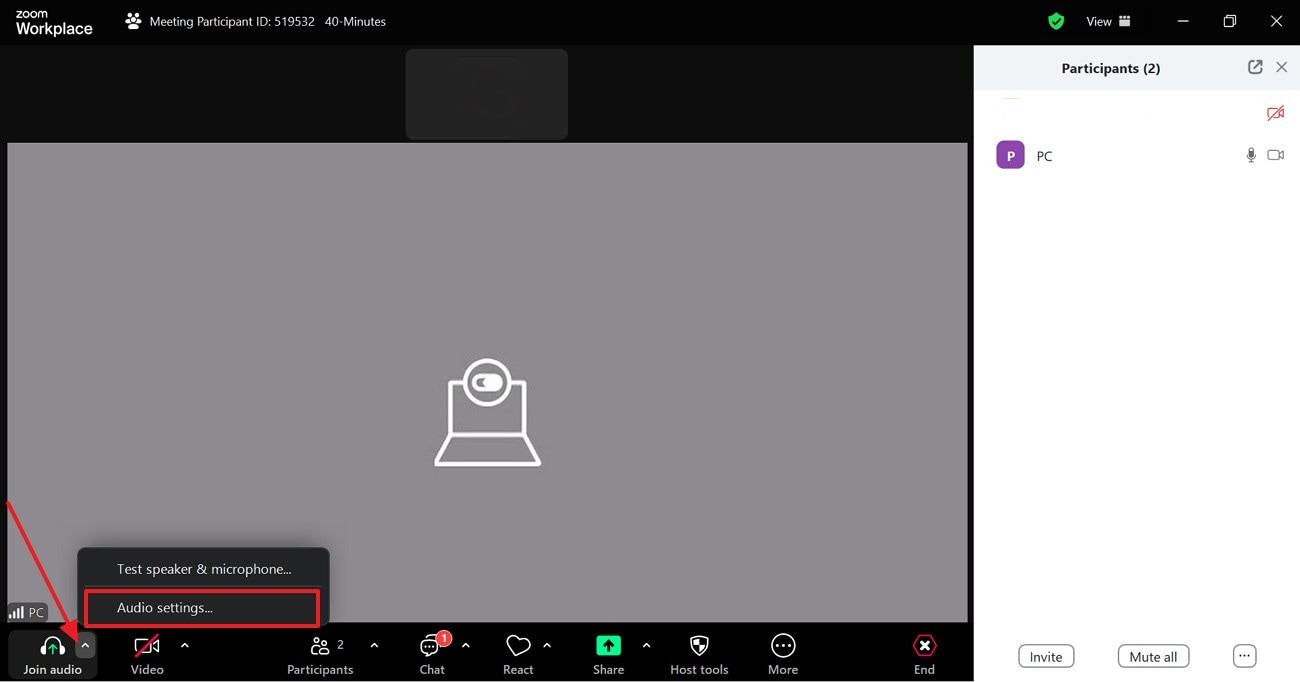
One of the easiest ways to turn off your mic is by using its built-in settings. Whether you are using Windows or Mac, Zoom gives you clear options to mute and unmute yourself and other participants (If you are a host). This feature allows for quick control and visual feedback and prevents accidental audio transmission. Read the following steps to learn how to mute in Zoom:
Step 1
Join the meeting and look for the “mic” icon on the screen's bottom left corner. To mute yourself, click that “Upward arrow” icon, and a pop-up menu will appear where you have to select the “Audio Settings” option.
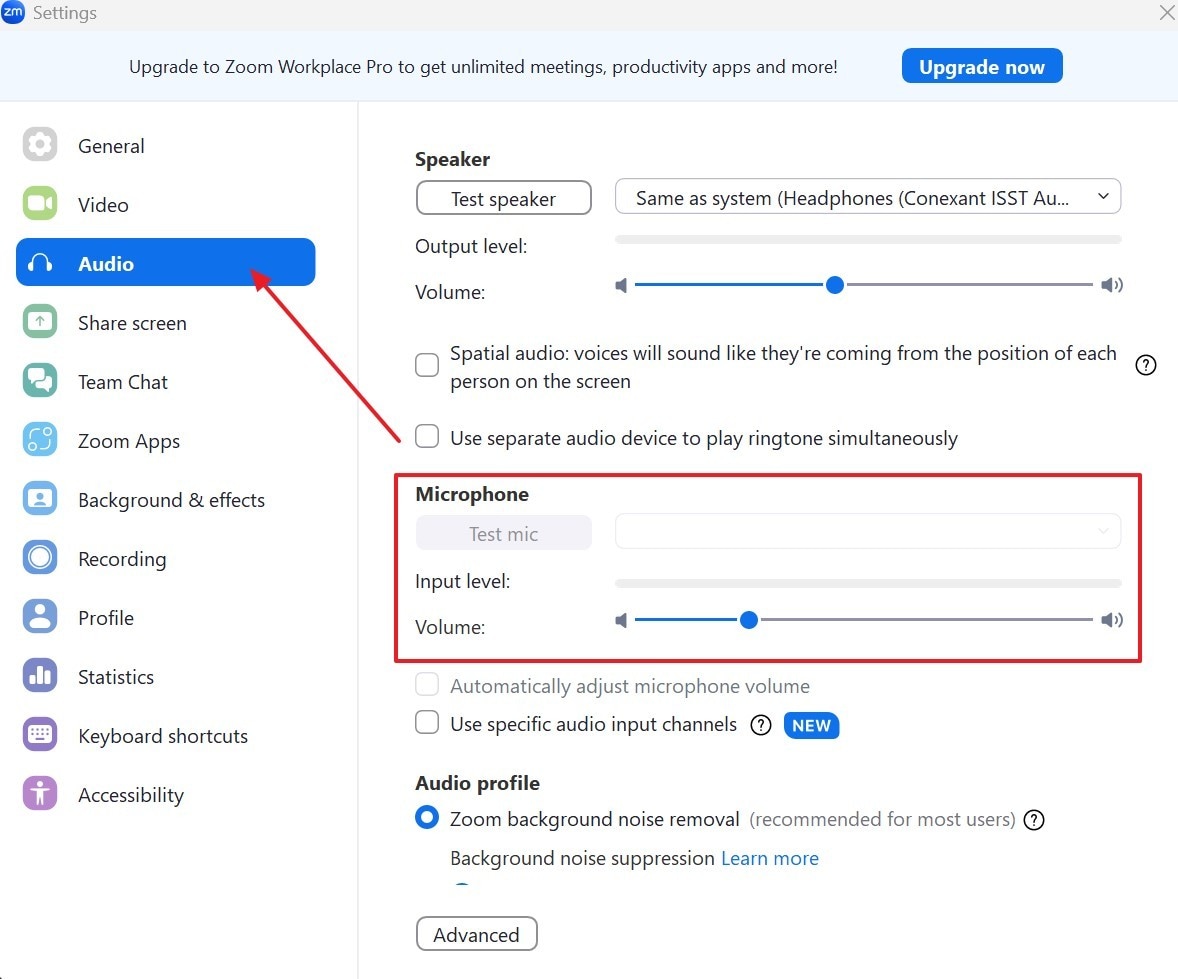
Step 2
Next, choose the “Audio” and drag the volume slider under the "Microphone" section to mute yourself.
Part 3. How to Mute Zoom on Windows and Mac by Volume Settings
If you want to learn how to mute a Zoom meeting with another method outside the app itself, you can use your computer’s volume settings. This approach lets you reduce or mute sound through your system’s sound controls, without having to touch anything inside the application interface. It’s especially useful when you need to silence the meeting quickly, by following the steps below:
Step 1
After joining the meeting, press the “Speaker” icon from the Windows taskbar and click the “Volume Adjusting” icon beside the speaker to expand the menu.
Step 2
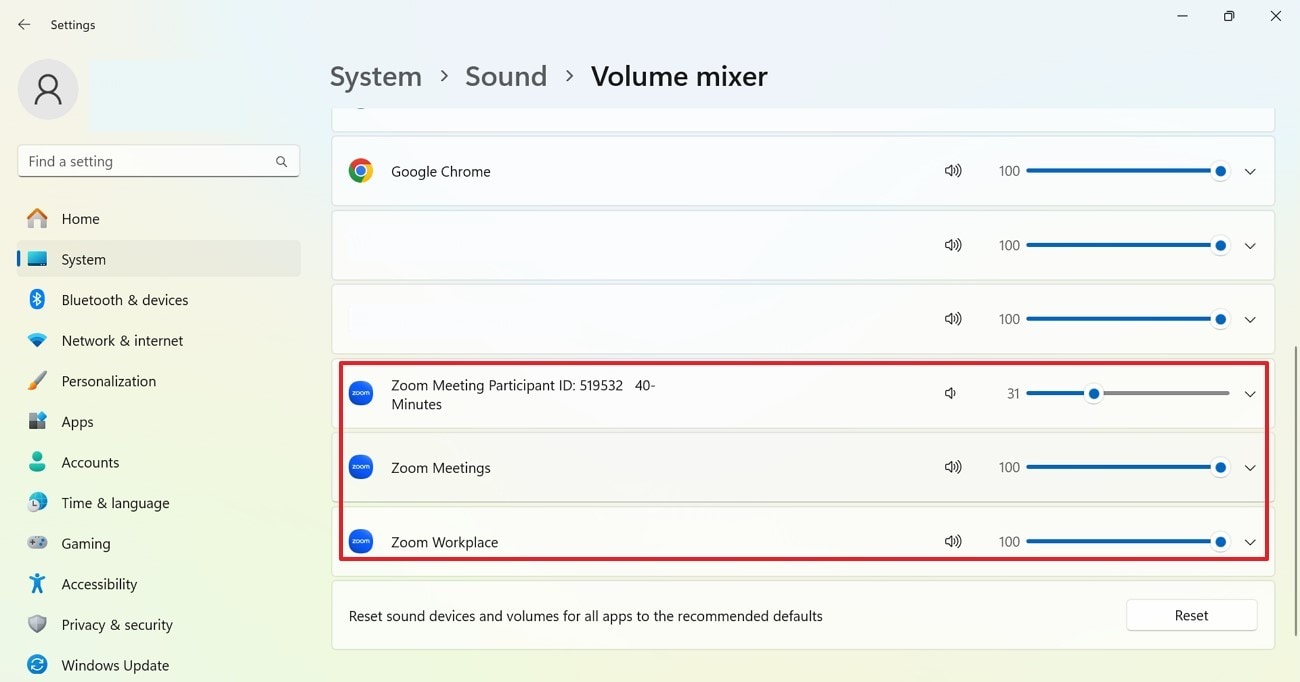
From the extended menu, choose the “Volume Mixer” gear icon to open the settings.
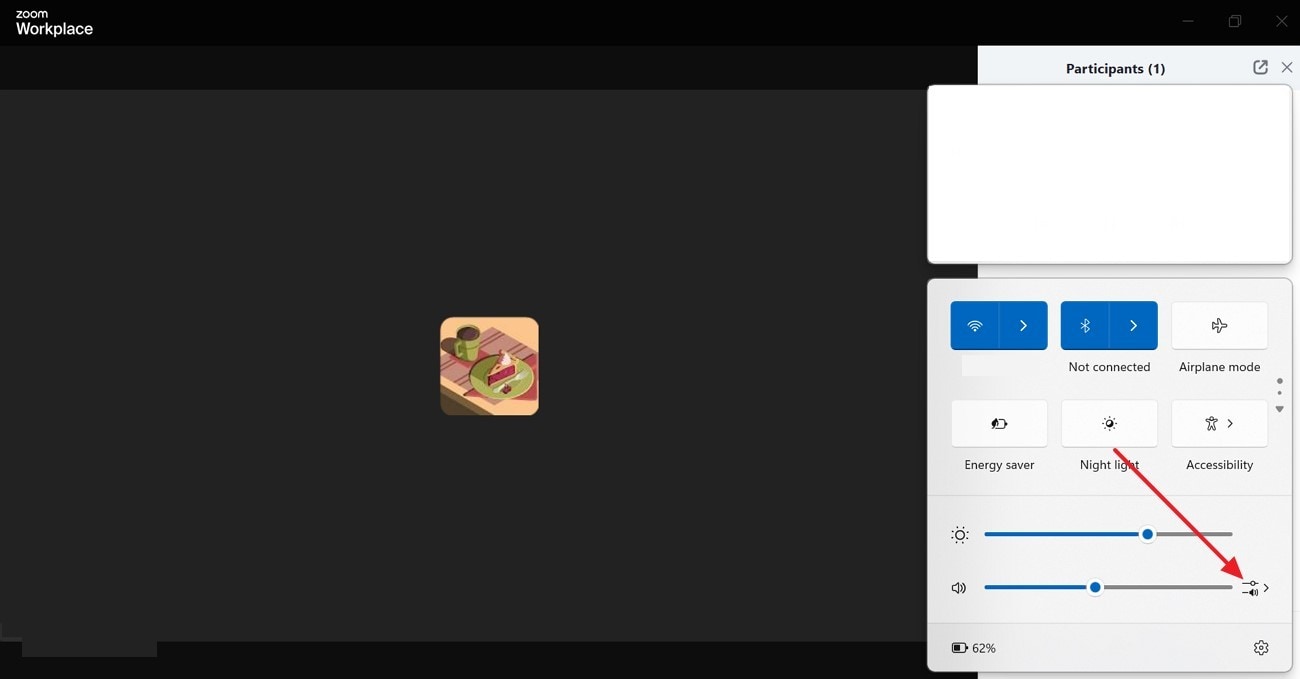
Step 3
Afterward, locate the “Zoom Meeting Volume Bar” in the Volume Mixer and click the “Speaker” icon beneath it to mute Zoom audio without affecting other apps or your system volume. You can also drag the volume bar to reduce or increase volume.

Accurate Batch Audio to Text Converter for Win and Mac
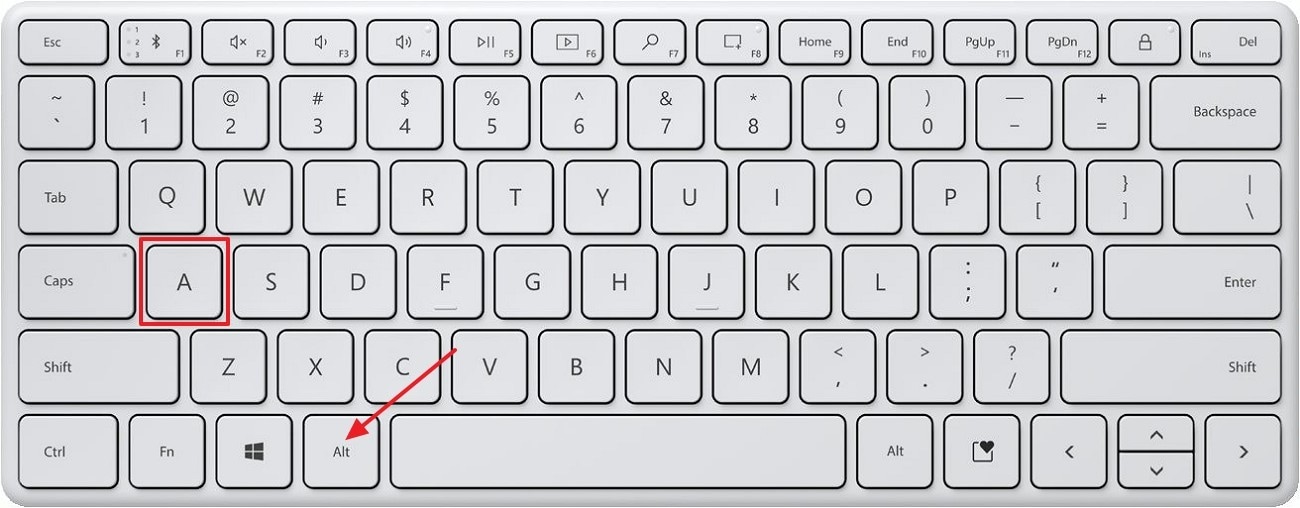
Part 4. How to Mute Zoom on PC by Shortcut?
You can use this method without drawing attention or fumbling through settings for easy access. It enables you to silence your meeting using keyboard shortcuts. This rapid and straightforward technique allows you to mute or unmute yourself immediately with a simple key press. For your assistance, the following section has a detailed guide on how to mute the mic on Zoom:
For Windows
When you want to disable or enable the microphone on a Windows PC, press the “Alt + A” key.
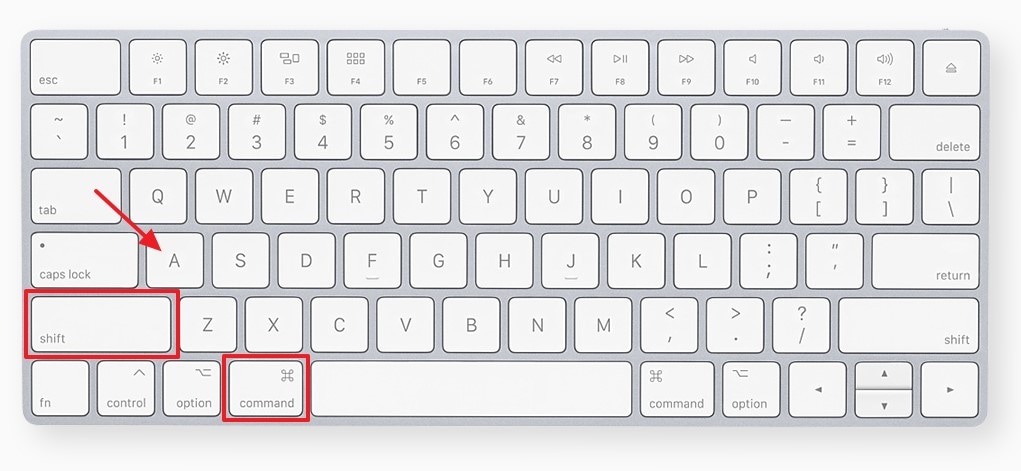
For Mac
- If you want to turn off your microphone on Mac with a shortcut, click the “Command + Shift + A”
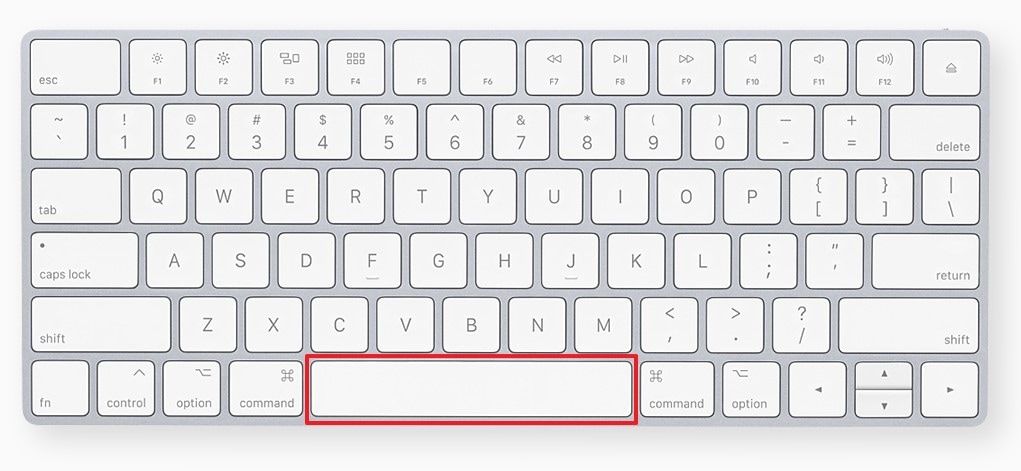
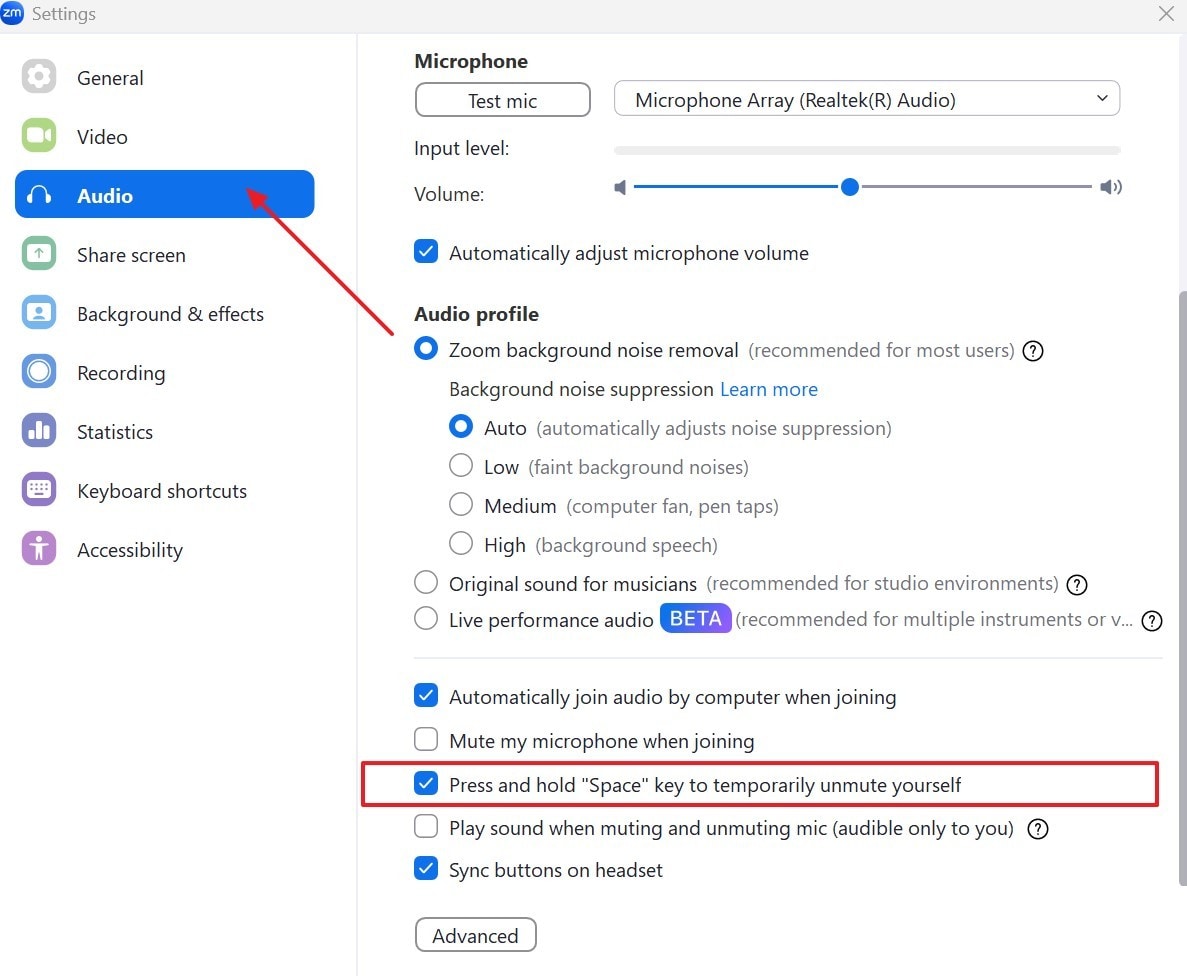
- For momentarily unmute (Push to Talk) on PC or Mac: Hold down the “Spacebar.”
The “Push to Talk” feature is convenient if you want to stay muted most of the time but still jump in to speak occasionally. This unmutes while you hold down the spacebar and then automatically mutes you as you release the key. They’re discreet, fast, and perfect for avoiding awkward delays when you need to speak. For the detailed steps on how to enable this feature, follow the given instructions:
Instructions. Access the app on your PC or Mac and select the “Gear” icon in the upper right corner to access your settings. Next, choose the “Audio” option from the menu on the left side. Then, select the checkbox beside “Press and hold the SPACE key to temporarily unmute yourself.”
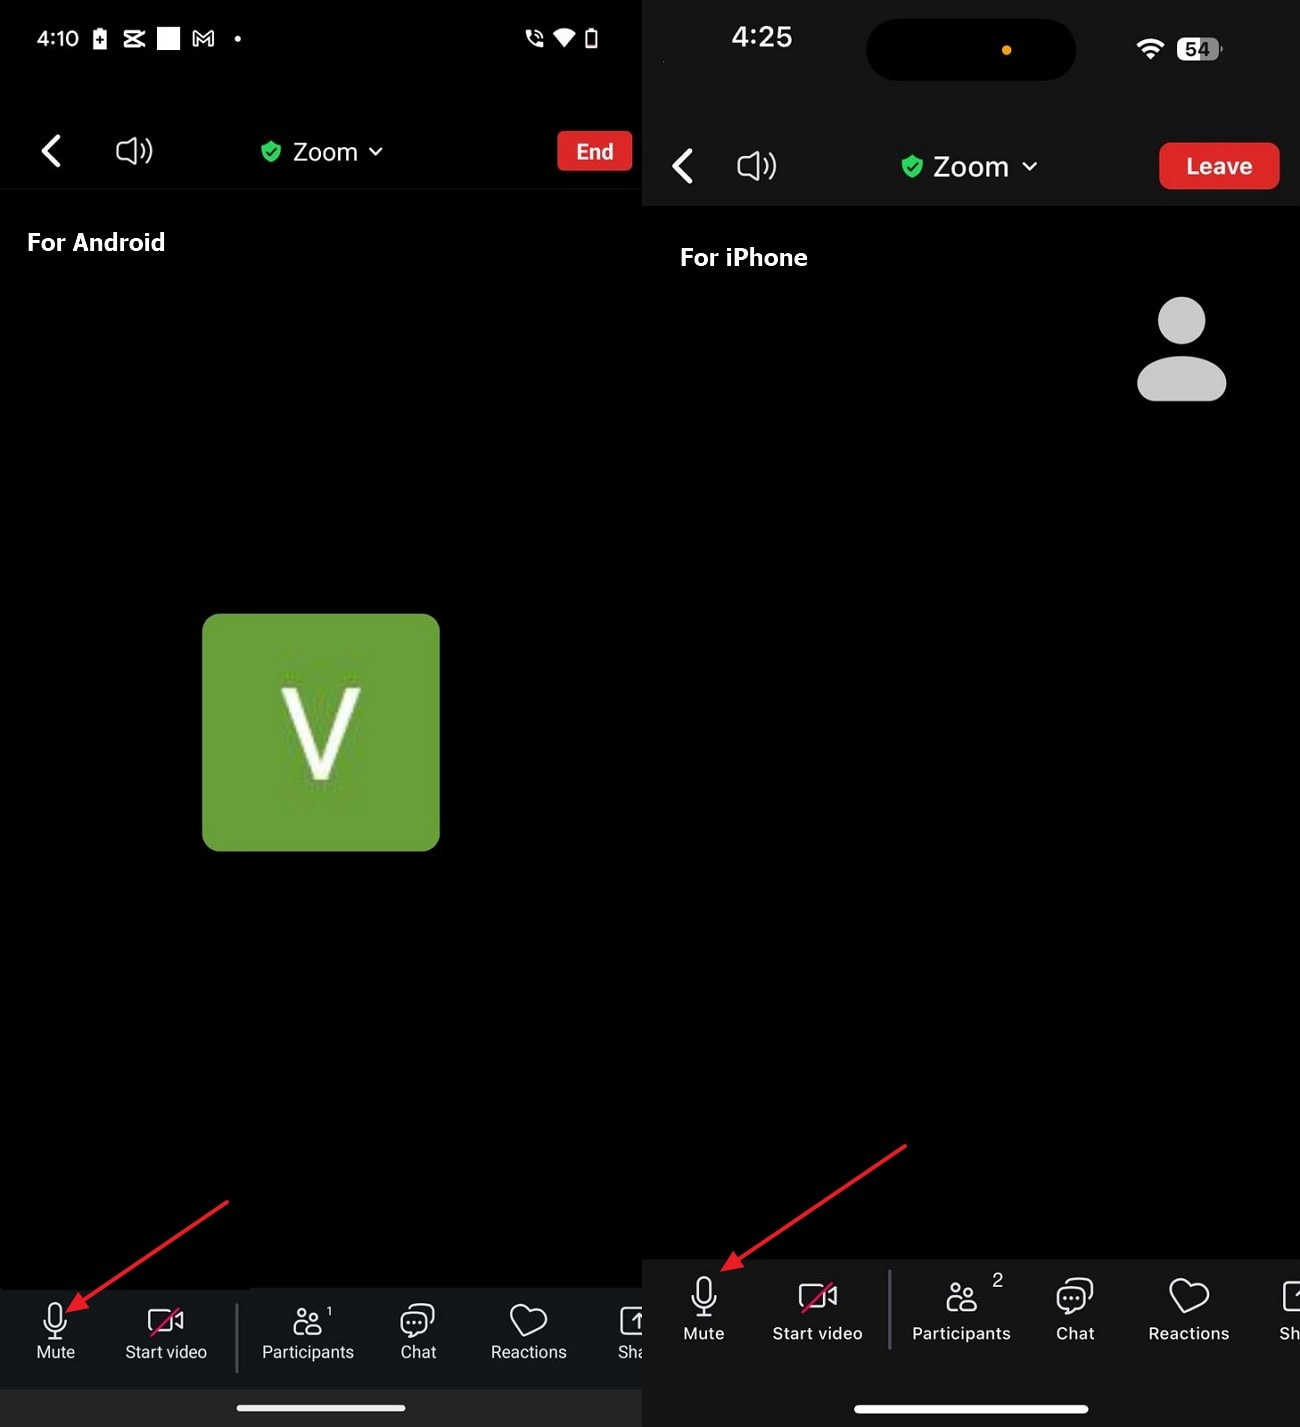
Part 5. How to Mute Zoom on Mobile?
Disabling the microphone on Zoom is quite simple when carried out on a smartphone or tablet, and it allows easy audio management. Regardless of the operating system, an iPhone and Android both have the mute function operating in the same manner. This method is perfect for on-the-go users who need to join meetings from anywhere and still want to maintain control over background noise. Here is how to turn off the microphone in Zoom on mobile:
Instructions. Open the meeting room, look for the “Mic” icon on the bottom panel of the screen. Then, tap the “Microphone” icon once to mute yourself. The red line will come through it, which shows that you've been muted.
Accurate Batch Audio to Text Converter for Win and Mac
Part 6. How to Easily Transcribe Recorded Zoom Meetings in Batch for Review
Now that you know how to mute audio in Zoom, what if you want to review what was discussed afterward, without watching the entire recording again? Maybe you missed a key point, need to create meeting notes, or want to keep a searchable record of everything said. Therefore, you can use Wondershare UniConverter to transcribe multiple videos with a 95% accuracy rate instantly.
Additionally, it converts your video into a .txt format, allowing for easy reading, searching, and sharing of the meeting material. The tool will enable you to select the file destination for exporting the transcribed video. Users have the option to choose from as many as 20 languages to transcribe their Zoom recordings, making it perfect for multilingual teams and worldwide cooperation.
Other Key Features
- UniConverter lets you add subtitles to your recorded Zoom meeting, allowing for better clarity and accessibility.
- You can choose the font style, such as Elegant, Minimal Playful, etc., with a wide range of color options in the subtitle editor.
- Within the subtitle editor, it allows you to change the position of the titles from top to bottom anywhere you like after adding subtitles.
A Detailed Guideline to Transcribe Your Video Using UniConverter
After learning how to mute a Zoom meeting, the following section will give you a detailed guide on how to use this tool for transcribing:
Step 1. Access the Tool and Select the Speech to Text
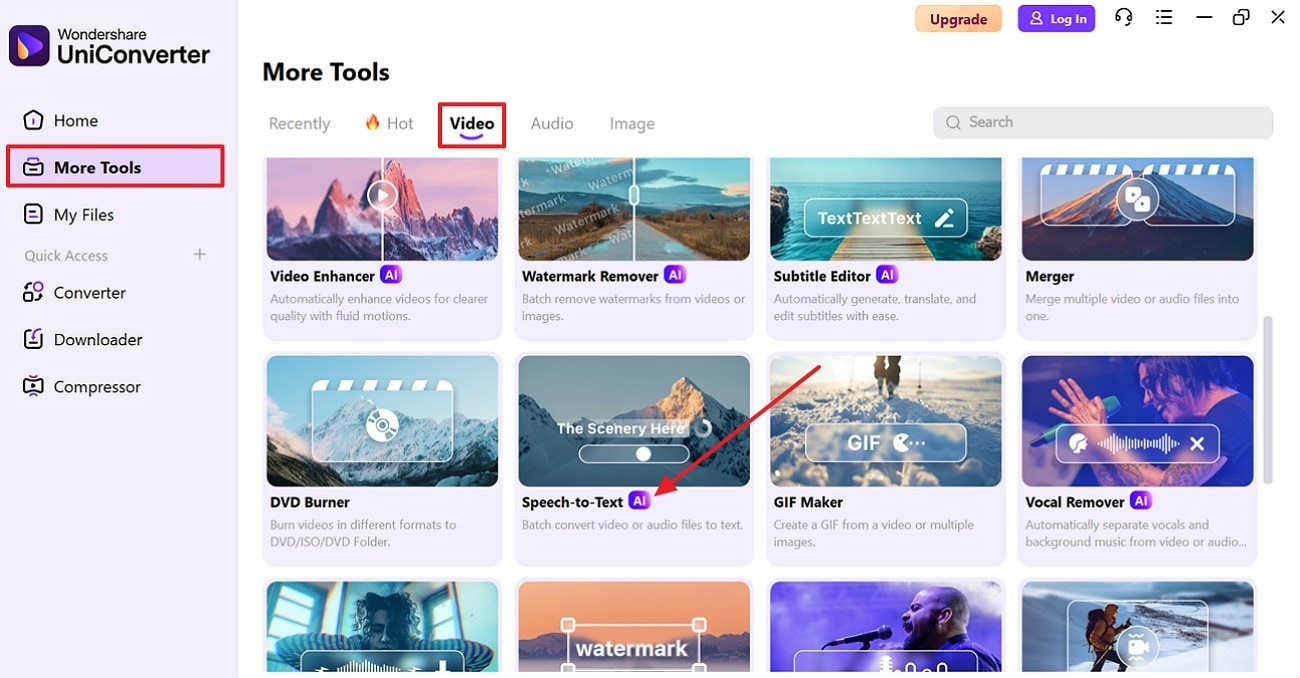
Open UniConverter and go to the “More Tools” section from the left panel, and choose the “Video” to pick the “Speech to Text” tool.
Step 2. Add a Recorded Zoom Meeting
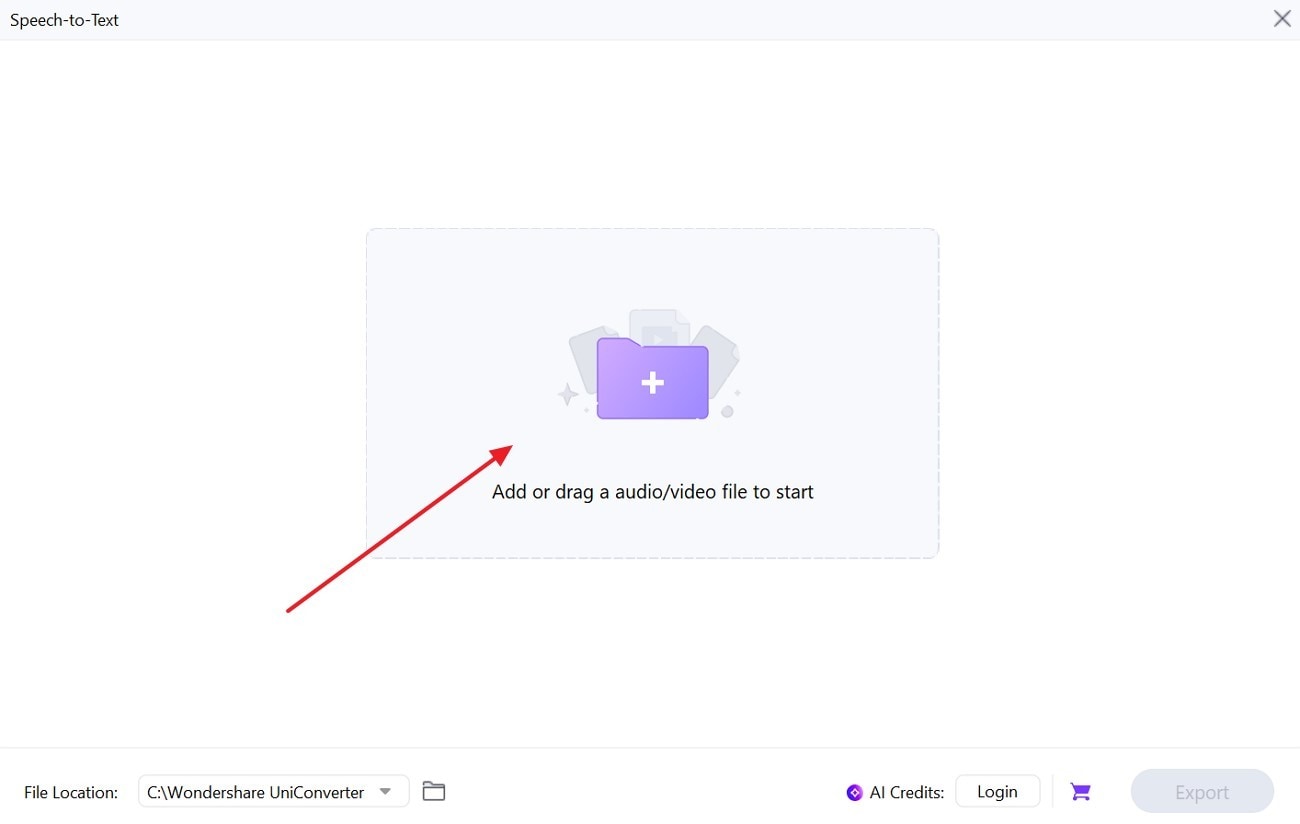
Afterward, press the “Add or Drag Audio/Video Files Here” button to import the target video from your device.
Step 3. Choose the Transcription Language and Export
Next, press the “Downward” arrow beside the “Voice Language” option to expand the list and choose the desired one from the options. Finally, click on "Export" to download the transcribed zoom video to your device.
Conclusion
To sum up, it is crucial to handle audio in meetings beyond mere formality to confirm effective communication and foster a professional atmosphere. That’s why this guide has offered you comprehensive instructions on how to mute Zoom audio without muting the computer. Also, if you record meetings for future reference, don’t waste time manually re-watching them. In fact, you should transcribe your several recordings at once using a clever program like Wondershare UniConverter.
Accurate Batch Audio to Text Converter for Win and Mac
FAQs
-
1. Can you mute all participants at once if you're a Host?
Indeed, you can turn off everyone’s mic in a meeting by clicking the "Participants" tab and selecting "Mute All." This is especially useful in large group calls to reduce background noise and maintain order. -
2. Why can't I unmute myself in a Zoom meeting?
If the host has disabled the setting that allows participants to unmute themselves, you won’t be able to speak until they grant permission. Even if you know how to mute the mic in Zoom, the host’s controls will restrict the unmute option during the meeting. -
3. Can I mute Zoom notifications but keep the audio?
Indeed, you can disable chat sounds and pop-up notifications in the application’s settings while still hearing participants speak during meetings. This is a great way to stay focused while keeping your ears open for key points. -
4. Is it possible to transcribe live Zoom meetings in real-time?
The app offers live transcription (closed captions) for Pro accounts and above, but it may not be 100% accurate. For more precise results, record the session and use a tool like UniConverter to transcribe it later.

