
Imagine trying to read a street sign through a foggy window versus a crystal-clear glass pane. That is the fundamental visual gap when comparing HD vs SD video. In the fast-evolving world of digital media, understanding the difference between SD and HD is more than just counting pixels; it is about the experience, storage efficiency, and compatibility. Whether you are archiving old family memories recorded in SD video or streaming the latest blockbuster in high definition, knowing the nuances of HD & SD ensures you get the best viewing quality.
This comprehensive guide dives deep into the HD SD difference, helps you choose the right format, and reveals the ultimate SD to HD video converter tools to revitalize your footage.
- SD video is suitable for low-bandwidth environments, quick sharing, or legacy devices, while HD video delivers sharper visuals for modern displays and platforms.
- Converting between SD and HD involves trade-offs in quality, resolution, and processing time.
- For users working with multiple files, batch conversion becomes critical. Wondershare UniConverter works as a batch SD and HD video converter, allowing users to efficiently convert SD to HD, optimize video settings, and maintain consistent output quality across large video libraries.
In this article
Part 1. What are SD Video and HD Video
SD Video
Definition of SD video
SD stands for Standard Definition. For decades, this was the industry standard for broadcast television and early digital video recording. Think of SD video as the "paperback book" of the video world—reliable, accessible, and functional, even if it lacks the glossy finish of a premium print. It relies on a lower pixel count to render images, which was sufficient for the CRT (tube) televisions of the past.
Common SD resolutions (480p, 576p)
The resolution of a video is defined by the number of pixels displayed on the screen. SD video typically refers to resolutions of:
- 576p (PAL): 720 x 576 pixels, the standard for Europe, Australia, and parts of Africa/Asia.
Typical use cases of SD video
While it may seem outdated, SD video is still widely used in specific scenarios:
- DVDs: Standard DVDs are natively 480p or 576p.
- Low-bandwidth Streaming: When the internet connection is poor, platforms like YouTube automatically drop to SD (360p or 480p) to prevent buffering.
- Legacy Broadcasts: older TV shows and news archives.
Pros:
- Significantly smaller file sizes
- It has faster streaming on slow networks
- Compatible with virtually any device ever made
Cons:
- Low visual fidelity
- Appears blurry or "blocky" on modern large 4K screens
- It lacks fine detail
HD Video
Definition of HD video
HD, or High Definition, is the modern standard that replaced SD. If SD is a foggy window, HD is a freshly cleaned one. It offers a significantly higher pixel density, allowing for sharper images, better color accuracy, and a 16:9 widescreen aspect ratio that fits modern monitors and TVs perfectly.
Common HD resolutions (720p, 1080p)
HD and SD differ primarily here. HD usually starts at:
- 720p (HD Ready): 1280 x 720 pixels. The entry point for high definition.
- 1080p (Full HD): 1920 x 1080 pixels. The current "sweet spot" for most web content, Blu-rays, and streaming services.
Advantages of HD video quality
- Crisp Detail: Text is readable, textures are visible, and faces are distinct.
- Vibrant Colors: HD standards often support wider color gamuts than SD.
- Widescreen: Native 16:9 aspect ratio eliminates the black bars often seen with old 4:3 SD content.
When HD video is preferred
HD is the go-to for almost everything today: YouTube uploads, streaming movies (Netflix, Hulu), professional presentations, and social media content (TikTok/Instagram Reels often favor 1080p).
Pros:
- It offers significantly smaller file sizes.
- Its lower bandwidth requirement allows for faster streaming on slow networks.
- It boasts near-universal compatibility with virtually any device.
Cons:
- It has inherently low visual fidelity.
- It can appear blurry or "blocky" when displayed on modern large 4K screens.
- It lacks the fine detail found in higher-resolution formats.
Part 2. HD vs SD Video: Key Differences Explained
To truly grasp the HD SD difference, we need to break down the technical metrics that separate them.
Resolution Comparison (SD vs HD)
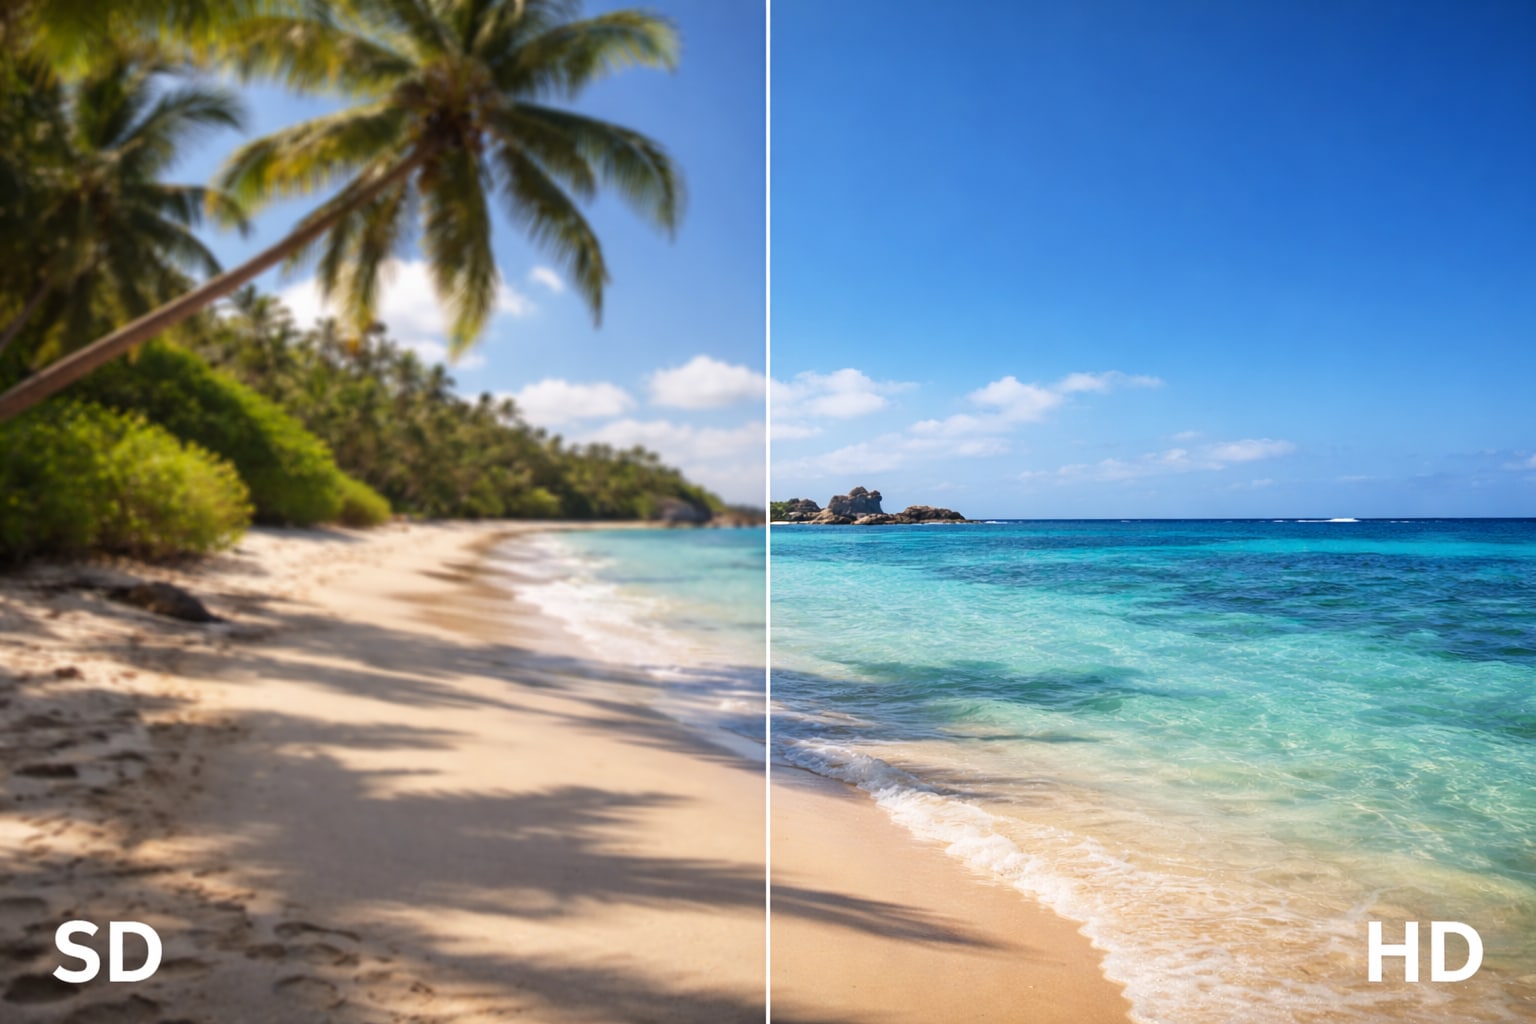
Pixel dimensions: The most obvious difference between SD and HD is the sheer number of pixels. A 480p SD image contains about 345,600 pixels. In contrast, a 1080p HD image contains over 2 million pixels. That is roughly 6 times more visual information in the same frame.
Visual sharpness differences: This pixel density translates directly to sharpness. On a small phone screen, an SD video might look acceptable. However, stretch that same video onto a 55-inch TV, and the image breaks down—edges become jagged (aliasing), and the picture looks soft. HD maintains its integrity on larger displays, keeping edges sharp and details intact.
Video Quality and Clarity
Detail level: In an HD SD video comparison, HD captures nuances that SD misses entirely—individual strands of hair, the texture of fabric, or leaves on a distant tree. SD tends to "smudge" these fine details together.
Viewing experience on modern screens: Modern screens are optimized for HD or 4K. Playing SD video on these screens requires the device to "upscale" the image, often resulting in a muddy look. HD content maps 1:1 (or closer to it) with modern displays, providing an immersive experience.
File Size and Storage
Storage requirements: Here is where SD wins. Because it holds less data, it takes up less space. A 1-hour movie in SD might be 700MB to 1GB. The same movie in Full HD (1080p) could range from 3GB to 6GB, depending on compression.
Compression impact: SD to HD converter tools often have to deal with compression artifacts. SD video is often heavily compressed (using older codecs like MPEG-2), which can introduce "blockiness" in fast-moving scenes. HD uses newer codecs (like H.264 or H.265), which are more efficient at maintaining quality even at lower file sizes.
Streaming and Playback Performance
Internet speed requirements: Streaming HD and SD requires different bandwidths. SD can stream smoothly on connections as slow as 1-3 Mbps. HD (1080p) typically requires a stable 5-10 Mbps connection to avoid buffering.
Compatibility with devices: While every device can play SD, not every old device can handle high-bitrate HD. However, in 2026, practically any smartphone, tablet, or computer released in the last decade handles HD effortlessly.
HD vs SD Video Comparison Table
| Feature | SD Video (Standard Definition) | HD Video (High Definition) |
| Resolution | 480p (720x480), 576p (720x576) | 720p (1280x720), 1080p (1920x1080) |
| Pixel Count | ~340,000 to ~400,000 pixels | ~920,000 to ~2,000,000+ pixels |
| Aspect Ratio | Typically 4:3 (Square-ish) | Typically 16:9 (Widescreen) |
| File Size | Low (Small footprint) | High (Larger footprint) |
| Bandwidth | Low (1–3 Mbps) | Medium/High (5–15 Mbps) |
| Best For | Mobile data, old DVDs, archiving | Streaming, Blu-ray, large screens |
| Visual Quality | Basic, softer image | Sharp, detailed, realistic |
Part 3. When Should You Use SD or HD Video?
Choosing between HD vs. SD video depends entirely on your end goal.
Best scenarios for SD video
Email Attachments: Most email servers have a 25MB limit. SD is perfect for sending quick clips without using cloud storage.
Slow Internet Areas: If your target audience lives in a region with poor connectivity, SD ensures they can actually watch your content.
Internal Previews: Video editors often use low-resolution SD "proxies" to edit faster before switching to HD for the final render.
Best scenarios for HD video
Social Media & Branding: TikTok, YouTube, and Instagram favor high-quality content. SD videos can look unprofessional and lower engagement.
Professional Presentations: Displaying work on a projector or large monitor demands HD clarity.
Archiving Memories: If you are digitizing old tapes, upscale them to HD to preserve them in a format that will look good on future TVs.
Part 4. Best SD and HD Video Converters 2026
If you have old SD footage that needs an upgrade, or HD footage you need to shrink, you need a reliable SD to HD video converter. Here are the top tools for 2026.
Wondershare UniConverter (Best for PC/Mac)
Wondershare UniConverter is the Swiss Army knife of video tools. It isn't just a simple video SD to HD converter; it utilizes advanced AI to upscale video. Unlike basic converters that stretch the pixels (making them blurry), UniConverter's AI Video Enhancer analyzes the footage to add detail, reduce noise, and fix color balance during the conversion process. It supports over 1,000 formats and utilizes GPU acceleration for lightning-fast speeds. Beyond simple conversion, this robust desktop software serves as a complete multimedia suite. You can compress massive 8K files, record screens, burn DVDs, and edit clips with ease. For creators seeking a balance of professional power and drag-and-drop simplicity, UniConverter delivers the most reliable performance in 2025.
Best For: Professionals and enthusiasts who need high-quality AI upscaling, noise reduction, and high-speed batch processing.


SD & HD Video Converter for Flexible Quality Control
Pros:
- AI Upscaling: Converts SD to HD while actually improving visual quality.
- Blazing Speed: GPU acceleration makes it one of the fastest batch converters on the market.
- All-in-One: Includes editor, compressor, burner, and downloader.
- Broad Support: Handles over 1,000+ formats, ensuring compatibility with any device.
Cons:
- Advanced AI features require the full version.
- Software installation required (not web-based).
HandBrake (Open Source Desktop Tool)
HandBrake remains the gold standard for open-source video transcoding, loved by tech enthusiasts for its reliability and granular control. Completely free to use, it excels at converting high-bitrate HD files down to manageable SD sizes or switching modern codecs like H.265 (HEVC) to save space without sacrificing quality. While it lacks the AI-driven upscaling features found in premium tools, it makes up for it with deep customization options—allowing users to tweak everything from frame rates and audio channels to specific encoder presets. It is the perfect tool for users who understand the technical side of video and need a robust, no-cost solution for batch processing and file compression on Windows, Mac, or Linux.
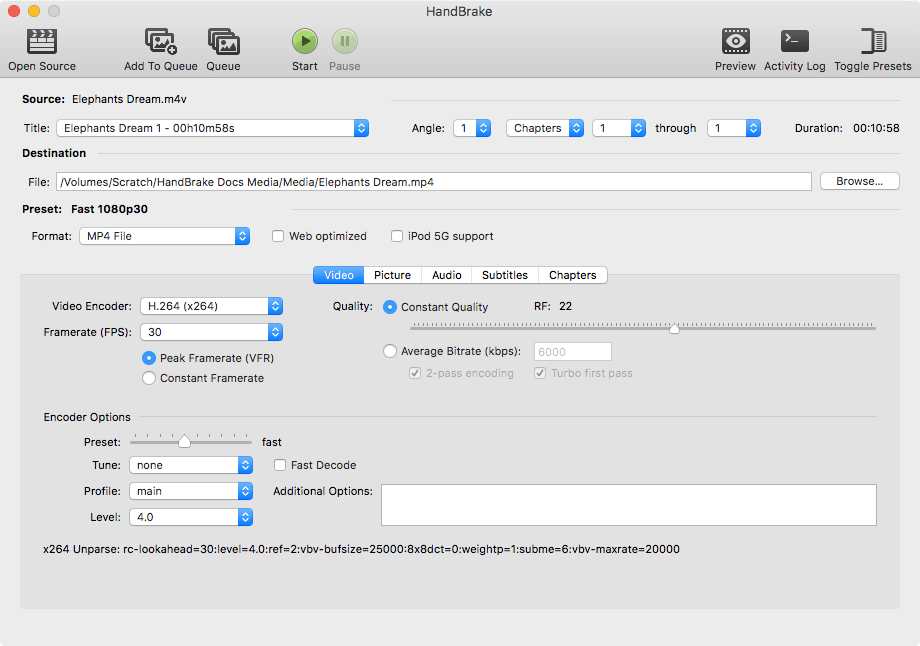
Pros:
- Completely Free: Open-source with no watermarks or hidden costs.
- Deep Control: Allows precise adjustment of bitrate, framerate, and audio tracks.
- Efficient: Great for reducing file sizes (HD to SD) without noticeable quality drops.
Cons:
- No AI Upscaling: Converting SD to HD only stretches the image; it does not add detail.
- Complex Interface: Can be intimidating for beginners due to technical jargon.
Online-Convert (Web-Based)
For users who need a quick fix without the hassle of installing software, Online-Convert.com is the go-to web-based solution. It stands out for its sheer versatility, supporting conversion between hundreds of formats, including obscure ones that desktop tools might miss. In 2025, it continues to offer a straightforward "drag-and-drop" experience where you can upload an SD video, select your target HD resolution (like 1080p), and let the cloud servers handle the processing. It is particularly useful for one-off tasks on shared computers or Chromebooks. While it doesn't offer advanced AI restoration, its commitment to privacy—automatically deleting files after 24 hours—makes it a trusty companion for quick, on-the-fly format changes.
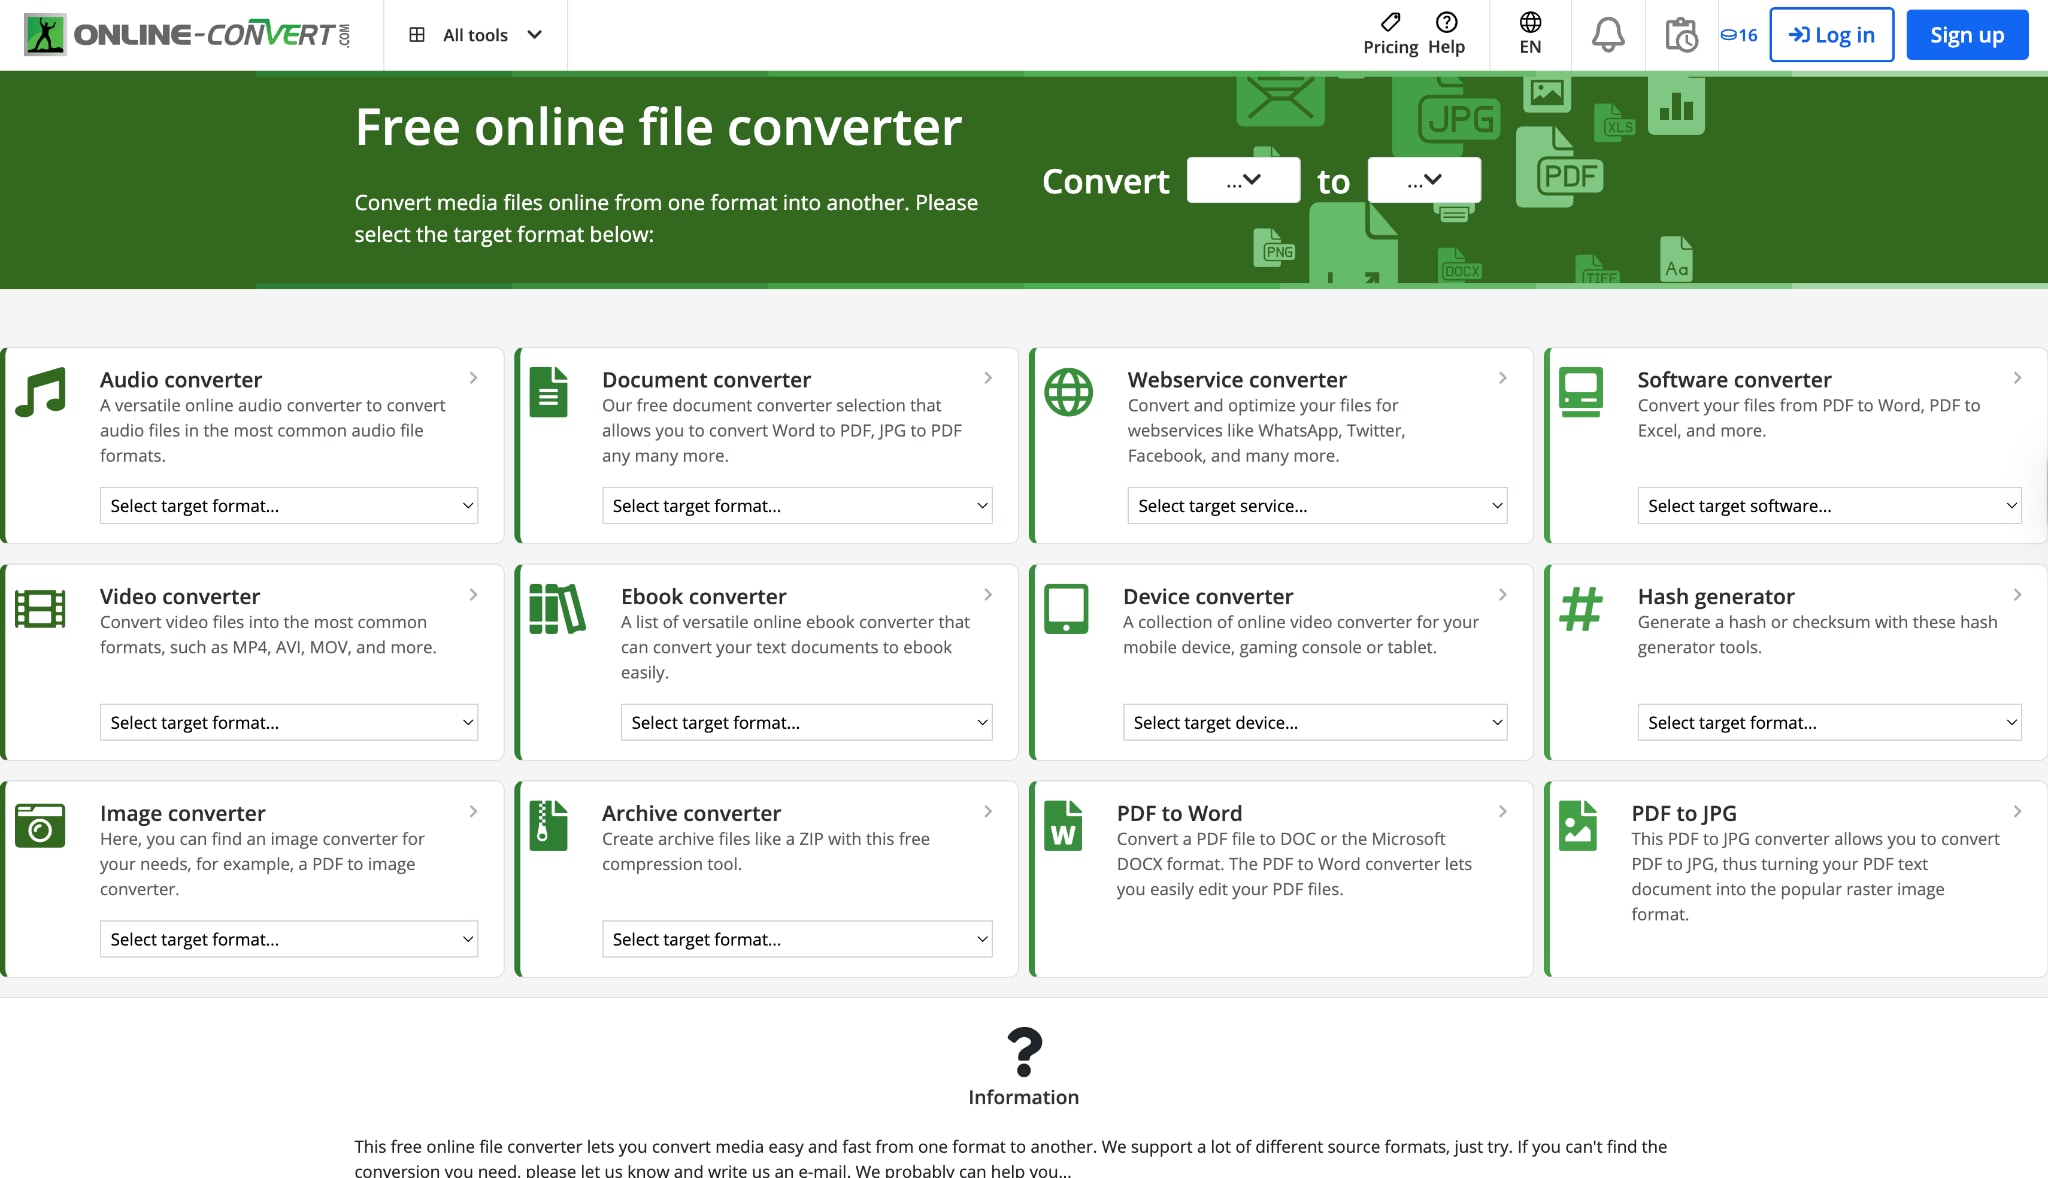
Pros:
- No Installation: Works entirely in your web browser on any OS (Windows, Mac, ChromeOS).
- Broad Format Support: Converts almost any file type you can throw at it.
- Privacy: Automatically deletes uploaded files from servers after 24 hours.
Cons:
- Internet Dependent: Upload and download speeds depend entirely on your internet connection.
- Limited File Size: The free version has strict limits on file size and conversion speed.
CapCut (Mobile App)
CapCut has taken the mobile editing world by storm, and for good reason—it puts professional-grade tools right in your pocket. While primarily a video editor, its "Export" features effectively function as a converter, allowing creators to take 480p clips and save them as crisp 1080p or 4K files optimized for social media algorithms. Its standout feature for 2025 is the "Smart Sharpen" and "Reduce Noise" tools, which use lightweight AI to instantly clean up grainy footage. It is the ideal choice for influencers and social media managers who need to shoot, edit, polish, and publish content directly from their smartphones without ever touching a computer. It bridges the gap between editing and converting effortlessly.
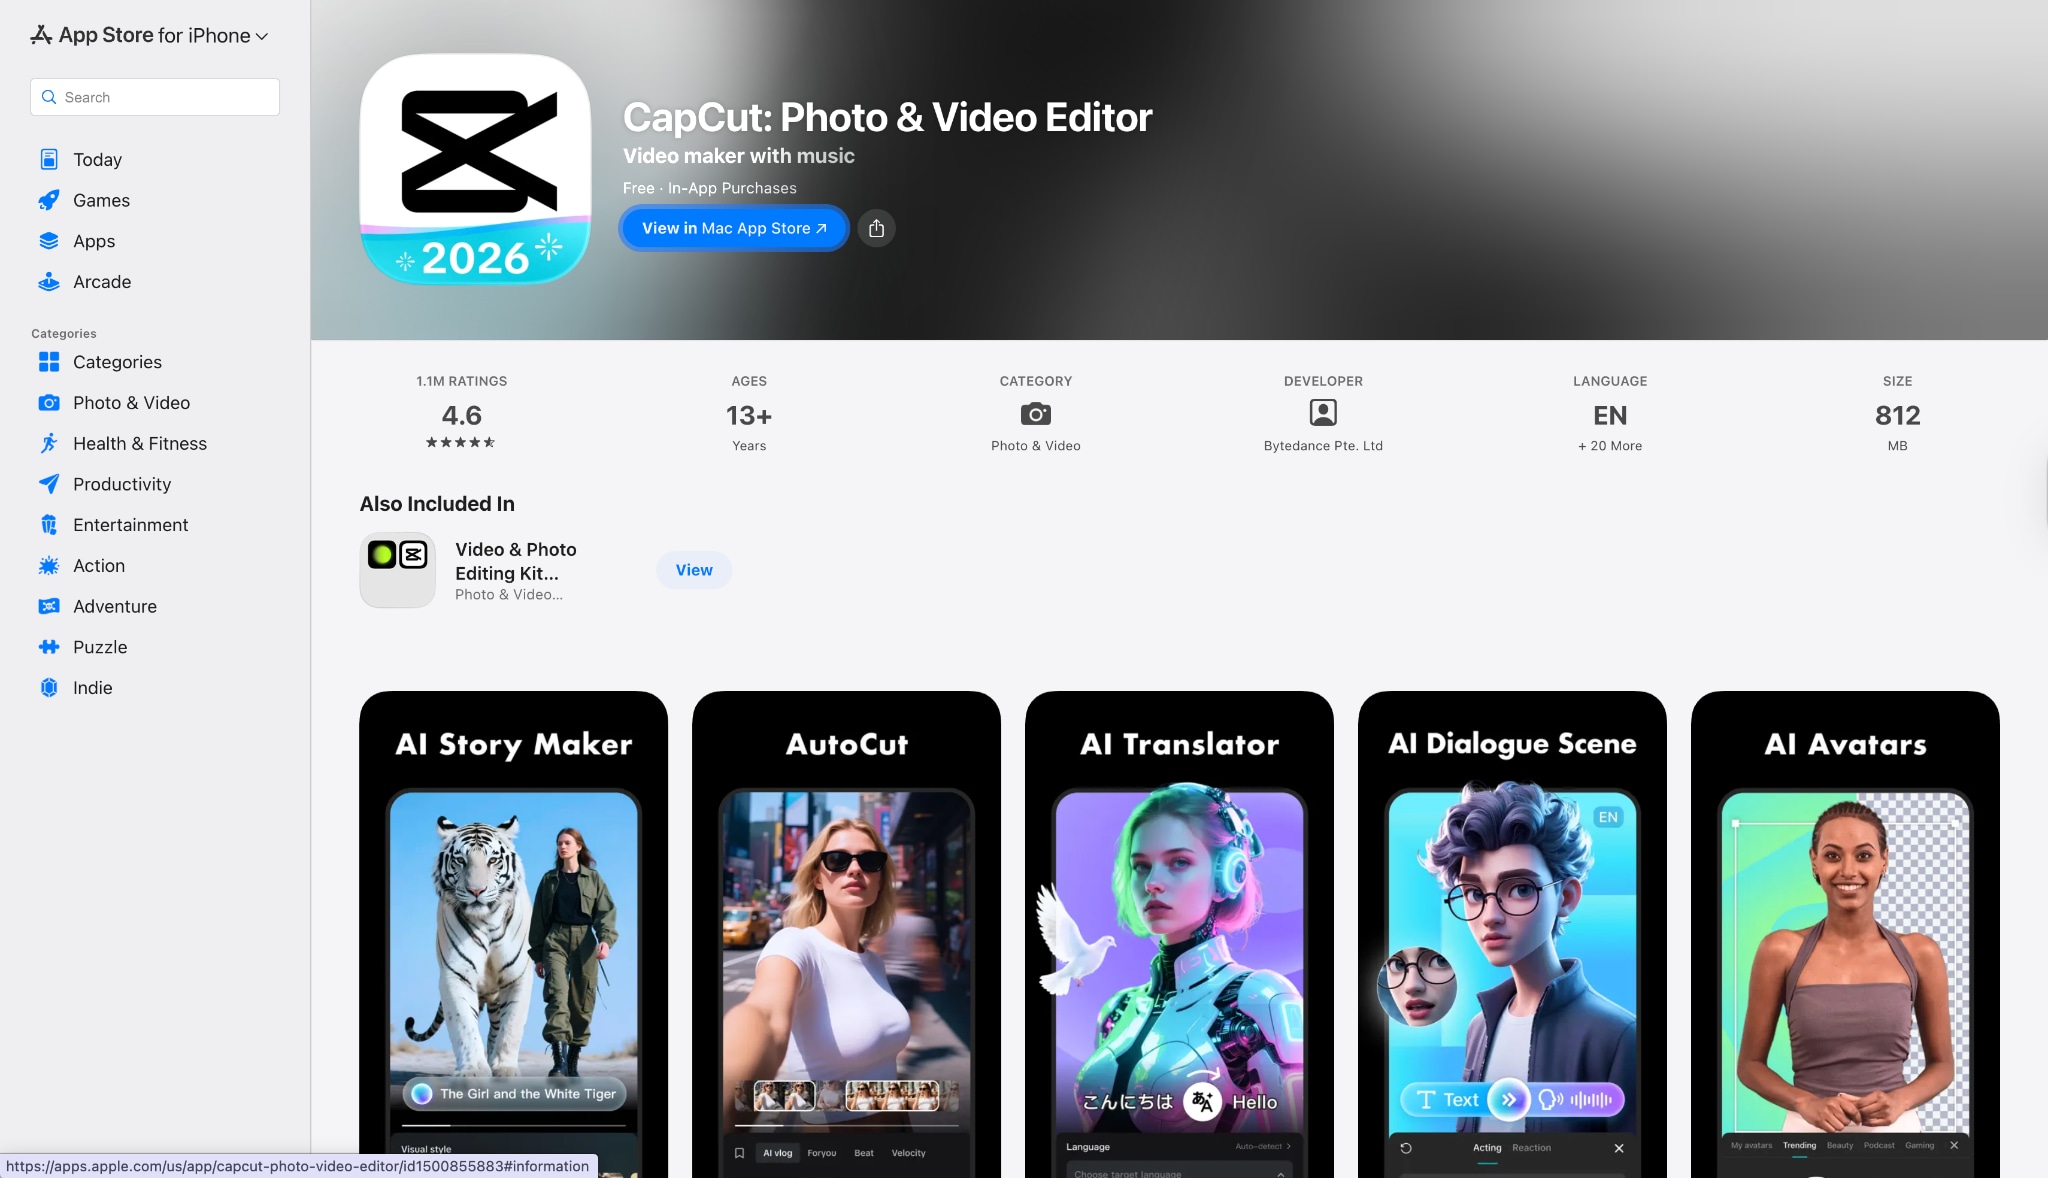
Pros:
- Mobile Convenience: Edit and convert videos directly on your phone.
- Smart Enhancements: Built-in filters and basic AI tools instantly sharpen videos.
- Direct Sharing: Exports directly to social platforms like TikTok in the correct ratio.
Cons:
- Resource Heavy: Can lag or crash on older smartphones when processing high-quality video.
- Limited Control: Fewer technical export settings (bitrate, codec) compared to desktop converters.
Part 5. Bonus Guide: How to Easily Batch Convert SD to HD Videos
Simply changing the resolution from 480p to 1080p often results in a blurry mess. To truly convert SD video to HD quality, you need a tool that enhances the footage. Here is how to use Wondershare UniConverter to achieve professional results.
Scenario A: Converting SD to HD with Quality Enhancement (AI)
Step 1: Access the AI Video Enhancer

Step 2: Import Your SD Footage
Once the Video Enhancer window opens, you will see a central area designed for importing your low-resolution media. Click the purple "+ Add Video" button in the center or drag and drop your SD video files directly into the interface. You can add multiple clips here to perform batch processing on several videos at once.

Step 3: Select AI Model and Resolution
Navigate to the "Choose AI Model" sidebar on the right and select the best option for your clip, such as "Face Enhancement" or "Quality Restoration." After selecting a model, choose your desired upscaling factor, such as "4X (5120 x 2880)," to significantly boost the resolution.
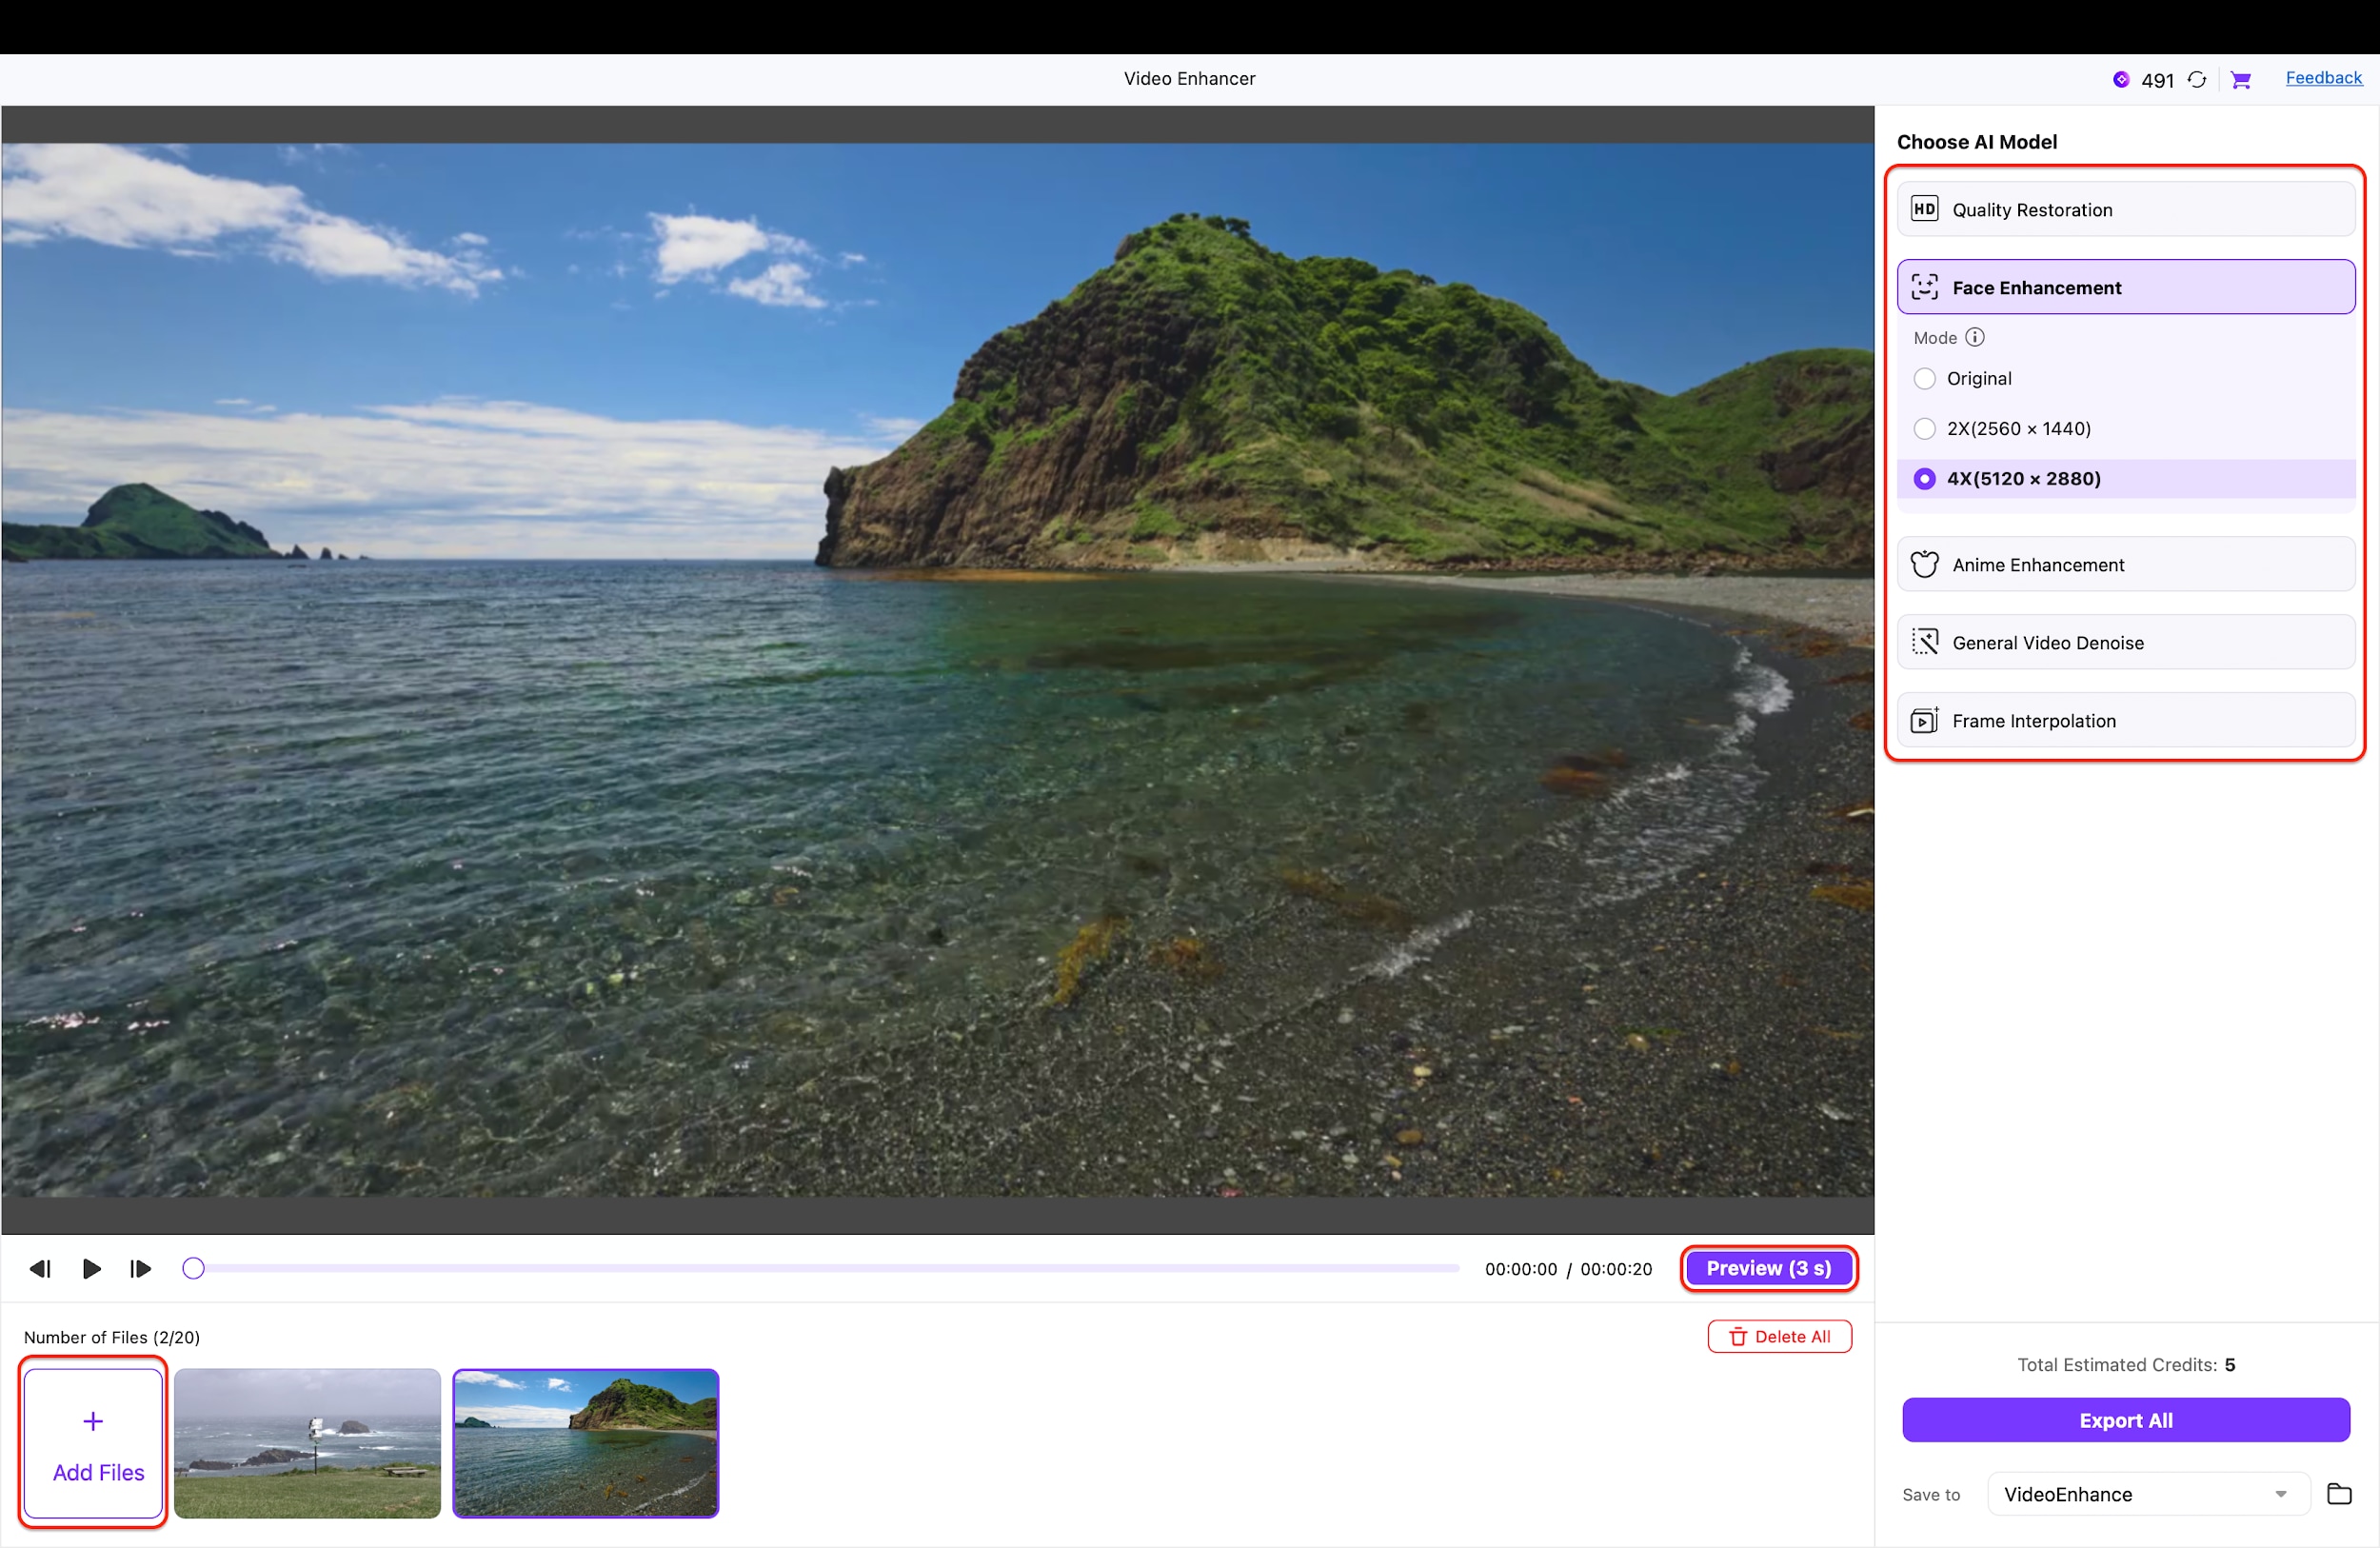
Pro Tip: If your footage features human subjects (or want to upscale your image to 2x or 4x), select the "Face Enhancement" model to specifically sharpen facial features while upscaling the rest of the frame.
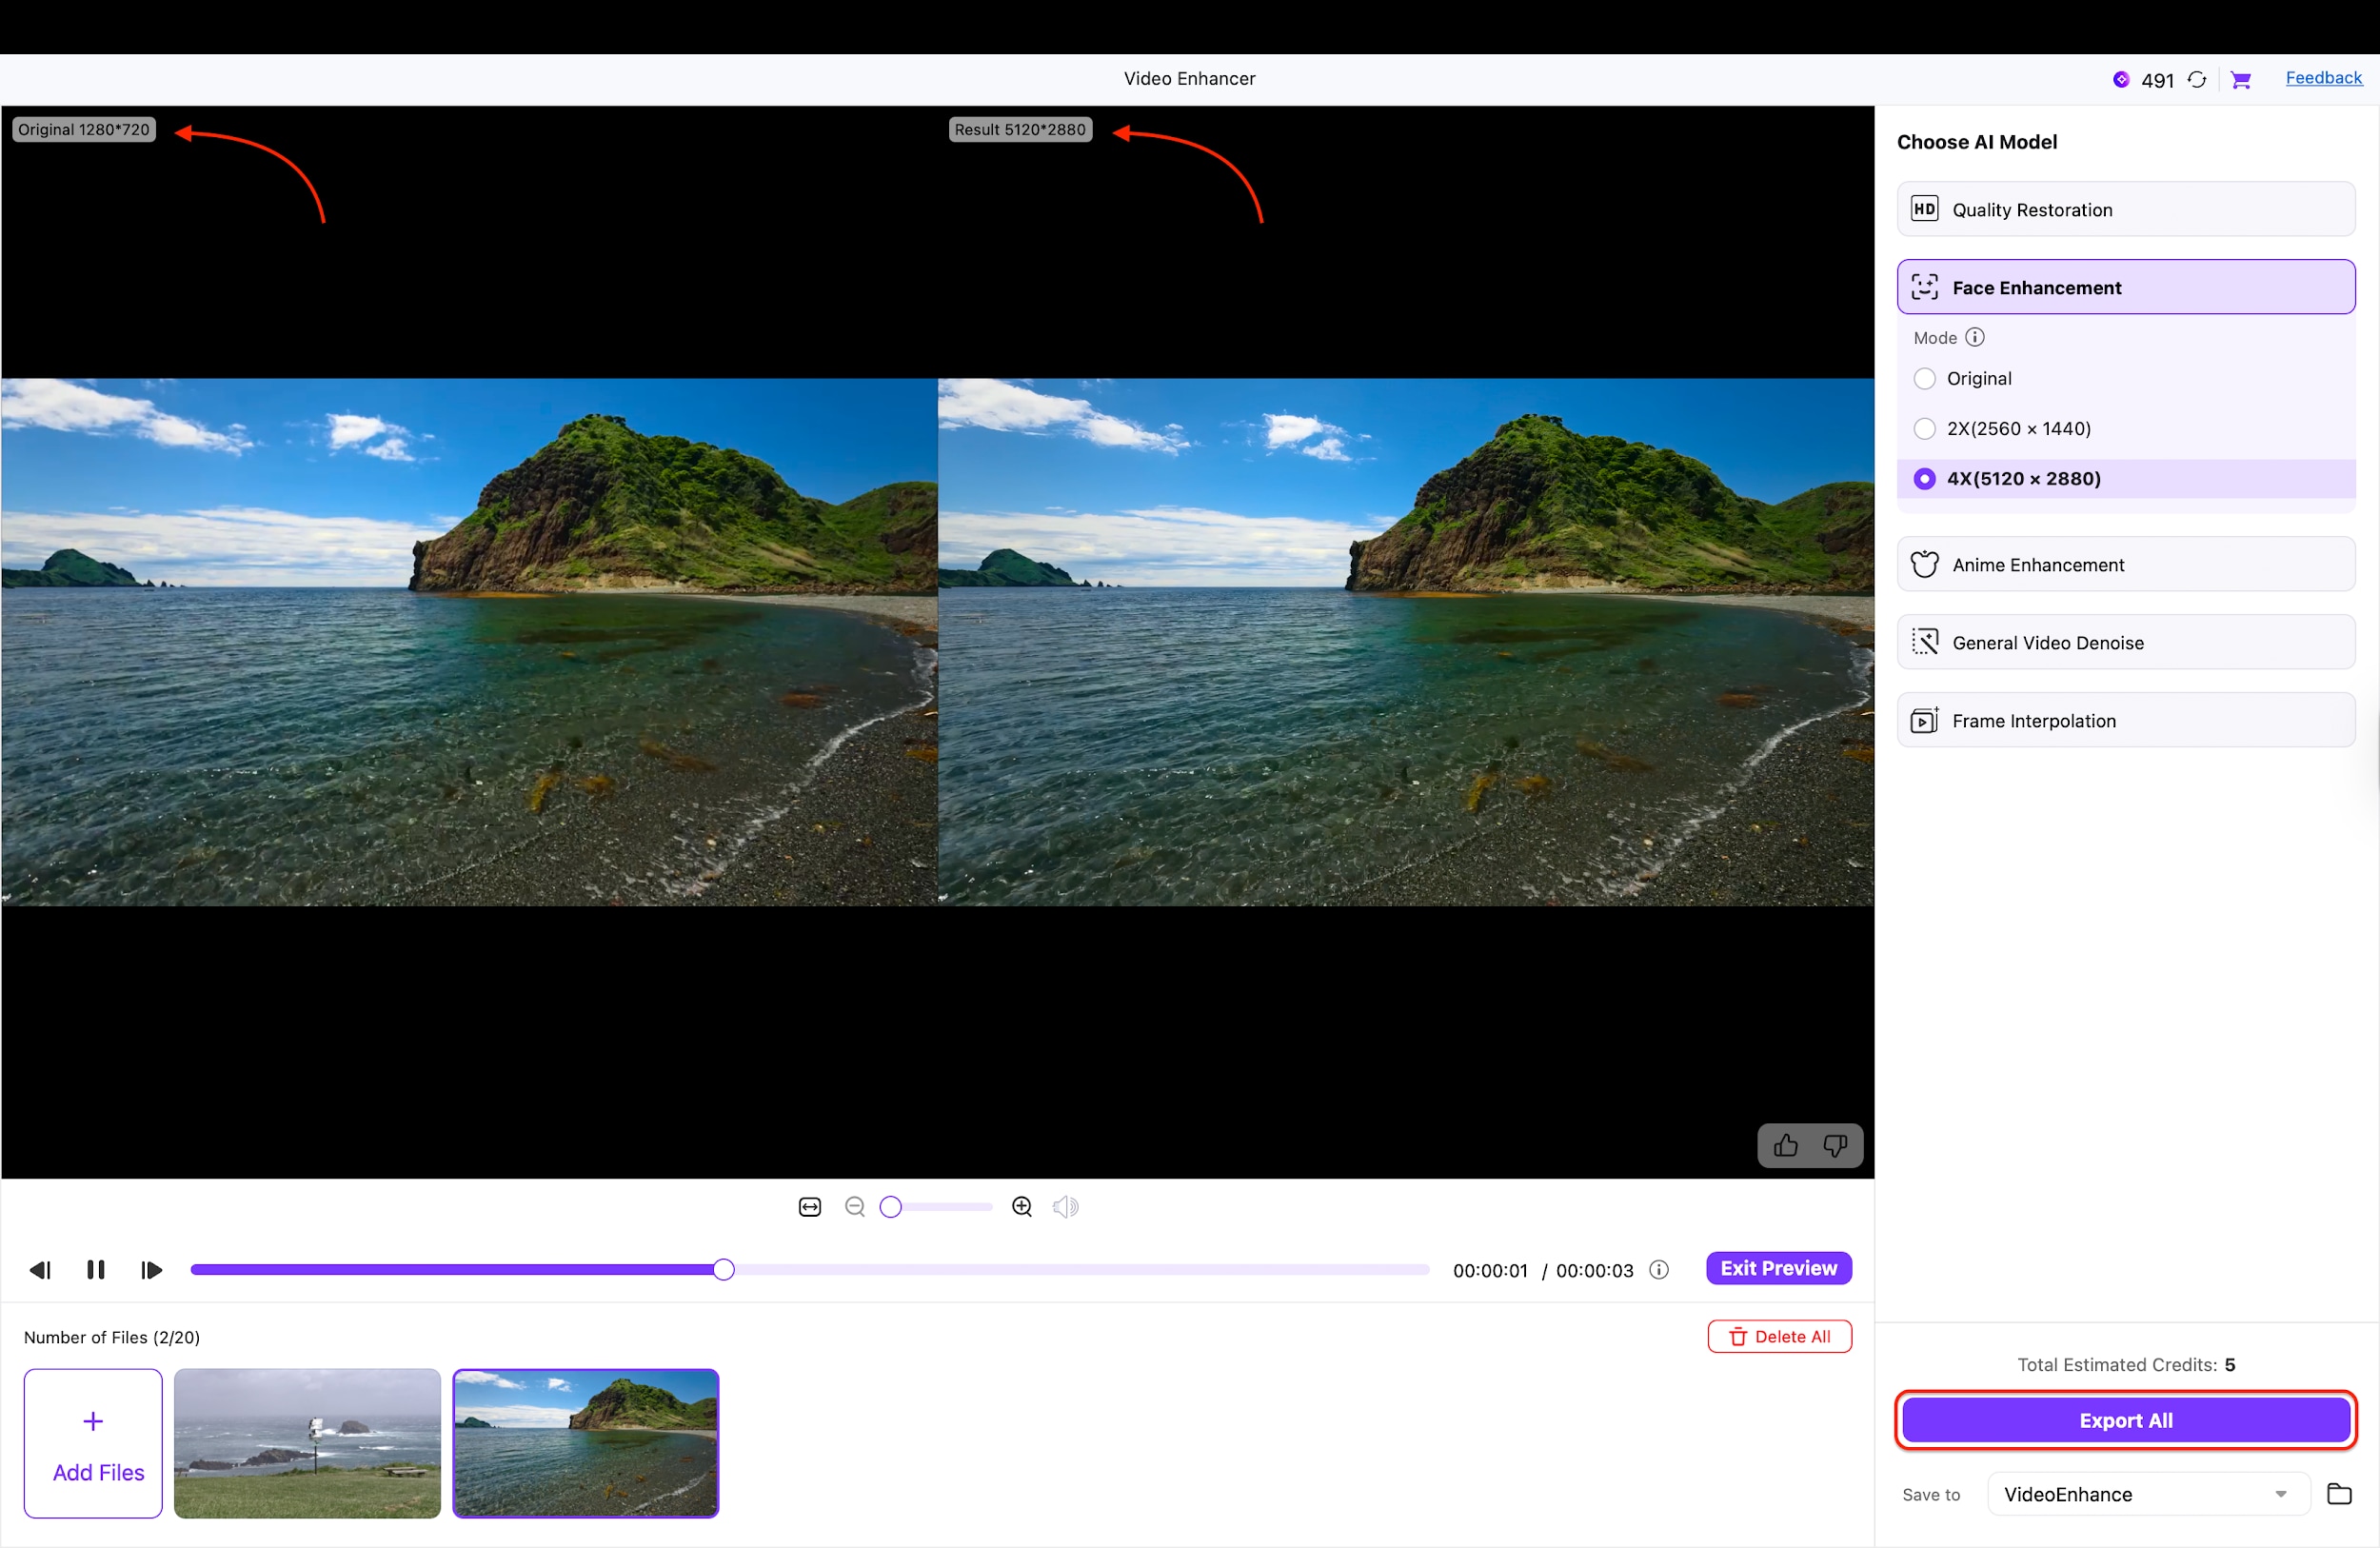
Step 4: Preview and Export
Click the "Preview" button to generate a comparison that shows the "Original" SD quality alongside the enhanced "Result." Review the split-screen view to ensure the sharpness and detail meet your expectations before finalizing the process. Finally, click the "Export All" button at the bottom right to save your newly converted high-definition video files.
Scenario B: Converting HD to SD (to save space)
Step 1: Open the Video Converter Tool
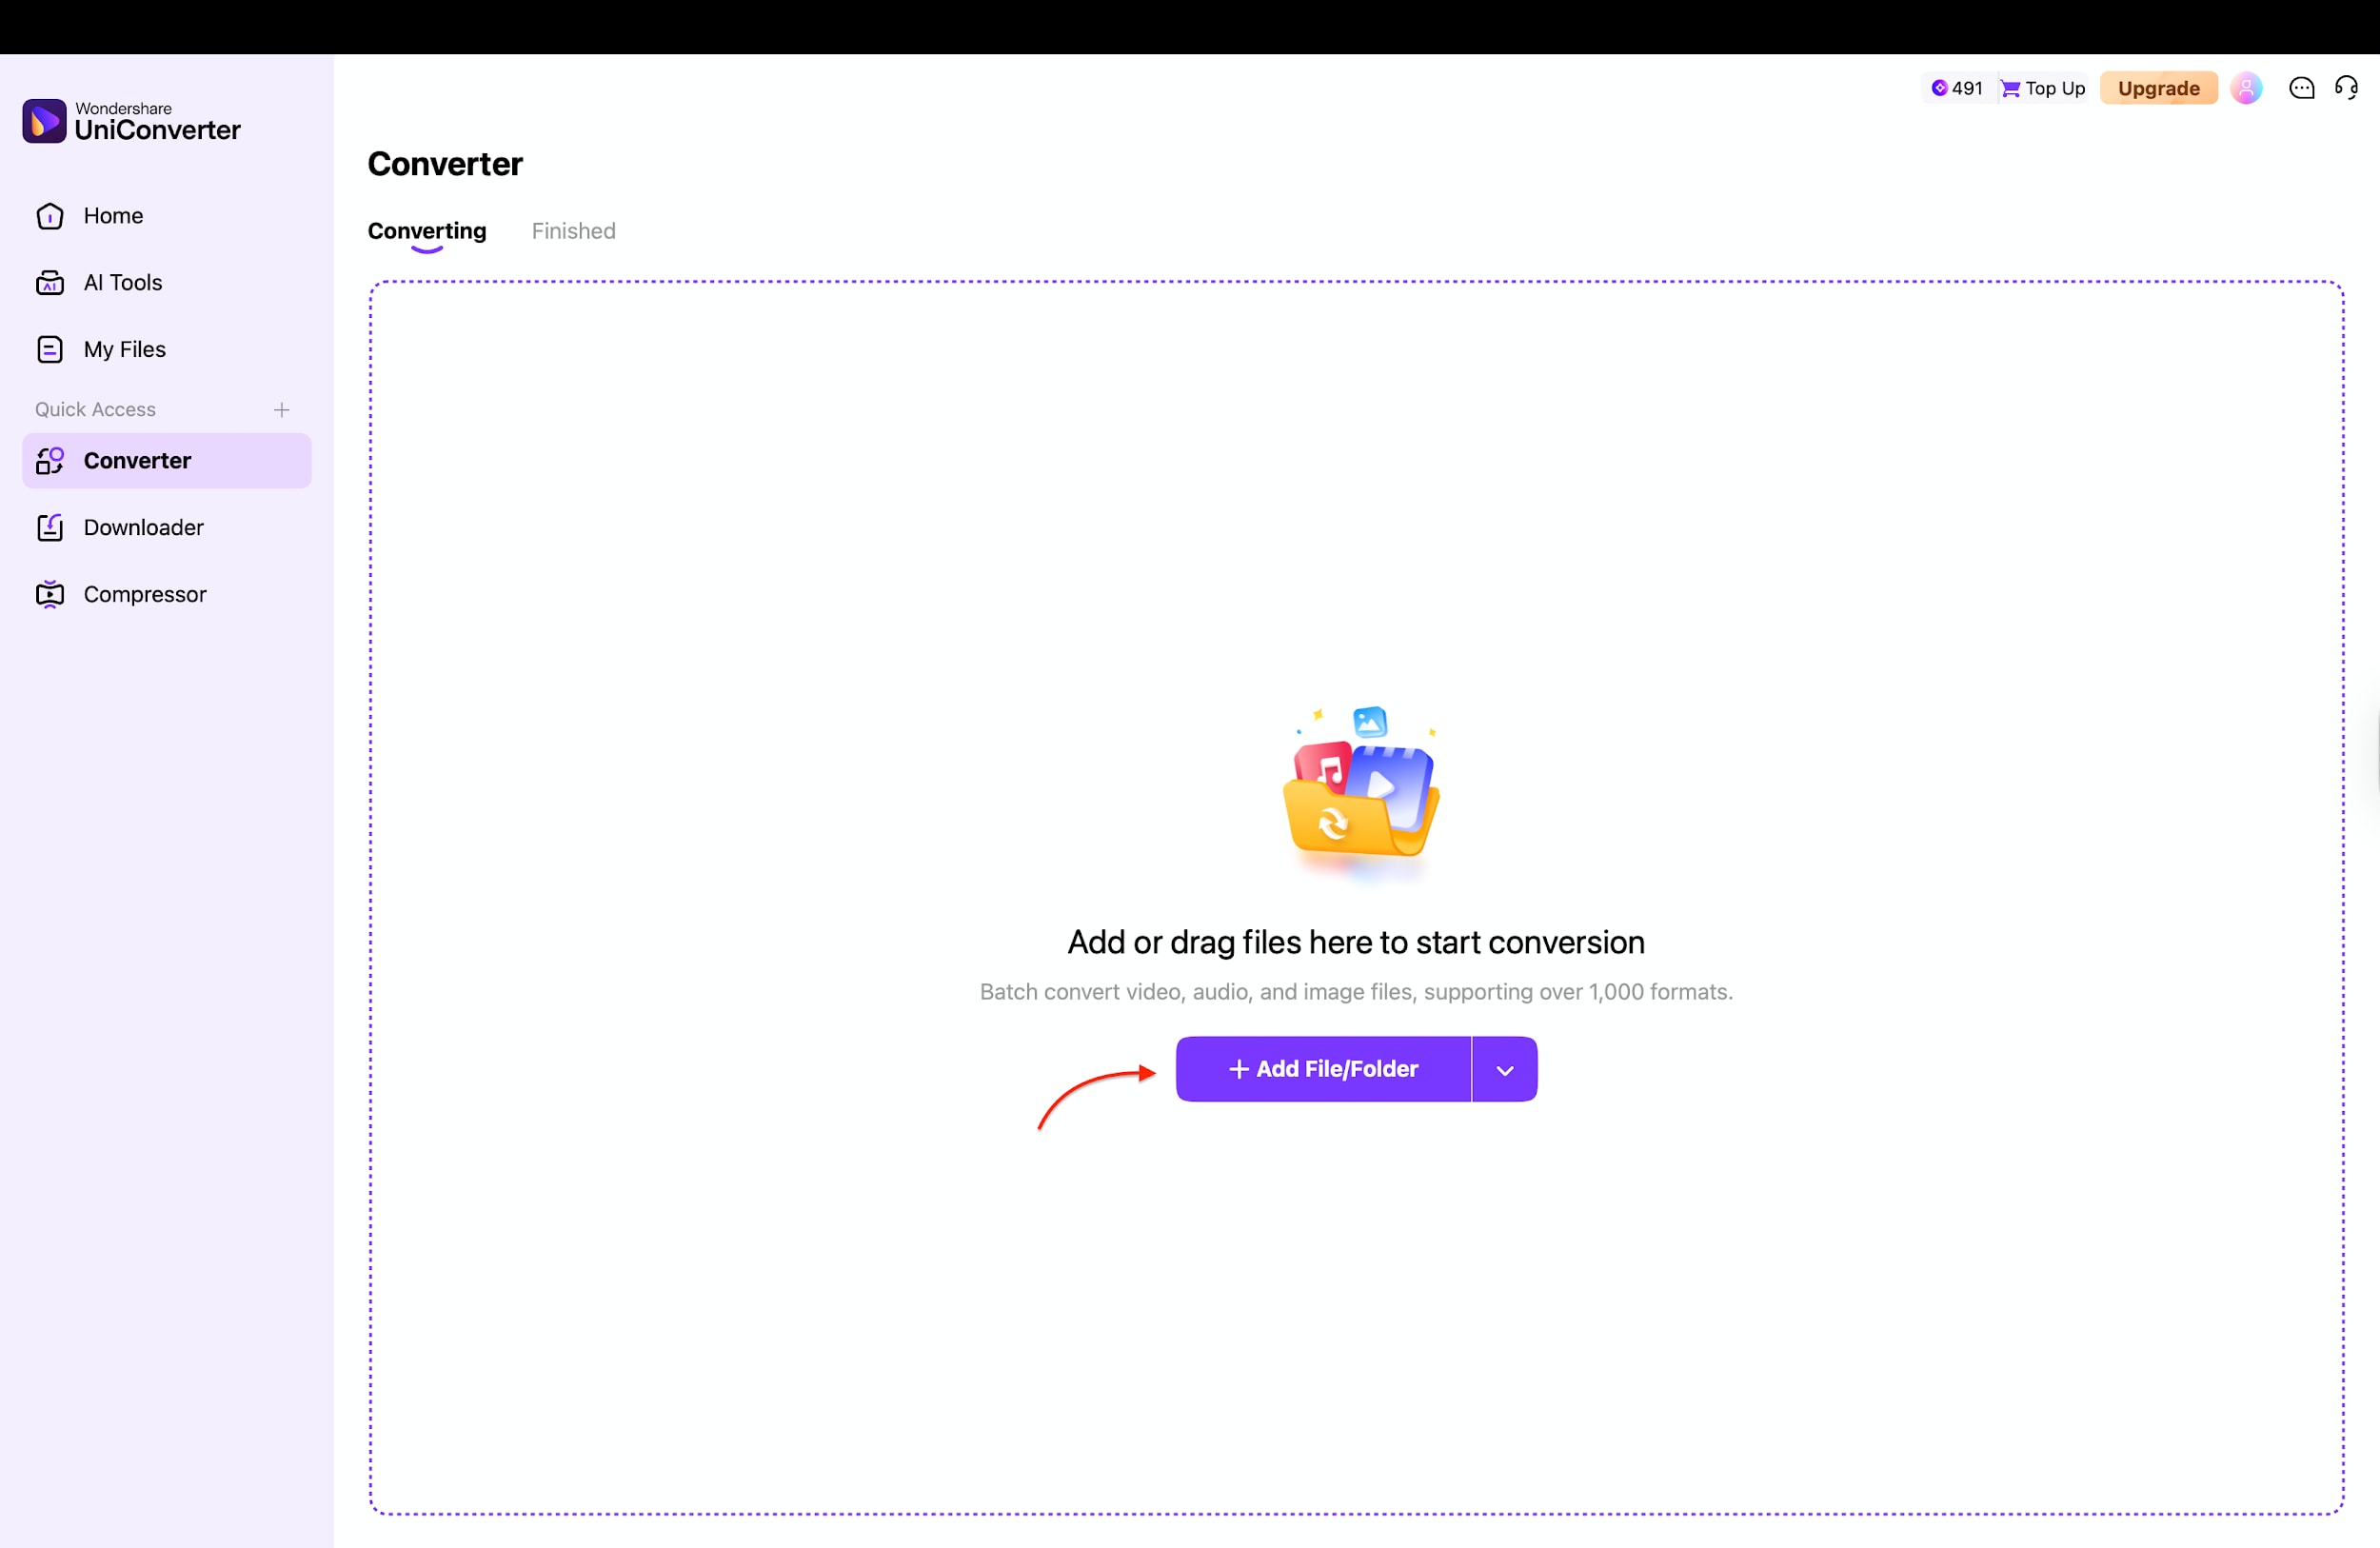
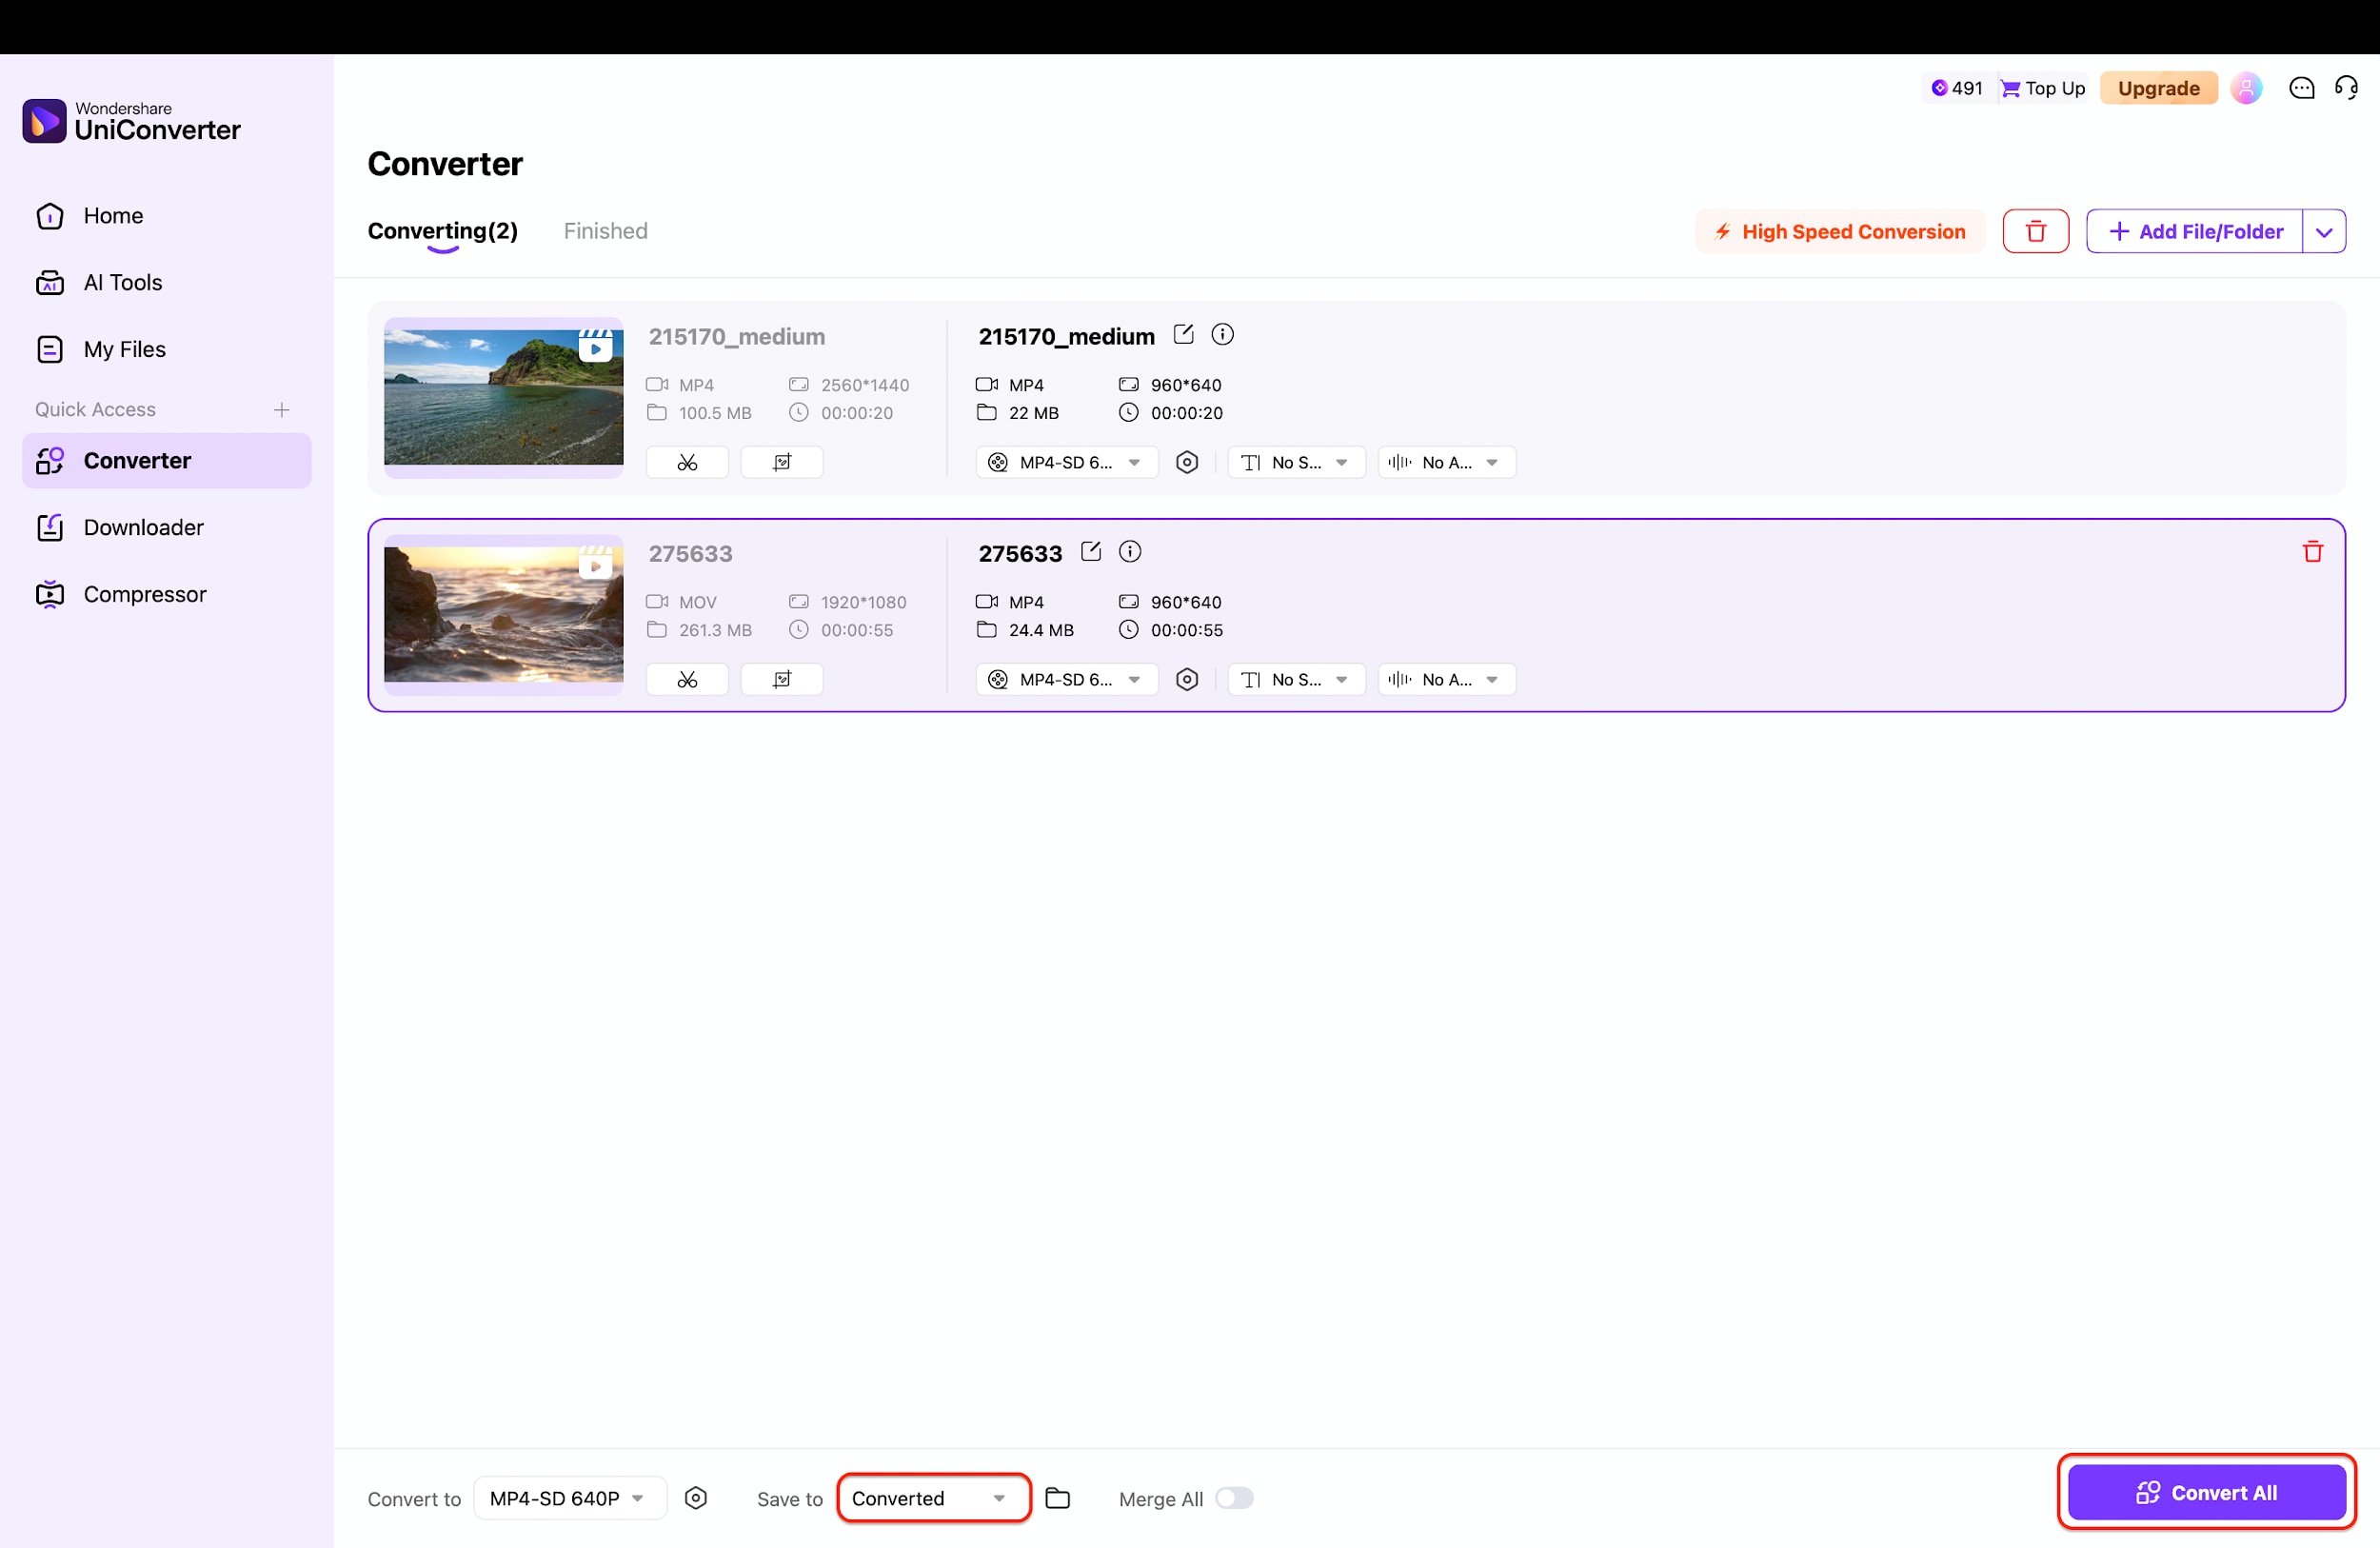
Launch Wondershare UniConverter and locate the "Converter" card on the main Home screen, which is the primary tool for changing formats and resolutions. Click on this card to enter the dedicated conversion interface, designed to handle batch processing for multiple files efficiently. This tool is distinct from the AI enhancer and is best used when you simply need to change file types or lower the resolution.

Step 2: Import Your HD Videos
In the Converter window, you can easily drag and drop your large HD video files directly into the central workspace. Alternatively, click the purple "+ Add File/Folder" button to browse your computer's storage and select specific videos or entire folders to load. This flexible import system allows you to queue up dozens of videos for simultaneous downscaling.
Step 3: Choose SD Output Settings
Click the output format menu at the bottom left labeled "Convert to" to reveal the full list of video format options. Under the "Video" tab, select "MP4" and then choose a standard definition resolution like "SD 640P" or "SD 576P" from the list.
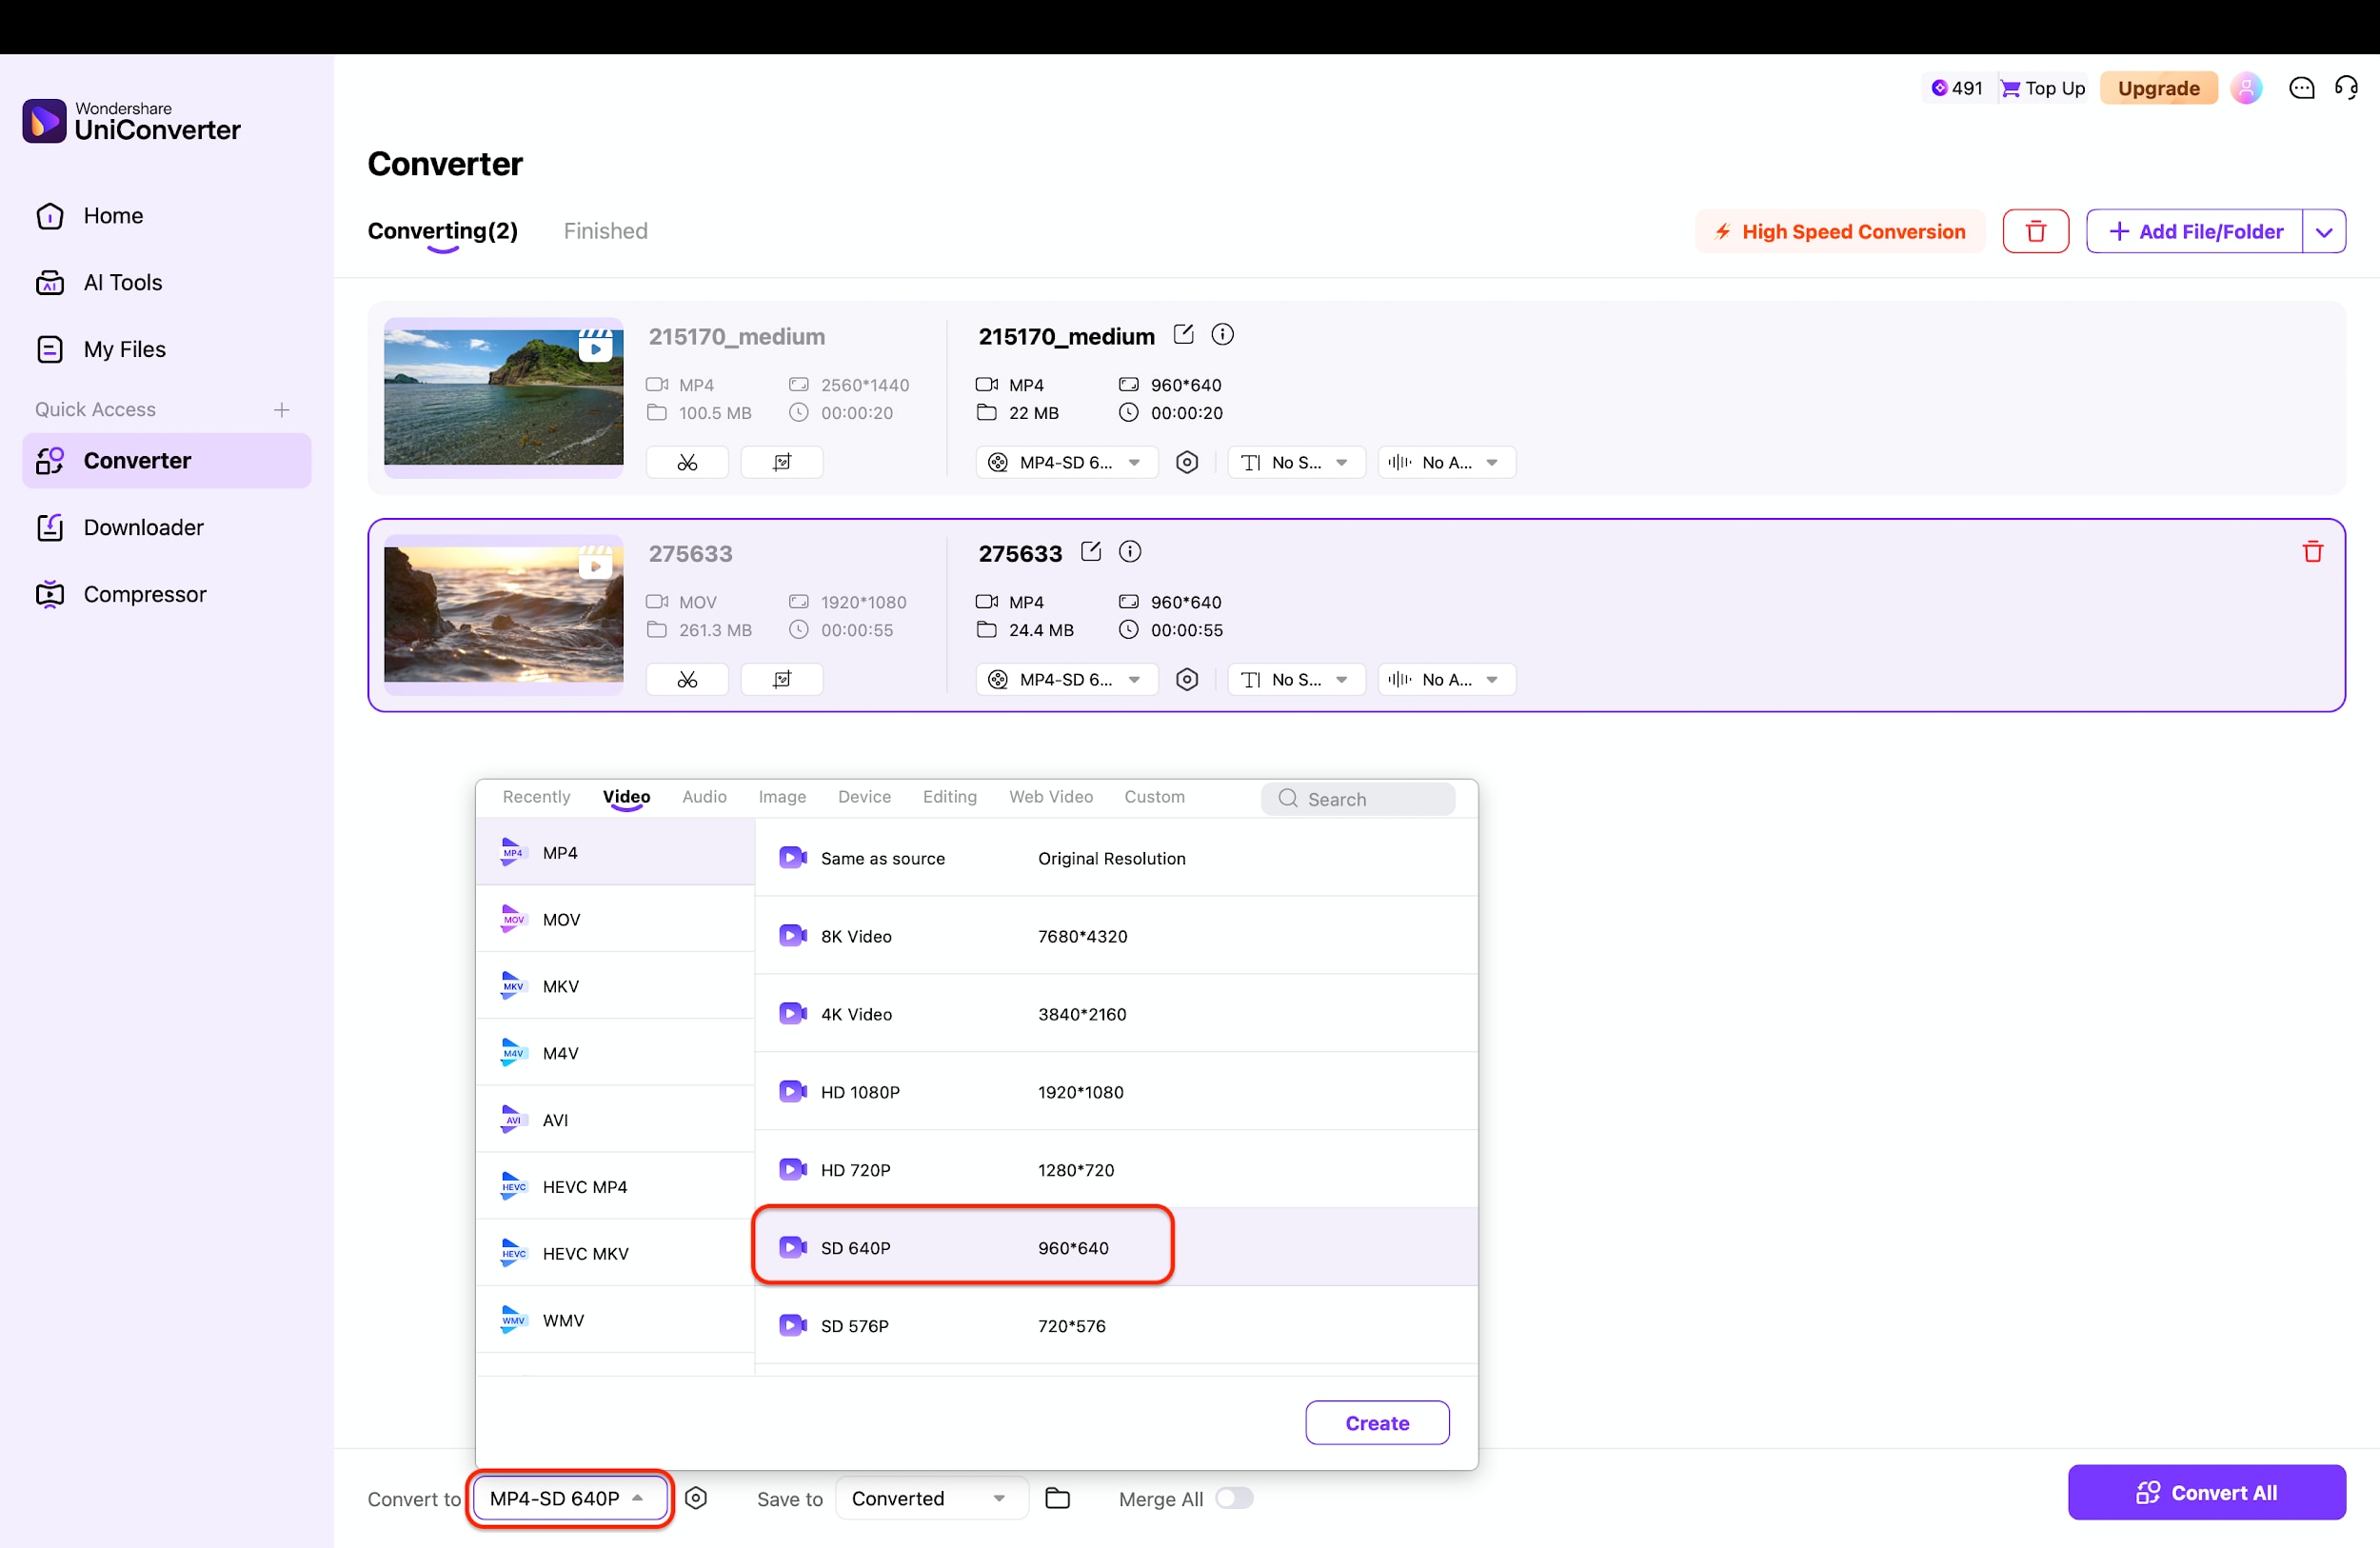
Pro Tip: Selecting "SD 640P" is often the sweet spot, as it significantly slashes file size while keeping the video clear enough for viewing on phones or tablets.
Step 4: Start Batch Conversion
Once your settings are configured, verify that the "High Speed Conversion" icon at the top right is toggled on to utilize hardware acceleration. Finally, click the purple "Convert All" button at the bottom right corner to begin the process of downscaling your videos from HD to SD. The software will rapidly process the queue and save the smaller, space-saving files to your designated folder.
Part 6. Tips and Troubleshooting for SD vs HD Video & SD to HD Conversion
Converting video formats can sometimes be tricky. Here are some quick tips to ensure your SD to HD converter workflow is smooth.
Why Does SD to HD Conversion Still Look Blurry?
If you stretch a small image, it blurs. This is the biggest pitfall of free converters.
- Use AI: Always use a tool with AI upscaling (like UniConverter) rather than simple resolution stretching.
- Sharpening: If your tool lacks AI, apply a mild "Sharpen" filter during conversion to define edges.
- Don't Overdo It: Upscaling 240p directly to 4K will almost always look bad. Try stepping up to 720p first.
Converted HD Video File Size Is Too Large
HD files are naturally big, but they shouldn't be massive.
- Codec Matters: Ensure you are converting to H.264 (standard) or H.265 (HEVC). H.265 offers the same quality as H.264 at half the file size.
- Bitrate Control: You don't need a 50,000 kbps bitrate for a converted SD video. Lower the bitrate to around 2,000–4,000 kbps for 720p/1080p upscales; the source doesn't have enough detail to justify more data.
SD to HD Conversion Takes Too Long
Upscaling, especially with AI, is resource-intensive.
- GPU Acceleration: Enable hardware acceleration in your software settings (NVIDIA/AMD/Intel). This shifts the load from the CPU to the graphics card.
- Batch Wisely: Don't queue 50 videos at once if your PC is older. Do them in batches of 5.
Common SD vs HD Mistakes to Avoid
- The "HD is Always Better" Myth: A poorly shot, shaky HD video looks worse than a professionally lit, stable SD video.
- Ignoring Aspect Ratio: Converting 4:3 SD to 16:9 HD often stretches people, making them look short and wide. Always choose "Fit to screen" or add black bars (pillarboxing) to maintain the original shape.
Conclusion
In this guide, you have navigated the technical landscape of HD vs SD video and learned that the difference lies not just in pixel count, but in clarity, storage, and viewing experience. While SDvideo has its place in archiving and low-bandwidth situations, the modern standard is undeniably High Definition.
However, having old SD footage doesn't mean you are stuck with low quality. Tools like Wondershare UniConverter bridge the gap, allowing you to breathe new life into grainy footage through advanced AI upscaling.Whether you are a creator needing to polish content or a family archivist, the right SD to HD video converter makes all the difference. Ready to transform your library? Try UniConverter today and see the clarity for yourself!
FAQs
-
1. Is SD or HD better for YouTube?
HD (1080p or even 4K) is significantly better for YouTube. Higher-resolution videos look sharper on modern devices, and YouTube’s algorithm generally favors higher-quality content in terms of compression handling and viewer experience. -
2. What is the main difference between SD and HD?
The primary difference is resolution. SD is usually 480p, which has fewer pixels and less detail, while HD starts at 720p and goes up to 1080p, delivering a much sharper and clearer image. -
3. Can I convert SD to HD without losing quality?
You can’t add real detail that doesn’t exist in the original SD footage. However, AI upscaling tools can improve perceived quality by sharpening edges, reducing noise, and optimizing contrast, making SD videos look better on HD displays. -
4. Does converting HD to SD reduce file size?
Yes. Converting HD to SD significantly reduces resolution and bitrate, often shrinking file sizes by 70–80%. This is useful for emailing videos or saving storage space. -
5. Why is my converted video audio out of sync?
Audio sync issues usually occur due to mismatched frame rates during conversion (for example, converting 30 fps footage to 24 fps incorrectly). To avoid this, make sure the output frame rate matches the source video in your converter settings.

